Paths made of sea stones. Paths in the garden: how to make a beautiful pebble path with your own hands. Step-by-step creation instructions
Modern landscape design is unthinkable without natural materials. Increasingly, suburban areas, recreational areas and residential lands are being registered. And we’re not just talking about cladding.
After all, even when working with parking lots, entrances and garden paths, natural stone is used. It would seem that what is so difficult here? I took several pallets of material and laid them on the solution. But there are developments and features when using natural stone. How to do it using technology, that’s the challenge!
What can you buy
There are breeds that are most appropriate for the garden path. We recommend taking a closer look at:

Various shapes
There are specific types of material, and it is from them that builders start when choosing a convenient natural stone for work:
- Flagstone. Flat type. It is extremely inconvenient to install due to the varying thickness. Can often be found on children's playgrounds.
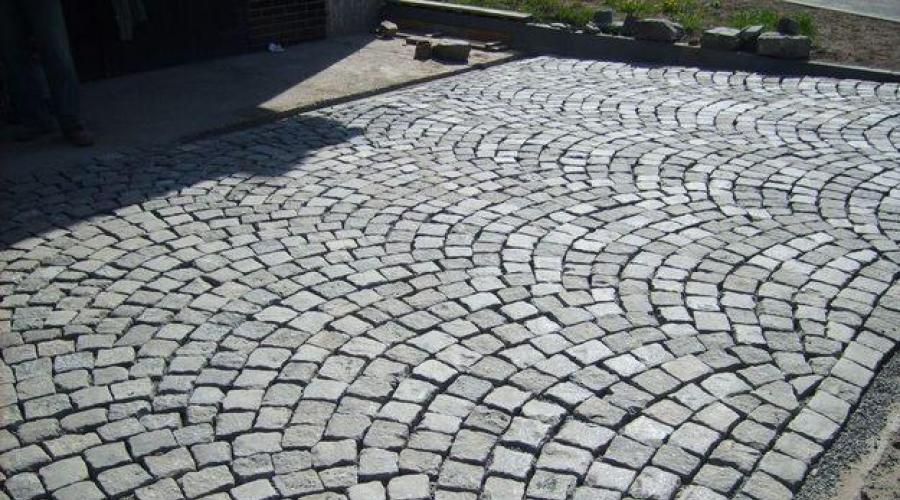
- Chip paving stones. Regular rectangular stones. Classic type natural material, for example, for pavements.
- Cobblestones. Must have roundness. It is very difficult for women in heels to walk along such a path.
- Boulders. Not a basic natural material because big size. But it perfectly fills sharp changes and problem areas.
Path paved with marble tiles.
How to pave it yourself
The technology of work is not related to the type or breed of material. The only difference is in the installation methods.
- A cement solution is created, and it is fixed in it road surface. A shallow trench (up to 30 centimeters) is first prepared. Then the bottom layer is compacted and sprinkled with sand. The latter serves as a pillow. 10 centimeters per shock-absorbing layer is enough. After repeated compaction of sand, intermediate gravel is poured on top. Sometimes crushed stone or small construction waste is used. Next, concrete is poured with reinforcement for maximum strength. And only then comes the laying of the stone. This method is expensive, difficult and time-consuming; it is used only on difficult soil.
- It is much easier when there is no preliminary preparation. If you don’t need a deep trench, then make channels for the bayonet of a shovel. Then they compact it well and cover the very bottom with construction polyethylene. A layer of gravel is poured on top of it. And a layer of sand (pillow) is already applied to the rough stone. So natural stones are laid on it.
Tools required for working with stone
In paving they use:
- Rubber mallets;
- Shovel and bayonet shovels;
- Levels;
- Trowels;
- Angle grinder with attachments for working on stone;
- Brushes;
- Rope markings;
- Tamping handle;
- Vibrating rammer (for industrial scale);
- Equipment for reinforcement;
- Devices for preparing concrete.
From by-product building materials you will need:
- Crushed stone;
- Cement;
- Sand.
Developments and rules
Any type of path made of natural stone begins to be created according to the same pattern:
Stage 1. We mark the territory. It is necessary to clear the future path or site from bushes, weeds, household waste and stones. Tension the thread even with significant tortuosity. We just put pegs for fixation more often.
Stage 2. Carefully dig a trench the required depth with the expectation that the final layer of stone will be above surface water.
For your information! There is a third method of paving, called highly artistic.
It doesn't require a lot of work, but without an artistic touch the composition won't come together. The fact is that only the largest stones are bought for work, which are simply laid in place of the removed soil.
Over time, vegetation will appear in the seams of such stones, one might even say slabs. But that’s the designer’s move, and it’s more profitable for the budget.
Works of masters: 
The most complex compositions cannot be completed without the use of stones of different sizes and shades. 
Balance between regular cobblestones and carvings 
The classic style cannot be achieved without a border stone, therefore, when planning just such a style, it is better to stock up on a small square-shaped stone. 
During the installation process, craftsmen often use this trick: they place the cement-sand mortar in a bag with the end cut off and, like experienced confectioners, work out each seam. 
Approximately, this is what a stone that has been laid for a long time looks like using the third paving method, when at least preliminary preparation, and the stones are placed almost chaotically in place of the cut soil.
How to lay a path from thin natural stone
We are talking about a rock similar to sandstone or shale. They try to lay thin and light stone tiles on stone dust. It is mixed with cement mortar. This combination has a beneficial effect on the shrinkage of lightweight materials.
Even for thin layers of stone, it is advisable to compact the gravel with maximum effort. And already on a hard and smooth plane you can lay the facing material.
Pros and cons of paths made of natural stones
On the positive side:
- Choice of color and shape. There are no limits to the designer's imagination.
- Eco-friendly materials.
- At high-quality installation very durable and stable design. Negative influences external environment not scary.
- Just figure out how to lay it yourself.
From the negative:
- Most breeds are very expensive.
- Wide slabs and large stones heavy.
- There are breeds that are very difficult to assemble.
- Rocks with a low strength threshold cannot be used for parking lots, parking lots and driveways.
Estimated cost
Price for Moscow and the Moscow region for 2017:
- Sawn sandstone from 1400 rub/sq.m.
- Yellow sandstone from 500 rub/sq.m.
- Flagstone lemezite from 209 rubles/sq.m.
- Granite from 200 rub/sq.m.
- Lemesit from 200 rub/sq.m.
- Sandstone “paving stones” from RUB 2,199/sq.m.
- Burnt sandstone from 750 rub/sq.m.
- Flagstone paving stones from 990 rub/sq.m.
Results
garden path in the private sector cottage village or at an elite dacha - it’s practical, aesthetically pleasing and durable.
Educational program on video
Instructions for creating a track - from Dmitry Chernak.
Pebbles - smooth round pebbles polished by the sea - are a very popular material for garden decoration today. It looks attractive and aesthetically pleasing both as a material for a garden path or patio, and as a decoration or the main material for a fence. Some owners of private houses pave entire yards with pebbles, creating a strong, durable, beautiful coating. By selecting stones by color, shape, size, and skillfully combining them, you can create amazing patterns. What can you build from pebbles in your garden? Let's look at a few simple examples.
The pyramid is very easy to make; this design can be placed in a flowerpot, flower pot, or you can make several pieces for a flower bed.
You will need pebbles, the size of which gradually decreases, like the rings in a children's pyramid, as well as glue. A smaller stone is glued to the largest flat stone, which will be the base of the pyramid, the glue should dry, after which you can move on to the next stone, etc.

For the base, a wide flat stone is taken and dug into the ground so that the pyramid is stable. The top stones may be pointed, irregular shape
The pyramid is dug with its base into a pot or into the soil of a flower bed; it looks very original.

A pyramid of pebbles is an original garden decor that will attract attention. This design looks very unique and organic among green plants.
Example #2 – flower pot trimmed with pebbles
To “cover” with pebbles flower pot, it is convenient to use cement mortar. Select pebbles of approximately the same size and lay them edgewise. Small stones can also be attached with a base. The cement layer can be painted, or the pebbles themselves can be painted in one or more colors - it’s up to you. A large flat boulder, if you can find one, will do as a base or a stand for the pot. Plants in such pots look attractive and natural.

Pebbles are used to create this pot. various colors, quite large. To line a small pot, select small pebbles (flat or pointed). Several of these pots with green plants will help create a wonderful composition.
Example #3 – “pebble” rugs
Lay out a path from sea stones– it’s quite a complicated matter, but making a rug out of them is simple, and it looks great. You will need flat stones of approximately the same size, glue, carpet (preferably thin), and a knife.

First you need to place the stones on the carpet without glue to create flat surface, then you can start gluing each individual pebble
Select stones of the same thickness from your collection to make stepping on the rug comfortable. Then you need to cut a piece of carpet the right size(you can also use an old carpet or rug). We place stones on the fabric, laying them out so that the coating is smooth and harmonious. Silicone glue is used for gluing. Glue is applied to each stone, and then the stone is placed in the designated place.

The necessary ingredients to create a rug: carpet, glue, knife and flat pebbles. This rug can be used in the garden, at the entrance to the house, and in the interior. You can make stands for garden services in the same way.
When the glue dries, the mat is ready. It can be placed at the entrance to the gazebo, near the bench. If you want to place it in the yard, you can use a rubber mat as a base and glue on the rubber. Such a pebble mat will not be afraid of water. By showing your imagination, you can create a real masterpiece using paints and stones different color, laying out patterns.
Stones can be decorated with painting. Ideas and secrets of technology:

To create this rug, pebbles of the same size and a wide variety of natural shades were used. You can try to lay out a simple geometric pattern using larger or smaller pebbles, it can be painted - working with sea pebbles is doubly pleasant, because... you can create whatever you like
Example #4 – a basket of sea stones
To create a decorative pebble basket you will need the following tools: two small plastic pots of the same size, scissors, a sheet (10 mm thick), a pencil, a jigsaw, transparencies, hammer, several nails, frost- and moisture-resistant cement glue, small flat pebbles (about 200 pieces, length 3-4 cm), wire cutters, spatula, brush, wire mesh.
So, let's get to work. First, cut off the rim (2.5 cm wide) from the top of one of the pots. We compress the rim so that we get an oval, apply it to a piece of plywood, and trace the outline. Then we cut out the resulting figure on plywood with a jigsaw. The rim is placed on a plywood oval and attached to it with nails along the edges of the plywood. This is a template for creating the base of the basket.
The base is laid out with film, its edges should protrude on the sides. The form is filled with a layer cement mortar 10-12 mm thick. The wire mesh is adjusted to the size of the mold and pressed into the cement. The basket is garden decor, you'll probably want to plant some flowers in it, so you'll need to make holes in the base for drainage.
Cement glue is applied to the flat side of the stones and they are glued to the base. Once you have glued all the stones to the base, leave it to cure overnight. After drying, the plastic rim must be removed and the finished base separated from the plywood. Turn it over and remove the film.

The picture reflects the first 4 stages of work: create a template for the bottom, fill it with cement, use mesh and film and start laying stones
Now let’s start “laying the walls” of the basket. Apply glue to the stones and lay out the first row along the edge of the base. The remaining rows are laid out in exactly the same way, only with greater coverage, otherwise the walls of the basket will not be inclined, but straight.
After you have made five rows of masonry, let the glue dry for half an hour; to be sure, you can prop up doubtful places with a mug. Excess cement should be cleaned off before hardening. To remove, you can use a narrow spatula or a modeling tool, and clean the surface of the stone with a brush.

The base is ready, now let's start creating the “masonry”; to lay out the last row you can use round pebbles, as in in this case, or pick up pointed ones
Then another 2-3 rows of pebbles are laid out, the last row, in order to give the product originality, can be laid out with round pebbles. After finishing the laying, leave the basket to harden for a couple of hours.
Now you need to make a handle. Cut out the bezel from another plastic pot and pass it through the center of the product, the handle should protrude above the top edge of the basket. The handle is laid out flat stones edge, take more solution to create a handle. Place the stones on both sides at the same time, the last one should be in the middle. Dry the solution and remove any excess. After a few hours, when the solution becomes solid, carefully remove the plastic rim and clean the bottom of the handle.
You can even use trash to decorate your summer cottage. How exactly:

A basket of pebbles will look great on the terrace, at the entrance to the gazebo, or in any other corner of the garden. If you won’t surprise anyone with vases and pots, this small form will inevitably attract attention
Please note that it is better not to take the basket by the handle - in any case, this part of the product will be the most fragile.
Example #5 – pebble path
A pebble path can be of two types: with a free embankment and with fixed stones.
The first option is much easier to do, but it doesn’t look as impressive. To create it you will need pegs, plastic limiters for paths, rakes, shovels, fabric used in landscape design, pins, pebbles, gravel.
So let's begin. On the prepared area, we mark the boundaries of the path (you can use a hose, pegs), it is convenient to make the width no more than 80-100 cm. The turf is removed along the perimeter of the path, trenches about 15 cm deep need to be dug on the sides. Area limiters for the future path should be installed in them. If the path has curves, use additional corners - they will maintain the integrity of the structure. The cheapest limiter is made of plastic, but you can also use forged, concrete, or wooden ones, which look much more attractive. After installing the curb, fill the trench and reinforce it. The surface level on both sides of the fence should be 3 cm lower.
A special fabric is placed in the recess. The corners can be secured with a stopper, in which case the curb is fixed after laying the fabric, or pressed down with flat stones. The fabric will protect the path from weeds. The resulting base of the path is filled with a mixture of gravel and small pebbles and leveled with a shovel or rake. If you need to add stones here and there, do so. Water the path with a hose - the gravel will become cleaner and the embankment will settle a little and level out.

Creating such a path is quite simple, and if you decorate it in any of the described ways, the garden will look modern and attractive
The path is ready. To make it look more attractive, you can install solar lights, plant flowers, make a lawn - at your discretion. Caring for such a path is simple - you will need to remove weeds and debris from time to time.
Path with fixed stones
On a pebble path with clearly fixed stones, you can create a wide variety of patterns, ornaments, designs, and use various colors, bright colors. Pebbles are becoming an increasingly popular material today – they are used in both landscape design and interior design. This material can be bought, and if possible, brought from the sea coast.

Example of a combination of stones: good combination blue and brown colors. The pattern of a “wave”, a flowing stream, was created using stones laid out edgewise. Flowers also create harmony lilac shade, go well with the color of the stones

Of course, such beauty is the work of a real master, but you can try to create mosaic elements too. To begin with, you can practice by laying out a pattern on the sand.
First, decide what patterns you would like to see on your path; we give several examples in the article, but today the Internet offers an even greater choice. Sort the stones by size, by color, and think about whether you plan to use paints.
The base of the path is a hole 15 cm deep, dug around the perimeter. The pebbles can be located either level with the ground or slightly higher. The bottom of the pit is covered with a layer of sand and stone chips (about 2 cm). Then the raw material is laid out on the sand. concrete mixture(layer 5 cm). Wet the concrete if it is dry.
Now we work with pebbles. If you have no experience, practice laying stones on the sand. When creating a pattern in the shape of a circle, mark the center and edges on the path, start laying out from the center. The stones can either fit tightly to each other or be laid out at some distance. In the center of the circle, the pebbles should touch tightly. When creating a circle, the stones are arranged edgewise. The surface is leveled using a level, the pebbles are compacted rubber mallet. A third of the height of the stone should be in the concrete layer. You may or may not have a curb, but if you do, the path will be stronger.

Laying out a path is a troublesome and time-consuming task. Can be used separate element made of pebbles, a kind of inclusion - as in this case on a path made of wild stone
The finished path or paved area should be watered, covered with film and left overnight. The next day we fill the gaps between the stones with concrete - no more than 2/3 full. We moisten the dried concrete again and clean the necessary areas with a brush.

Amazing things can be created by combining sandstone and pebbles. With the use of paints, such a path looks simply fantastic.
After this, the path is again covered with a tarpaulin, now it needs to be left covered for several days. In general, in order for the mixture to set well, it is advisable not to walk on the new path for a couple of weeks. If there is cement left on the stones here and there, clean them with a damp sponge.

Path with the effect of a dry stream - all pebbles are laid out on edge, different angle laying out creates the impression of water movement, as if this is not a path, but a real stream or a small river flowing through the garden
If everything worked out well for you, you can try more complex patterns on another area or path. By making a pebble path with patterns, you will see for yourself how beautiful it is and how your garden will be transformed.
Interesting to know! How to use glow stones for landscape design:
Walking along such a path is not only pleasant, but also useful. If you walk on it barefoot, it will act as a massager. The stones massage all the active points of the foot, so this man-made beauty will make you healthier.
A garden plot with neatly paved paths always speaks of its owner’s love for beautiful landscape design. Natural stone is often used for these purposes. It harmonizes so well with any landscape that it has no equal among other materials for designing paths. Natural stone is a great way to create unique design, as well as a valuable decorative element that helps to collect all the objects on summer cottage into a single whole.
Pros and cons of natural stone paths
Roads paved with natural stone always look amazing. They are capable of transforming garden plot and highlight the advantages of the surrounding landscape. But natural stone also has others advantages, in addition to excellent decorative qualities:
In use natural stone There are, of course, some not particularly pleasant moments:
- When purchasing material you will have to spend a tidy sum;
- Natural stone pretty massive, therefore its movement is possible only with the help of transport;
- Before laying the stone, it is necessary to draw up small project , containing a sketch of the future track and specific calculations.
Features of natural stone: comparison with other materials
A natural stone - unique material created by nature itself. Thanks to this, it has developed some features that significantly distinguish this product from artificial analogues. You can compare natural stone with other materials using the following criteria How:
The most discussed fact regarding natural stone as a building material is, perhaps, its price. The manufacturer prices such a product far from cheap. However, compared to other road paving materials, natural stone is not that expensive, especially considering its numerous positive properties. Basically, the cost of such building materials always remains unchanged, which cannot be said about other products offered to developers.
As the name suggests, natural stone is not created chemically in a factory. It is mined in small quarries and then sent for processing. This is another distinctive feature of natural stone - to obtain it you do not need to pollute environment production waste. Plus, the process of its extraction is not at all complicated and therefore does not require the use of explosives. The natural origin of the stone guarantees that this material environmentally friendly and does not pose a risk to human health. Even during operation, the material does not express absolutely any negative features.
Natural stone is so diverse and unique that this fact is simply amazing. No company will be able to produce such a unique material. The possibilities of nature are endless - she has created millions of stones that are not similar to each other, and they are all beautiful in their own way. Of course, before going on sale, natural stones undergo production processing as cutting and grinding, however, this does not make them any less exclusive. The variety of materials does not stop at the variety of shapes and textures. IN construction stores You can find stones of different colors. In terms of quantity of assortment, no material can compare with natural stone.
 Despite the high cost, natural stone is very economical way
pave garden paths. main reason This paradox is that natural material does not spoil and practically does not change over time, thereby relieving the developer of the need to resume repair work.
Despite the high cost, natural stone is very economical way
pave garden paths. main reason This paradox is that natural material does not spoil and practically does not change over time, thereby relieving the developer of the need to resume repair work.
Natural stone can actually become ideal option for people who have the opportunity to invest once in construction a large sum to forget about road problems forever. Many materials are different decent service life However, this creation of nature surpasses them several times.
As already mentioned, during service, natural stone is almost does not change. That is why it is very convenient to use as a material for paving paths. If we compare natural stone with any other building material in terms of stability and strength, then we can say with confidence that it has no equal.
Even with regular use, such a coating will remain in the same condition after several tens, or even hundreds, of years. It is important that natural stone does not react at all to exposure low or high temperatures. Under their influence, it does not deform or crack, which can happen with artificial material.
Laying natural stone paths
Paving garden paths natural stone can occur in one of two ways:
- By applying a coating to a sand cushion;
- The method of laying material on a concrete mixture.
Both the first and second technologies are almost identical, however, they still have some distinctive features.
Sequence of laying natural stone on a sand bed

The size of the trench that is dug initial stage technology is determined by the properties of the soil. The stronger and stronger earthen layer, the smaller the depth of the “workpiece” should be. For weak and light soils this value can reach 50−60 cm. Otherwise, it is recommended not to make a trench deeper than 30 cm.
As for the formation of a sand cushion, it is better if this process occurs in two approaches. The total thickness of the laid layer should be about 10−15 cm. Each layer should compact well and pour water.
Laying on concrete
Laying “on concrete” is also carried out in several stages:
- At the level of the boundaries of the future garden path, a trench;
- into her alternately layers of crushed stone and sand are laid;
- Then a formwork is created into which concrete is poured;
- After the mixture has dried, the formwork is removed;
- The resulting form is poured sand;
- Natural stone is laid on the sand layer;
- Performed seam processing in the form of filling them with sand;
- The surface of the path is moistened.
The formwork should be removed only after completely dry concrete. To prevent cracks from appearing on the surface of the hardening mixture, it is necessary to water it periodically.
IN modern world production area building materials does not stand still. New technologies for the production of artificial raw materials are increasingly appearing. Nevertheless, natural materials are considered very valuable, since no enterprise has yet managed to surpass their quality. Natural stone is enough expensive pleasure.
However, it is impossible to find a better material for paving paths than this material. It is distinguished by its high strength, durability, and remarkable decorative properties. Laying natural stone is not such a complicated process, especially if you study its technology in detail.
For paving and landscaping suburban area Natural stone is often used. On sale there are tiles that are regular or free form, which makes it possible to implement any designer’s projects.
Natural materials for arranging paths
Natural stone is characterized by the following properties:
- Frost-resistant.
- Durable.
- Durable.
- May have different shapes.

The properties of a material largely depend on its origin. The most common are:
- Slate. It has a layered structure, so it can be quickly divided into separate slabs if necessary. Due to its porosity, the material is destroyed when exposed to moisture in cold weather.
- Shungite is considered one of the most durable stones, which allows it to be used when creating paths. There are paving slabs and paving stones on sale; the design and color may vary significantly. Not a large number of quartz in the material leads to the formation of white and gold patterns.
- Quartzite is frost-resistant, hard and durable. The material is difficult to process and requires special tool. Quartzite tiles and paving stones can be white, red, or green. Developers often prefer quartzite due to its good price-quality ratio. A cottage with paths made of this material is a practical solution.
- Granite is considered the most durable natural material that can be used as decorative surface. The appearance of the created paths is attractive, but granite is rarely chosen for summer cottages due to its high cost. Natural stone for paths is sold in the form of tiles with smooth edges, which simplifies installation work.
Goldite and lemesite can be used to create paths. Marble is considered one of the most expensive natural materials, therefore it is most often used for interior decoration premises.
Advantages of road materials made of natural stone
You can create paths from natural materials with your own hands. The main advantages of using natural stone:
- Even with the most unfavorable conditions The material can last for several decades.
- Frost resistance. Too low a temperature can cause changes in the basic properties of the material.
- Strength. The garden path will be subject to mechanical stress throughout its entire lifespan. High strength eliminates the possibility of defects.
- Easy to install. You can carry out the work yourself; this requires a relatively small set of tools.
- Large selection: texture, size, color.
The only drawback is the high cost of the product. Cobblestones and concrete paving stones are much cheaper, which is primarily due to the nature of production.
Comparison with artificial materials
When comparing materials, pay attention to:
- Features of the applied production technology.
- Technical and operational characteristics.
- Price.
- Application area.
For all the above parameters, except price, natural material superior to artificial. The high cost is justified by the fact that paving stones of natural origin last much longer. Disposable financial investment will pay for itself within long period operation, because natural stone does not react to environmental influences.
Necessary tools for working with stone

You can pave the path yourself. To do this you need the following tool:
- Bayonet and shovel shovels for working with soil.
- Rubber mallet.
- Level for determining the correct position of individual stones.
- An angle grinder with special attachments that are designed for working on stone.
- Brush for removing debris.
- Rope and pegs for marking the area.
- Vibrating shrink machine.
- Devices for preparing concrete.
You will also need crushed stone, sand and cement to prepare the base and lay the stone.
Substrate preparation and installation
To ensure that the paving stones do not move during use, the base must be properly prepared. There are 3 main technologies:
- Concrete.
- A combination of cement and sand.
- Sand.
A load-bearing concrete base is created when the created path must withstand a significant load. The sand bed is suitable for placing boulders and cobblestones. The best option is a mixture of sand and cement.
Planning and marking

- The path should be located at a sufficient distance from trees, because roots can damage the integrity of the foundation.
- The width of the path should be no more than 1.2 m. It is recommended to choose a multiple size of paving stones, which will reduce the amount of work.
- It is recommended to give simple shapes tracks, because with complex ones, you have to spend a lot of time cutting the stone. Due to the high hardness, this is quite difficult to do.
- The slope must be created in such a way that precipitation is diverted away from the structures.
Marking on the site is carried out using pegs and thread. It allows you to save high accuracy during work.
Drainage layer design
Heavy rainfall can create a lot of problems because... water washes away the base. Therefore, experts recommend creating a high-quality drainage layer:
- Removed upper layer soil taking into account the markings.
- The recommended depth of the trench to be created is 30-40 cm.
- A layer of sand is placed at the bottom of the trench and compacted well.
- The next step is to lay geotextiles, and the fabric should overlap by 10 cm. This layer is required to reduce the likelihood of weed growth, because it only allows water to pass in one direction.
- The drainage layer is represented by a layer of gravel, the thickness of which is 10-15 cm. A fine fraction material is selected, which should be compacted. The layer is covered with non-woven textile.

excavation
Installation of curb stones is carried out after creating a drainage layer. The height of the curb is adjusted by adding sand. Most often it rises 5-7 cm above the ground.
Construction of a concrete base
The main load will fall on concrete base. It is created as follows:
- A layer of sand 3-4 cm thick is poured.
- The border is often used as formwork. If necessary, the spread of concrete mortar can be limited by securing edges made from boards around the perimeter.
- A layer of concrete 10-15 cm thick is poured into the created formwork. If a car drives on the surface, the base is reinforced. It takes about 72 hours for the composition to dry.
- After the concrete has gained hardness, a cement-sand mixture is poured onto the surface. The selected tile will be laid on it.

Concrete foundations are expensive. However, if the technology is followed, the track will last for a long period.
Cement sand base
A universal option is a cement-sand base:
- To begin with, a layer of sand 7-10 cm thick is created and compacted.
- Dry cement crumbles and is compacted again.
At the time of laying the paving stones, the cement-sand base must be dry. To prevent it from falling apart, you should install curbstone and formwork.
sand cushion

The cheapest option is a sand cushion. It has relatively low strength and reliability, but is suitable for paths that will not be subject to high loads. Not recommended for use in case of high level groundwater and with moving soil.
The preparation of the sand cushion is carried out by scattering the material in an even layer. It is recommended to add water from time to time, because... this will simplify the compaction process.
Laying natural stone

The technology of laying natural stone allows you to do the work yourself. In this case, installation features depend on the thickness and configuration of the stone. Among the features of the work being carried out, the following can be noted:
- Smooth paving stones are laid closely, maintaining a minimum gap. Gaps between individual stones can cause the foundation to erode.
- Work begins with laying out 1 row, the length of which should be no more than 1 m.
- The next step is to create a transverse row, gradually creating areas of 1 m².
- The correct placement of the paving stones should be checked periodically. For this, a building level is used.
- When individual stones settle, a solution is added. Protruding elements track being created are easily knocked out with a rubber hammer.
- After laying all the tiles, the seams formed are sealed cement-sand mortar. To do this, the prepared mixture is scattered over the surface and distributed with a brush. After 3 days the operation is repeated. The voids should be filled in order to eliminate the possibility of precipitation penetrating under the material.
If used uneven tiles, then it is selected in such a way that the seams are minimal. Gaps that are too wide are sealed with sand and filled with water.
Conclusion
Development modern technologies caused the appearance quality materials. Polymer tiles are an unusual offering; you can also purchase paving stones made from tinted concrete. However, natural stone is considered the most beautiful material, which can be used when creating tracks. The resulting surface shade and patterns are unique, because... formed naturally over a long period.
Construction work, including paving paths, requires preparation and careful planning. This helps prevent problems next stages construction process, avoid unnecessary expenses.
When planning paths on a site, you should take into account all existing buildings, shrubs and trees, and the purpose of the paths. So the paths should be located at a distance of at least 60-80 cm from the trees, so that the growth of plants does not subsequently deform the masonry.
Depending on the frequency of use of the paths, their width should be indicated. For those less in demand, a width of 75 cm is sufficient, for those in constant use – 1-1.5 m.
Paving material: features of choice
One of the most critical stages in the process of creating paths is the selection of paving materials. Preference is given to one or the other after answering the following questions:
- How often are the tracks planned to be used?
- What are climatic conditions area of the site: humidity, temperature;
- How much money can be spent on creating tracks;
- What is the style of the area where the paving will be done.
Not only the aesthetic result of paving paths, but also the service life of the paths depends on the correct selection of materials.
A natural stone
The stone is suitable for laying out paths in areas with any style of landscape design - in this sense it is universal. The durability and cost of the material depends, first of all, on the type of stone used. For paving paths the following are used:
- Granite, which is distinguished by its durability, variety of shades (from light gray to black, from beige-pink to burgundy, green and blue shades), resistance to particularly low temperatures. The material can be purchased in the form of paving stones or tiles.

- Slate, inferior in strength to other rocks, the hardest type of slate is quartzite. Thanks to its layered structure, the stone is easily divided into layers-tiles, which are used for laying. The material has a rich color palette– white, gray, dark orange, dark green shades.

- Quartzite, a more expensive stone compared to slate, but with greater hardness and durability. It can be painted white, grey colour, shades of red and green. It has a rough surface, so it does not become slippery in rainy weather or winter. Sold in the form of paving slabs or paving stones.

- Shungite, a durable, abrasion-resistant stone. It does not absorb moisture, so it is not subject to destructive effects when sub-zero temperatures. The color scheme of the material is in gray and black shades. If the composition of the stone contains quartz, white or gold veins can be seen on its surface. Paths can be laid out either from large slabs or from smaller ones; paving stones can be used.

- Sandstone, a less expensive breed in comparison with other types of natural stones. It has less strength and absorbs moisture more than slate, quartzite or granite, but this figure is still quite low (from 5 to 20%). The roughness of the surface prevents slipping, which makes movement in winter or rain safer. The material can have a natural shape, sold in the form of slabs and small tiles of irregular shape, in the form of paving stones.

- Flagstone, which may include granite, quartzite, sandstone, limestone, slate and other rocks, made in the form of plates from 12 to 150 mm. Their strength and durability depend on the thickness of the slab, its shape, and the origin of the stone.

Natural stone in most cases - durable material. However, this material is quite expensive. In addition, some types of natural stone have their own disadvantages.
In addition to using slabs or paving stones, paths can be laid out from natural cobblestones. It is possible to combine stones with rough and smooth surface, for example, sandstone with granite.
Fake diamond
As artificial stone Materials such as clinker and concrete are suitable for paving paths.
Concrete – durable material; samples that imitate natural stone are suitable for finishing paths, but ordinary concrete slabs can also be used.
Thus, concrete paving stones replace natural stone paving stones: they are sufficiently hard, have a geometric or slightly rounded shape, and are cheaper than natural materials.
It is better to use concrete slabs with a rough surface to make it easier to move along paths and prevent slipping.
The strength of concrete paving slabs depends on the technology of its production. She may be:
- vibropressed;
- vibrocast.
In the first case, the tile is not durable and frost-resistant, but has an attractive appearance: made in the form of paving stones, bricks, leaves, flowers, imitates a wooden surface.
The second type is laid on paths with increased mechanical stress. Vibrocast concrete tiles lasts longer if followed the right technology its installation: water should not stagnate between the tiles to avoid their premature destruction.
Clinker– a material made from refractory and kaolin clay is much more durable than concrete. Its price is also higher. The material can be used in the form of paving stones or tiles. Clinker paving stones are more durable and resistant, so they should be laid for paths with very high traffic. However, it is better to lay out garden paths clinker tiles so as not to overpay for expensive material.
Tree
Materials such as wood are also used for paving paths. It is not durable, but it looks quite impressive. Extend service life wooden paths periodic processing of wood will help by special means with antiseptic and water-repellent properties, varnish, oil for wood processing. The most suitable trees oak and larch are used for paving; they do not rot as quickly as other species.
 Their service life can reach 15-25 years, with proper primary and subsequent processing.
Larch shows itself well even in winter The paths are laid out with wood cuts or paving stones. For the first option, saw cuts are suitable various diameters
Wooden paving stones have standard form and laid with the wood pattern facing up. This ensures the strength and abrasion resistance of the coating.
Calculation of materials for paving paths
Based on the created plan and the selected material, a calculation should be made required quantity tiles, paving stones or stones.
First, the number of elements required to cover 1 m 2 is calculated. The resulting amount is multiplied by the total area planned for the paths. This number reflects the required volume of material. It should be taken into account that you need to purchase 5-10% more products in order to eliminate errors made in the calculations (if any). In addition, some elements may be damaged during paving. It is better to purchase materials in one batch, so as not to avoid differences in shades and quality.
Paving technologies
There are 2 main technologies for paving paths. The difference between them lies in the base material for laying tiles, paving stones or cobblestones. The following technologies are distinguished:
- Laying on a sand base. Suitable for paving paths made of natural stone or paving stones - materials that are thick.
First, a layer of soil about 20 cm in size is removed from the area where it is planned to create a path. A layer of crushed stone of 5-10 cm is poured into the resulting trench. At this stage, curbs are installed using cement mortar. The space between them is filled with sand, on which a stone is then laid, stone tiles or paving stones.
If wood is used for paving, then after removing a 20-centimeter layer of soil, a waterproofing film is placed in the recess. A mixture of sand and gravel or crushed stone with a thickness of 2.5 to 5 cm is poured onto it and compacted. Such drainage will prevent premature rotting of the wood. Then the curbs are installed and the final sand layer is poured onto which the saw cuts are mounted.
The height of the sand cushion is about 5-10 cm. The space between the wood cuts is covered with sand or earth mixed with grass seeds or ground cover plants.
- Paving on a concrete base. It is used for laying tiles, although it is also suitable for cobblestones and solid paving stones if they are expected to be subjected to heavy impact.
As in the case of a sand base with the desired area The turf is removed, filled with crushed stone, and curbs are installed. These fences are required because... serve as formwork concrete mortar. After installing the fencing elements, reinforcing material is laid on the crushed stone metal grid, then the space is filled with concrete.
To lay tiles you need to prepare a dry garnet sand-cement mixture in proportions 1:6. The composition is poured into a layer of 4-6 cm, compacted and leveled. Tiles are laid on top, the seams between the elements are sealed.
So, step-by-step paving of paths looks like this:
- Marking the area for paths;
- Selection and calculation of paving material;
- Creating a base for laying;
- Laying the selected material;
- Sealing seams between elements.
Each stage of paving is important and contributes to achieving the intended result and preserving the paved path for a longer period.
Features of paving paths with different materials
Mainly paving technology paving slabs, paving stones and wood cuts are similar. But in the process of laying this or that material, there are some nuances, the observance of which depends on obtaining a good result.
Features of paving with paving slabs
Paving slabs are laid on the prepared base in a direction away from you - during the process you should not step on the base. Each tile is tapped with a rubber hammer to secure the element. After finishing the masonry, the seams are sealed with grout and the tiles are watered. After 2-3 days, you need to water the path again.
Work is carried out in dry, clear weather, otherwise the result may deteriorate.
Features of laying paving stones
The paving stones are mounted from the curb to the center, the elements must fit tightly to each other. After laying out each subsequent row, it is necessary to check the horizontal position, because even small deviations will subsequently cause the entire masonry to shift.
When laying granite paving stones, it is better to take elements one by one from different packages so that possible differences in shades are not noticeable.