How to make children's beds. We take care of the rest of the younger generation by making a children's bed with our own hands from wood. End frame attachment
Read also
Children grow up quickly, and furniture is quite expensive. In a regular crib, a child can sleep for three, maximum four years. Soon you will again have to buy an expensive bed that meets safety and comfort standards. The bed should be as comfortable and functional as possible. In fact, a do-it-yourself bed for a child is made “on time”, you can do it :)
To make a baby crib with your own hands, you do not need any professional skills, and the process will take a maximum of 3-4 days. Drawings and photos for manufacturing are provided on the Internet. From them it is clear: the process of making a crib is simple and exciting. The main thing is to use only high-quality materials and carefully think through the entire process from start to finish. As a result, both the child and the baby himself will be happy. In this case, instructions are provided for making a crib for a five-year-old child. Of course, he will be able to sleep in it until he is seven years old. But if the baby has a large build, the parameters of the blanks can be changed upward.

On video: review of a crib. Important points, constructive solutions, useful tricks.
Advantages of a do-it-yourself crib
Furniture stores have a huge variety of crib models for different ages. You can see cribs made of wood, chipboard, fiberboard and plastic. We provide exclusive models made of artificial and natural rattan, photos of which can be seen in catalogs. But the first factor in choosing a crib for a child should be the material from which the piece of furniture is made.

The crib must be made exclusively of solid wood. It can provide the required strength and durability. We pay attention to the processing of corners and the safety of all surfaces. If necessary, we clean the shields over the entire surface.
The only drawback of wooden furniture sold in most stores is its sky-high cost. A good model of such a crib will cost about 25 thousand rubles, and not everyone considers such costs appropriate, taking into account that the bed will last the child a maximum of 4 years.

A DIY children's bed will cost parents a maximum of 17 thousand. This is taking into account that the highest quality and environmentally friendly materials will be used. Designing and manufacturing a crib yourself has the following advantages over buying a finished product in a furniture store:
- you have the opportunity to design a model that will fit perfectly into the interior of the room and will have the necessary parameters, the height of the sides and the size of the drawers;
- confidence in the quality of the piece of furniture. If your child jumps on the bed, you won’t worry that the bottom will accidentally break right under him;
- enjoyment of the process of creating a crib. The baby will even be able to help dad in this important process.
Materials and tools
Before purchasing the necessary materials and tools, you should carefully consider the entire process of creating a piece of furniture. Consider whether you are truly ready to complete this process. It is better to do all the work outside the house, as it will be quite difficult to get rid of dust and sawdust. If it is not possible to have privacy in a separate room, you should cover all upholstered furniture with plastic and remove the carpet from the floor.
You should find detailed drawings of the crib with step-by-step photos on the Internet or in magazines. But if you have experience in carpentry and have previously encountered furniture design, you can do without them. The main thing is to make drawings accurate to the centimeter.

Then we start purchasing materials. We will need:
- furniture panels made of wood;
- aluminum corners;
- self-tapping screws of different calibers;
- wheels for drawers;
- a lattice base for the crib, which can easily be replaced with a sheet of regular plywood of good quality.
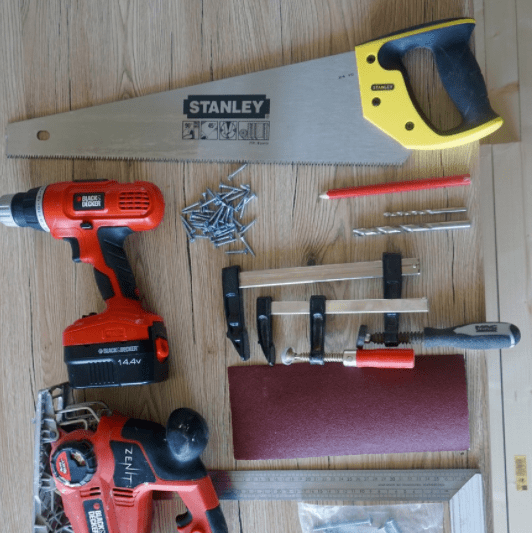
The tools you will need are a drill, a jigsaw and a grinder. You should also get a piece of sandpaper to sand corners and cuts.
All materials can be easily purchased at a hardware store. You need to buy another mattress; for a child it is better to choose a good, high-quality orthopedic mattress.

High-quality mattresses are available on the Internet at reasonable prices; their photos and characteristics will allow you to familiarize yourself with the products in detail. Even with this purchase, the cost of the bed will remain more acceptable than when buying a finished product in a store.
To ensure that the dimensions of the mattress and crib match, it is better to first buy a mattress, and only after that proceed to drawings of the crib.
Instructions for making a crib with your own hands
After you decide on the size and appearance of a bed for a child, look at photos of popular models on the Internet and find the necessary drawings, you can begin making a royal bed for your baby.

Instructions for making a crib are as follows:
- We mark all the parts on wooden boards. It is better to use a regular lead pencil, which, if necessary, can be easily washed off with a sponge and detergent. Don’t forget to immediately mark the sides and the higher headboard: otherwise it will have to be installed additionally in the future;
- Use a jigsaw to cut out all the details. Here we carefully monitor the straight cut line. We seal the cut edges with paper tape;
- If you decide to draw complex shapes on the side of the crib and its headboard, you can use the means at hand as a form. For example - a plate, glass or bottle;
- in accordance with the length of the sides, we cut out aluminum corners and drill 4-5 holes in them for self-tapping screws;
- We screw the corners to the bottom of the sides so that the base of the mattress rests on them. At the same time, they will increase the strength of the structure;
- to connect all parts of the crib, it is better to lay it on its side;
- we process decorative holes (if any) with sandpaper; it is better to do the same with sharp corners;
- If the shields are made with high quality, their surface will be smooth and will not require additional processing. But for beauty, the crib can be opened with primer and varnish. Although one impregnation of a pleasant shade will be enough;
- To fasten parts together, it is better to use special ties instead of ordinary self-tapping screws. This is both more reliable and more convenient;
- We assemble the drawers. The best option is two large drawers so that you can put large toys and bedding in them;
- if desired, you can make low legs for the crib, and you should not forget about the metal corners for them;
- We lay the mattress on the base and lay down the bed linen. The baby crib is ready with your own hands.
By the way, you can order cutting of materials at a hardware store, having previously provided all the dimensions of the parts.

The Scandinavian style for children's rooms is gaining more and more popularity, and a do-it-yourself bed-house is a real manifestation of parental care, skill and imagination. An original bed design, made taking into account the size of the room and the age of the child, is beautiful, safe and economical. Adults can be confident in the reliability of the bed’s design, and children can have a place to rest, just like the heroes of fairy tales.
There are a lot of options for how to make a bed-house. In terms of construction work, everything is becoming more standard; it is important to draw up a diagram of the proposed product, preparing the necessary materials.
Tools
House walls
First of all, drawings are made for the bed-house using a simple pencil and a square. To build the walls of the described bed, four wooden beams are taken, each of which is 1 m 20 cm. These will be the supporting parts for the vertical structure of the house bed. To add aesthetics to a gable roof, the edges of all supports are sawn off from above to form an angle of 45 degrees.

Marking

Details of the walls of the house

The edges of the supports are sawn off at an angle of 45 degrees.
Roof
This part of the bed-house will also require four bars and the same steps, including finishing the edges at an angle of 45 degrees. All processed bars are assembled, the upper ridge is attached using wood glue. The parts can also be secured with a self-tapping screw, which should be screwed in at a distance of 3 mm from the border of the junction of two wooden parts. We advise you to follow some rules when working:
- It is recommended to clean all cuts with sandpaper;
- the self-tapping screw must be screwed in slowly so as not to delaminate the wood;
- When drilling, it is recommended to use a vice to secure the product;
- Optimal modern drills and a slow process are the key to quality work.
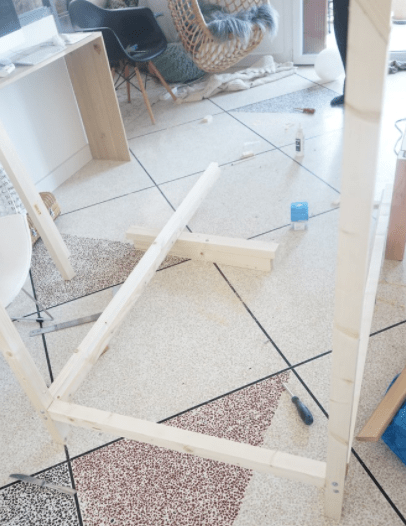
When two slats are fixed to the two supports of the future bed, the end result is the frame of the house. Repeated procedure will lead to the appearance of two equal frames - the end walls of the bed.


Gluing parts

Connecting parts

End frame attachment
To complete the manufacture of the end frame of the bed, an 8.2 cm block is screwed at the bottom to support the vertical posts and stabilize the entire structure. For bed assembly, an eccentric tie of the side components is preferable. It is very important to make an accurate design for the desired hit. Self-tapping screws will help make the task easier. The structure is also attached to simplify assembly and save time with flat corners - squares with a side of 3 cm. All accessories for the procedure are available at a hardware store.
When making this tie, drill holes in the crossbar with a 10mm drill bit. They should be located on its midline, not through and have a depth of 12.5 cm. The diagram shows how to fix their outer edges 3.5 cm from the edge of the crossbar.
A 6mm drill bit helps create the hole on the side. It is fixed exactly in the middle and falls into a pre-prepared recess. The eccentric then firmly secures the required appearance of the screw. It is also possible to use wooden parts on long self-tapping screws with pre-gluing. We should not forget about stabilizing the connection using corner brackets.

Attaching the end crossbar


Finished end frame
Assembling the basis of the structure
Two thick bars are prepared as the sides of the bed. The inner side of the beam accommodates thin strips using self-tapping screws and involves screwing in the screws at an equal distance from each other. These parts will support the frame of the future bed of the house, which will make it possible to secure the slatted bed bottom.
For accurate work, it is important to make a template measuring 6 cm with holes for self-tapping screws - 2.5 cm. Use a pencil to mark the positions of the holes on all racks so that the upper edges completely coincide with the crossbar. A 6 mm drill is an assistant in organizing through holes in the marks. The procedure is fourfold: in this way, all the posts are connected to the sides of the bed.
Next, prepare the hole for the eccentric on the longitudinal post inside. Long self-tapping screws are screwed in from the outside, which should smoothly connect the side components of the bed and the vertical support with possible gluing of the joining point. The eccentric is inserted into the holes from below and the bolts are then tightened. Repeat the procedure to connect both frames to the sides of the bed.
After fastening the sides of the product to the ends of the house bed, the frame is supposed to be fixed, thanks to the three longitudinal components of the roof. Three beams according to the size of the sides are attached using an eccentric or self-tapping screws and glue. When choosing the latter, the bed-house must be strengthened with corner fasteners.

For assembly you will need two thick timbers

Thin strips will support the frame


The frame is assembled using an eccentric tie

Connection of side supports with crossbars
Slatted bottom
The slats are screwed to flat strips, which in turn are secured to the frame sides. It is important to carry out the correct tightening to hide the screws. The interplank interval is on average 7 cm, 13 parts go to the bottom. The remaining slats will be suitable for the safety side, assembled using corner brackets, but this is not necessary.
These slats can be borrowed from other sleeping places. There are new types of bed slats on sale. There are also ready-made models that are inserted directly into the bed frame. This option is suitable for standard size beds.

Fastening the slats

Decoration
A home-made bed-house has an undeniable advantage - it includes original proportions, colors and sizes. For the boys' version, you can use a sea-colored canvas or thick curtains to organize a military headquarters, and for girls - decor with flags and a canopy made of organza or tulle.
The crib should be ready to welcome a new addition to the family while the mother prepares to be discharged, but not just out of courtesy and joy. Man is a social being, and a stable society is impossible without hierarchy. Having received his own territory and things from birth, even if he still does not completely understand their meaning, the little person will gain self-confidence, over time correctly determine his place in society and achieve success. This, of course, is not an absolute law, but statistics clearly show: babies who, by the will (or lack of will) of their parents, wandered anywhere at an unintelligent age, have a much greater chance of growing up careless and worthless. There is even a historical and sociological theory: they say that people began to emerge from savagery and create civilization when the cradle was invented and mothers stopped carrying their babies around all the time.
All this may be interesting, but in a developed civilization, dad, rushing around stores and websites in happy anticipation, discovers that the prices for cribs for babies are disproportionately high compared to the complexity and material intensity of the products. And you won’t be able to undermine it; under every hidden scam there is a solid medical, environmental, production and legislative basis. But what about in a consumer society, and let the parents spare nothing for their child.
Let's say the head of the family is a craftsman. Then he has the idea of making a crib himself: its design has been formed over thousands of years, there is nothing complicated about it, and nothing is required of material. It is possible to make a crib for a baby with your own hands, using ordinary household tools plus a jigsaw, manual or, better, electric. There is one more reason: after giving birth, the mother, especially if it is her first child, will be “on edge.” Having made sure that the faithful did not revel or procrastinate in her absence, but worked diligently in his field for the sake of the family good, she will calm down much faster and generally return to normal. And there will be more milk, which is again good for the baby.
Which one will we do?
Classic crib for a newborn, pos. 1 in Fig., the design is simple. Basic requirements for it:
- Environmental cleanliness and complete health and sanitary safety.
- No sharp protrusions or edges.
- There should be no holes/openings or crevices in which a little one can get stuck with anything, from a finger to a head.
- The presence of sides is required; It is well known how dangerous it is for babies to fall even from a small height. It is desirable that the front side (wall) be partially folded or lowered to make it more convenient for the mother to care for the child.
- Ventilated, i.e. lattice or perforated bottom. No matter how much baby hygiene products improve, the baby will one day make the bed dirty.
- If the newborn is the first-born and it is planned to someday add brothers and sisters to him, then sufficient strength and durability in combination with a collapsible design.

Often, for ease of movement around the house, a baby crib is placed on wheels, pos. 2. In small apartments you can sometimes find samples with drawers for linen in the under-bed space, like in adults, pos. 3. However, for the reasons stated above, drawers under an infant's cot should be equipped with waterproof lids. Finally, a rather complex and expensive, but convenient for mother and space-saving product - a crib for newborns, combined with a changing chest, pos. 4.
Many babies have to be rocked to sleep. Main types of rocking beds hammock, pos. 5, cradle (with upper suspension of the bed), pos. 6, and a cradle (with a bed on the lower curved rocking supports), pos. 7. A hammock is only suitable as a temporary rookery, say, at the dacha on the weekend. The baby’s bones are still soft, and constant lying on something malleable deforms his skeleton. Cribs for newborns - hammocks are most often made folding and transportable.
The cradle is easy to rock, but difficult to make, because... some kind of mechanism is required. In addition, the risk for a baby to fall out of the cradle, hanging over the side, is much greater than from a hammock or cradle. The latter, moreover, is easier to make, and the small bumper protrusions on the rocking chairs make it completely safe, which is why the cradle is the most common. The cradle must have a bed lock, preferably a spring one with a self-resetting mechanism, which must be retracted for rocking, otherwise a busy mother may forget to insert it when leaving the crib. “With self-reset” means that the mechanism itself will place the stock horizontally and reset the pin into the socket if the angle of inclination of the cradle exceeds a certain permissible value.
Note: cribs for babies may have completely different bumpers, see the end for details.
Motion sickness in the transverse direction is not optimal for a person, this is how our vestibular apparatus is designed. Anyone who has gone to sea on a boat or sailing yacht knows that pitching motion is much easier to bear than side motion. Babies who are constantly rocked sideways may even develop an addiction to rocking, which is why the obnoxious screamer, as he grows up, risks turning into a hyperactive idiot or “no” autist. The likelihood of injuring the baby’s psyche by excessive motion sickness is reduced to almost zero if the cradle (pos. 8) or cradle (pos. 9) is adapted to motion sickness in the longitudinal direction.
Recently, pendulum beds have become widespread, pos. 10, free from the disadvantages of cradles and cradles. Firstly, transverse motion sickness in a pendulum crib is harmless, because The child’s body does not tilt when it is used and his vestibular apparatus experiences a completely negligible load in one plane. Secondly, it is almost impossible for a child to fall out of it, because the crib itself is not tiltable. Thirdly, the under-bed drawer can be arranged more simply - access to it is provided automatically. The pendulum mechanism itself is fundamentally simple, pos. 11, you will only have to occasionally adjust the tension of the springs as the child grows.
What not to do!
Under no circumstances should you make a crib for a newborn that can swing in 2 planes, pos. 1 and 2 in Fig. Perhaps your offspring, having matured, will set out to become a pilot or parachutist and, from the first approach, will withstand the jumping training with a joyful grin, without turning a bit green. But in infancy, humpty dumpty back and forth would not have benefited Valery Chkalov either.

Further, it is undesirable to make the bottom of the crib with too thin lathing, pos. 3. When the baby learns to stand up, his legs will crawl into the cracks along with the mattress. A thick mattress pad (see below) solves the problem, but this is extra work, material and costs, and unnecessary drying and replacement. The best bottom for a newborn’s crib is made of fiberboard with a thickness of approx. 10 mm with holes with a diameter of 20-30 mm, drilled along the grid with a pitch of 70-90 mm. If it suddenly becomes completely unusable, it is easier and cheaper to replace than a mattress pad, and the spare space takes up less space. And don’t worry, fiberboard is an environmentally friendly material, even cleaner than the original wood. In its production, no synthetic binders are used, and during the processing process, all volatile substances are “exhaled” from the wood.
Note: It is also undesirable to make a height-adjustable bottom in a baby’s crib. The nests under its holders are tempting from the point of view of understanding the world, and the little finger will climb into them. If without nests, then a rather complex and expensive mechanism is required. And for mom, a folding side is quite enough.
A bad solution is also the playpen crib, pos. 4. In all creatures whose life is divided into an active phase and sleep, instinct during the latter requires complete safety. Combining the sleeping area with the play area does not provide it. Which adult is able to get a good night's sleep at work? What can we say about small children who are defenseless and are not yet able to understand their surroundings?
About the canopy
A canopy over a newborn's crib is not a luxury. And not so much a remedy for dust, which should not exist in a nursery or in a well-kept apartment in general. But remember, which adult has not been driven to white heat by an autumn fly or a mosquito itching and itching in the dark? What does it feel like for a baby who doesn’t yet use his hands? And there is really no need to turn on the fumigator or spray repellent in the nursery.

The canopy over the baby's crib is made from natural fabric that allows air to pass freely: chiffon, voile (silk or cotton), organza (silk only), muslin. The optimal design is a tent, on the left in the figure, or a tent, in the center, allowing, if necessary, to completely fold back/retract the canopy. But we remember: in the process of learning about the environment, the child will tug and pull the canopy.
Purchased children's canopies are equipped with a durable bracket with a holder made of light, durable elastic plastic, on the right in Fig. If you make it yourself, the best option is a canopy tent suspended on a cord from the ceiling. An M6 hook-screw screwed into a steel threaded collet cannot be pulled out of the ceiling by a strong adult, and if it is unscrewed, the hole is almost invisible on a ceiling only 2.5 m high. except for the lightest fabric and thin lace, it will not fall off.
Note: The best protection for the crib from annoying insects and dust, under which even an asthmatic will not be out of breath, is a mosquito net. But not a fiberglass window, but a special tropical one. Its meshes are wider than those of airy dress-drapery fabrics and it itself is stronger. This is a rare product here, but still take an interest. Ruched bows also look good on her.
What kind of sides should I make?

Sellers offer a wide variety of protective barriers for infant cribs: folding, lowering, hinged, sliding, with doors and hatches. But upon closer examination, it turns out that there is something everywhere in which a finger or the entire pen can get caught. And the recesses under the overhead parts carefully store dust and, as it were, invite settlers. Only unwanted ones and not of the human kind, but of the arthropod.
The simplest and safest bumpers for a newborn’s crib are folding ones with elastic bands, see fig. The height of the folding part of 150-180 mm is enough for the mother to comfortably care for her child. There are no complaints about such boards, but it is reliably known that at least one new person in this world with a character to envy m-mes Sobtchak & Timoshenko, for 3.5 years she was never injured or broke anything; The rubber bands were changed 2 times during this time.
Note: 2 ways of laying a folding strip of this type will be discussed below.
Let's get down to business
Now it's time to make a crib. Its design and decoration is another matter (with one small exception, see below); First you need to make a strong and reliable base for them. And even before that, decide on the material; first of all, in terms of its safety for the baby, then in terms of price and manufacturability at home.
What to make it from?
Even the safest plastics are no longer needed: as children grow up a little, they begin to touch everything. Tactile sensations from plastic run counter to his fundamental instincts, which can cause irritability and damage the developing moral and volitional qualities. For the same reason, we also discard metal, which will also cause more harm when the baby starts teething. Then the shortcomings of textile and other semi-soft types of cribs will be fully reflected.
 As for laminated chipboard, the emission class of phenol-containing compounds is E0 (zero, highest or extra grade), it seems to be applicable for children's furniture. But conscientious manufacturers honestly indicate in their specifications: “For children from 6 months”, therefore, not newborns. In addition, high-quality laminated chipboard is expensive; a crib made from it will cost more than a ready-made one with a canopy. That is, a newborn’s crib should be made of wood.
We select wood for a crib taking into account the fact that its impregnation with any biocides is unacceptable. Therefore, any industrial wood of foreign origin is no longer needed: consumer supervision simply will not allow it to enter the market raw. Among deciduous domestic species, birch and beech are suitable for a crib for several generations; for single use - cheap aspen or linden, but it is expensive. All others contain tannins, salicylates and other substances that are harmless for adults, but can cause allergies in an infant.
Of the coniferous species, pine is quite reliable, but not every type. Pine wood goes on sale in the form of expensive tar, cut down during sap flow, and cheaper dried wood, harvested in winter. Tar is good for outdoor buildings because... It is not susceptible to rot and pests, but is absolutely unsuitable for a crib. In other coniferous trees, the change in resin content from sap flow to sleep is not so pronounced, so it is better not to take risks.
In order not to make a mistake with pine, it is better to make a crib out of it using plywood. The cheapest construction and packaging plywood is made from dead wood pine glued with harmless and safe casein glue. There is no point in “cheating” for manufacturers, because everything else is more expensive. A plywood crib will last with proper home preparation of the material, see below, 2-3 times for 4-5 years, which is quite enough for a family.
About finishing
Over time, the baby will feel that there is something in his mouth that is being bitten. And then he will start gnawing on everything. This is a natural and necessary process, but once it created serious problems for children's furniture makers: leaving the wood bare means that fibers will be swallowed, or even choking on a splinter. Nitrolac is not harmless, and its sharp scales cut lips, gums, and tongue.
Now there is no such problem: water-based acrylic varnish, firstly, is completely safe; secondly, it is very durable. Compounds of a similar composition restore the enamel of bathtubs, which even a seasoned wolf would break its fangs on.

Very suspicious parents can also put special silicone pads on the sides of the crib. But you will have to buy them and adjust the design to the chosen model: construction and aquarium silicone is not suitable for homemade products, you need a special one, from which teething toys are made. It is not on sale in its raw form, only in finished products.
Cradle and classic
How a classic wooden crib for newborns works is shown in Fig. on right. Pay attention, firstly, to the placement of the sides in the pockets and the prefabricated design of the rocking chairs. We'll deal with the first one later, and use the second one further. Its recommended dimensions and specification of parts in a modern design, without labor-intensive artistic details, are shown in Fig. below.


Cradle
Who knows, perhaps the pediatrician, after looking at your restless baby, will recommend rocking him to sleep in a cradle. Child differs from child to child, and there is no person who fits into the general rules in everything. In such a case, in Fig. drawings of a newborn's crib - a cradle made of boards. However, it is no longer possible to keep an older child in a cradle, so the length of this crib should not be increased. Secondly, a latch (stopper) of the bed is still needed, since the baby is restless. In this design it is manual, so remember to insert as you leave and supervise each other.
Plywood classic
Here in Fig. – detailing of a classic-type plywood crib for a newborn with a side with elastic bands. It was made at home; a hand jigsaw (electric ones were not widely available at that time). The wayward person mentioned above grew up in her. Material – 2 sheets (quite a lot left) of birch plywood 6 mm thick; Construction pine will also work.

First of all, a plaster was prepared (several pieces of packaging cardboard put together), the outlines of the parts were sketched on it, and everything was covered with solid plastic film. Then a sheet of plywood on the plaza was impregnated with a water-polymer emulsion, first on one side, and after it had completely dried on the other, and cut into blanks with a hacksaw. Using a jigsaw, grooves for the sheathing were cut out in the middle plates of the bags and openings in the backs.
Parts were glued together from plates using PVA for wood (sold and is sold in construction and hardware stores). The glue was applied with a brush in a thin layer to all glued surfaces of the plates of the package and kept until softly tacky (the glue film turns slightly yellow and becomes translucent in places).
There was no money to hold the packages together; there was no time to do it. Therefore, small bags were simply wrapped in plastic and tied tightly with a flat elastic band; It took a whole skein, approx. 10 m. It was necessary to tighten the bags with an elastic band, twisting and pulling the turns very evenly so that the plates did not crawl along the glue. The upper and lower planks of the walls (items 1 and 3) still crawled, so after applying and soaking the glue, they had to be knocked down with small nails. The nails were then pulled out, and the holes were covered with homemade putty made from sawdust using the same PVA.
It was more difficult with the backs; you can’t tighten them with rubber bands. Therefore, holes were drilled for assembly guides, for which furniture dowels 18 mm long were used. The gluing of the backs was carried out on the plaza under pressure, which was used to use dumbbell plates and stacks of books. According to calculations, for 2 layers of PVA of such an area, a bend of 25-35 kg is needed, evenly distributed over the surface of the bag.
Also, from 3 strips of plywood each, the parts of the support belt were glued together, but it was assembled in the crib in place. After drying for 3-4 days, any leaks of glue that appeared in all parts were cut off with a safety razor blade (there were no assembly knives then either) and the edges were sanded.
While the glued bags were drying, the frame of the bed was assembled from boards cut into half a tree, glued without holding and reinforced with nails. The rectangularity of the frame on the glue that had not yet hardened was carefully verified by measuring the sides and diagonals, because it then served as an assembly template, and only then were the nails driven in. The flooring of the bed is fibreboard with perforation, see above. It was laid on glue and nails on the side on which the legs of the crossbars were, so that they lay on the longitudinal beams, and did not hang on nails and glue.
Note: The racks of the sheathing of the backs were made similarly to those of the walls, but shorter. Placed in place before placing the top plate.
The crib was assembled using screws (nowadays, of course, confirmations would be better). The loads on the joints of the baby crib are small; fastening with threaded hardware along the layer in this case is quite reliable and at the same time allows up to 4-5 disassemblies/assemblies if the plywood is impregnated with a water-polymer emulsion. The squareness of the box was verified with a stock, and its horizontality with a level. Then marks were made along its bottom and beams of the support belt were placed along them using glue and nails; The transverse ones should be spaced between the longitudinal ones, so the crib will be stronger.
The oval support boss of the flap of the side is less traumatic, and it is easier to make than a pocket. Some 18 mm thick scraps were used for the bosses; they were installed with glue and nails. At the ends of the planks, U-shaped holes were selected for them using a drill and chisel - there were no household wood routers then either.
Time still passed, and the crib was covered with an oil varnish, not as harmful as nitro. Immediately, the elastic bands were fixed in the blind holes, also with furniture dowels. Then another final drying, and the crib is ready.
Transformer
There are also many convertible cribs for newborns on sale, but at least one variety is not just a fashion statement. We are talking about a crib for growth, but it doesn’t come down to a sliding bottom. An already sufficiently formed personality may be indignant: “I won’t sleep like a little guy!” Therefore, a transformable crib “from scratch” should be structurally and externally similar to an adult one. In this case, the fence is made removable from a cord; Of course, this is an option only for fairly calm babies. And the transformation comes down to removing one back and using it to increase the length of the bed. Drawings of a homemade “growing” crib for newborns are shown in Fig.

Drawings of a crib “from scratch to grow”
What if you are very restless?

It also happens that the doctor throws up his hands: nothing can be done, he needs to sleep with you, then he will outgrow it. Or, on the contrary, the mother may be the most wonderful in the world, but she is weak and she cannot constantly get up at night to feed. Then you will need a cot attached to the parent's bed without a front wall. A crib for restless newborns must include a bumper - a soft, hygroscopic pillow along the contour with ties, see fig. on right. And from what and how to sew a crib bumper with your own hands, see the video below:
Video: how to sew a bumper (sides) for a child’s bed
Arrangement
Under no circumstances should you protect the crib mattress from getting wet with oilcloth; this will lead to abrasions and diaper rash for the baby. Firstly, you need 2 mattresses, with a reserve for drying. Secondly, they must not rot and dry quickly enough. Therefore, it is preferable to sew them from linen and wrap them in calico, flannel or flannel. The stuffing is the best horsehair; its almost complete replacement is coconut fiber or sisal.
Now remember that the bones of a newborn are soft. Therefore, the thickness of the mattress should be small, up to 6-7 cm. But then sleeping, feeling the hard bed with your body, will not be so comfortable. A 10-15 cm thick mattress pad made of the most dense, 45-50 number, furniture foam rubber will help out; it is wrapped in the same fabric as the mattress. The mattress pad will also absorb some of the moisture, which will speed up the drying of the mattress, but then you also need 2 of them.
A newborn does not need a pillow to prevent torticollis from developing. However, sometimes, on the recommendation of a doctor, for very fidgety people you have to buy a butterfly pillow: its middle is almost flat, and its wings are voluminous. But there is no need to experiment with such pillows yourself - suitable materials are not sold separately and the manufacturing technology cannot be “domesticated”.
Decorations
When considering the design of a baby’s crib, you need to remember that his vision, both in terms of sharpness and color perception, develops gradually. Therefore, the contours of the decorative elements need to be smooth, and the colors dim and unsaturated, preferably close to the middle of the spectrum: pale yellow, light beige, light green, pale blue. Whitened red and orange are acceptable, but poisonous green, deep blue and purple tones are not acceptable, as are anything shiny.

A very simple and useful way for a child to decorate his crib is to hang a carousel mobile above it, see picture, with soft toys. Their smooth movement will not only calm the baby, but will also contribute to the development of his visual motor skills. Since mobile phones for babies came into use, the number of children with congenital visual defects has decreased markedly.
Finally
Presumably, it has now become clear to you that a simple crib for a newborn is not so simple in its essence, because it contains the whole world of a new person. Therefore, let me wish you success not only in mastery, but also in studying the basics of child psychology. They have it from the very beginning, even if they themselves do not understand it yet.
Making a baby crib with your own hands has a number of advantages. This is both a lower cost compared to buying ready-made furniture, and quality (parents can be confident in the safety of the materials used). Despite the fact that working with wood is labor-intensive and time-consuming, the result will greatly please the child, who will receive a unique sleeping place made taking into account his needs and wishes.
Preparatory stage
Before starting production, you need to take into account all the nuances and prepare materials, without which the work will be impossible.
Bed design
The crib must be simultaneously:
- comfortable (to give the child the opportunity to roll over in his sleep without hitting the walls, and due to the “breathable” design to ensure air flow);
- safe (protect from falling, have no protruding sharp parts, have a sufficient margin of safety);
- functional (the space under or above the bed should be used to store toys, clothes and bedding);
- attractive (cause pleasant emotions and the desire to use it for its intended purpose, fit into the overall style of the room).
When choosing a design, it is important to consider your carpentry skills and technical capabilities. A novice craftsman who has access to a minimal set of tools will be able to make only the simplest models of beds, consisting of sides, headboards, legs, slats and drawers, without loss of quality.
It is worth starting to create beds in the form of a car, airplane, flower or other complex structures only in cases where the person doing the work has considerable experience and plans to process the parts using professional equipment.
Tools
The more different tools a master has, the faster and easier it will be for him to complete the job. However, there are some that you can’t do without:
- Electric jigsaw.
- Knife saw.
- Sanding machine (it can be replaced with sandpaper, but in this case, processing the boards will take much longer).
- Screwdriver.
- Drill.
- Bulgarian.
- Files.
Materials
Solid wood is considered the best material for making children's furniture. A bed made of pine, beech or oak will last a long time and will be relatively resistant to moisture and pest attacks. At the same time, natural wood has two qualities that do not always make its use possible: the significant weight of finished products and the high price.
Instead of solid wood, you can use cheaper materials (such as MDF, chipboard, OSB, plywood and others). It must be remembered that during their production substances based on formaldehyde are used, the vapors of which negatively affect even the health of adults, and they can cause irreparable harm to the fragile body of a child.
Other
You will also need consumables:
- Self-tapping screws of different diameters.
- Metal corner and ties.
- Rails or other guides and wheels (for structures with retractable elements).
- Simple or colored pencil.
- Paper for notes.
Making a bed: step-by-step instructions
Making a crib can be divided into many small steps:
- Marking wood. Using a regular clerical pencil, draw the location of the parts. When all work is completed, traces of the stylus are erased from visible surfaces with an eraser or washed off with alcohol. To draw complex decorative elements, you can use objects that come to hand (for example, to draw a circle, just circle the bottom of a glass).
- Sawing. Performed using an electric jigsaw. While working, you need to ensure that the cuts are neat and even. Finished parts should be numbered if the design involves a structure consisting of many elements.
- Preparation of fastenings. You need to cut out the spikes and nests for them in the parts that will be connected to each other. Also at this stage, you should cut off two pieces of metal corner for attaching the slats, from which the bottom of the bed is formed. Mark holes for screws on the cuts and drill them.
- Sanding parts. Use a grinding machine or sandpaper to process all cuts and the surface of the boards if it is rough.
- Varnishing and other types of decorative processing. If the parts are expected to be painted, varnished, covered with film or upholstered with fabric, this work should be done when the bed is disassembled.
- Assembly. By gluing tenons into the grooves and using metal ties, the structure is assembled, starting from the main frame. Wheels are attached to the drawers, and slats are attached to the bed walls. When everything is ready, put on the mattress and cover the bed with linen.
Possible mistakes
Anyone who has not previously encountered furniture making may make a number of mistakes. Here are the most common ones:
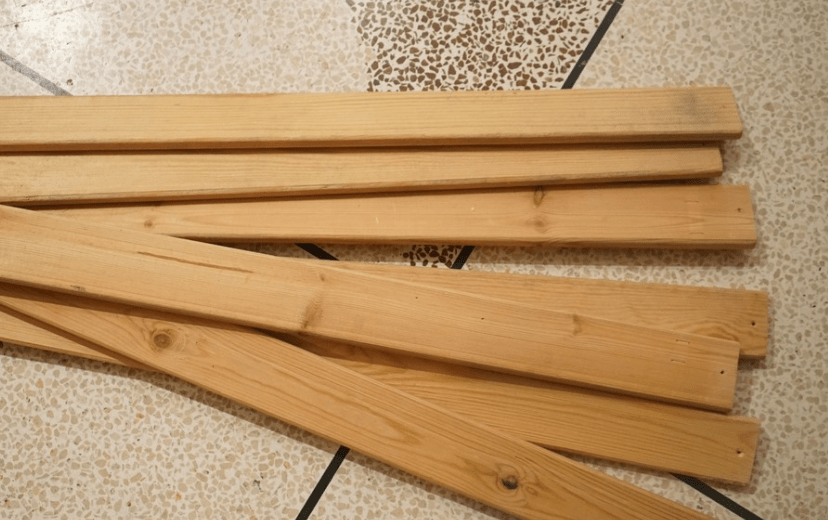
- Use of fresh wood. Since over time the material will dry out, become denser and, accordingly, decrease in size, the structure will simply fall apart. For a bed, you should only purchase boards that have been left in a dry, ventilated area for two or three years or have been machine dried.
- Neglecting to polish parts. All parts of children's furniture must be properly processed to avoid injury. Since a child can stick his hand even into narrow crevices or crawl completely under the bed, even those that are inside the structure should be sanded.
- Connecting parts using screws. This assembly option is good anywhere, but not in children's furniture. Under the influence of constant loads, the thread will destroy the structure of the wood fibers, and over time the structure will become loose. To assemble the parts, you should use special tenon joints, which are shown in the figure below, and be sure to glue them with wood glue. To strengthen areas that are subject to the greatest loads, metal ties are used.

Decor ideas
To make a children's bed from wood with your own hands, you need to be guided by the accompanying drawings and dimensions. Since the size of the mattress is fundamental, you need to independently calculate the dimensions of the parts.
Based on Harry Potter
Making such a bed is not much more difficult than a regular one, but the joy of a child who dreams of touching the magical world of Harry Potter will be endless.
The main decorative elements are:
- number 5979 (the numbers can be easily cut out of wood, painted silver and glued to the footboard, or use metal badges for this purpose, which are sold in a hardware store to indicate apartment numbers);
- an inscription symbolizing the Hogwarts school of wizards (the easiest way to do it yourself is by printing it on a color printer, gluing it onto a piece of veneer cut to size and covering it with several layers of varnish).
The space under the bed can be left empty, but it is much more effective to fill it with drawers. An excellent option would be to equip an extra bed there, which will come in handy if one of the young wizard’s friends comes to visit.

The original dimensions of the bed and color combination are shown in the figure.

With canopy
This bed will be more to the taste of girls. According to the design concept, the canopy is made in the form of side curtains, and the top of the bed remains open, but if desired, you can improve the design (for example, tighten the top part with fabric).
Since curtains need to be washed regularly, the fastening should allow them to be removed and hung back without difficulty.

If for some reason the presence of a canopy is undesirable, the same bed can be made without it. To do this, it is enough to shorten the slats on which it rests, so that the legs end flush with the sides.

Cozy house
A real lifesaver for parents whose children have trouble falling asleep. The design of this bed creates a calm and at the same time fairy-tale atmosphere, and high sides in the form of walls and a roof help the child feel protected.
The effect of the night sky can be created on a tree in several ways:
- paint with acrylic paints, which have a beautiful glossy texture, are durable, and do not have a strong odor;
- purchase wallpaper or self-adhesive film with a similar design;
- cover the board with a fabric of the appropriate color (in this case you will have to regularly vacuum the inside of the bed).

Instead of drawers under the bed, you can equip a pull-out sleeping area for guests.

Two-tier with ladder-chest of drawers
If there are two children in a family, and the area of the apartment does not allow for a separate bed for each, you should pay attention to this option. True, unlike simple designs, creating a bunk bed will require more time, skill and effort.
Under-bed drawers and a chest of drawers will optimize space and provide additional storage space. If desired, the steps can be made ordinary.

When working on such a bed, you need to take care of the safety of the child who will sleep on the lower tier. All fastenings of the “top floor” must be reinforced with metal corners.

Loft bed
An excellent combination of sleeping space and play area. Such a bed will be a godsend for owners of small apartments, and even if there is a separate children's room, it will delight a child who loves adventure and active games.

Depending on personal preferences, the roof of a makeshift house can be covered with slats completely or partially. It would be a good idea to use fabric instead of boards, but you should not fasten it tightly - since woven fabric collects dust, such a canopy will have to be shaken out and washed often.

With work area
Suitable for an older child. The only inconvenience when using such a bed will be the choice of a suitable location, because if the place to sleep requires maximum shade, then the work desk should be in an area with sufficient lighting.

With some skill, such a design can not be made from scratch, but can be modified by the bed, the diagram of which is given above. To do this, you will have to move the stairs to the side, dismantle the roof, and cut out the tabletop and shelves from a new board.
Ottoman
To build a sleeping place of this type, you will need a minimum of material, tools and effort. Even a beginner in carpentry can get the job done without damaging the wood.
The lack of carved decorative elements can be easily compensated for with beautiful bed linen or special stickers for furniture. If the style of the room allows, it is worth covering the wooden panels with adhesive film with interesting patterns; subsequently, the appearance of the bed can be refreshed by simply peeling off the old film and replacing it with a new one.

For a younger child who may roll onto the floor in his sleep, it is necessary to provide a limiting edge.

Of course, in one article it is difficult to describe all possible design options and talk about all the possible errors and misunderstandings that may arise during work. But carpentry is a kind of creativity, so you shouldn’t be afraid to improvise and deviate from the previously outlined plan.
One of the main advantages of making furniture for your home by hand is the ability to make it the right size from a material of the right quality and color. Everything is limited only by the imagination of the creator and the area of the children's room.
For example, for a boy’s room, you can make a do-it-yourself bed house in marine colors. As a result, the child will receive not only a wonderful place to relax, but also a real military headquarters. The girl will be pleased with the decor in the form of multi-colored flags, a delicate tulle canopy and other cute little things.
Preparation and manufacturing process
Children's rooms, especially those with a Scandinavian style design, very often include a bed in the form of a frame or frame house as a mandatory element. In a workshop or store, such interior elements are quite expensive. However, you can make such a bed with your own hands., even with a very modest budget.
Equipment and materials
To make a children's bed-house with your own hands, drawings are easy to make. All you need is the dimensions of the future structure and a couple of blanks.

You can purchase the material at a hardware store. The timber from which the structure of the bed house is made is also sold there. To make a children's bed for a mattress that is 165 centimeters long and 80 centimeters wide, you will need:
- Wooden beams in the amount of two pieces 40 by 70 with a length of 1660 millimeters.
- Four wooden beams 40 by 70, 1200 millimeters long.
- Two flat slats 10 by 70 by 1660 millimeters.
Step-by-step instruction
The implementation of this bed idea can cost about fifty euros. You can cut costs and use parts and the bottom from an old bed with slats.
Making the base
 First you need to make a base of four beams, each 1200 millimeters long. This structure is the vertical support of the bed. After installation and fastening, a small piece is sawn off at the top of each support beam at an angle of 45 degrees. This is necessary for the further formation of a beautiful roof with two slopes.
The cutting line must first be marked with a pencil using a square or rulers. Here the wood posts are marked and cut down using a regular hacksaw. But in specialized construction stores you can purchase a device for cutting at one angle or another.
Roof assembly
To make the roof, four wooden beams with a length of 730 millimeters are used. After fixing them, you should perform the same procedure as with the base boards - file their edges where they meet the roof at an angle of forty-five degrees.
Important! You should immediately pay attention to the resulting cuts. To prevent the child from getting injured, it is necessary to treat the cut areas with a piece of sandpaper. The structure of the house itself is assembled from cut 1200 mm vertical supports. All this is attached to the roof ridge, made of 730 mm beams. The upper part of the ridge is attached to the general structure of the future bed using pre-prepared wood glue.

The joints of all parts of the roof and vertical supports must be additionally glued, preferably two or three times. After this, the entire upper part should be seated on 40 mm self-tapping screws. Bolts and screws must be screwed in at a distance of up to 4 millimeters from the junction lines of the two parts of the roof. This must be done without pressing too hard, since the wood tends to delaminate.
A little tip: when you drill the entire structure, use a vice. You do not need to drill very quickly; use only drills made of high-quality material suitable for wood. After screwing two roof strips to the supports, the frame of the future house is obtained.
Gradually our creation takes on its final shape. The procedure is repeated with the remaining parts. As a result, we get two identical frame structures - these are the end walls of the bed house.
Frame attachment

To completely complete the end frame composition, you need to screw an 820 mm block downwards. This baluster is a transverse support, supporting the mass of vertical posts of the structure. This measure keeps the entire bed in balance.
The distance from the transverse beam of the bed to the floor of the room is 150 millimeters, since the project implies the presence of legs for the bed. But this does not mean that you are obliged to repeat everything thoroughly. The bed may have no legs. In this case, the cross beam will need to be screwed flush to the bottom edge of the vertical supports, without indentations.
Please note that an eccentric tie was used to assemble the side parts of the crib. It is also important to note that for such fastening techniques, your calculations must be very accurate. The result will be hitting the appropriate point. If such gluing turns out to be too difficult for you, then it would be better to use self-tapping screws. Then you need to additionally buy flat corners measuring thirty by thirty millimeters. This approach significantly speeds up the process and simplifies the assembly itself.
If a design with corners is easier and faster to assemble, why do some people still stop at gluing? The answer is simple - iron corners look less stylish and aesthetically pleasing. The eccentric adhesive liquid firmly and reliably holds all parts together, their connection is hardly noticeable.
 Related materials and items for the screeding process can be purchased at specialized stores for repairs and construction. For such a hidden installation, you need to drill holes in the bottom beam of the bed using the previously specified 11 mm drill bit. The hole should be located clearly along the middle line on the crossbar. Please note that the hole is through. Its depth reaches 130 millimeters.
The hole is separated from the edge of the crossbar block by about 40 millimeters. Here it is worth paying attention to the size of the bolts and screws used. The next step is to drill a neat hole from the side, just in the middle of the beam, with a six-millimeter drill. It should fit clearly into the recess we made earlier. A screw must fit into the resulting opening, then the entire structure is secured with an eccentric.
Another good tip. You can attach all the wooden parts of the bed to long self-tapping screws, having previously treated them with an adhesive. Please note that the connection must be balanced using corner-type brackets.
Assembling the base of the house
 To assemble this part, we will need several thick beams with a section of 40 by 70 by 1660. They will meet the characteristics of the sides of the crib. From the inside, thin planks (10 by 70 by 1660) are screwed to the wood blocks using self-tapping screws.
Be sure to keep an eye on so that the screws are always at an equal distance from each other. These plates serve as support for the installed frame that supports the bottom of the bed house. We have already assembled the frame frame using a gluing liquid - screed. At this stage, it is critically important to accurately measure and adjust everything, and to avoid mistakes in your own calculations.
Make a template 6 centimeters long from a piece of wooden block in advance. Several holes are made in it for self-tapping screws. They are located at a fixed distance of 25 millimeters from each other. With its help, the proposed holes are measured on all other future racks.

Using a wooden template and a pencil, mark the location for the holes. It is important to draw marks on both sides of the bars on all four crib posts. It is important to accurately place the upper end of the template at the level of the upper edge of the crossbar.
After finishing the basting, take a 6 mm drill and make through holes in the designated places. This procedure is performed only four times - the vertical posts are tightly and securely connected to the sides of the bed.
On the inside of the longitudinal post you need to mark a place for the future hole into which the eccentric is placed. It is made with a 10 mm drill. The outer side is processed, after which longer screws are screwed into it - up to 10 centimeters.
It is important to take into account that the bolts on the self-tapping screws should fit smoothly into the prepared holes, connecting the verticals with the side parts of the bed. You can also additionally glue the structure.
Particular attention should be paid, of course, to the joints. After all the operations performed, adhesive liquid is poured into the holes in the lower tier, and then the bolts are tightened. You need to carry out a similar operation with all parts of the frame structure, then connect it all to the sides of the bed-house.
Attaching the general frame
 The sides of the bed house are already securely screwed to the ends. Now comes the strengthening of the overall structure. This is done using four bars. For this we will use parts 1660 millimeters long.
It is imperative to take into account that the length of the beams must exactly match the length of the sides of the crib. All components are secured in the same way as in the previous stages - using an adhesive mixture and self-tapping screws. Do not forget also about additional strengthening of the composition with the help of corner fasteners.
Making rack bottom
 In this case, the crib contains slats from an old slatted bed. If you do not want to use the old bottom or do not have one, then a hardware store can offer you an excellent alternative - specialized slats. These beds will fit standard mattresses.
The slats are fixed directly on flat strips; on the sides they are attached to the four sides of the frame base. You need to tighten all the parts one to another so tightly that parts of the screws do not stick out from your product. You can also leave a small gap between each plank - in this case it was 8 centimeters. For the bottom of a standard mattress, it was necessary to screw 14 slats.
Tip: from the pieces left after cutting the slats, you can make a wonderful side. For small children this is a mandatory safety element. It is assembled using one or more brackets secured at each corner. That's all, work on the crib house is finished. The time required was about noon.