DIY children's railway. Start in science How to make a model railway
You can make a model railway with your own hands, but this will require extensive preparation. When building a model, knowledge in the field of the structure and operation of the railway is required; this can be read in books that are used for training in higher educational institutions, technical schools, as well as in instructions such as “Rules for the technical operation of the railway”, “Instructions for the railway alarm." There are periodicals such as “Lokotrans”, “Semaphore”, “Railway Business”. In these magazines you can find useful information about the railways of Russia and the world, and some publications have sections dedicated to railway modelling. There you can find descriptions of technologies, working methods, patterns of rolling stock models, and expert advice.
When building a model with your own hands, you need skills in working with various tools: for working with wood - work with a jigsaw, files, for measurements and markings - the ability to use a square, ruler, caliper. To work with electronic devices - correctly mold parts, connect wires, solder, measure current and voltage. If you don’t have the skills to do the job, then it’s worth studying the technique and practicing before starting to build a model railroad. For training, you can purchase cheap materials and tools, and then use high-quality raw materials and tools when building the model.
The construction of a model begins with the creation of a work plan, a route diagram, an approximate map of the terrain - with the planning and design of a railway line with your own hands. After the project is ready, the first step is to build a base for the model - a sub-model. In the future, a layout will be located on it, and it will be used as an external surface on which tracks, stations, depots, forests, mountains, rivers will be located, but also an internal part for wires and various devices that ensure the operation of the layout.
Paths are laid on the sub-model. Railway rails and sleepers can be bought in a store, but using special machines you can make them yourself. Few modellers are involved in such production. After laying the tracks and connecting the electrical part of the model, relief and vegetation are created, and models of residential buildings, factories, and train stations are installed.
There are some details on the model, objects you can make with your own hands, or you can buy them in stores. If purchased models are not satisfied with their appearance or do not have sufficient detail, then they can be modified independently. Some modellers use this technique.
Models of houses, plants, lighting poles, traffic lights - all these layout elements can be made independently, at home. You can find more information about how this is done in the articles in the “Layouts and Modules” section of the site.
In addition, the construction of a model is not only the production of individual railway infrastructure objects, it is the unification of all components of the model using a single, identical scale, era, theme of the model and time of year.
The New Year is coming soon, and it’s better to prepare for it in advance - including on the model :) Therefore, I made a New Year’s diorama for myself in my favorite scale - TT.
The diorama turned out to be 20*20 cm in size. The diorama is made on a homemade “box” made of plastic.
The tree is made of a brass tube with soldered wire branches. The needles are ordinary HOX-ovsky tinted flock.
The height of the tree without a star is 13 cm. Christmas tree decorations are various beads. The rain is real rain, slightly cut off. The star is cut out of a piece of plastic and sprinkled with glitter powder. The tree has four glowing garlands of SMD LEDs in housing 0603, 11 in each. The garlands can blink (a primitive circuit based on a transistor and a capacitor), there are two modes: normal - a simple glow, and blinking.
The snow is made from regular baking soda mixed with diluted PVA glue. The paving stones in the square are from Auchagen.
Ice glowing cubes – sculpted from plasticine and copied from CrystalLine 940 transparent resin. Blue and white LEDs are “cast” into the resin.
The figures are Preiser, painted independently. There are not enough figures - in general, very few “winter” ones are produced in TT. I think I’ll remake some more of the “summer” figures...
Decorative gifts under the tree are cut out of cardboard and covered with paper from candy wrappers.
The car is “Moskvich” from Herpa. Snowman - made of foam balls.
In general, the process of creating the square took a month - mostly in the evenings and weekends. If only I didn't have to go to work... :)
The houses in the photo are not part of the diorama - they are simply placed for the background.
Square during the day
Christmas tree on four sides:


And here is Ippolit Georgievich :)


Square at night
Photos were taken at different shutter speeds


Photos of the process
 Christmas tree frame. After soldering, I painted the frame green.
 Christmas tree with flock. The flock has not yet been painted the desired color.
For young modelers and enthusiasts who feel sorry or don’t have money for purchased rails, but at least have time, below we present you an example of a budget modeling railway track.
The basis Our road is a subframe made of slats and plywood. Its size can be approximately 3000x500x120 mm or more. It depends on the area of the room. The role of ballast is performed by wooden blocks on which sleepers are laid. Homemade rails are attached to the sleepers.
To make your road surface look like the real thing, lubricate it with liquid wood glue and sprinkle with sand sifted through a fine sieve. When the glue is dry, shake off any excess sand. You can do it another way: paint the stretcher with paint. Of course, first it needs to be puttied and sanded...
Sleepers can be made from strips of plywood or pine planks 60x10x4 mm. In order not to bother with making each sleeper, the work can be simplified. Take a sheet of plywood, mark it according to the size of the sleepers and cut it with a fine-toothed hacksaw, then smooth out all the irregularities with a file and sandpaper and paint it with oil paint or ink black.
The finished sleepers are laid on the canvas - glued at a distance of 20-25 mm from each other.

To make them you need a stamp. It is made from two metal rectangular bars of the same section.
Process these bars on a milling or planing machine. On one, mill a groove measuring 7x10 mm and two notches with a diameter of 3 and 4 mm, on the other, the same notches, but instead of a groove, a protrusion. You will get a device like a punch and a matrix. The rail head is stamped into the recess (see figure below). For a 1:50 scale model, a 3.5mm notch is used, and for a 1:100 scale model, a 2.5mm notch is used.
Let's talk about the sequence of operations. Take a strip of tin (see picture below), draw a center line, fold it. Place a wire with a diameter of 2.5-3 mm inside for the rail head, crimp it with wire cutters and now put it in the stamp. Clamp the die in a vice and you will get a rail that is even along the entire length with a good head and neck.
Without removing the rail from the stamp, flare its base in different directions with a screwdriver and level it with a mallet.
Attach the finished rail to the sleepers with nails. Do this carefully and as accurately as possible. First of all, mark a line of one thread of rails along the entire length of the canvas. To do this, pull the thread exactly at a distance of 15 mm from the edge of the sleepers, securing it to two nails temporarily driven into the first and last sleepers. Lay and nail the rails exactly under this thread. At the same time, they should neither touch it nor pull it to the side.
There is another way. Plan a rectangular block measuring 1000x32x10 mm. Place it in the center of the ballast, secure it with nails and lay rails on either side of it. You will see how evenly they will fit, and the distance between them will be precise along the entire length - equal to 32 mm between heads.
The rails must be connected to each other at the joints with rods that are inserted into the rail heads. The rail joints should be in the middle of the sleepers.
When you have completed one section of the track, test the locomotive on it and begin building the next section.
Fasten the sections together with metal hooks or loops attached to the stretcher.
So, you have built a railway track, laid sleepers and rails. Now you need to install the support masts and tension the contact wire.


Support masts. Plan a support from a block 200 mm long and 21 x 21 mm in cross section. Take plywood (30 x 30 mm) for the base. Drill a hole with a diameter of 10 mm in the center, sand it with sandpaper and fit the lower part of the mast under it.
You can make the pendant on which the contact wire is attached from any wire with a diameter of 2-3 mm. Do not forget to wind the spring, as shown in the figure; to do this, take a nail with a diameter of 2 mm, clamp it in a vice and wrap a spiral 10-12 mm high around it. The pendant is ready. It is attached to the support mast through a bracket and, in addition, for greater strength, it is tightened with a string - ordinary thread or thin wire.
Insulators there may be plastic beads or small buttons.
Contact wire runs along the entire railway track. It is supported by the support masts we just told you about and the support wire. It is fixed above the contact wire and connected to it with guy wires.
To make the model portable, the hanging wires have a break in several places and are connected by connectors - two metal plates: the contact wire is soldered to one, and the support wire to the other. The plates are equipped with a lock - cutouts are made on one, rivets are soldered on the other. Thanks to this, the plates are easily and quickly separated.
You can “green” the finished railway. The material for the “grass” is dry sawdust painted green with gouache. They are sifted through a sieve onto a tablet greased with wood glue, drying oil or oil varnish.
“Trees” are made from rubber sponge, foam rubber or a bundle of copper wire. The harness is folded in half and twisted to the distance of the “trunk”, and for the “branches” the wire is separated. To make the “tree” “green”, it is dipped in liquid glue, allowed to drain and the “crown” is sprinkled with finely chopped colored tissue paper.
Toy railroads are integrally associated with childhood. Many of us at a young age once owned a plastic or iron model railroad. And those who could boast of a foreign-made model were considered lucky.
Nowadays, the hobby of toy railroads has grown into a large modeling industry. Moreover, this business is already more focused on an adult audience than on children.
To the main attributes - a track and a locomotive with trailers - trees, houses, roads, cars, and relief surroundings were added. And a table with a full-fledged model of a railway, with many details and little things, is already real art.
Abroad, similar products cost from 2 thousand dollars, but in this article I will tell you how to make a full-fledged model of a toy railroad with your own hands.
Table
You will need space for the layout. Ideally, this should be a separate table, but you can get by with a small table, or simply a fenced-off area on any suitable surface. It all depends on your desire and scope. I recommend starting with a small place - for example, part of a table, and then, if you are inspired, make a larger layout. It’s better to start small than to immediately take on a large amount of work and quit halfway.
Starter set
The thing without which it will not be possible to make a model railway is the railway itself. Or rather, a set of rails, a train and a power system for it. Here, alas, there are no alternatives - everything needs to be bought. It’s good that these days there is so much to choose from on the market.
Sketch
To know where you are heading, you need to have a goal in front of your eyes. Make a rough sketch on paper - where everything should be, and what the general appearance of your layout will be. Browse the Internet, look at numerous railroad models and take note of what you like - bridges, crossings, houses, stations. You can make a model of a stop station in the Wild West, or you can make a model of a station in the center of a modern city. But be sure to decide before you get to work. And make markings on the table so that you don’t suddenly discover that the track goes beyond the boundaries of the table, or that the barrier will cling to a passing train.
Mountains
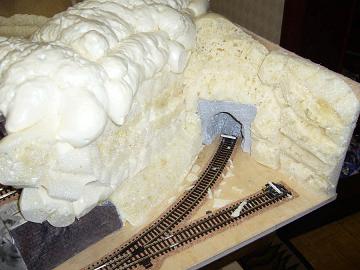
The presence of a mountain with a tunnel through which the train will pass will decorate the layout. To create a small mountain you will need polyurethane foam, plywood, a knife, alabaster and sandpaper.
First, think over and, if possible, draw a sketch of the future mountain. Then knock down a small box of plywood or other suitable material over the rails. Make sure that the size of the box will allow your train to pass freely through the tunnel. Then start applying foam around the box, with pauses of one and a half to two hours, to allow the layers to dry and not sag under their own weight. After you apply the required volume of foam, leave it to dry for at least a day.
After a day, pick up a knife (a stationery knife is more convenient) and start picking at the mountain - cut off the excess pieces, giving it the shape you intended. Cut out hollows, crevices, try to make it as natural as possible.
Next you will need alabaster. Dilute it with water and cover the entire mountain with a thin layer of up to 3 mm. It dries quickly, so use small amounts of it. Then wait again for several hours until everything hardens - it is better not to use a hairdryer.
Now you need to paint the mountain gray. To do this, buy a can of primer at any auto store, matching the color of the gray stone, and you can paint your mountain. Just test the paint on something else first to make sure it's the right color for you.
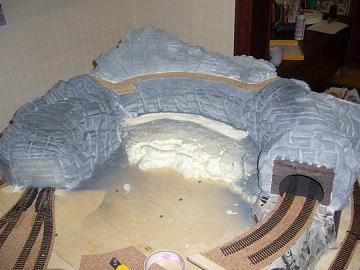
Next, use sandpaper and rub the mountain in places to remove layers of primer here and there. This will make the mountain more naturalistic, so that it is not a uniform color, but a shade from light to dark gray. You can repeat painting and sanding several times until you get something you're happy with. You can also paint individual pieces of the mountain white or black to make it more realistic.

Finally, take green paint and tint the pieces of the mountain in the color of green - this will make it even more naturalistic. Only the paint should be a believable, “moss” color.

Your mountain (or slide) is ready. Congratulations, you've already done quite a bit of work. Next in line are the remaining details of the relief.
Here it all depends on your imagination, the size of the free space and the suitable details that you have. Fill an unoccupied table surface - for example, with fake grass, which is sold in stores. Toy houses, figures of people, transport, a railway crossing, a train station with a station, a bridge, trees - these are all the details that will decorate your layout. Many of them can be found in Lego sets, or simply individually in toy stores. Companies that sell products for railway modeling also sell excellent kits, but in this case, be prepared to spend a lot of money.
You can make a model on a large table, with lots of details, relief terrain, electric running and a real miniature town. But you can also make a small model - a battery-powered train, with a small piece of landscape and a few decorative elements.
Whatever option you choose, the model you make will decorate any home and will be of interest to any company - both children and adults.
For young modelers and enthusiasts who feel sorry or don’t have money for purchased rails, but at least have time, below we present you an example of a budget modeling railway track.
The basis Our road is a subframe made of slats and plywood. Its size can be approximately 3000x500x120 mm or more. It depends on the area of the room. The role of ballast is performed by wooden blocks on which sleepers are laid. Homemade rails are attached to the sleepers.
To make your road surface look like the real thing, lubricate it with liquid wood glue and sprinkle with sand sifted through a fine sieve. When the glue is dry, shake off any excess sand. You can do it another way: paint the stretcher with paint. Of course, first it needs to be puttied and sanded...
Sleepers can be made from strips of plywood or pine planks 60x10x4 mm. In order not to bother with making each sleeper, the work can be simplified. Take a sheet of plywood, mark it according to the size of the sleepers and cut it with a fine-toothed hacksaw, then smooth out all the irregularities with a file and sandpaper and paint it with oil paint or ink black.
The finished sleepers are laid on the canvas - glued at a distance of 20-25 mm from each other.
To make them you need a stamp. It is made from two metal rectangular bars of the same section.
Process these bars on a milling or planing machine. On one, mill a groove measuring 7x10 mm and two notches with a diameter of 3 and 4 mm, on the other, the same notches, but instead of a groove, a protrusion. You will get a device like a punch and a matrix. The rail head is stamped into the recess (see figure below). For a 1:50 scale model, a 3.5mm notch is used, and for a 1:100 scale model, a 2.5mm notch is used.
Let's talk about the sequence of operations. Take a strip of tin (see picture below), draw a center line, fold it. Place a wire with a diameter of 2.5-3 mm inside for the rail head, crimp it with wire cutters and now put it in the stamp. Clamp the die in a vice and you will get a rail that is even along the entire length with a good head and neck.
Without removing the rail from the stamp, flare its base in different directions with a screwdriver and level it with a mallet.
Attach the finished rail to the sleepers with nails. Do this carefully and as accurately as possible. First of all, mark a line of one thread of rails along the entire length of the canvas. To do this, pull the thread exactly at a distance of 15 mm from the edge of the sleepers, securing it to two nails temporarily driven into the first and last sleepers. Lay and nail the rails exactly under this thread. At the same time, they should neither touch it nor pull it to the side.
There is another way. Plan a rectangular block measuring 1000x32x10 mm. Place it in the center of the ballast, secure it with nails and lay rails on either side of it. You will see how evenly they will fit, and the distance between them will be precise along the entire length - equal to 32 mm between heads.
The rails must be connected to each other at the joints with rods that are inserted into the rail heads. The rail joints should be in the middle of the sleepers.
When you have completed one section of the track, test the locomotive on it and begin building the next section.
Fasten the sections together with metal hooks or loops attached to the stretcher.
So, you have built a railway track, laid sleepers and rails. Now you need to install the support masts and tension the contact wire.
Support masts. Plan a support from a block 200 mm long and 21 x 21 mm in cross section. Take plywood (30 x 30 mm) for the base. Drill a hole with a diameter of 10 mm in the center, sand it with sandpaper and fit the lower part of the mast under it.
You can make the pendant on which the contact wire is attached from any wire with a diameter of 2-3 mm. Do not forget to wind the spring, as shown in the figure; to do this, take a nail with a diameter of 2 mm, clamp it in a vice and wrap a spiral 10-12 mm high around it. The pendant is ready. It is attached to the support mast through a bracket and, in addition, for greater strength, it is tightened with a string - ordinary thread or thin wire.
Insulators there may be plastic beads or small buttons.
Contact wire runs along the entire railway track. It is supported by the support masts we just told you about and the support wire. It is fixed above the contact wire and connected to it with guy wires.
To make the model portable, the hanging wires have a break in several places and are connected by connectors - two metal plates: the contact wire is soldered to one, and the support wire to the other. The plates are equipped with a lock - cutouts are made on one, rivets are soldered on the other. Thanks to this, the plates are easily and quickly separated.
You can “green” the finished railway. The material for the “grass” is dry sawdust painted green with gouache. They are sifted through a sieve onto a tablet greased with wood glue, drying oil or oil varnish.
“Trees” are made from rubber sponge, foam rubber or a bundle of copper wire. The harness is folded in half and twisted to the distance of the “trunk”, and for the “branches” the wire is separated. To make the “tree” “green”, it is dipped in liquid glue, allowed to drain and the “crown” is sprinkled with finely chopped colored tissue paper.