Children's sandbox that can be closed. Children's sandbox in the garden: we are building a cool place for children to relax. Quality of sand in the play container
At first glance, a home children's sandbox is a simple and unpretentious structure. However, in order for the kids to have fun playing, and for parents not to worry about their safety, it is worth taking the arrangement of the playground with full responsibility. Before you make your own sandbox with a lid or a regular open one, you need to carefully study all the construction recommendations.
How to build a sandbox with a lid in one day
When landscaping a children's corner at the dacha, many questions arise - what type of sandbox is better, where to place it, what dimensions should the sides have. All sandboxes are divided into two types - open and closed. The latter, in turn, are divided into sandboxes with a canopy, with a lid, and with temporary protection, such as a tarpaulin.
The sand under the lid always remains clean
The advantage of sandboxes with a tight lid is that they are not only protected from the ingress of leaves from trees and debris, but also from the invasion of cats. Thanks to the lid, children will always play in clean sand. This structure can be closed for the winter; it will easily survive bad weather and remain unharmed.
Better place for children to play on the site
When choosing a place for children's games, you need to consider the following points:
- the corner should be shady, because children can play in the sand for several hours, and playing in the sun is unacceptable. At the same time, you should not place the sandbox in deep shade, without glimpses of sunlight, in such a place the sand will dry for a long time after rain;
- if children will play not only in the hot season, but also in spring or autumn, it is worth choosing a place protected from the wind;
- the playground should be clearly visible so that parents can see at any time what is happening there and what the kids are doing;
- The best place is slightly elevated or level. Placing in lowlands is undesirable, because water will accumulate there and the sand will always be damp;
- For safety reasons, it is unacceptable to place poisonous plants such as wolfberry, datura, and castor bean near reservoirs, open wells, or planting near children's buildings.

The place for children's games should be clearly visible
Selection and preparation of materials
Traditionally, children's sandboxes are made of wood. In this case, iron is not a very good option, because in the summer it gets hot in the sun, and in the spring or autumn it is very cold to sit on it. However, you can make a combined sandbox with a metal lid and wooden benches with your own hands, combining comfort with reliability.

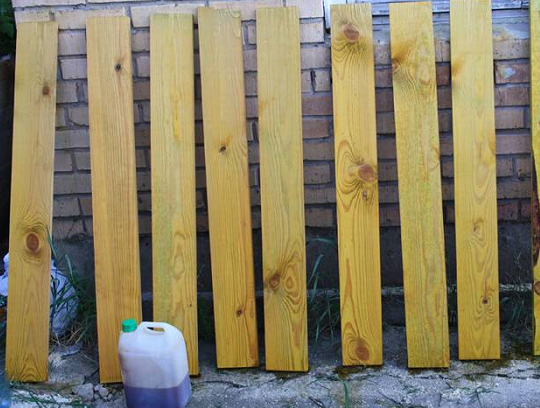
Wood is the best material
For the sides, use smooth logs without bark, boards with a thickness of at least 2 cm and bars. The cover can be made from thinner boards, OSB sheet or roofing sheet. All wooden parts are carefully planed and checked for protruding chips. If the lid is iron, the sharp edges are protected with wooden slats or folded inward.
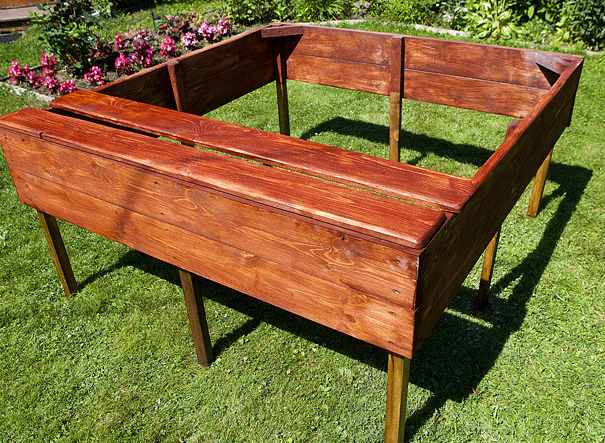
The sides are made no more than 25-30 cm high so that children can climb over them freely. High walls can become an insurmountable barrier for children. The sandbox can be any size, depending on how many children will play in it. On average, a structure of 1.8 by 1.8 meters is sufficient for 3-5 preschool children.

A sandbox can be made from scrap materials
To make a children's sandbox with a lid measuring 1.8 by 1.8 m you will need:
- four boards 180 cm long, 30 cm wide and at least 3 cm thick for the sides;
- four bars 5 by 5 cm and 30 cm long each;
- two sheets of OSB 180 by 90 cm for the cover;
- two pieces of board 180 by 30 cm and two bars 180 cm each for fixing the lid flaps;
- four door hinges;
- wood screws 3.5x45 mm;
- geotextiles, crushed stone for drainage;
- hacksaw, Phillips screwdriver, building level, tape measure, shovel.
Step-by-step installation instructions
To make a children's sandbox with a lid and a bench with your own hands, it is advisable to first study photos of finished models and draw up your own drawing of the future creation. The diagram must indicate the dimensions of all parts. This approach will greatly simplify subsequent work.

Drawing of a sandbox with a lid
The entire installation process is divided into the following stages:
- drawing up a drawing;
- preparation of material and tools;
- clearing the site and arranging drainage;
- installation of the base;
- installation of the cover.

Installation and installation steps:
- On the leveled ground, mark a square 1.8 by 1.8 m and remove a layer of soil of 5-10 cm. Make a deeper hole in the center - approximately 45 by 45 cm.
- The central recess is filled with crushed stone, after which the entire square area is covered with geotextiles in several layers. In this case, crushed stone plays the role of drainage to drain excess water after rains, and geotextiles protect clean sand from mixing with the ground.
- A sandbox box is constructed from boards, placing a block in the corners to give rigidity to the structure. The boards and bars are connected using self-tapping screws. To make the structure strong, at least four screws are screwed in on each side. During work, be sure to check that the angles are 90 degrees.
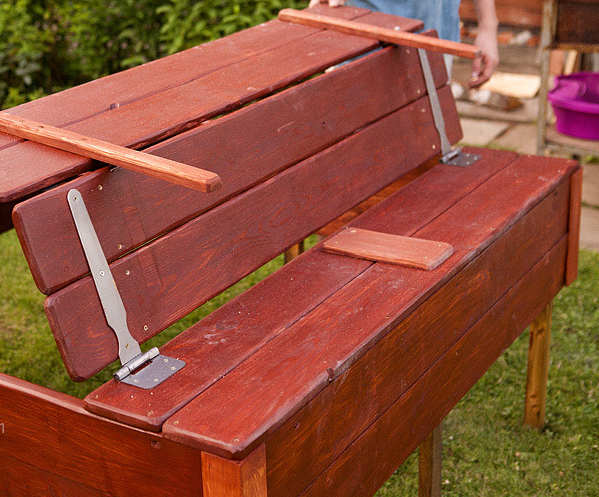
- Start making the lid. To begin with, racks are attached to each of the doors, on which the lid will rest when open. Stepping back from the long edge of the OSB by 5 cm, screw a block parallel to it along its entire length. A board 180 by 30 cm is attached to the block, perpendicular to the lid. Proceed in the same way with the second leaf.
- Attach two door hinges to opposite walls of the frame. Lay the sashes on the frame so that the support posts are in the middle and screw them to the hinges.
- Fill the resulting container with sand. It is preferable to take river sand, it is much cleaner than quarry sand, which often contains admixtures of clay and pebbles. For children's games, a layer of 15-20 cm will be enough.
- The closing sandbox is ready! During games, the folded doors serve as a seat, and when closed, they reliably protect the sand from debris and moisture.
Interesting ideas for creative parents
A square or rectangular box with sand is the most common option for a place for children to play. But you can show your imagination and do something interesting and non-standard. A sandbox in the shape of a pirate ship, train or car will undoubtedly cause great delight among kids. All you need is skillful hands, a little material and time.

Idea for dads “with hands”
How to make a fun sandbox boat
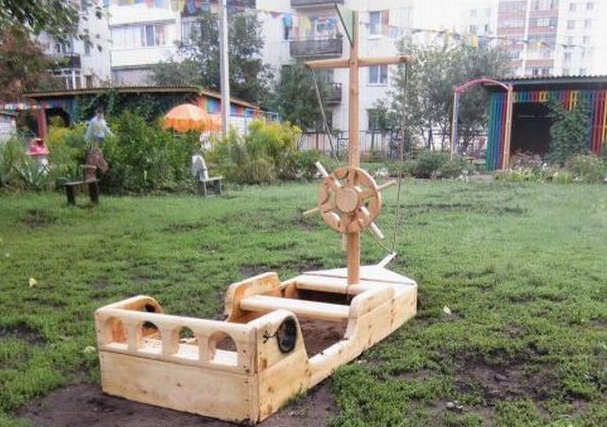
A do-it-yourself sandbox-ship will not only decorate a children's playground, but also a favorite place for young sailors to play. It's not difficult to make. The simplest option is a rectangular base with two posts 1.7 m high in the center, on which an awning sail is stretched.

It is very easy to make such a boat
To build a sandbox ship with an awning, you will need:
- two boards 170 cm long, 30 cm wide and 3 cm thick for the sides of the box;
- four boards 70-80 cm long, 30 cm wide and 3 cm thick for the ends and seats on them;
- two bars 5 by 5 cm and 200 cm long, as well as one 70-80 cm long (across the width of the box) for the mast posts;
- 3 meters of dense awning fabric;
- twine for attaching the sail;
- four threaded hooks, wood screws;
- fastening metal corners.
Sequence of work:
- A rectangular box is assembled from boards and mounting angles.
- At the ends of the structure they are screwed onto the seat.
- The future boat is installed in the prepared place.
- For the mast, all three bars are connected with self-tapping screws in the shape of the letter P and dug into the center of the box, deepening it 30 cm into the ground. For greater strength, you can additionally screw the bars to the boards of the box.
- The awning fabric is folded in half and thrown over the horizontal crossbar of the mast.
- A hook is screwed into the corners of the box. Tie the awning to the hooks using pieces of twine.
The second option is designed for experienced craftsmen, because only true craftsmen can make a sandbox in the shape of a real ship with their own hands. The basis of the structure is made up of boards and beams. However, you can build something similar using sheets of thick plywood or OSB, from which the outline of the ship is cut out and attached to a standard box.

A real ship

Decoration of the site and joy for children
Sandbox car for little racers
Making a sandbox in the shape of a car with your own hands is not at all difficult. The main thing is that the structure has wheels and a steering wheel, and other details such as headlights and bumpers can simply be painted on. The machine is based on a traditional rectangular box. If there are unnecessary tires on the farm, this greatly simplifies the work. They are simply dug in a third on the sides of the box, imitating wheels. You can also take a real steering wheel or cut it from a piece of plywood.

If there are no old tires, you can use cuts of thick logs, pieces of OSB, cut and painted to fit the wheels. As with the boat, the structure can be completely cut out of plywood. For such a machine you will need:
- standard OSB sheet 1.22 by 2.44 m 1.0 cm thick or several sheets of plywood;
- metal mounting angles;
- wood screws;
- door hinges, if you plan to make an opening hood;
- jigsaw, sandpaper, tape measure, screwdriver.
Parts that need to be cut for assembly:
- body side panels – 2 parts;
- body ends – 2 parts;
- cab side panels – 2 parts;
- hood – 1 piece;
- bumper - 1 piece;
- roof - 1 piece;
- dashboard for the cabin – 1 piece;
- seat – 1 piece.

Stages of work:
- A drawing of the machine parts is marked on the sheet, and then cut out with a jigsaw. All edges are carefully processed with coarse sandpaper so that children do not get injured by protruding chips.
- All parts are connected using fastening angles.
- The seat in the booth is additionally reinforced with a piece of thick timber so that it does not become loose.
- The hood lid is screwed with self-tapping screws or attached to two door hinges so that it can be opened.
- A steering wheel is installed in the cabin.
- The finished car is painted, adding small details along the way.

A beautiful and solid sandbox will undoubtedly become the center of a children's corner in the country. Its installation does not require any special construction skills and does not take much time.
Reading time ≈ 3 minutes
Despite the fact that one generation gives way to another, all children at all times love to play in the sand. To provide children with such joy, you need to think about how to make a sandbox for them. It is very important for children to have a playground not only in the yard, but also in the country, so a do-it-yourself sandbox is the only right choice to provide children with the opportunity to engage in active games rather than sit near the TV.
Sandbox materials and sizes
If you look in the children's department of the hypermarket, they also sell sandboxes: plastic, wooden. But as soon as you look at the price, the thought immediately arises: maybe you can make a children’s sandbox with your own hands, so as not to pay such a large amount? But when returning to your summer cottage, difficulties may arise with the choice of material and the size of the boards.

In order to have a general idea of what this will require, it is better to first look at a photo of a sandbox made by yourself, and you can get to work. First of all, you will need to find boards. But keep in mind that this will require well-planed boards so that children cannot get hurt.

To make the sandbox for children beautiful, you should first draw up a drawing. But when drawing up a drawing, it is very important to take into account the size of the area.

In most cases, such a playground is made square. The most optimal size of such a structure is 1.5 or 2 meters in length and width, and 20-30 cm in height.

Before you make a sandbox with your own hands, you should decide on the thickness of the boards - they should be no thinner than 30 mm.
How to make a children's sandbox?

When starting work, it is better to watch a video of creating a sandbox yourself - this will give you an idea of what needs to be done.

Since sand will be poured inside, which will put pressure on the boards, it is best to fasten them to each other with self-tapping screws. But before assembling the structure, the wood must be treated with an antiseptic.

Since rain and snow will fall on the sandbox, rot and various insects should not appear in the boards. This treatment of the boards will allow this playground to be more durable.

In order for the sandbox at the dacha to last as long as possible, it is necessary to make a canopy for it. Such a canopy will protect children from bright sunlight, and, if necessary, from short-term rain.

To protect children from troubles, it is necessary to make a bottom for this playground. If you use agrofibre as the bottom, then various beetles and other insects will not get into the sandbox from the soil. In order for agrofibre to hold better, it must be attached to the boards with a furniture stapler.


It is also worth thinking about providing children with somewhere to sit in this playground. To do this, you will need to attach boards on top or make wooden benches with backs on opposite sides.


In this case, children will have the opportunity not only to play in the sand, but also, if necessary, to relax on a bench.
Summer has come, the children have grown up and the question arose about building or buying a children's sandbox. A market analysis of children's sandboxes was quickly carried out. As a result, the following picture emerged: there are either plastic or wooden children's sandboxes.
For a more or less reasonable price, you can purchase a sandbox that is somewhat reminiscent of a plastic basin. The remaining models, for which there was at least some desire to purchase, were very “surprised” by the cost. Ultimately, there was an opinion that it would not be possible to purchase something normal at an affordable price. And it was decided to make a sandbox with our own hands, and a wooden one at that.
How to make a sandbox. Problems and questions
Since I had never made children’s sandboxes before, a number of questions and additional requirements arose at the project development stage. I will list the main ones.
- What size should a children's sandbox be?
- How tall should a children's sandbox be?
- What thickness of boards is needed to build a sandbox?
- Do you need a sandbox lid?
- If necessary, what should it be?
- How to organize a place where you can “bake Easter cakes” (table, bench, etc.)?
- Where to install the sandbox?
- How to sift sand? And is it necessary to sift it at all?
- How many boards are needed? And which ones?
Having scoured the Internet, I didn’t find any answers, mostly vague recommendations on the topic of how to make a sandbox with your own hands. Naturally, this did not satisfy me and I had to invent something. Unfortunately, I never made any drawings, but I will try to briefly describe my train of thought and the answers to the questions posed above.
Children's sandbox dimensions

Having slightly compared the size of the child, the prospects for his growth and the appearance of company (including a brother or sister) in the future, I came to the conclusion that a sufficient size and shape of a children's sandbox is a square of approximately 1 m to 1.5 m. This size, on the one hand, will allow 2-3 children to be directly in the sandbox at the same time, on the other hand, it can be installed anywhere without any problems.
Then I began to think about leaving as few scraps of boards as possible during construction. Not far from the dacha there is a base of sawn materials and the standard size of their boards is 0.12 x 6 m. The solution came naturally, the dimensions of the children's sandbox should be 1.2 x 1.2 m. Let me explain, from a board 6 meters long you get 5 boards of 1.2 meters each, i.e. half the sandbox and no scraps.
Sandbox height
And so we decided on the size of the children's sandbox, now the height. What height should a children's sandbox have?
- The height should be sufficient so that so much sand can fit in the sandbox that the child cannot reach the ground.
- The child should easily climb in and out without the help of adults.
Based on these two criteria, it was decided that the height of the sandbox should be no more than two boards, i.e. 24 cm. Such a sandbox is suitable for both a one and a half year old and a three year old child. Moreover, the sand (in depth) in a children's sandbox should be about 10-12 cm, that is, about half the sandbox.
Thickness of boards for children's sandbox
The thickness of the side walls was chosen to be 32 mm. For two reasons. Firstly, boards of the specified thickness will provide sufficient strength and rigidity. Secondly, the likelihood of cracking of the boards when assembling the sandbox is significantly reduced, i.e. more convenient installation.
Sandbox cover

Do you need a sandbox lid? I thought for a long time and decided that it was still needed. It is necessary for two reasons. Firstly, the sand in a closed sandbox will remain dry, which is important for the child’s health. Secondly, the lid on the sandbox will protect against the entry of any foreign objects: leaves, apples falling from a tree, and of course from birds, cats and cats. I think it's clear what I meant about cats.
But making a cover for the sandbox in the form of a lid - I didn’t like this idea. This cover will be lying around all the time, you will have to take it off and put it on, in general, it will be inconvenient. After looking at pictures on the Internet, I found several options for making a sandbox with a lid.
- The lid transforms into a shelf on which you can build Easter cakes.
- The lid transforms into a bench on which you can not only build Easter cakes, but also sit.
I really liked the idea, and it was decided to build a children's sandbox with a lid that transforms into a bench. And you can sit (not only for a child) and the surface for “baking” Easter cakes is good.
I decided to make the lid for the sandbox from a 20 mm board. So it will turn out to be quite strong on one side, and light on the other.
Children's sandboxes for the dacha - photo


The idea of supporting educational, healthy recreation for the youngest members of the family has become so popular that entire playgrounds are often made for one or two children. If you don’t have as much time and money as you need, you can limit yourself to an extremely useful and multifunctional sandbox with a bench and a lid. If there is a desire, the result will appear in any case.
Traditionally, the most interesting projects for children in our country are built the old fashioned way, from wood. Even an intricate version of the sandbox - a transformer with a bench lid. The design with a bench is convenient for parents. Children act at their own discretion - they sit both on the bench and on the lid.
What is needed so that an innocent structure for children's sand play does not turn into a headache for parents or educators:
- A lid is essential for a children's sandbox, especially if the structure itself is located near a house, trees, or with a large number of poultry and animals;
- Use the highest quality sand, with regular sanitation and replacement of the contents of the sandbox;
- The sandbox itself must be equipped with benches, preferably with your own hands.
- A children's sandbox should not be a monument, but it should be reliable; children's pranks should not destroy the bench or tear off the lid.
Advice ! It is not necessary to immediately jump into the construction of a sandbox with a folding lid and a bench; you can often get by with the simplest and very practical construction.
It all depends on the availability of material and imagination. For example, a miniature log house made of round timber, with stumps - benches, will definitely appeal to the children; moreover, it is the most durable and safe design. The lid can be made from plywood.

If a child falls onto the side or corner of the structure, the sloping surface does not pose a health threat. The folding design of the bench will interfere less with playing. Often, the adjacent surface is covered with a thin layer of sand or decorative lawn varieties of grass are sown.

Large “monumental” boxes for a large group of children are also allowed. The advantages of such designs include simplicity, large space for the whole group.
Building a sandbox with a lid and two benches
If you have at least a little carpentry practice, you can rent a jigsaw and a sander, buy pine boards, self-tapping screws, and choose a simple square sandbox design with a hinged lid-bench for your work.
What is the beauty of this design:
- The lightweight flaps of the sandbox lid recline with very little effort, so even 6-7 year olds can open and close them;
- The sandbox flap easily turns into a backrest, which adds comfort;
- The design is easy to repair and improve if necessary.
For your information! The folding version of the lid is convenient to use, but is not as durable as the panel structure of the sandbox lid.
It is almost impossible to wean children from the habit of climbing onto any accessible surface, and the folding version of the lid cannot always support the child’s weight.

There are no particular difficulties in making a monoshield roof, but only adults can remove it from the sandbox and install it back.
Step one - assemble and prime the box
We treat boards cut to length and machine-sanded with a primer, or pentaphthalic varnish or just drying oil. Varnish coating usually requires several layers and thorough drying.
We connect using short bars and wood screws with the installation of a corner spacer at the top and bottom of the boards. This results in a strong and reliable connection. After tightening the fasteners with a screwdriver or screwdriver, be sure to check that the heads of the fasteners fit flush into the wood and cannot scratch your hands.

Step two - we make sashes and benches
The roof consists of two wings, each of which is made of two parts - movable and fixed. We sew the fixed one, made up of two boards, to the box with self-tapping screws. This is the base of the lid and bench.

Next, you need to connect the movable part of the sash - the bench - with the fixed one. To do this, we lay it out next to it on the box and “screw” the pre-purchased canopies. We make sure that there is a small gap of a couple of millimeters between the connected halves, which ensures normal rotation of the lid flap. The result is a folding wooden accordion that easily transforms into a bench.

Children are known to have a penchant for jumping on the lid. Pay special attention to the strength of the lid and bench, strengthening it with additional spacers. This bench can easily support the weight of an adult or three children.
Installing a children's sandbox locally
The question of where a children's sandbox should be located is very important for the health of children. Sometimes children simply refuse to play due to uncomfortable conditions. It is not necessary to open both benches. Half of the lid can serve as an excellent gaming stand.
Several conditions must be taken into account:
- For normal well-being in the summer, the children's sandbox should be blown by a small, tiny breeze, but not a cold draft;
- Ideally, the sand in a children's sandbox should warm up well; from morning until the midday heat, you need to open the lid, this will free it from overnight condensation and warm it up to an acceptable temperature;
- There should be no tall trees or dense thickets near the playground that could serve as a haven for insects; in these cases, the cover will only serve as external protection;
- It is better if the playground and sandbox are removed from the road and closed from prying eyes, and are not in the path of rainwater runoff.
- A bench will allow you to put things or toys away and not lose them.
Important ! The lid on the sandbox must lock, otherwise the wind may open and break the bench.
We place the structure on the ground
If the design of the children's sandbox has a high sun canopy or benches raised above the ground, additional fastening should be provided during installation for stability. This will help prevent the sandbox from tipping over if an adult sits on the bench.
To install such a sandbox, they dig out a small, spade-sized ditch, and after installing the box, it is leveled and filled with earth with a slight tamping of the soil along the perimeter of the sandbox. Please ensure that the bench is secured with force and cannot collapse on its own and injure the child.
There are many different positions on the Internet regarding the need to install an additional bottom for a children's sandbox. The main argument of supporters comes down to the need to prevent the germination of various grasses and weeds, the seeds of which will definitely get inside; sometimes the presence of a bottom is motivated by additional protection from dampness and contamination of the sand itself.
Installing a bottom is considered mandatory if the soil is damp and the height of the sides of the children's sandbox does not provide the sand necessary for reliable waterproofing. One of the most practical options for the bottom of the sandbox is considered to be a pair of ordinary tourist karemats.

The final procedure is to fill the sandbox with sand.
Filling a sandbox box with sand does not come down to dumping the entire mass inside, and that’s the end of the matter. Any sand, river, from a quarry or a secondary product packaged in bags, requires sifting, washing and disinfection. For sifting, they often use an old construction tool - an old metal bed net. At the time of loading, the lid and bench can be covered with a cloth.
Flushing should be performed before the start of each spring and summer season. You can use tap water or rain water by pouring sand onto a spread sheet and filling it with rainwater. After washing, the sand must lie in the open sun for at least 6 hours to dry and completely disinfect it from pathogenic microflora. Don't forget to wash the lid and bench, they also require care.
Summarize
A wooden sandbox with a lid and benches is becoming almost a standard; among the construction of children's playgrounds proposed by enthusiasts, more than half of the cases have sandbox designs with folding benches.
The above diagram of a children's sandbox with a bench and a lid can last for ten years, subject to care, regular washing and disinfection. The cover will protect you from dirt and leaves and even heavy torrential rains. To winterize such a sandbox, it is enough to cover it with a thick film.
Do you dream of returning to childhood at least for a moment? It's not at all difficult to do this. Just create sandbox with lid, and then build castles or make sand cakes with your child.
In this article we will tell you about such an important part of the sandbox as the lid and offer several options for it manufacturing.
In addition, the article contains useful tips on the correct placement of the sandbox on the site, the selection of high-quality sand and the construction sequence.
Types of children's sandboxes
Let's try to consider the main types of children's sandboxes. They may differ in material for manufacture, design, design.
The most common ones not so long ago were wooden sandboxes, but today manufacturers also offer plastic, which delight the eye with a rainbow of bright colors and all kinds of shapes.
But if you still decide to create a sandbox with your own hands, the list of materials can expand significantly, since both improvised means. After all, a sandbox can be made from old tires, used plastic bottles, and pallets.
The simplest design of the structure can be supplemented benches, sun umbrella, cover and other accessories. And you can design the sandbox in accordance with your own imagination and level of skill.
Sandbox in the form boat, turtle, ladybug or stylized truck with sand Kids will definitely like it.
Selecting a location
First of all, you should look for the most suitable sandbox appropriate place according to some requirements:
- A place for children to play is a must must be visible, because you will have to constantly look after the child. Therefore, you should not hide the sandbox in a secluded corner behind overgrown bushes;
- Give up places windswept. There is absolutely no need for grains of sand to get into the baby’s eyes under gusts of wind. It’s easy for a small child to catch a cold in the wind, so you shouldn’t risk his health;
- Find a place on the site where one edge of the sandbox will be in the shade, and the other in the sun. Most likely, it is better to install it near a large tree with a spreading crown. If such a place cannot be found, the problem of creating a shadow can be solved either with the help or by installing a “mushroom” type umbrella.
Materials and tools
 When starting to purchase everything you need, still ask your child’s opinion regarding sizes future building.
What if a small builder plans to create sculptural compositions or a castle with towers, a moat and fortress walls? In this case you will need big sandbox.
To create a standard wooden sandbox you will need the following:
- 4 wooden blocks about 50 cm long;
- dense polyethylene or plywood sheet for the base;
- boards for making frames and benches;
- material for making covers.
Important advice! When choosing wood as a material for a sandbox, take care of the antiseptic with which the boards are impregnated. This can be a primer or alkyd impregnation, which will protect wooden surfaces for a long time from rot, fungus and pests.

Once you have stocked up on everything you need, you can begin making a sandbox.
Preparation and marking of the site
 A standard sandbox for children has the shape of a square with a side 1.7 m. But that doesn't mean you have to follow those standards.
So, using pegs, a tape measure and string, mark the perimeter of the area of the required size and shape. This is done as follows:
- We drive in 2 pegs on distance 1.7 m from each other (we measure the required distance using a tape measure);
- From the first two pegs at an angle of 90° we again set them aside 1.7 m and drive in the third and fourth pegs;
- To make sure that the corners of the future sandbox are planned correctly, we check the length both diagonals(the length of the diagonals of the square must be the same);
- If diagonals are not equal, move one of the sides (both pegs at the same time) until the length of the diagonals coincides, while maintaining right angles.
Only now we stretch the cord, marking the perimeter of the base.
Preparing the base
 It is important to consider some kind of drainage so that the water in the sandbox and next to it didn't stagnate:
- Removing the soil layer to depth 30–40 cm inside the marked area;
- We dig a hole in the center to the depth about 60 cm. To allow water to be absorbed into the soil after rains, we make a slight slope towards the center of the sandbox. To do this, we simply remove a little more soil: a little from the edges of the sandbox and more from the center;
- Then the hole needs to be filled with small gravel or pebbles, a layer at 20 cm.
It turned out simple drainage well, but thanks to it, even after heavy and prolonged rainfall, the water will quickly go away and the sand will not be damp.
If you give up the foundation, then after a while the sand will mix with the ground and there will be insects in it, which is completely useless.
To prepare the base for the sandbox, pour it onto a layer of crushed stone or pebbles. The layer thickness should be approximately 5 cm. We lay plywood or thick plastic film on this “pillow”.
Frame making
 The manufacturing process for a sandbox includes the following steps:
- In the corners of the future sandbox, in places marked with pegs, we dig in the prepared bars to a depth 20 cm;
- The surface of each board for the sides of the sandbox and future benches is of high quality polish, otherwise the baby risks getting more than one splinter;
- Using self-tapping screws, we attach the sides from 2-3 boards. The height of the sides should be approximately 30-35 cm;
- All that remains is to lay it and strengthen it with self-tapping screws 4 horizontal benches along the perimeter of the sides.
Recommendation! The frame and benches should under no circumstances be fastened with nails. Over time, the structure can become loose, so the fastenings must be as reliable as possible. It is better to use self-tapping screws for this purpose - they are easy to use and reliable fasteners.
Cover selection
Without covers The sandbox is indispensable. It will protect the sand from debris, leaves and twigs getting into it, and will also prevent pets and stray animals from getting into the habit of doing their toilet chores in it.
There are several options for making the lid:


Sandbox finishing
 We decorate the finished building to your liking. We paint the sandbox with bright colors and draw funny pictures.
If your artistic abilities are questionable, that's okay. There are all kinds stencils for printing designs, with their help decorating the sides will not be difficult.
It remains to install bright Beach umbrella for protection from the hot sun. If the sandbox has a “mushroom” canopy, it can be decorated by painting it like a fly agaric. In general, do not limit your imagination to any limits. Then your sandbox will look bright, unusual and original.
Selection of sand, its preparation and backfilling
 Left fill sandbox. But even here there are possible subtleties.
It turns out that the purest sand is river sand, but even before filling it will have to be sifted through a special construction sieve.
This procedure will help get rid of pebbles, pieces of shells and dangerous glass shards. You can buy it in stores washed or quartz sand. Sometimes you can find sand with special additives to repel animals.
And be sure to check out when purchasing quality certificate, which must indicate that this sand is suitable for use on playgrounds. This way you will show concern not only for the children’s leisure time, but also for their safety.
Where to buy a ready-made sandbox
 Plastic, wooden and metal sandboxes with and without lids, as well as other equipment and accessories can be purchased via the Internet and in specialized shopping centers.
Prices for products shown vary from 1500 rubles for the smallest and simplest plastic sandboxes and above.
The cost of sand in construction supermarkets and online stores directly depends on its quality. The starting price of river sand is 950 rubles for 1 ton and above.
You can watch how to make a sandbox with fungus with your own hands in this video.