Do-it-yourself wooden house drawings. How to build a wooden house with your own hands - photo report on construction (74 photos). Heating system design

Technologies for creating cozy, spacious and safe residential buildings involve the use different materials, but there are not many environmentally friendly ones among them, so it is not surprising that wood remains in demand in this process.
If you decide to build a house, wooden house will become one of best ideas due to the ease of construction and many advantages of the material.
Do not think that such houses are monotonous and require high costs: It is quite possible to adapt any construction idea to your needs and capabilities, so we are sure that information on how to build a house out of wood with your own hands will not be superfluous for you.

Build a wooden house with your own hands: projects, photos
Types of wooden houses
Construction wooden house DIY can be different and depends on the type of materials used.
Main types of wooden houses:
- houses made of ordinary or rounded logs;
- paving structures (using profiled or glued beams);
- frame and prefabricated panel structures;
- houses made of wood blocks - this technology is just beginning to gain popularity.
Let's discuss the features of the building wooden houses the most common varieties. Many people consider pre-built houses to be the most sustainable. frame structures and fixation in the foundation. They are divided into frame, panel, frame-panel (frame-panel) and half-timbered.

Despite low cost starting materials, such structures have many advantages: they are easy and quick to erect (about a week), have high thermal insulation, allow redevelopment over time, and can withstand any weather conditions.
However, they also have their drawbacks: such houses are not entirely environmentally friendly (insulation is used during the construction process) and interfere with normal moisture and air exchange (a less than comfortable microclimate will be maintained inside the building).
Houses built using rounded logs will cost little more expensive than the first type. They are based on logs subjected to preliminary grinding and milling, which have an ideal smooth surface, so they are quite easy to install.
Moreover, due to this treatment, the joints between the logs do not remain empty, so you don’t have to worry about the quality of the insulation.

Unlike the first type of structure, houses made from such logs are stored inside favorable microclimate. But it is worth considering some of the disadvantages of buildings made of rounded logs: during processing of materials, the strongest part of the tree, the sapwood, is partially lost; the small diameter of each log is the reason for the insufficient thermal insulation of the premises; During drying, such logs may crack.
Houses made of beams (hewn and edged logs) - another good option construction. The beams can be solid or profiled: the latter are created on the basis of Finnish and German technologies. The house is built similarly to the principle of the designer and is easily sheathed with protective and decorative coatings.
The main advantages of such structures are low price, ease of moisture removal, resistance to external influences and easy installation.
Disadvantages - wind permeability (for this reason, such houses are almost always insulated) and high term shrinkage, so we do not advise you to do finishing immediately after construction.
If you watch educational videos about wooden houses, you can build such structures with your own hands. But it is better to entrust the creation of houses to experienced specialists.
During installation individual system heating, you will definitely need to choose and buy the right one, there are several options, evaluate the advantages and disadvantages of each and choose the best one.
Read about how to choose heating batteries for a private home.
Pros of log houses hand assembled- V decorative variety, maintaining a special microclimate inside the rooms, complete environmental friendliness and minimal need for external and internal finishing work.
Disadvantages - necessity high costs both for the material itself and for qualified services, as well as the difficulty of finding specialists who can actually perform such work efficiently.
Houses based on laminated veneer lumber – the most expensive. They are created from logs that have been split into slats and dried. Thanks to this technology, the material is durable and resistant to external factors. The boards are sanded to remove all external defects and glued together under a press with alternating cross-section and longitudinal section.
Other advantages of laminated veneer lumber, besides those listed: ease of use in building installations, no risk of creating cracks over time, evenness and no need for finishing. But, of course, materials of this quality will cost you a lot.

How to prepare for work
Before you start building a wooden house, you need to not only decide on the materials, but also think about how and where it will be built.
Look at the projects of wooden houses with your own hands - and sketch out a preliminary construction plan. Pre-clear and level the area.
During the construction process, you will need a lot of materials intended for the construction of the foundation, walls, roof and other elements of the house. These are the wooden beams themselves, a concrete mixer, tow, a saw, a screwdriver, a hammer, roofing felt, nails with self-tapping screws, antiseptics, corrugated sheeting, plane and drill electric type, as well as wooden dowel and scaffolding.
Main stages of construction
Now let's find out how wooden houses are built.
This process consists of several stages:
- Laying the foundation. This stage will take up about a third of all construction costs. Focusing on the characteristics of the soil, decide on the basis of the foundation: as a rule, in wooden houses a columnar or screw-type foundation is constructed. Columnar foundation consists of reinforced concrete blocks, stone and brick. Screw foundation more suitable for mountain and forest areas and involves screwing piles into the ground and pouring concrete for subsequent laying of the external foundation.

Construction of a wooden house, photo
- The next stage of construction of a wooden house is wall installation. Soak beams, logs or other wood-based materials with a special protective solution - and begin laying in accordance with your project. It is advisable to make the walls high to ensure maximum air circulation. Often, modern sandwich panels are used for walls, and they are also covered with siding for additional strength and protection.
- When we build a wooden house with our own hands, it is important to create a strong and reliable roof structure . To build a roof, lay rafters, moisture protection, thermal insulation coatings and main material: corrugated board, ondulin, tiles, slate, etc.

- Before you start creating openings for doors and windows decide on their size and opening mechanism. Make sure that during installation there are no blown gaps: it is better to entrust this work to specialists.
- Now you can get busy interior finishing of floors, ceilings and walls. First install all the necessary communications in the house: sewerage, electricity, gas, etc. and don't forget about internal insulation, if provided for by your project. In some cases decorative finishing and will not be needed at all.

- An important stage in building a wooden house with your own hands is installation of communications and, in particular, heating systems. This could be the installation of a special boiler, a heated floor system, a heating stove and other measures.

Having gone through all the stages of the instructions on how to build a wooden house with your own hands, and having made sure of the quality of the work performed, you can begin decorative design. But we recommend that you pay attention to some expert comments regarding the work of building a wooden house with your own hands.
 In a wooden house, it is impossible to live without a heat source in winter, and often owners choose for this purpose not only requires skills, but also has its own characteristics - they are described in the article at the link.
You can read about the pros and cons of container houses.
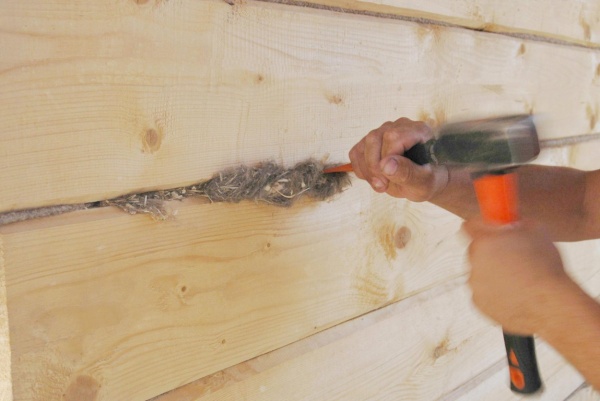
When you decide how to make a wooden house and what materials to use during construction, take all the necessary measurements in advance. After sawing wooden beams install a strapping crown that will connect the elements at the corners and fasten them with dowels. To do this, make 3 holes in the beams and drive the dowel in a checkerboard pattern every 35 cm.
The beams are mounted and tied into the floor with a crown. Place the beams in the cut at 70 cm intervals, alternating with the compactor. For the floor, use boards with dimensions of at least 4 cm; for the final covering, use a tongue-and-groove board with a thickness of approximately 3.5 cm. Provide thermal insulation using linen cord, felt, tow or moss.
If you set out to build a wooden house with your own hands without construction experience, do not forget about drainage. On the outside of the upper edge of the beam, make cuts with a height and width of 1.5 cm.
In the photo you can see one of the options for creating a drainage system on the roofing.

If the house is expected to have several floors, start building the second at a height of at least 2.5 m. Above top floor make an attic or attic.
Use paneled doors and windows of wood or metal-plastic type.
As for the roof, it is important not to make a mistake with the materials. For racks and braces, use a board with parameters 10x4 cm, for rafter system– 15x4 cm (every meter), for lathing – an uncut board with a width of 2.5 cm every 0.4 meters.
Remember! Wood, despite its “breathing” properties, will not ensure normal air circulation in the bathroom, basement, kitchen, etc. small spaces. Ventilation will have to be done here.For this purpose, air ducts are installed on the roof, and if it is necessary to create forced draft, special equipment, operating due to valves. Elements can be placed on them to prevent noise. You can also use fans and equipment that promote air outflow. remember, that high-quality ventilation must be provided in every room of the house.

How to decorate a wooden house
Surely you will find a lot interesting models DIY wooden houses. But you can decorate your home yourself: for this you will need finishing (for example, siding) or paint of a suitable shade.
It's not enough to know how to do it wooden house, it is important to ensure a normal level of humidity in the rooms where painting will be done. Also, the choice of paint will depend on the type of wood and its condition.
Remember! Where on wooden materials a large load is provided, it is necessary to carry out multi-layer painting.Most often, paint is used for decoration. oil type. It will take a long time to dry, but will also retain its brightness for long term. In addition, this paint is non-toxic, so it is perfect for residential premises. To decorate surfaces you can use acrylic, varnish, special means for impregnation. But the surface will have to be cleaned first, as well as the pattern and shade removed if it has already been decorated previously.
All cracks and irregularities are treated: use putty, sand the boards and use wedges. You can also use a plane. At the next stage, the surfaces are primed and after drying they begin to paint.

Now you know that without much effort you can create a stylish and cozy home.
Video
We told you how to make a house out of wood with your own hands, and to reinforce the information, we also suggest watching a video of building a wooden house.
There is nothing better than a wooden house - its atmosphere, microclimate and comfort cannot be compared with any of the modern buildings. And built with your own hands, it becomes priceless! Thanks to wide choice building materials, the task can be easily completed as professional builder, and a novice amateur.
Selection of materials for a wooden house
It is quite difficult to choose among the huge variety of materials best option. Conventionally, they can be divided into three groups:
Logs – this includes materials with a round cross-section:
- debarked log – practically unprocessed chopped tree trunks, including dead pine;
- planed log - removed upper layer wood to give a more versatile shape;
- rounded log - factory processing allows you to give all logs the same shape and size;
- glued log – several layers of glued wood are given a cylindrical shape.
Beams – processed logs with a square, rectangular or D-shaped section:
- four-edged timber - the log will have a square or rectangular shape;
- profiled timber - characterized by the presence of an already cut thermal lock;
- laminated veneer lumber - multi-layer wood, often made from different breeds, with a square section.
The advantages of debarked logs are low price and resistance to external factors. But because different sizes and the forms of the log house are quite difficult to assemble.

Planed logs are much easier to use, but for a novice builder, a ready-made house kit made from rounded logs is more suitable.

The only drawback of this solution is that the price is much higher than ordinary planed logs. But, given the ease of assembly, you can save on paying hired workers and reduce construction time to a minimum.

The most expensive and progressive material is laminated veneer lumber. Thanks to manufacturing technology, you can choose the dimensions required for the wall thickness. Thus, for regions with cold and snowy winters, uninsulated wooden walls should be at least 50 cm, while the cross-section of a regular log often does not exceed 22 cm.

Kits with already cut door and window openings, which allows you to build a house in just a day. Price wood panels higher than sandwich panels, but due to the high strength of the material, there is no need to construct a frame.
Foundation for a wooden house
Considering light weight building (unless, of course, it is built from half-meter logs), the solution to the question of how to make the foundation depends only on the preferences of the owner. For example, for stable sandy and sandy loam soils, a shallow strip foundation is sufficient.

And on marshy soil you can organize a budget foundation from car tires or screw the piles.
The process of laying the foundation is similar for all types:
- marking the area with pegs and stretched twine with the obligatory precise alignment of the corners;
- removal of the fertile soil layer - it can be taken to the future flower garden or vegetable garden;
- digging a trench for the foundation or holes for piles - the earth is thrown inside the perimeter if it is planned to fill the base;
- assembly of formwork or installation of piles.
The formwork needs to be poured with concrete in one go, so it is better to order ready-made. You will have to take care of convenient access, and pouring should be carried out immediately upon the arrival of the concrete truck. It is also important to allocate a place in advance for draining residues and washing the concrete pump. You can prepare formwork in the form of road or paving slabs - they will always be useful on the farm.
The outside piles are covered with sand, cut to one level, and the shaft is filled with concrete. They are covered with caps or channels, where the lower frame of the house will then be attached.

Features of wall construction
Particular attention should be paid to the binding crown. It is he who is exposed maximum loads, is subject to rotting and fails. Therefore, it is better to place a wedding board made of larch 5 cm thick under it.

Replacing this board is much easier than replacing the first crown.
Two layers of waterproofing are placed on the foundation. Both the wedding board and the binding crown in the corners are connected “in half a tree.”


Jute is laid on each row of logs or beams to seal the joints and then the top crown is laid.
It is important to remember - using wood natural humidity, every two crowns must be connected by dowels. These are ordinary bars, often round section, and serve not to fasten the beams together, but to keep the walls from deforming during shrinkage.

Gable roof installation
For a wooden house gable roof – best option. Depending on the length of the rafters, the rafters can be made hanging, strengthening the entire structure with ties, or layered, which are supported by racks.

For wooden walls Mauerlat is optional. Attach the rafters to top harness can be a rigid or sliding connection. Last option necessary for houses with shrinkage above 8%, otherwise, due to the pushing force, the walls of the house may not only deform, but also tear off the top trim.
For novice builders without experience in roof construction, it is better to consult with professionals. Incorrect calculation of loads, including the amount of precipitation, can lead to depressurization of the structure.
The video provides instructions on how to build a house from profiled D-shaped timber:
A house is a fortress for every family man, and a wooden one is also an environmentally friendly, “breathing” home in which all family members will be cozy and comfortable. For many centuries people have chosen wood as a building material for settlement, and all because such structures are durable, heat-conducting, cozy and attractive. The house will be warm and cozy in winter, cool and refreshing in summer, so that the comfort of the owners of a wooden estate is guaranteed at any time of the year.
Features of building a wooden house
Main stages:
- Creating a new project or studying an existing one. Thanks to such documentation, you can preview the final result, select materials wisely, distribute construction nuances, and obtain important permits. At this stage, all organizational, financial, and design issues are considered and resolved.
- Foundation. It takes more than 30% of material costs, a huge amount of time and effort. A properly created foundation guarantees a long service life of the building. When choosing a base for a wooden house, you need to focus on soil properties. Most often, building a wooden house with your own hands involves installing columnar or screw foundations.

- House type . The most common frame wooden houses are budget, they can be built for $190 per square meter(excluding communications). From rounded logs - $270, and from laminated timber - $460 or more. Attention: the ideal material for constructing a wooden house with your own hands is considered to be logs 7 m long and 25 cm thick. For small house Wood and 17 cm in diameter are suitable.
- Walls .
After the foundation has settled and all preparatory work they begin to build walls. They can be made with round log, glued or planed beams. This is processed wood without bark, knots and various irregularities, which is good appearance and high production indicators. Wood is good for health, has low thermal conductivity and allows you to decorate every area finished house. Before laying the walls, logs must be impregnated with appropriate solutions to prevent damage.

- Roof of a wooden house.
To build it, you need to lay the rafters, heat and waterproofing, the main roofing material. It's important to choose correct form roof, so that it protects from weather precipitation and disasters, and also fits harmoniously into the overall picture of the building. Modern market presents several types roofing coverings, this is ondulin, corrugated sheets, metal tiles, slate. As people say, “to the taste and color” of each owner.

- Windows and doors . Before making openings for these parts of a wooden house, you need to think about the mechanism used in operation (hinged, sliding), architectural design (classic, arched openings), and much more, which will allow you to use the windows and doors of your future home in the most comfortable and high-quality manner.
- Floor and ceiling .
We choose the type of flooring; it must be strong, durable, and attractive. You can lay linoleum, tiles, laminate, carpet or wooden covering. The ceiling for a wooden house must be made aesthetically pleasing and all electrical communications connections must be hidden in it.

Necessarily! Waterproof the floor even before the screed and finishing stage. - Is finishing necessary?? House made of timber or rounded logs with facing decorative works doesn't need it, but the building is made of simple log requires a long time for shrinkage and finishing using modern materials.

- Sewage and water supply system. If there is a water supply pipe near the house, then you only need to connect to it, and when not, then you will need autonomous water supply, which costs considerable material costs. It is imperative to install a sewer system and make a drainage pipe so that the foundation and flooring the entire site was not damaged by groundwater.
- Heating is carried out after the construction of the house is completed. You can lay a heated floor, connect an electric or gas boiler, or make a heating stove. It would also be correct to insulate the house both inside and outside, using thermal insulation materials.
And the last step is electricity. Wiring is installed according to the architectural plan of the building, sockets are placed and lighting. Of course, the construction of the house does not end there, but the main stages have been completed.
Building a wooden house with your own hands is not a difficult task, but a very responsible one. So that the final result serves the owner long years, you need to adhere to the “unwritten” laws of housing construction.
What does a builder need to know in order to make the work easier for himself and his assistants?
Firstly, you need to make all the calculations and cuts in advance future design. After that, a binding crown is installed, which is connected in the corners into half a tree and fastened with dowels.
Attention: to mount the dowel, 3 holes are made in the beams, where it is driven in a checkerboard pattern with an interval of 35 cm. Experts advise using oak or birch for such purposes.
Secondly, the beam is mounted and tied into the floor with a crown. The beams are laid end to end in increments of 0.7 m, followed by a compactor and then beams again. The floorboard should be about 40 mm, the wider the pitch, the larger the board will be. The final covering for the floor will be a tongue and groove board, 35 mm thick. Linen tow, felt, moss, and tow are perfect for thermal insulation.
Thirdly, you need to lay a drainage system. To do this, cuts of 15 by 15 mm are made on the outer side of the upper edge of the beam.
Fourthly, if you plan to build multi-storey building, then the second floor should be built at a height of 2.5-3 m, then an attic. Doors are most often paneled; windows can be made of wood or metal-plastic. Both options are appropriate.
Fifthly, for the roof you need to select a board of the following sizes:
- 10 by 4 cm - for braces and racks;
- 15 by 4 cm every 1 m - for the rafter system;
- uncut, 25 mm at 40 cm intervals for sheathing.
And for the main roof covering you can use corrugated sheeting, corrugated sheets, etc.

Types of ventilation systems
It is widely known that wood can “breathe”, and therefore living rooms enough air will flow in for a comfortable stay in the house. But this is not enough for narrowly focused rooms, kitchens, bathrooms, and basements. And therefore it is required additional ventilation Houses.
Natural air exchange is provided; air ducts are mounted on the roof, which direct the air flow in the right direction. To force the circulation of air draft, you can install special equipment, and install noise-insulating elements using simplified valves for the air supply and exhaust. Thus, the problem of excessive noise levels will be solved.
Ventilation mixed type regulated by a device for powerful air outflow, which is regulated by a fan.
Attention : ventilation system needed both in residential and non-residential premises, this applies to basement and attic structures.

The supply pipe is mounted closer to the floor, and the hood is mounted under the ceiling. The entrance openings are equipped with a mesh to prevent dust, dirt, rodents, etc. from entering the house.
To keep your house warm in winter, you need to close these openings. It is important to minimize the risk of air condensation accumulation, which directly affects the life of the wood.
Decoration of the building
Painting a wooden house transforms the building, making it more luxurious and modern. Before this stage, you need to prepare well, take into account the humidity of the room where the floor or walls will be painted, determine the type of wood and the condition of the boards. Another factor that should not be forgotten is the degree of load on the floor covering. In the hallway the mechanical impact is greater, which means you need to apply paint more carefully and in several layers; in the bedroom you can get by with paints and varnishes or choose enamel with low level wear resistance (cheaper).

For boards use oil paint although it takes a long time to dry, it serves for a long time, looks beautiful and does not emit harmful fumes. In addition to paint compositions, you can use varnish and acrylic to impregnate wood. They are suitable for perfectly cleaned surfaces that already have a textured pattern and color.
If there are wide cracks in the floor, they need to be repaired with putty using wedges. “Comb” protruding surfaces with a plane. Next, prime, dry well and only after these procedures proceed to applying paint.
As it turned out, building a house with your own hands is very simple - a little imagination, strength, patience, financial investments and professional video materials that will help you step-by-step explain all the nuances of constructing a building efficiently, quickly and affordably.
Our clients can choose house designs from two types of materials:
rounded logs. In its production, solid trunks are used. During the rounding process, perfectly smooth logs of the same diameter are obtained. Houses assembled from them do not require exterior finishing, which reduces construction costs;

timber. Many of our clients prefer this material because it gives more ample opportunities in facade design and interior decoration. Our projects use regular, profiled and laminated timber. The first option is the cheapest: it comes without additional processing. Profiled and laminated timber are chamber dried, which reduces shrinkage of the box.
Our clients are often interested in which material is better: more economical, warmer, more durable. We are confident that any wooden house, during the installation of which technology was strictly followed, will serve its entire life. settlement period. The WoodHouse company guarantees high quality execution regardless of the type of material.
Standard and individual projects
WoodHouse engineers have created a number of standard projects, which take into account the ideas of most consumers about comfortable private housing. You can order an inexpensive wooden house from us with an area of 38 m2. Small one-story buildings are most often used for seasonal residence. We also offer projects two-story houses large area For year-round use. They are equipped with all communications and engineering networks. The price of a wooden house is determined not only by its area and number of storeys. It is also influenced by the design of the foundation and the complexity of the architecture. Among the standard proposals you will find projects with an attic, garage or terrace. We are also ready to develop individual solution, taking into account all the wishes of the future owner. You can take as a basis any of the projects available in the catalog or order calculations from scratch. This is how the best wooden houses of our company were created.
The price of a turnkey wooden house includes wall and roofing kits, as well as all technical documentation. Our employees are constantly in touch with the client and are ready to promptly resolve any issue that may arise. Choose the home of your dreams in the WoodHouse catalog and order it from the company’s website or by phone.
Building a wooden house with your own hands is not such a difficult task. The main thing is to know and take into account all the subtleties when performing each type of work.
Construction of wooden houses from A to Z includes:
- choice of material;
- drafting;
- foundation construction;
- erection of walls;
- roof installation;
- hanging windows and doors.
So, let's try to figure out how to build a wooden house with your own hands.
Tree selection
Modern wooden houses are built from logs and beams. The best log– rounded. It is sorted and processed industrially. Therefore the material contains minimal amount traces of knots, sufficiently dried. Chopped logs can also be used to build walls.
What are the benefits of log walls? They have maximum thickness, thanks to which, during the cold season, the living quarters remain warm for a long time. A log house has a long service life; looks original and beautiful.
Glued laminated timber has similar characteristics. In addition to the large thickness (for capital construction use 210 marking), it has the following important qualities:
- Gives minimal shrinkage (only 5 cm);
- Maximum resistance to aggressive influences external environment;
- Practically does not rot, thanks to a special industrial processing;
- Has no natural defects ( resin pockets, insects, etc.), which affect the quality of the walls.
In addition to profiled timber, the construction of wooden houses is carried out from sawn and planed timber. Their cost is several orders of magnitude lower. The beams have a lower degree of drying and, accordingly, shrink more.
Regarding the choice of wood type, it is best to purchase conifers, which grew in the northern part of the country. They are more resinous and therefore more moisture resistant. It is rational to build a wooden house with your own hands from spruce, cedar, and pine.

Individual project
How to make a wooden house with your own hands without a project? It's practically impossible. Private builder will definitely make an omission in something.
High-quality individual projects take into account the features of each stage of construction. The type of foundation, method of installation and fastening of the crowns, types of roofing are selected taking into account the properties of the log or timber.
With the approval of the customer, the layout of residential premises and their square footage are developed. From total area, or rather the length external walls depends on how the crowns should be attached. Projects take into account many other nuances. Do-it-yourself wooden houses, projects (photo below) for which are developed individually, turn out to be reliable and beautiful, have no flaws and are durable.

Choosing a foundation
A do-it-yourself wooden house requires a reliable, durable foundation. Because the capital buildings made of wood don't have that heavy weight, like stone ones, the choice of base is quite wide.
Foundations are installed in private construction:
- columnar;
- tape;
- slab
Experts believe that the best of them is lightweight tape. It is called lightweight because no crushed stone is added when mixing the working solution. Therefore, the density of hardened concrete is lower.
The columnar foundation, although very popular, has significant shortcomings. One of the most significant is the cost of work. In addition to using special equipment to install piles or pillars, a preliminary geodetic survey must often be carried out to determine the properties of the soil. Slab foundations good for residential wooden buildings having a large total area.
Although a spacious wooden house with your own hands (the video is presented at the end of the article) looks luxurious, it requires a lot of physical effort and money. According to the project, the depth of the strip foundation depends on the degree of soil freezing. The trench is dug to a depth where the soil does not freeze. The width of the trench should be 25 - 30 cm.

Under construction strip foundation under a wooden house with your own hands as follows:
- 1. A trench of appropriate depth and width is dug.
- 2. Sand is poured into a 10 cm layer, watered and compacted well.
- 3. A 10-centimeter layer of crushed stone is poured on top, which is also watered and compacted tightly.
- 4. A layer of roofing material is laid on top of the pillow.
- 5. Formwork is installed. If it is not removable, it is reinforced with metal wire.
- 6. Reinforcement is installed above the waterproofing layer. Antiseptic-treated metal rods are pulled lengthwise and crosswise and secured with rigid wire.
- 7. Next, concrete is poured. Grades 200, 250 and 300 are suitable. The consistency of the concrete should resemble liquid sour cream.
The time for sufficient setting of the foundation is 10 – 12 days. Concrete under favorable conditions weather conditions gains design strength up to 70-80% in 7-14 days. This is enough to already load the foundation, and complete 100% solidification of the foundation will occur only after 28 days from the moment the foundation is poured.
You can continue building a wooden house with your own hands (video at the end of the article).
Construction of walls
Independent construction of wooden houses simplified if profiled timber is used.
It has grooves that connect easily. Before starting the construction of walls, it is necessary to check the horizontalness of the foundation. It is necessary that the hydraulic level shows zero, since when installing the first crown, the construction geometry must be observed.
The foundation plane must be perfectly flat and straight. In addition, when laying, the corners of the first crown are aligned vertically. They should be exactly 90 degrees. If the geometry of construction is broken from the very beginning, the walls will not be smooth, and there will be skew at the level of window and door openings.

Installation of a wooden house with your own hands at the stage of wall construction is carried out as follows:
- 1. A layer of roofing felt is applied to the foundation without first applying mastic.
- 2. If it is necessary to level the surface of the foundation, when its skew is more than one centimeter, wooden wedges are placed at a distance of 30 cm from one another.
- 3. A “zero” board is installed on top along the entire perimeter of the foundation.
- 4. The space between it and the foundation is filled with polyurethane foam.
- 5. The first crown can be laid at a distance of 25 cm from the edge of the foundation. It is also allowed to install crowns behind the edge of the foundation at a distance of no more than 5 cm.
- 6. At the corners, the first crown is attached to anchors.
- 7. The bowls of the first and subsequent crowns are tightened for compaction by assembling them onto a pin.
- 8. The bowls of the first crown are tightened using a reinforced washer measuring 60x80 mm.
- 9. Further reinforcement of the screed using a reinforced washer is carried out every 5 - 6 crowns.
- 10. Screeding around the perimeter of the crowns is done using metal or wooden dowels.
- 11. The crowns are connected to each other thanks to grooves. On bottom beam a new one is applied. It is inserted into the grooves by hitting the overhead board with a sledgehammer from above.
- In addition to anchor fastening, end fastening is also used - the ends of the crowns are joined at the ends. In this case, if one of them cracks, it can be easily removed and replaced whole.
Roof installation
The best option for a wooden house is a light gable or mansard roof. Roofs of complex configuration are appropriate for large buildings, as they are heavier. The proportionality of the weight of the roof with the ability to support it with the walls of the house is calculated when drawing up individual project. It is difficult for a non-professional to calculate this value correctly.
Do-it-yourself installation of a wooden house at the roof installation stage consists of the following steps:
- installation of foundation beams;
- rafter fastening;
- laying of sheathing;
- laying waterproofing;
- roof fastening.
The base beams (mauerpats) are attached with one edge to the upper crown in a diagonal position using anchors. The horizontality of the opposite ends is checked with a level. The rafters represent wooden triangles. They are knocked together and then attached, starting from the ridge, to the beams. A sheathing is attached to the top, that is, thin transverse and longitudinal boards. The size of the gaps depends on the choice of roofing material.
If you plan to cover the roof sheet roofing(corrugated sheeting, metal tiles, slate, odulin), the distance between the sheathing is half a meter, roll materials(roofing felt) - the sheathing has a maximum gap of one centimeter.
Waterproofing is laid on top of the sheathing. At the joints of the roof, the roof panel is laid overlapping with a gap of 15 - 20 cm. Roofing material is attached on top of the waterproofing. How to install a roof on a wooden house with your own hands (video at the end of the article) can be seen in this diagram:

After installing the roof, it is advisable to insulate it, even if the attic will not be a living space. This allows you to halve energy costs when heating your home. Most best insulation - mineral wool. It is made from natural raw materials, non-toxic and retains heat perfectly for a long time. Mineral wool is cut into medium-sized panels, which are attached between the beams and rafters.
If the attic is an attic and family members will live in it, it is necessary to additionally insulate the floors and walls. Mineral wool is also used for this. In the first case, it is necessary to install logs; in the second case, the insulation is attached to the sheathing. At the same time, one should not forget about hydro- and vapor barrier. You can close unsightly gaps with chipboards.
Spacer for openings
Depending on the type of timber or log, a do-it-yourself wooden house shrinks by 6–9% on average; house made of laminated veneer lumber – up to 3%.
This must be taken into account when planning to install windows and doors. To avoid distortion and cracking of frames and door frames, it is worth installing frames on the window and door openings upon completion of construction.
They are T-shaped plates. The brackets are installed as follows::
- 1. Grooves are cut out at the ends of the adjacent crowns.
- 2. Wooden blocks are hammered into them.
- 3. Stuff the pigtails on top along the entire perimeter of the openings.
- 4. The gaps between the pigtails and the ends of the crowns are filled with tow.

In the future, the walls must be given time to “fall” into place. During this time, the openings maintain a rectangular or quadrangular shape and do not warp, since the frames hold them securely. When the main shrinkage is over, you can attach window frames and door frames.
When viewed in cross-section, the structure looks like this:
- 1 - crowns;
- 2 - tow (50 mm);
- 3 - platband;
- 4 - pigtail (40 mm);
- 5 - slope slats;
- 6 - window frame
Experienced carpenters know how to install frames on window and door openings of complex configurations. And it’s better to entrust even simple work to them. With minimal experience, cracking of the crown often occurs at the end, breaking of the frames during shrinkage of the crowns.
So, you now know how to make a wooden house with your own hands. Happy construction to you.