Do-it-yourself wooden firewood. Methods for making a woodshed for a summer residence with your own hands. Planning a woodshed before construction
Read also
The presence of a woodshed in the courtyard of a residential building or cottage means a lot to the owners. This is a room for long-term storage of firewood. Firewood is used to heat a house, a bathhouse, or to build a fire to cook kebabs or barbecues. In order to be satisfied with these benefits constantly, they stock up on a sufficient amount of wood materials and store them in a dry place. Firewood should be stored in a covered, ventilated area to keep it dry. This will ensure order and a neat appearance on the site. It is not necessary to spend money on hiring workers and new materials to build a woodshed. It is much easier and cheaper to build a woodshed yourself than to build a house or barn.
During construction, the following materials are used: wood (boards, timber, joists), brick, timber or metal beams, roofing from materials used for the roofing of a residential building, etc. To begin with, they plan the future location of the woodshed, prepare a drawing of the premises and decide what materials to build from. The choice of design and materials is made taking into account the location of the future structure, the size of the residential building, the arrangement and appearance of the site, the material level of the owner of the future structure
Some limit themselves to building a simple functional room from available residual materials, without caring about the appearance. It’s another thing to build a neat building with your own hands, which will fit into the picture with both an expensive house and an old, but well-groomed and decorated house; with a green garden and flower beds in the yard and a bathhouse, where family, relatives, friends and colleagues like to relax. If you have worked hard on the design of the house and the site, then it is worth building a woodshed with a corresponding appearance so that it becomes an additional decoration on the site.
Where to build?
If the house has a stove or fireplace, it is advisable to build a woodshed close to the house, but so that it is not too noticeable. It is advisable to take into account the entrance for vehicles that will deliver and unload firewood.
If firewood is not required for heating the house, then the woodshed is built closer to the bathhouse (if available) or barbecue area.
Prepare drawing and tools
The drawing is needed for a detailed representation of the construction and dimensions, preparation of the required tools. For construction you will need: a hammer, a drill, pliers, twine, a stepladder, a plumb line, a hacksaw. Next, materials for construction are purchased. If the opportunity arises, they work with materials used in the construction of previous structures.
How to make a base
First they plan what to build the foundation from. Foundation columns are made of brick, concrete, stone. The base on the logs is installed on posts and leveled. The foundation is made at a depth of 30-60 centimeters. The height of the logs is 10-15 cm from the ground level, which will prevent dampness in the structure. Boards are installed on top of the logs laid in a row.

To prolong the quality of construction and eliminate the appearance of fungi, you need to cover the base with special compounds and treat the boards and joists with fire-fighting compounds. Columns of logs made of brick and concrete are connected with anchors.
Tip: Discussing woodshed decorating techniques with family or close friends or neighbors will provide useful ideas and thoughts. Children enthusiastically get involved in such interesting tasks and willingly present interesting ideas. The use of leftover materials (firewood, pieces of boards, logs, etc.) will resolve the fuss with construction waste
Roof construction option
Four sheets of wood are attached to the beams. They reduce costs by using beams that have not been treated with special compounds. But it is advisable not to skimp on this. For reliability, install another beam on both sides. The sheets are placed on top of the beams so that the edges are in the center of the width of the beam. The sheets are fitted tightly to each other and nailed with a nail (screws). If it is discovered that the size of the sheet does not fit the beam, lay another beam and attach the sheet to it. It is recommended to lay a tarpaulin in the roof to prevent precipitation and moisture from penetrating into the room. When purchasing tarpaulin, the main thing to remember is that you need to cover the entire area, and it is better to have extra pieces of tarpaulin left than to find out that a few meters or centimeters are missing at the time of construction. Before trimming, a sheet of wood is applied to the beam and, having decided on the desired size, the excess piece is cut off. The slope of the roof is made towards the rear of the structure, as moisture drains from the roof. An additional advantage is the installation of a drain to collect water. At discretion, the flow of water from the drain is directed to moisture-loving plants on the site.

How to make a woodshed floor?
The assumption that flooring is not needed in a room is incorrect. The main function of a woodshed is to store firewood in a dry, ventilated place. If the floor is missing, accumulated moisture causes the wood to rot. The distance between the first layer of firewood and the ground is at least 10 centimeters. Take into account waterproofing under the joists
Common types of wood burners:
- Open
- In the form of a canopy
- In the form of a barn
- From an old barrel
- From rabbitry
- From pallets
- Forged woodshed
- Frame woodshed
- From logs
Open
Easy to build and at the same time neat looking. Materials used: beams, boards, bricks, etc. It is attached to the house without installing a canopy or roof. If the woodshed is built on a terrace, you don’t have to think about an additional foundation. It is advisable to build the woodshed on the side of the house with natural ventilation, which receives little sunlight. It is recommended to leave a gap between it and the wall of the house to prevent moisture from entering.

In the form of a canopy
This type consists of three walls. A roof (single or gable) is installed on two side walls. Instead of sheathing, plywood is used; rafters are not used.
The canopy is made wider than the size of the structure using materials similar to those for the roof of a residential building. The correct option for laying firewood is in two rows to select firewood from both sides

Another type of wood shed
This is also a common type of canopy. Consists of three walls. The roof (single or gable) rests on two side walls. This is a lightweight type of roof for a residential building due to the non-use of rafters and the use of plywood instead of sheathing. Boards with corrugated sheets and tiles are used.

In the form of a barn
It looks like a house with a window for ventilation and a door. It is built like a barn, only smaller in size and intended for storing firewood. It is built from boards, plywood, galvanized sheets and slate. This building is closed on four sides, so waterproofing under the roof is taken into account. The construction of such a structure is useful in that it provides an additional room for storing household appliances and tools. This way they will be in one place and not scattered throughout the area. If you store firewood on the veranda under the benches, you will get something like a woodshed.

From an old barrel
Use an old barrel as a mobile container for storing firewood. Place an iron hoop in the middle of the barrel and cut out the container with a jigsaw. Carved legs are attached to it. Insert the cutting into the prepared holes. This type of woodcutter is designed for a small amount of firewood.

From rabbitry
Some people make woodsheds from empty rabbit hutches. Remove the mesh and doors and fix the roof. If necessary, reinforce some places with a metal frame. This is a cheap way to store firewood and is suitable for people who rarely visit their summer cottages

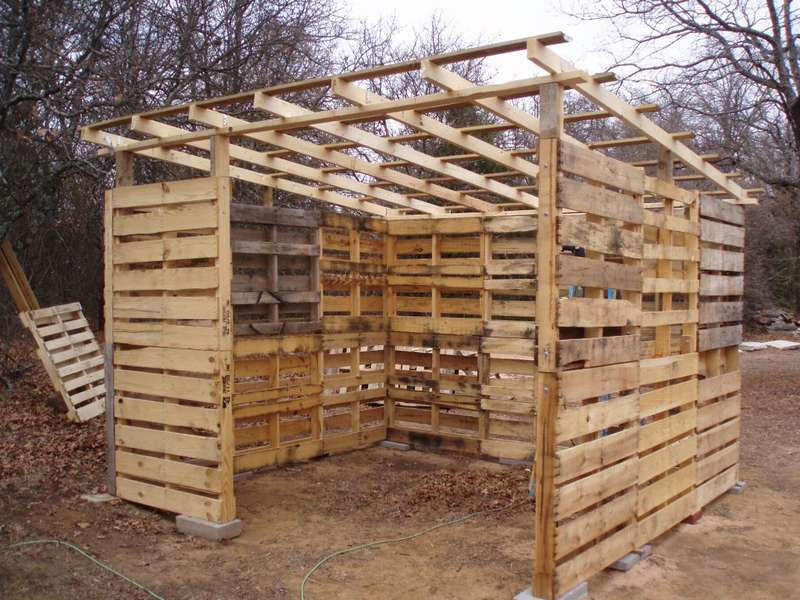
From pallets
Unnecessary pallets are reused to build a woodshed. This method is not expensive if you have old pallets. The advantage of this type of construction is that new materials are not purchased. The room is constantly ventilated. A cube is made from five pallets without edges, fixing the joints with corners. Paint will be required to protect against moisture.

Forged woodshed
Forged products are sold or made to order. They are used at home near the fireplace or in the yard in the barbecue area. They are compact, neat, and do not take up space, but the cost is higher compared to the cost of building your own. Another difference is the small capacity.

Frame woodshed
A frame woodshed is easy to erect. Air penetrates into the room and prevents the appearance of dampness. The woodshed consists of four columns and a sloped roof. You can use boards of non-standard sizes. The only drawback is that precipitation gets on the firewood.

From logs
A log structure is built in the same way as a shed. Only from logs instead of timber. But it is not as easy to build as from timber. Logs, moreover, are more expensive than timber. The advantage of this type of wood burner is its attractive appearance. Moreover, if a residential building on the site was built from logs, then two structures made from this material are pleasing to the eye.

Decorating the woodshed
Having completed the construction, they work on how to improve and decorate the outside of the structure and fit it into the surrounding landscape. Every person values both functionality and beauty.

- Flower beds are a popular method of decorating a woodshed.
- Or install a birdhouse
- Change the wood tone to your desired color
- It is important to place the firewood correctly and carefully. The aesthetic appearance cannot be neglected. Firewood is stacked in a semicircle in round woodsheds, and in squares in rectangular ones. If there is no floor, put trellises under the woodpiles, so the firewood remains dry. Long logs are placed at the bottom. The firewood is placed tightly next to each other in a row; it is better to place the next layer with an indentation above the bottom layer with a slope.
- Summer residents use their favorite plants as decorations for the woodshed. Wild grapes, ivy, and flowers are suitable for decoration.
- A camouflage net is used.
- Lantern charged by sunlight.
On their private plots, the owners set up saunas, baths, and create cozy living rooms with a fireplace. At the dacha they use stove heating or potbelly stoves, barbecues and brick barbecues for cooking. And in order to use all this, you need firewood, and in large quantities, which needs to be stored somewhere. Storage areas are organized specifically for firewood, which fit well into the design of the yard. Craftsmen make such firewood boxes with their own hands.
Why do you need a firewood rack?
Drovnitsa is a structure for storing firewood that performs the following functions:
- maintains optimal moisture content of timber (15–20%) - firewood is not left outside in the open air; bad weather can destroy all reserves. Storage in a shed and garage does not solve the problem, since these structures are intended for other purposes. Improper ventilation in the garage leads to rotting firewood supplies;
- organizes the storage of heating materials - scattered pieces of wood look sloppy, stacked pieces also spoil the landscape of the site. Firewood is stored in the woodshed to maintain order in the yard;
- decorates the yard - the original firewood shed looks interesting and gives the yard a well-groomed appearance. A unique design solution is the imaginative stacking of firewood in the storage area;
- allows you to store firewood in immediate access for heating in the winter - in order not to go outside for firewood in cold weather, a small structure for storing it is placed indoors. Forged woodpiles with patterns, in addition to convenience, add coziness to the living room with a fireplace. Small metal firewood holders are included with the fireplace. They are made in different styles - classic, patterned, abstract. They are safe to use.
Regardless of whether you are harvesting wood for a bathhouse or for heating your home, those logs that have been stored dry will bring the greatest efficiency
Kinds
Firewood racks vary in material, location, and shape.
A structure for storing firewood can be created from scrap materials:
- logs;
- boards, timber and other timber;
- wooden pallets;
- , foam blocks, bricks;
- from profiles or round metal pipes;
- fittings.
The roof of the structure is made of slate, corrugated board, plywood, metal sheets, roofing felt, linoleum.
The forms of firewood can be very different - from classic to original
Depending on the location of the firewood sheds, there are:
- street;
- indoor;
- permanent;
- portable.
In addition, firewood is stored in wooden barrels and concrete well rings. Such firewood sheds are used to zone the space of a personal plot, making low walls out of them. If there is a bench near the barbecue, then the materials can be beautifully and compactly folded under it.
DIY metal firewood rack
Metal structures for storing timber look attractive, are durable and easy to construct.
The owner assembles the firewood box from aluminum profile pipes in a few hours, it is inexpensive and lasts for many years.
For a metal firewood rack, the owner will need:
- aluminum profile 2.5 m long - 1 pc.;
- aluminum bracket 2.5 m long - 2 pcs.;
- self-tapping screws - 1 pack;
- paint for the final coating of the structure;
- tape measure or measuring tape;
- Bulgarian;
- drill and metal drill bit;
- level.
Step-by-step manufacturing instructions
The version made from aluminum profiles can be assembled in 3 hours.
Basic steps to create a structure for storing firewood from metal:
- The profile is sawn in half.
- One bracket is cut into four equal parts (for vertical posts).
- The second bracket is cut into the following parts: 4 pieces of 30 cm each; 4 pieces of 15 cm; 4 pieces of 5 cm for legs.
The firewood shed for this project is the most budget option
- Assemble the side posts. The vertical supports are parts of the bracket 60 cm long. The horizontal crossbars between them are sections of the bracket 30 cm long.
The parts are fastened with self-tapping screws or bolts, having previously drilled holes
- The side posts are connected with an aluminum profile 60 cm long.
- Attach the support legs.
Since the design is small in size, you can work on a table
- Screw the support brackets (15 cm) at an angle of 45˚.
Support brackets are needed to enhance the reliability of the structure
- The finished firewood box is painted and then placed on a bed of gravel. The firewood is stacked after drying.
The structure will look stylish if you cover it with matte black paint
Profile firewood racks are mobile and easy to move, having previously prepared the site.
Small metal structures are used when logs are needed to light a barbecue or fireplace and are not the only means of heating a residential building.
Do-it-yourself wood firewood
You can make a wooden stand yourself. In this case, improvised means or purchased material are used. The presented design can be assembled in 2 hours.
Required tools and materials
For the simplest wooden firewood you will need:
- 2 long boards of 150 cm and 4 short boards of 34 cm for the lower frame;
- 4 long bars of 150 cm each and 2 short bars of 34 cm each for the side posts;
- 2 boards 145 cm each;
- miter saw;
- jigsaw;
- roulette;
- level;
This basic design can be upgraded with a roof and floor if necessary.
The back wall of the firewood can be the wall of a house, garage or barn. You just need to be sure that there is no excessive dampness in this place and that the drains are properly organized.
Do-it-yourself firewood racks are always unique in appearance. Craftsmen put their soul into the result of their work. In addition, the owner builds the structure based on his needs, so it will be useful and convenient. If the aesthetic side is not important to the owner, the woodshed is done in the backyard, so it does not spoil the appearance of the site.
The owner of a private house or cottage is in a more advantageous position than city residents, since he can organize a picnic in the fresh air at any time. And, naturally, for many people a picnic is associated, first of all, with juicy and tasty kebab. To prepare it, you need to take care not only of the availability of meat, but also prepare firewood so that you can concentrate on the process of cooking meat, and not waste time and effort searching for fuel. Considering that for such cases you will need quite a lot of firewood, it is advisable to create a suitable storage place for it. And the best way to cope with this task is a structure such as a woodshed.
Regardless of whether you plan to purchase a ready-made one or make it yourself, it won’t hurt you to first find out what its purpose is.
Purpose of a woodcutter
Every owner of a private house or cottage should worry about having a supply of firewood. This issue needs to be resolved, regardless of whether you have a modern heating device in your house. The fact is that the owner of a private building may often find himself in situations where it may be necessary:
- cooking barbecue;
- heating the house with a fireplace;
- sauna firebox.
However, here you need to remember that the weather is never constant and can ruin your plans at the most unexpected moment. For this reason It is recommended to take care of the construction of a special structure to protect firewood from precipitation. Regardless of what kind of firewood you use, you should create appropriate storage conditions for it. In this regard, it makes sense to talk about the construction of a firewood shed. This building is perfect for storing firewood, where it will be safe and always ready for use.
Naturally, you don’t have to do such serious work, but quickly put everything on wooden pallets or partitions so that they can at least somehow protect the firewood from precipitation. However, is it worth spending time and effort on this solution to the problem?
It is very important for any owner that there is order in the yard or dacha and that every item is in its place. This statement is also true for such a building as a woodshed. If you approach its construction wisely, it can be turned into a structure that can decorate any yard.
Selecting firewood options
When deciding on the size of the woodshed, you you should focus on the amount of firewood, which you usually store to meet your daily needs. It is recommended to build a woodshed so that it can hold much more fuel than the estimated amount, because you can never predict whether you will have the opportunity to prepare a new portion of fuel tomorrow.
You can also use a different approach to determining the size of the woodshed. A guideline for this can be the amount of building materials you have. A thrifty owner always has a certain amount of building materials at hand, so if your plans are to make a woodshed with your own hands, then you can always use the materials you have to build it.
When you start choosing a design for your woodshed, you a number of conditions should be taken into account, without which you will not be able to make a structure for storing firewood that will completely suit you:
- the ability to provide natural ventilation;
- protection from sunlight, which negatively affects the structure of wood, reducing its burning time;
- the ability to arrange rows of logs in such a way that they are securely fixed.
 Regardless of which version of the woodshed you choose, it must be equipped with a roof. Moreover, the length of the latter should exceed the area of the main building. This will provide protection from precipitation that could penetrate the wood if your roof is not sized to the optimal size. Besides, It wouldn’t hurt to arrange a special drain, and install the roof itself in an inclined position.
If you decide to make a firewood shed that will act as an extension to the house, then it is advisable to place it in such a way that it is adjacent to the residential building on the north side. This will not only help you save some on the material, but also improve the heating of the main structure.
A rather interesting solution is the woodshed, which is erected in the form of a separate building. Such a construction can be carried out in the following options:
- structure with a roof and three walls;
- gazebo with door;
- full barn.
If you decide to opt for the latter option, then keep in mind that this structure can be used by you both for storing firewood and for placing gardening tools and tools.
Compact firewood racks would be useful for a firewood rack. In this case, we are talking about small devices made in the form of urns, which are used to carry firewood. Although the firewood boxes look quite elegant, making them requires a lot of effort and patience. A simpler option is purchase ready-made firewood logs, which will bring you a lot of benefits in your household.
Materials for making firewood
 It just so happens that wood is traditionally used for most buildings that are erected on a plot of land. However, if you do not have enough experience working with this material, then you can make roofs and walls based on other sheet materials.
In doing so, you need to take the following into account: It is not advisable to choose metal, otherwise your woodshed will resemble an oven, and this will have a negative impact on the wood that you will store in this building.
You also need to take care of the presence of gaps in the firewood. When covering this structure, do everything in such a way that there are fairly wide gaps in it. Proper ventilation is one of the important conditions, the observance of which will allow you to provide yourself with high-quality wood fuel.
When starting to install a roof, you can use materials such as:
- slate;
- polycarbonate;
- tree;
- building materials that you have left after repairs or construction of other objects.
 Not every owner will want to spend time and effort making a firewood rack or firewood rack with their own hands. In such cases, he can do a much simpler thing - purchase a ready-made structure. However, you must immediately prepare for the fact that such a purchase will cost you a pretty penny. Today, firewood storage retails for an average of $1,000. There are enough photos and descriptions of such structures on the Internet, so after reading them you can easily choose the option you like best.
Making a woodshed with your own hands
If you consider yourself to be in that category of people who are not used to missing out on the opportunity to save on something, then the following information will be useful to you, which provides a step-by-step description of the sequence of work on making a woodcutter with your own hands.
The woodshed itself has a fairly simple structure and the process of its construction can be represented in the following stages:
Woodshed adjacent to the wall
 Perhaps someone will decide to choose the option of a woodshed in the form of a building located close to a nearby building. In this case, the technology for its construction will be almost the same.
Just keep in mind that if you are doing continuous cladding, make sure there are small gaps. This way you can solve the issue with ventilation. If you plan to lay the slats with a sufficiently large step from each other, then You can choose mesh as a covering material, which is used to cover the building along the sides.
When starting to arrange the roof of the firewood shed, you can choose any of the roofing materials available to you. At the same time, remember that the roof must be installed in an inclined position, which will thereby create the desired angle, ensuring natural drainage.
Nuances in building a firewood shed
To avoid making serious mistakes during the construction of a woodshed, you need to remember the following points:
- When installing a roof, you need to take care not only of the presence of a slope that ensures proper water drainage. You must calculate the optimal dimensions for this. Ideally, the roof extends beyond the boundaries of the woodshed by approximately 20 cm;
- No less important work is the installation of the floor. It must be present in the woodshed, otherwise moisture that can get there will harm the wood fuel. If you take the trouble to create the floor, then create conditions for natural air convection and don’t let the firewood spoil ahead of time;
- Before you start building a firewood shed, you need to apply a special product to each element that is determined by the design of this structure that will protect them from rot, fungus and harmful insects.
 Although many owners of private houses and summer cottages are accustomed to storing firewood wherever they have to, this does not benefit them. If the place where firewood is stored is not protected from precipitation, then it will not remain suitable for its intended use for long. Therefore, the construction of a firewood shed is more than relevant for every owner of a private household. Anyone can build this object, because for the work you can use available materials at hand.
In addition to this, you can choose the most suitable option taking into account the available free space in the local area. And in order for a self-made woodcutter to meet expectations, first need to make a project, which should reflect the dimensions of both the structure itself as a whole and its individual elements.
A firewood shed is a structure designed to store neatly stacked firewood, which you cannot do without outside the city. It allows you to store fuel so as not to take up much space and allow it to dry. It’s more convenient to create it yourself in order to guess the size and shape as much as possible, and also get a product that meets the individual needs of the owners.
Features of a homemade firewood rack
A homemade woodpile for firewood is formed in accordance with several mandatory conditions. Firewood must be protected from rain and snow, but still have the opportunity for ventilation. In addition, it is important that the chosen location is in the shade, away from open fire. Materials should not be stored directly on the ground; the floor should be made of either bricks or planks.
However, it is very bad if the floor connects directly to the ground, so it is important to maintain a gap.


The next condition is the attractive appearance of the structure., which should be combined with the rest of the buildings on the site and the overall landscape design. It is important that the building is convenient for use: the owner has the opportunity to approach it from the required side and easily obtain the required amount of firewood. In this case, the fuel material must adhere tightly and not fall apart.
Suitable location
It is important to say that some people at their dacha do not make a special woodpile, but simply store firewood in the open air, covering it with material that protects it from water. But also for this purpose you can use an ordinary shed already existing on the site. A special street structure located near the house will be much more convenient. By the way, if firewood is most often used for cooking outdoors, then it is more logical to place the firewood rack close to the stove or barbecue. The optimal location is the wall of a metal garage or a special area next to the house. The main thing is that the firewood can be supported on three sides.


There are beautiful structures made of metal or wood that are installed indoors at home. For example, this could be a vertical firewood rack for a room with a fireplace. In this case, a decorative function is added to the wood storage function. A portable mini firewood rack is often made by hand.
Usually it stores a supply of firewood for lighting the stove, which you have to replenish when you go outside.


Which material to choose?
The correct choice of material will largely determine how long and how successfully the firewood box will serve. For the street, metal is often used to make a visually attractive structure that will serve for a long time and will not deteriorate from precipitation and other weather conditions. For example, it could be a woodpile made of aluminum profiles, which can only take a couple of hours to make yourself. By the way, it is very convenient to use for carrying, because its low weight greatly simplifies this procedure.
Reliable and durable products are made from iron or steel parts, for example, rods or pipes.


The most popular are woodpiles made from wood. If the aesthetic appeal of the issue is not too important, you can use existing materials left over from previous construction work and not purchase new ones. Alternatively, the wooden structure can be made of pallets, pallets, beams, bars or boards. The only important condition is to pre-treat the material with a product that protects against moisture and insects. A wooden firewood box is quickly assembled, can be used for quite a long time, weighs little and is budget-friendly.
Covering a woodpile located outdoors is a must, and slate, sheets of metal, polycarbonate or even polyethylene are suitable for this purpose. By the way, the structure can even be woven from vines, if the latter grows in large quantities on the site. Separately, it is worth mentioning the woodpile built into the fireplace or stove, that is, it is a niche next to the firebox, made, as you might guess, of brick.


Decorative woodpiles, which are small in size and located in residential areas, can be forged, a regular bag made of thick cord or rope, a basket made of durable material, or even a regular wooden box with wheels.
How to do it yourself?
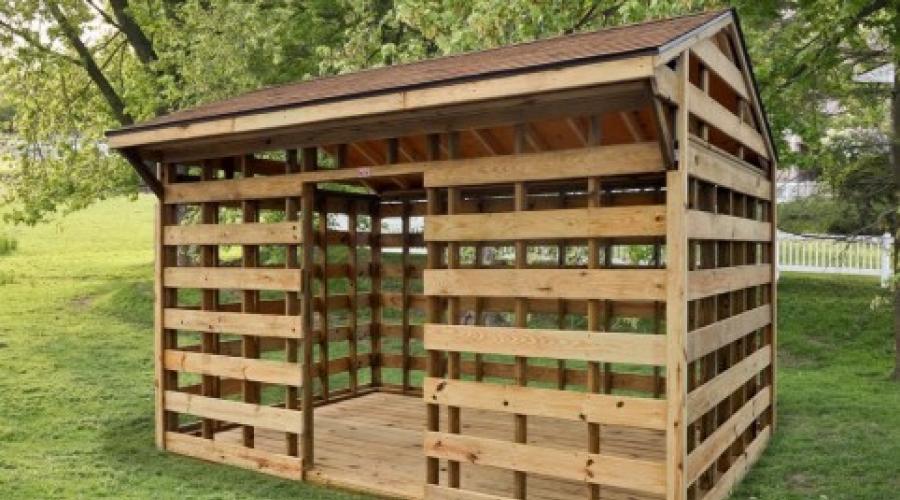
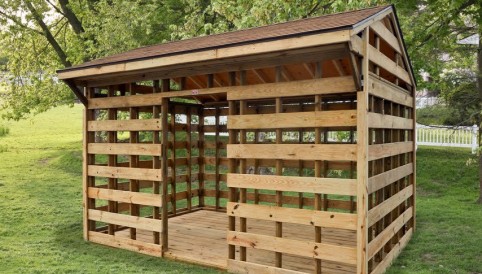
There are a large number of designs and drawings of various woodpiles on the Internet. They can vary in shape and appearance, have a frame or canopy, look like an ordinary barn with lattice walls, or be a real work of art. For a large amount of firewood used, a shed is more suitable, which can be regular or lattice. In the latter case, it will be possible to provide better ventilation, which means the firewood will remain dry. In any case, you will first need to prepare the foundation - dig a pit for soft soil, the depth of which will vary from 20 to 25 centimeters.

The resulting hole is filled with layers of gravel and sand. Next, you can build a support of six blocks: a couple should be in the middle, and the rest should be in the corners. The parameters of the standard block are 200 by 200 and 600 millimeters. At the next stage, a double layer of roofing material is laid.
To assemble the frame, you will need to use bars with parameters of 100 by 100 millimeters, pre-treated with special machine oil.


The formation of the lower trim will be facilitated by the use of screws, nails or self-tapping screws, thanks to which the blocks and bars will be connected. The strapping is strengthened with special corners, after which you can begin installing the racks - respectively, in the corners and in the middle part. In addition, you can add a couple of racks in front and one rack behind. They will be responsible for the entrance area and, accordingly, additional support. It is important to make the front pillars slightly longer and the rear pillars shorter to ensure a rainwater drainage system.


Boards are nailed to the side, after which the rafters and roof frame are formed. Roofing felt and corrugated sheets are placed on top. A roof overhang distance of 35 centimeters should be maintained. The floor can be laid so that gaps of 2 to 3 centimeters remain. It will be most convenient to assemble it from boards measuring 100 by 40 millimeters. The walls, by the way, are installed at intervals of 100 millimeters.
It is necessary to cover the shed with a special solution that will protect against beetles.


A small woodpile is most often located next to the home fireplace and is made of either wood or metal. In the first case, it is recommended to take an old barrel as a basis and disassemble it into separate planks. Since each piece is usually bolted to a metal hoop, it will have to be cut first. The bed can be easily made from chipboard or an ordinary wide board, and the legs from wooden blocks. It is important to varnish the resulting firewood for a better appearance, as well as long-term use.

A steel woodpile is also often made independently. It is assembled from a 2-mm steel sheet and a steel rod with a cross-section of 8 mm. The sheet is bent or cut out in a semicircle, which can be done with a grinder or a gas cylinder. Next, legs and handles are attached to the resulting container. For beauty, the firewood box should be painted with black or silver paint.
Having a large amount of wicker and the ability to process it allows you to make a wicker structure at home.


First of all, a rectangle is assembled from slats to form a frame. Then several holes are made on opposite elongated sides. A copper wire is inserted into the middle holes, transforming into handles, and a vine is inserted into the rest. Having intertwined all the twigs, you can fix the finished firewood using stain or varnish.
If you don’t have time to create a full-fledged structure, you can make a firewood stand with a support made of stakes. First of all, the surface is treated - covered with pebbles or covered with a special waterproofing material. The material should be taken rectangular so that the woodpile has four distinct corners. High supports are dug into these points, to create which ordinary logs are taken. Their thickness will depend on the amount of firewood that will be stored.
Each economic owner of a summer house with a bathhouse, barbecue or stove will certainly have a designated place for storing firewood. The woodshed can be shaped like a barn, a gazebo or a simple shed on supports. However, there are also very creative options.
It’s not difficult to build a woodshed in your country house with your own hands. But before work, it is important to decide on the type of structure, select suitable materials for construction, and also read the step-by-step instructions.
The purpose of this design is clear even from the name. Under the woodshed's canopy, logs are neatly stacked in stacks for further storage. However, along with its direct purpose, such a building can become a wonderful decoration for a summer cottage.
Do-it-yourself woodshed construction technologies
The dimensions and design of the woodshed are selected based on the expected amount of firewood that will be constantly stored. It would be appropriate to develop a project taking into account modern materials and technologies.
The optimal moisture content of firewood for fuel is at the upper limit of air dryness, i.e. 15-20%.
If you plan to build a wood shed near, or near a frame shed, then it is rational to build a closed structure, more reminiscent of a shed (with or without a porch).
It is better to build such a structure using frame or frame-panel technologies, guided by considerations of speed of work and low cost of materials. Also, the woodshed can be combined with an outdoor toilet or shed, have two separate entrances and a common wall.
How to make it in the form of a gazebo
In this case, the structure has a floor covering, two or three sheathed walls, and some kind of canopy (for example, made of profiled steel sheets or polycarbonate). The rafter system of such structures is not always equipped.
A woodshed of this design can be attached to a house, bathhouse, outbuilding or other building, but it is better not to resort to such a measure in order to avoid the appearance of bark beetles and damage to the firewood and walls of the building.
In the form of a canopy
The simplest design. The canopy is attached to several vertical support posts and protects the logs from rain.
The firewood is well ventilated and dries, but in winter it will probably be covered with snow, and in the worst case, ill-wishers will easily carry away all the supplies from under such a canopy.
Modern firewood racks of non-standard shapes
For example, a woodshed can be built using panel technology and look like a honeycomb. Firewood is stored in separate cells. This allows you to sort the firewood, separating dried from wet or larger from smaller. Firewood racks in the form of racks are no less convenient. However, they will not fit a large amount of firewood.
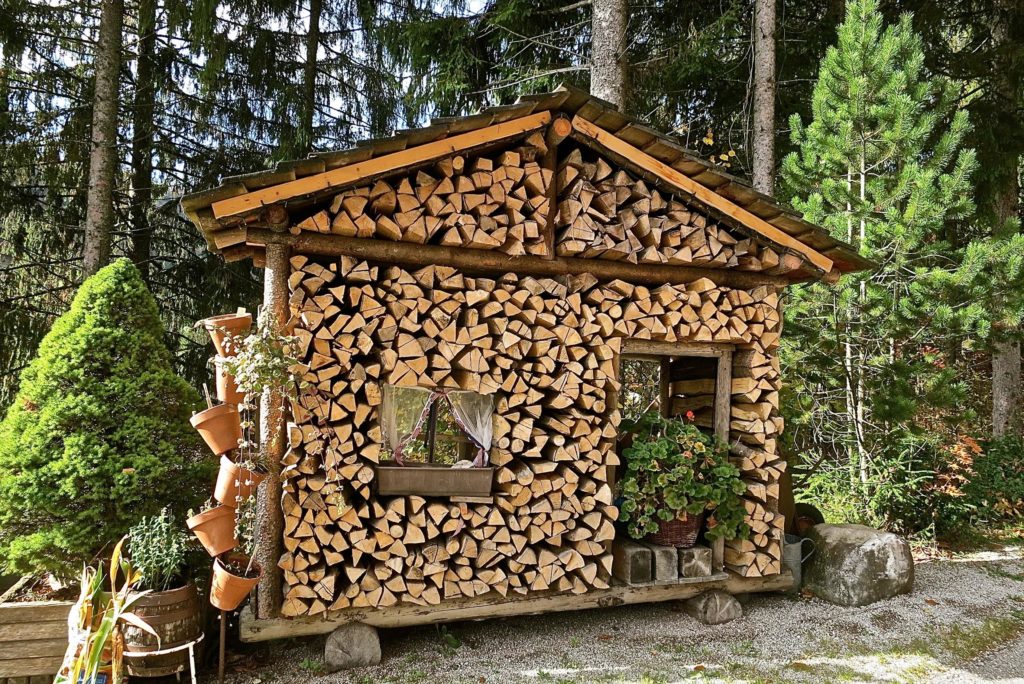
Another interesting idea is to use old barrels or cuts from very large trunks to store firewood.. The core of the saw cuts is removed, the elements are placed on top of each other and secured with wire/rope. Advantage: original design. Disadvantage: low structural strength.
The smallest firewood sheds for the dacha are metal, wicker, glass, and plastic. and woodsheds are produced using cold or hot forging methods. The woodshed has the shape of a small basket, floor rack, etc. Small firewood burners are used exclusively indoors, for example, installed near fireplaces or sauna stoves.
Selection of materials for building a woodshed
Tree
Wood is perhaps the most popular material for building a woodshed and. The building materials used are timber, edged and unedged boards, pallets, fiber boards, plywood, logs, etc.

Wood is easy to process, installation takes a minimum of time, the buildings look quite aesthetically pleasing and harmonize with the landscape of the dacha.
Bricks and blocks
You can build a woodshed out of blocks and bricks; such a structure will be quite strong and durable, but the design requires significant investment and labor.
If the woodshed is built in the form of a shed, high-quality ventilation is required, otherwise the firewood will not dry and will begin to rot.
Metal profile and polycarbonate
Metal structures are very durable, and artistic forging elements turn the firewood rack into a masterpiece. Metal structures require protection against corrosion. Polycarbonate is usually used in conjunction with metal or wooden frames. You can use this material to make a roof, make a canopy, sew up the wall of the woodshed. The advantages of the material are availability, easy installation, high light transmittance.
Calculation of approximate costs
Materials:
- board 5×15cm for pillars – 3-6 thousand rubles. /m3;
- board 5x10cm for the floor, walls, roof rafters;
- 15 mm plywood for the roof - from 500 to 1200 rubles / sheet;
- board 2.5x5cm for finishing;
- hot-rolled equal-flange metal corner - about 40-80 rubles / linear meter;
- self-tapping screws - from 0.09 rub./piece;
- nails – up to 100 rubles/kg;
- fastening corner - about 30-40 rub./piece;
- ondulin - 450 rub./sheet, galvanized profiled steel sheet - from 185 rub./m 2.
How to build step by step
The video shows the process of constructing a classic woodshed:
Designing a wood shed
Let's look at step-by-step instructions for building a country woodshed in the form of a gazebo with sheathed walls, a pitched roof and no entrance doors.
The frame will be made of lumber, the wall cladding will be plywood, and there will be a small one above the entrance. The dimensions of the structure are 2.5 x 1.4 m.
Laying the foundation
The woodshed is a lightweight structure that can be supported by a foundation made of horizontally aligned blocks. If desired, you can pour a shallow shallow foundation or lay out a prefabricated strip foundation from blocks, as is done during construction. In winter, it is more convenient to equip a pile-screw foundation.

Sometimes a foundation is built from car tires. This is an unusual, but quite budget option.
Any type of foundation must be waterproofed with roofing felt / bitumen mastic.
Bottom trim and floor laying
For the lower frame, which is traditionally laid on the foundation and fastened to it with anchors, you can use high-quality boards or timber. If timber is used, then its opposite edges should be cut down according to the “half-tree” pattern for a reliable connection. Read about building a shed from 6x3 timber with a terrace.
The floor joists are attached between the boards of the bottom frame. For a base of the size indicated above, you will need 7 boards 120 cm long and 28 mounting angles. Fixation is done with galvanized self-tapping screws. For convenience, it is better to use a screwdriver.
The floor covering is done with edged boards. It is advisable to leave a gap of up to 25 mm between the flooring boards to prevent moisture accumulation and better ventilation of the floor and firewood. The boards are laid across the joists and secured with nails or self-tapping screws. Find out about frame houses with an attic.
All wooden elements must be treated with an impregnation that improves fire safety and prevents wood from rotting (for example, Senezh impregnation).
Installation of frame posts
Before installing the support posts, 5 x 10 cm boards are laid and fixed around the perimeter of the structure. The posts will be attached to them. Each rack is made of two boards, which are held together with wood glue and nails. Instead of boards, you can use 10 x 10 cm timber.
For a firewood rack with a perimeter of 250 x 140 cm you will need:
- 6 racks 140 cm long;
- 2 racks 155 cm long;
- 2 racks 171 cm long.
The racks are installed vertically and fixed with mounting angles. For greater reliability, the corner posts are reinforced with jibs. The shortest racks are the back wall of the woodshed, the longest racks are the façade. Verticality is checked with a bubble level or plumb line. Find out how to make a country toilet without a cesspool.
The front wall (also known as the entrance opening) will be formed from three boards - two vertical, 171 cm long, and one horizontal. The length of the crossbar must correspond to the width of the entrance opening. It is best to attach the crossbar (with perforated corners) at a height of one and a half meters from the floor line.
Roof installation
To arrange the roof you will need boards that will serve as rafters. These elements are laid at an angle of 15 degrees. The rafters are attached to the top frame, which consists of beams or boards attached to the upper points of the support posts. The upper ends of the supports are cut at an angle of 15 degrees, the slope towards the rear wall of the woodshed. You will need 6 rafters. They are attached to the top trim with nails. Read how to make a carport at your dacha.
The boards are not laid flat, but on edge.
Wood shed wall cladding
The walls of the woodshed can be covered with slabs crossed with slats (like a lattice), moisture-resistant plywood, etc. If it is attached, use similar materials. Tree trunk cuts are perfect for decoration.
The sheathing is secured to the support posts with galvanized self-tapping screws.
Canopy or canopy
The canopy is installed before the finishing roofing material is laid. This structural element will additionally protect the woodshed from precipitation. For the canopy, you should take 6 pieces of boards of the same length, cut the ends at an angle of 15 degrees and attach the parts to the top trim or lining of the woodshed.
To strengthen the structure, supports are placed under the rafters of the canopy. The ends of the canopy rafters are sewn up with an end board. A sheathing is mounted on top - the basis for the roof covering of the canopy. It is advisable to sew up the junction of the canopy and the roof with a metal strip or ridge profile.
Maintenance of the woodshed at the dacha
An open woodshed built using frame technology does not require any special care; only the wooden elements can be additionally varnished. It is better to equip the site before construction by laying paving slabs or pouring concrete.

A lantern powered by solar panels will decorate the façade of the woodshed and will allow you to take/stack firewood in the evening in the light.