We make the ceiling in the bathroom from plastic panels with our own hands. Ceiling made of PVC (plastic) panels: step-by-step instructions Bathroom ceiling made of plastic panels frame
Read also
No matter how the walls in the bathroom are decorated, they should be in harmony with the ceiling. Indeed, when the ceiling is painted with ordinary paint, various types of pollution can form on it, which are sometimes difficult to wash off. Also, the bathroom only in modern apartments has a large volume, but in old houses - you can only be in this place alone. Proper design of walls and ceilings will visually increase the area and make a small room comfortable.
PVC panels are so easy to install and use that most people prefer this method of decorating the ceiling in the bathroom. This material is not afraid of high temperatures and strong steam, does not corrode, and is not infected with fungus.
Material about options and technologies for decorating the ceiling in the bathroom will also be useful:
There are so many advantages in one type of material that I would like to immediately install it in my bathroom. At the same time, plastic panels are made in different colors, which allows you to choose the color of the ceiling in accordance with the overall color scheme in the bath. In addition to standard plain panels, the plastic industry offers a range of models with various patterns and inclusions.

When all the profiles are installed, the ceiling begins to be finished with plastic, which is inserted into the baseboard guide and secured with self-tapping screws to the profile guides. But before sheathing the ceiling, it is worth cutting all the panels to the required length.
In those panels in which the lamps will be installed, make round holes using a special socket or cut with a regular knife.
After installing the panel with holes, you need to tighten the lighting wires to these slots.

The last panel may be too wide for the remaining space, so it must be carefully cut along its entire length, the last fourth skirting board attached to the cut and inserted into place. The plinth is glued to the wall using such a universal product as liquid nails.
Fastenings for lamps are inserted into the lighting holes, to which all wires are connected. Next, you just need to insert the necessary light bulbs and the ceiling is ready for use.
DIY ceiling made of PVC panels in the bathroom (video)
PVC ceiling panels on the ceiling look equally good with ceramic tiles, the same wall panels, self-adhesive film and other finishing materials for the bathroom. Before installing the ceiling, it is necessary to put the walls and floor in order, since in the case of suspended ceilings, repairs begin not, as usual, from above, but from the walls, moving first to the ceiling, and then to the floor in the bathroom.
Bathroom ceiling made of plastic panels (photo)


Often, when mentioning a ceiling made of plastic panels in a bathroom, the imagination of ordinary people pictures white plastic lining. In fact, modern manufacturers offer a range of polyvinyl chloride slats with a wide color palette and a variety of textures that imitate wood, wild stone or leather. From the samples provided, you can choose the appropriate option, combined with flooring, wall decoration, and bathroom interior items.
Advantages of plastic panels in wet areas
This is caused by:
- the need only for desire and a standard set of tools;
- loyal prices for plastic compared to other finishing materials;
- ease of care: decorated surfaces can withstand frequent wet cleaning using detergents;
- plastic is not subject to deformation or destruction in damp rooms, and is resistant to repeated direct exposure to water;
- the fact that the cellular structure of the lamellas gives them the soundproofing effect necessary to absorb the noise of a running washing machine or rushing water;
- the ability to plan repeated repairs after many years: after 30 years of operation, plastic panels look like the day they were purchased.
- provided with a choice of colors and shapes that can satisfy design needs and wishes.

Finishing the bathroom ceiling with plastic has not lost popularity for several decades.
Of course, like other facing materials, this one also has disadvantages. After installation, there is a specific smell in the room, which, however, disappears after a couple of days.
Important! Plastic is subject to linear expansion with large temperature fluctuations. It is important to take this feature into account if you are going to install a plastic ceiling in a bathroom in a country house that is not heated in winter.
Necessary tools for work
Installing a plastic ceiling in a bathroom is not so difficult as to involve a construction team. It is quite possible to do it on your own, you just need to be patient, have the necessary tools, materials and act according to the instructions.
To work you will need:

Selection and purchase of plastic, moldings, connecting hardware
Before going to a hardware store, measure the area of the bathroom to determine the required amount of building material.
Layout options in which the size of the ceiling sides is a multiple of the length of the lamellas are very rare. PVC panels are produced in widths of 10, 20, 25, 37, 50 cm, the length can vary from 2.6 m to 6 m. To save money, it is advisable to choose the size of the lamellas at which there will be a minimum percentage of trimmed waste.
Important. The thickness of the plastic strips is not always the same, it can be 5, 8, 10 mm - this difference must be taken into account when purchasing connecting moldings and fasteners.
To repair the ceiling, you need to purchase:

Profiles vary in purpose and are:
- Starting. They are attached to the sheathing around the perimeter of the room, and the edges of the lamellas are inserted into the grooves located in it to facilitate installation and give a more aesthetic appearance to the completed structure.
Ceiling. It differs from the starting one in the presence of a decorative ceiling plinth. - Connective. Used in areas where the length of a standard profile is not enough.
- Inner corner. Used if the walls are also planned to be covered with panels.
- Plastic or foam baseboard. There is not always a desire to use a starting profile; in these cases, a special plinth is glued to decoratively finish the joints between the ceiling and walls.
Important. After purchase, plastic products must be left for a day in the room where the work will be carried out, so that they acquire physical parameters inherent in the temperature regime of the room.
Installation of a PVC ceiling in a bathroom is possible at any stage of renovation. This may be the final moment after covering the walls and flooring, or maybe the beginning of repair work.
Electrical component of the work

Before installation of the sheathing, electrical wires are brought out for lighting.
In any case, by the time the ceiling is decorated, it is better to decide on the choice of lighting source. You can place lighting fixtures on the walls or install recessed soffits.
Before installing the sheathing, electrical wires are brought out for lighting. If you plan to install a forced exhaust in the ventilation duct, it’s time to supply electricity to it. In addition, you will have to find the old wiring before you start drilling holes for the profile in order to prevent the drill from getting into it. It’s good when you have access to the distribution box and have the opportunity to see the direction of placement of the electrical conductors. Often, for aesthetic purposes, boxes are hidden under a layer of plaster, and the owner of the apartment does not always know their location. Therefore, it is better to ring the upper part of the walls with a multimeter or a beeper: there is a high probability that the electrical wires are located here.
Having given preference to spotlights, it is better to purchase them in advance. After all, their sizes vary, but you need to know for sure at what distance from the ceiling to place the sheathing for installation. The minimum gap between the suspended ceiling and the stationary one is equal to the height of the lamp (usually 120 mm) + 50 mm (minimum permissible distance from the ceiling to the soffit).
When lighting sources are located on the walls, to reduce space loss, installation of the profile begins close to the ceiling.
Covering the ceiling base with plastic panels in the bathroom does not require preliminary leveling.
This saves money and time, but the sheathing itself is placed in a strictly horizontal plane. Therefore, before starting to attach the profile, mark the ceiling using a level.

Installation of metal profile lathing for the ceiling in the bathroom
In those cases where the walls are tiled and the tiles are located horizontally, the marking process is simplified. You just have to, starting from the seam, draw a line along the perimeter of the bathroom walls.
You're less lucky when there are no tiles on the walls: you'll have to use a level.
The laser level is easy to use; you can quickly and easily apply precise markings. However, not every master has a level for home use.
Working with a hydraulic level
You will have to tinker with the hydraulic level, but the result will be no worse. The hydraulic level is a transparent flexible hose with flasks at the ends, filled with water. For accurate measurements, any accumulation of air bubbles is removed from it. The principle of operation is based on the interaction of liquid in communicating vessels; no matter what height you raise or lower one end of the tube, the liquid level at the other end will be established at the same level.
A pencil intended for drawing marks on walls is sharpened sharply: a 2-3 mm mark left by a thick lead will subsequently make it difficult to correctly connect the marks.
For this stage of work, it is advisable to find an assistant. If you find someone willing to help, the process won’t take much time. Otherwise, you will have to attach the edge of the hose to the wall with tape each time, and the procedure will be delayed. Start the mark from the lowest corner of the room.
The first mark is applied on the wall, at a distance of 10 centimeters from the angle, at a distance from the ceiling equal to the height of the lamp plus 5 cm.

One edge of the tube is applied to the resulting mark and the liquid level is aligned with the applied mark. The second end of the hose is transferred to the opposite side of the wall and applied flush with the surface of the liquid in the tube.
The number of marks applied should be equal to the number of corners (external + internal) multiplied by 2.
To connect the marks applied, you will need a beating cable, sometimes called chokeline thread. It is a thick thread coated with dry dye powder. The cord is pulled between the marks, after which you need to pull it slightly with your free hand and release it. The paint from the thread will leave a clearly visible imprint on the wall.
You can connect short gaps by placing a metal meter, usually a profile, between the marks and drawing a line with a pencil.
Applying markings using a construction bubble level
A bubble level is a sealed flask with a liquid and an air bubble in it, mounted in a wooden or metal block or profile. The air bubble tends to occupy a position at the top of the liquid, this feature allows you to check horizontal and vertical directions. The sizes of the rulers vary from 40 cm to 2.5 m. Before use, check the accuracy of the level readings, since they get lost after impacts or falls. Mark lines for installing the profile in increments of 80-100 cm (in bathrooms 1.5 * 2 m this point is sometimes skipped).
Installation of sheathing

Installing sheathing on the ceiling in the bathroom
Having completed the marking of the sheathing, they begin to screw the metal profile around the perimeter of the walls. The frame is mounted from a galvanized UD ceiling profile, which is secured to the walls with dowels and nails. For brick and concrete walls, nails 40 mm long and d 6 mm are used. If the walls are made of less durable material, the length of the hardware is increased to ensure reliable fastening.
For ease of installation, first, use a hammer drill or impact drill to drill holes for the dowel and nails in increments of 40-50 cm. To drill the tiles, use a special tile drill. Plastic screws are inserted into them. Drill holes in the profile at the same distance. Having aligned the resulting holes, screw the profile to the wall.
To connect in the corners, the UD profile is cut at an angle of 45. Holes are drilled in the ceiling for attaching the CD profile. To attach it to the ceiling, hangers are used - metal perforated strips; if their length is not enough, anchors are used.
Attach the CD profile, tucking its edges into the UD profile

The use of wooden sheathing in a bathroom is undesirable due to the ability of wood to change its geometric parameters under the influence of moisture. However, if you decide to install wooden beams, you must first treat it with antiseptic and water-repellent impregnations that prevent the growth of mold and mildew. The wooden structure is attached directly to the ceiling.
Compliance with the horizontal plane is checked using a rule, an even strip or threads stretched across the room.
Begin its fastening using a starting or ceiling profile.
The profile is secured with self-tapping screws on three sides of the sheathing.
Cut the panels to the specified size using a sharp knife, hacksaw, or grinder. In the locations of the spotlights, holes are drilled using a grinder with an attachment crown. If you don't have one, you can use a knife.
The edges of the first strip are inserted into the grooves of the ceiling profile; to do this, it is slightly bent and pushed until it stops. Screw it to each profile with self-tapping screws.

Installation of plastic on the ceiling in the bathroom
Each subsequent strip is inserted in the same way.
After installing the last lamella, the remaining fourth starting profile is cut off on one side and glued on top.
If there is no starting profile, glue the plinth for the ceiling.
You can attach PVC panels to a wooden sheathing using a furniture stapler.
If desired, the ceiling made of PVC panels in the bathroom is mounted in several levels; for this, a multi-level sheathing is simply made.
Making a ceiling from plastic panels in the bathroom with your own hands is not at all difficult. Even a novice master can complete this task in a few days. Such a ceiling can last for many years; it is not afraid of moisture or direct contact with water. No repairs will be required, even if the neighbors above flood. And the provided range can satisfy the most sophisticated needs to emphasize the individuality of the bathroom design.
In the bathroom it is quite possible to make a suspended ceiling with your own hands. Laying out PVC panels and sheathing them is not difficult at all if you follow our recommendations. You can assemble any ceilings, for example, mirrored, patterned or aquapanel. The choice is yours.


Advantages and disadvantages
Finishing work on the ceiling surface using polyvinyl chloride panels has both advantages and disadvantages. Having knowledge of a product's strengths and weaknesses will help you be prepared for unexpected situations.
Let's start with the positives.
- with the help of PVC panels you have the opportunity to make the ceiling surface smooth, without getting rid of the previous ceiling finish;
- PVC panels do an excellent job of hiding all communication wiring and ventilation systems;
- simple installation of lighting fixtures and lighting in a panel ceiling;


- in comparison with plasterboard construction, plastic profiles are much easier to install;
- there is the possibility of additional specialized installation of noise, sound and waterproofing;
- installation work on installing PVC panels is carried out using fasteners (dowels and screws), therefore, special knowledge and skills are not required for this work;
- the polyvinyl chloride panel is a moisture-resistant and easy-to-clean product that is not subject to the harmful effects of bacteria;
- If desired, plastic profiles can be mounted twice.


Despite the large number of positive aspects, PVC panels have some disadvantages.
- A large amount of the material offered looks cheap and is not very presentable. However, there are also very worthy products.
- When purchasing budget plastic profiles, there is a possibility of light transmission from the built-in lighting fixture. In this situation, it is recommended to purchase a lamp in a more expensive price category with denser internal walls.


- With a polyvinyl chloride panel, multi-level construction or complex bending is impossible. This material is not intended for the construction of complex decorative ceilings.
- PVC panel for covering the ceiling surface is acceptable in case of high ceilings. This material has a habit of “eating” several centimeters of the height of the living space.
- The joint and seam of the panels will be visible after installation work.


Panel selection
Before you start covering the ceiling with PVC panels, it is recommended to purchase all the necessary elements: frame slats, a profile and a specialized polyvinyl chloride cornice for the ceiling.
Choosing the right material, presented in a wide range on the shelves of construction stores, can be a real challenge.
There is a classification of PVC panels that takes into account the technological features of each type.
- Starter profiles are the most popular today. Their functionality is determined by hiding or masking the end of the panel. For this procedure, it is necessary to fix the starting profile over the entire area of the room, taking into account the marking line of the new ceiling surface.


- External and internal plastic corners are necessary for more precise and aesthetic joints in corner areas.
- You will need H-format profiles if the panel is not long enough. This product is used exclusively for connecting ends.
- Plastic skirting boards for the ceiling surface are necessary to mask the end of the panel. Ultimately, these are ordinary starting profiles, however, they have decorative elements in the form of borders.
- F-shaped profiles are necessary to hide the end of the panel. They are indispensable in cases of finishing work on the wall surface using various related materials.
- Multifunctional plastic corners - ordinary corners in an L-shaped format. They can be used to cover various joints.


PVC panels are produced in different color shades. It all depends on your personal preferences and desires. You can easily choose the desired color for your bathroom that matches the interior. There are solid and textured materials.


Calculation
The polyvinyl chloride panel is manufactured in different sizes. In most cases, the length of the plastic profile is 2.6 m, 2.7 m, 3 m. The width of the PVC panel is often standardized: 240 mm, 250 mm, 300 mm, 320 mm, 375 mm. Regardless of the chosen length and width, the panel thickness always varies from 8 to 10 mm.
To calculate the required number of polyvinyl chloride panels, you first need to calculate the area of the ceiling surface. To do this, measure all sides of the bathroom (length and width) and multiply the resulting parameters. Next, divide the area of the ceiling surface by the area of one unit of the product. You will find the parameters of the plastic panel on the label.


Installation
Before you begin installation work, you need to familiarize yourself with the required construction tools for working with PVC panels.
First of all, the assembly of the ceiling surface is carried out using:
- drills and hammer drills;
- hacksaws for metals;
- sharp knife;
- dowels, self-tapping screws with press washers;


- metal profiles for suspended ceilings: UD – profiles and CD – profiles;
- polyvinyl chloride panels;
- starting profiles and ceiling skirting boards;
- level;
- suspensions.
Installing a ceiling surface made of PVC panels is a fairly easy process, and no special construction skills or knowledge are required.


Let's look at the installation process step by step.
Preparation
First, you need to carry out preparatory measures before installing plastic panels in the bathroom. If there is any structure on the ceiling surface, it must be dismantled.
There is no need to achieve a flat ceiling surface, since the ceiling will be hidden behind a structure made of plastic panels. However, if there are falling off sections of plaster on the ceiling, it is recommended to get rid of them. The cleaned ceiling surface needs to be treated with a soil solution with deeper penetration, which will protect the ceiling from the occurrence of fungal deposits and mold. The primer solution is applied using a roller in several layers.


After the soil layer has dried, you can begin marking. To do this, mark with a line the location of the new ceiling made of PVC panels. The distance from the surface of the old ceiling will depend on how you plan to use the space under the ceiling.


If this space is not used, the indentation will be 4-5 centimeters. And if the space involves the installation of lighting fixtures or the laying of communication systems, then an indentation of the size you need is made between the plastic panels and the ceiling in the bathroom. Using a building level, draw the line of the new ceiling on all sides of the walls.


Frame making
After successfully marking along the intended wall lines, UD profiles of 2.5 cm by 2.5 cm format are fixed. Dowels are used for fastening. Then, taking the ceiling profiles, insert them into the guides and secure them using self-tapping screws with press washers.
On a note! There is no need to drill a hole in the ceiling profiles in advance. Using a screwdriver to tighten the screws, the screws will fit perfectly into metal products, and the fasteners will be very strong.


Lighting
If you plan to install built-in lighting fixtures in PVC panels, you need to prepare the following elements: wiring, terminal block, insulating tape and switch.
When choosing a lighting device, it is recommended to give preference to those models whose power does not exceed 40 watts. Ignoring this, there is a possibility of overheating of the plastic panel, subsequent deformation and the occurrence of toxic fumes.
The wiring must be fixed in areas where the lighting fixture will be installed. At the intended point we make a loop using a wire 10-14 centimeters long. For more convenient and reliable fixation of wiring on the frame structure, use the latches. It is not recommended to tighten it tightly, as there is a risk of deforming the braid.


In order to make a hole, use a crown for wooden materials. The diameter must clearly match the dimensional parameters of the lamp, but not less than 4 mm of the face rings. Standard diameters include parameters from 58 mm to 74 mm. Due to the fact that repairing the holes made is difficult, plan the installation area very carefully.


Assembling a canvas from panels
So, the final stage will be the collection of polyvinyl chloride panels on the ceiling surface.
To successfully cope with this process, you need to follow a simple algorithm.
- Plastic skirting boards are fixed to the guide profiles for installation work with the panels. Fastening is done using self-tapping screws that are screwed into the mounting strips. When joining corners, the plinths are cut at an angle of 45 degrees.
- Initially, the PVC panel should be inserted with a shelf into the grooves of the baseboards and fixed to the ceiling profiles with self-tapping screws and a press washer.
- The remaining materials are fixed in the same way, however, the shelf should not be inserted into the grooves of the baseboards, but into the grooves of the adjacent panel.


- In order to build a seamless ceiling surface, the materials must be fixed more tightly to each other.
- Quite often it happens that the panel that remains last is slightly larger than the required size. In this case, the panel will need to be trimmed. Cut the panel 5-6 millimeters smaller than the area where it needs to be installed. To begin with, the last panel is tightly mounted into the grooves of the plinth, after which it is shifted in the direction of the penultimate material for tighter pressing.
A bathroom ceiling made of plastic panels is currently a win-win option for finishing work. This option weighs little, is easy to install and retains its presentable appearance even in rooms with a high degree of humidity and at elevated temperatures.
Finishing the ceiling in the bathroom with plastic can even withstand troubles when neighbors from the top floor are flooded, which will minimize the amount of money spent on future renovations. Repairing a room with plastic ceilings is easy, since the degree of flooding is negligible.

Why choose plastic for bathrooms
Plastic ceilings in bathroom interiors are practical and cost little compared to other finishing materials. In addition, the installation of PVC panels is carried out quickly and will not cause any difficulties. You can quickly install the ceiling if you use a drill.

A large number of representatives of the stronger half of humanity install plastic ceilings on their own. The plastic coating is moisture resistant, easy to maintain and can be used for a long time. Before installing a plastic ceiling in the bathroom, you can choose a design model by looking at numerous photos on the Internet.

So how to make a plastic ceiling with your own hands? The solution to this issue will be found by itself after reading the article.


Preparing to install plastic ceiling panels
Initially, you should select and purchase the necessary material. It must be dense and of high quality. If the plastic is thin, you can see the wires and frame structure through it.


Then it is treated with antiseptic materials. After completing this work, plastering of cracks and other defects is carried out.

If the room is small, then you can place the plastic diagonally. This will help to visually increase the ceiling area, but the work will be somewhat complicated.

Installation of frame structure
Before installing a plastic ceiling in the bathroom, it is necessary to install a frame structure. There are two types of it: profile made of metal and wood. When choosing the latter variation, treatment should be carried out using an antiseptic special material. This will help prevent the development of fungi and mold.

Before you start installing plastic tiles, you should calculate the distance that will be between the PVC panels and the ceiling surface. Measure the height of the lamps. When marking the distance, it is worth resorting to the help of a building level.


If the tile is located near the ceiling, then the frame is attached directly to it. Before starting drilling work, it is worth checking to see if there are any wires running here.

The supporting profile or sheathing beams are attached to the surface of the frame structure. This will reduce the risk of sagging ceilings, which will help maintain the presentable appearance of the coating for a long period of time.

We install profiles and PVC panels
Subsequently, a plastic profile or ceiling plinth is installed. When working, you should use self-tapping screws with large heads, attaching them through a 30-40 cm gap between the holes.

At the same time, the lamps are being installed. After marking the surface of the ceiling where they will be located, electrical networks should be installed. Next, using a knife or hacksaw, the plastic is cut to size.


Before this, you need to insert one of the panel ends, then the structure is bent and the other side is inserted into place. The frame is installed and fastened with the same materials, which prevents it from rotting after some time.

The design ends with the installation of a lamp. After all work is completed, gaps and cracks are treated with sealant.


In the future, the ceiling is decorated in the style of the room’s design, which will help make the room unique and original.

Photo of plastic ceilings in the bathroom


Plastic panels are a win-win option for finishing the ceiling in the bathroom. They are lightweight, easy to install and retain a presentable appearance even under constant exposure to moisture at elevated temperatures.
Plastic can even withstand the consequences of a “flood” from neighbors above, minimizing the cost of subsequent repairs. Considering the practicality of the material and affordable cost, for many plastic panels are a good solution to the ceiling issue. And there is nothing complicated about making a ceiling from PVC panels in a bathroom.
Plastic panels are a great way to solve the problem of uneven ceilings. Under a perfectly flat surface assembled from panels, it is easy to hide all the flaws and differences in height of the base ceiling.
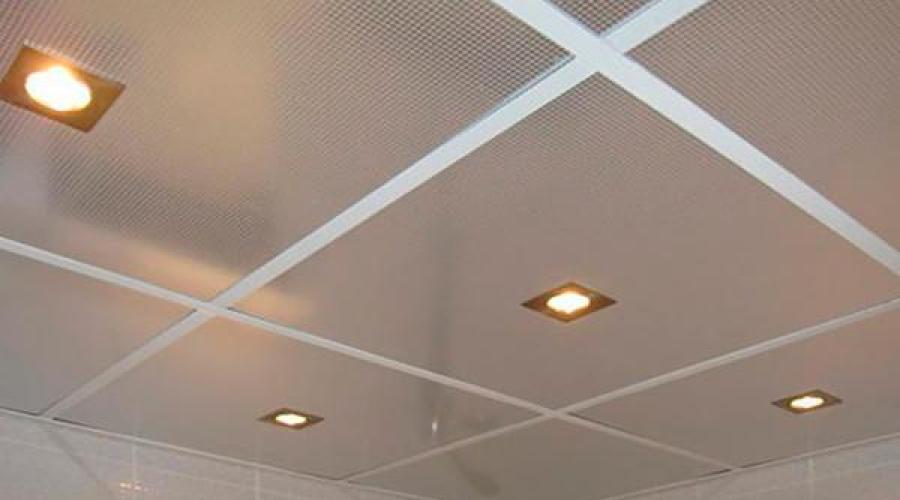
The ceiling made of PVC panels in the bathroom is famous for its excellent reflective ability, making the room brighter and visually more spacious
The material for their manufacture is polyvinyl chloride, called PVC. This is an absolutely safe thermoplastic polymer with excellent performance characteristics.
The finishing material is produced in the form of strips with a length of 2.6 m to 3 m. Manufacturers distinguish between wall and ceiling panels, the difference between which is in weight. Ceiling ones are much lighter than wall ones, which greatly simplifies the installation process.
Depending on the type of construction, three types of panels can be distinguished:
- “polka” - a long ten-centimeter strip with a narrow lock;
- eurolining - the same panel, but with a wide lock;
- wide seamless panel without lock;
The width of the ceiling strips varies between 240-375 mm. The thickness of the products is 5-10 mm. Their color palette is quite wide: panels are available in both plain colors and those decorated with a textured pattern.

Many buyers prefer so-called seamless stripes, which allow them to create the illusion of a monolithic coating
When choosing plastic panels, consider a number of points:
- To install a ceiling in a plastic bathroom, choose a material with a thickness of at least 8 mm. Too thin panels, illuminated by spotlights, will transmit streams of light, making the suspended ceiling structure almost transparent.
- Pay attention to the lot number of the purchased strips. Material from different batches can vary dramatically in shade.
- For finishing, it is better to choose PVC panels in neutral shades and calm tones. Light shades will not irritate the eye. And their ability to visually increase the space of a room will not be superfluous at all with low ceilings inherent in apartments in multi-storey buildings.
It is convenient to hide electrical cables leading to the lamps under the plastic panels. The undeniable advantage of plastic panels is their hygiene: mold and mildew, which often form in rooms with a humid environment, do not accumulate on the smooth surface of the material.

Thanks to the variety of assortment, you can easily choose the best option with which to transform the bathroom into a cozy room for taking water procedures
Despite the apparent complexity of the work, even an inexperienced amateur builder can make a bathroom ceiling from plastic panels.
Calculation of the required amount of material
To determine the required amount of material, you must first calculate the area of the ceiling by multiplying the length by the width. The resulting value is divided by the area covered by one panel. You can find this parameter on the material packaging.
Be sure to add 15% to the final value for the cuts, and round the resulting result to the nearest whole. It is better to select strips in such a way that there is a minimum of scraps left. To do this, it is better to choose panels whose dimensions are multiples of the dimensions of the ceiling being finished.
Determining the number of metal profiles will take more time. You can simplify the task by drawing a proportionally reduced plan of the bathroom ceiling on a piece of paper. Along one of the walls, mark several parallel straight lines, maintaining a step between them of 60 cm. They should be located across the direction of installation of the panels.
To install a plastic ceiling in a bathroom, you can use profiles of the same design as when working with plasterboard:
- 2.5x6 cm – load-bearing profile cd for the construction of stiffeners;
- 2.5x2.5 cm – ud starting profile for wall mounting.
When finishing bathrooms with a small area, you can do without installing guide profiles. In this case, the ceiling plinth is installed on a suspension so that its ends extend beyond their upper part.
If desired, the sheathing can also be made from wooden beams, attaching the frame to the wall with brackets. This will reduce costs and simplify the process of assembling the ceiling. But in this case, the wooden elements should be pre-treated with moisture-repellent impregnation.
We invite you to watch a video about installing panels on wooden sheathing:
Technology for installing a plastic ceiling in a bathroom
The process of installing plastic panels is quite simple to perform and does not require specific knowledge and skills. The installation process includes a number of main stages.
Tools you will need:
- Building level.
- Electric drill or hammer drill;
- Knife or hacksaw;
- Metal scissors;
- Screwdriver;
- "Crown".
To fix the ceiling plinth you will need “liquid nails” or silicone, as well as a cotton napkin to remove any remaining adhesive.
Stage #1 – preparing the base
The first step is to remove the old coating from the ceiling surface. There is no need to level out differences in height of the ceiling slab, but if its surface is covered with crumbling plaster, it should be removed. It is advisable to treat the cleaned surface with a primer, which contains components that have an antifungal effect.
After this, you can proceed to marking the surface. This can be done using a laser or hydraulic level. Wall tiles can be used as a guide, provided, of course, that they are laid correctly. To set the plane of the ceiling, marks are made at the same distance from the seam along the entire perimeter of the room along which the guide profile will be attached.

The amount of indentation of the suspended structure from the base ceiling depends on how the under-ceiling space is intended to be used
If you plan to install lamps in the ceiling, do not forget to leave a distance of 7-10 cm. When arranging communications, make an indent of such size that you can arrange everything you need without problems.
Stage #2 – making the frame
The ud profile is applied to the marks on the wall and fixed by “planting” it on metal screws. Some craftsmen note that it is much easier to use wood screws with a length of 25 mm and d = 3.5 mm for this. Thanks to the wide pitch, they screw in much tighter.
If the wall is tiled, the screws should be inserted directly into the vertical seams between it. The only condition: that the width of the tile joint does not exceed 2 mm. There is no point in drilling holes to attach the profile: the self-tapping screws hold firmly in the seams between the tiles. The main thing is not to twist them so that the thread does not break.

Stiffening ribs from cd profiles are attached transversely to the direction of the panels. They are fixed to the supporting profile and the base ceiling using U-shaped brackets. Each bracket is fixed to the ceiling surface with dowels, and its free ends going down are connected to the cd profile, fastened with self-tapping screws.
When assembling the frame, special attention should be paid to the plane of the structure. It should not have differences. To do this, when setting cd profiles, focus on the thread stretched between the opposite sides of the frame or use a building level.
When installing ceiling skirting boards, the main difficulty lies in trimming the corner joints. When joining in corners, the plinth is cut at an angle of 45°. But even if cracks are found after installation, they can always be blown out with silicone.
To attach the ceiling plinth, a thin layer of “liquid nails” is applied to the back side of the workpiece, and then pressed tightly against the ceiling. After waiting for a few seconds, carefully remove one hand and, holding the baseboard, remove any remaining glue from the edges.
Stage #3 - connecting lighting fixtures
If the ceiling repair option you have chosen involves masking communications or installing special lighting, it is advisable to do this before installing the panels. Having laid wires of the required length from the box, the ends of the electrical cables are reliably insulated during installation, wrapped in several layers of electrical tape. It is better to do the wiring from the box in parallel. This will make it possible to ensure the operation of other devices even if one of the lamps fails.
Some craftsmen prefer to drill holes for installing spotlights as they go. When the strip in which the lamp is supposed to be mounted is installed and secured, a hole is immediately made in it.

Having reached the installation location of the lighting fixture, drill a hole with a “crown”, run wires into it for connection, install the lamp, and so on until the next point
The diameter of the hole is determined by the size of the lamp. In the absence of a “crown”, the holes can be cut with a jigsaw or knife.
Spotlights are attached to the ceiling using the crimping lugs that come with them. To install the device, the antennae are pressed with your hands, the device itself is inserted into the hole and carefully released. The fixed lamps can only be carefully adjusted so as to completely block the technological hole.

This integrated approach of parallel installation of panels and installation of lamps is convenient because it allows you to work in a lit room
Having installed the last lamp, the old wiring is simply cut off and the new one is connected.
Stage #4 - assembling the canvas from panels
The strips must be cut to length before installation. This can be done using a jigsaw, grinder or regular hacksaw. Having outlined the length of the panel, the excess part is carefully cut off.
The starting strip is attached first, which will hold the edges of the adjacent panel and create a beautiful joint between the walls and the ceiling.

The first panel is placed in the groove of the plinth and laid as close to the corner as possible, fixing it to the crossbars with self-tapping screws 7.5 mm long and d = 3 mm, popularly called “tex”
To install the first guide panel, first insert one end of the strip, and then, bending it in a small arc, advance the second edge. The easiest way to tuck the long side into the starting profile is to use a screwdriver.
But this work should be done extremely carefully so as not to damage the fragile material. Having installed the strip, fix it to the supporting profiles, using the same “texes”.
All subsequent panels are assembled one by one, mounting them in the grooves of adjacent strips. When laying each subsequent strip, it is important to ensure that the joint is invisible. To do this, they should be pressed tightly, but effortlessly, against each other.
Installation of the last panel is the most critical step and requires extreme caution. The fragile material may crack if applied too much pressure. In addition, in most cases the last panel has to be cut in width so that it fits almost flush against the wall. To prevent the last panel from sagging under its own weight, it is fixed at several points to the crossbars using metal screws 25 mm long.

It is better to screw the screws closer to the wall directly through the plastic panel; the mounting points will subsequently be covered with a plinth
Having installed the last panel, all that remains is to cultivate the side with the connection without the starting profile. To do this, cut off the back strip from an unidentified starting strip with a construction knife, insert it behind the strip and glue it with sealant to the assembled canvas.
Video example of installation work
Watch the video about installing panels and installing skirting boards, as they say “it’s better to see once”: