We make economy furniture from cardboard: a table, shelves for books and shoes. Ways to create paper furniture with your own hands, diagrams and important nuances Corrugated cardboard furniture patterns

Gifting or making your daughter a home for her dolls is just the beginning. Next, this house will have to be furnished. This is a bunch of toy furniture, equipment, and accessories. This article will tell you how to make furniture for dolls with your own hands.
How to decide on sizes
The dolls, their houses and furnishings are smaller copies of us and our homes. And the most reliable way make doll furniture with your own hands and do not make a mistake - measure real objects, reduce them several times, and then work with the obtained values.
Furniture for dolls - copies of our furniture
How much to reduce the actual dimensions depends on how small or large the doll is, because they range from 7 cm to 60 cm or even higher. Accordingly, they need furniture different sizes. To determine the number by which to divide the actual dimensions, average height divide the person in centimeters (170 cm) by the height of the doll. Let's get some number. This is how you will need to divide the dimensions of real furniture.
For example, the height of the doll is 15 cm. We calculate: 170 cm / 15 cm = 11.3. It is by this number that we divide all the parameters of “human” furniture. It is also worth saying that 14-15 cm is the most popular size among the doll population. Because most finished furniture made in a ratio of 1:12. We can also use the existing dimensions, at least so that we can navigate the scale of the required parts and the amount of materials.

So, the most common doll sizes are:
- male doll 150 mm;
- female doll - 140 mm;
- child doll - 75-100 mm;
- toy baby - 65-75 mm.
If you need furniture for dolls of similar sizes, its parameters will be as follows:

If the toys you have are slightly larger/smaller, you don’t have to adjust the sizes. At big difference you will have to increase or decrease (or you can calculate it yourself).
Doll furniture made from matchboxes
The easiest way to make furniture for dolls with your own hands is from ordinary matchboxes. They are glued together using PVA glue, creating certain designs, then pasted over with paper or cloth, self-adhesive film etc. You can use wooden beads as legs, handles for drawers can be made from small buttons on legs or from long beads.

From matchboxes you can make chairs, a table, a chest of drawers, a bed, bedside table. Another thing is that the furniture is made for very small dolls, no more than 10 cm high. Although, you can use large quantity boxes, gluing them into blocks, and from these blocks create furniture for dolls about 15 cm high. This is also an option, but working with other materials is not much more difficult, and they are more flexible and allow you to create products of more elegant shapes.
This may be your first experience in manufacturing doll furniture. Later you can take on something more serious.
Furniture for a dollhouse made of cardboard
You can try your hand at making furniture for dolls using cardboard. The material is inexpensive, accessible, you can try and make mistakes, redo it. Cardboard is usually joined using PVA glue; you can use a glue gun or any universal glue that can glue cardboard, fabric, or wood. By simply making furniture for dolls with your own hands from cardboard, you will also use these materials. If we talk about convenience, then a glue gun is preferable - it glues quickly, it’s convenient to work, and the connection is reliable.

To make furniture for dolls, you can use regular packaging cardboard. It is cheap, but the furniture it makes is very delicate. It is unlikely that it will be enough for a child for a long time. But, as a “first experience”, this a good option. Cardboard products for scrapbooking are more reliable. It is more dense, homogeneous, has different thickness(from 2 mm and more), maybe with textured surface, embossed with single-color patterns, a pattern on one or both sides. The disadvantage of such cardboard is that you have to buy it, and some types of such cardboard are not very cheap.
Cardboard bed for a doll
This cardboard doll bed is designed for a large doll - up to 50 cm in height. If necessary, all specified dimensions can be reduced.

This option can be done in literally 10-20 minutes. There is no need for glue or other fixatives. The parts are held in place by grooves cut into the cardboard. The width of the groove is equal to the thickness of the cardboard, the length of the slots and the dimensions of the workpieces are indicated in the diagram.

Green and yellow dots indicate compatible cuts. They are inserted one into the other, where the assembly ends. If you like this model, it can also be made from plywood.
Schemes for making cardboard doll furniture
Basically, furniture for dolls made of cardboard is glued. It is unlikely that it will be possible to make something delicate or very complex from this material, but making simple models will not take much time. Having a diagram with dimensions, you can even do without explanations. Everything is clear.
Such models can be made “by eye”. Without the “upholstery” they look unsightly, but after that they look quite decent. A bedside table with doors and an open shelf - same design, different design
Furniture patterns for dolls can be used not only for making from cardboard. They can be transferred to plywood and cut out using a jigsaw.
Wardrobe for dolls made from scrap materials
The toy cabinet can be made of plywood, painted or covered with wrapping paper or self-adhesive film. There probably won’t be any questions here - everything is clear, and if you have questions, you can see their solution in the “natural” closet. But you can make it from absolutely inexpensive materials. The good thing about making do-it-yourself furniture for dolls is that its cost is very low.
From a cardboard box
The main task is to find a thick cardboard box of the appropriate size. Moreover, it will be easier to work if it is packaging - with folded edges. This folding part is a ready-made door. All that remains is to finish it - hang a mirror, attach a handle, etc.

One of the options homemade furniture for dolls - wardrobe
What do you need for work?
To work you will need a good adhesive tape, preferably one paper based, since it’s easier to glue the trim to it later. If you have a glue gun or a construction stapler (a large stationery one will do) with staples, that’s also good. If you will use other materials in addition to cardboard and paper, it is better to find a universal glue that glues paper, cardboard, fabric, and plastic. You will also need scissors, a stationery knife, and a ruler.

If the box you find is too large, you can make it smaller by cutting off the excess. To ensure that the folds are even, take a ruler. We apply it to the place of the future fold, we pass along the ruler several times with a blunt hard object (the stem of a spoon or fork). After this, the cardboard will be easy to bend.
Filling for a toy cabinet
We cut out shelves from scraps or another box. They should be a little - 5-8 mm - longer and wider internal space closet We bend the excess so that sides are formed on all sides. Folds form in the corners; carefully cut them off. We bend one of the parts 180° and glue it to the shelf itself. This side of the shelf will “look into the world.” We bend the other three parts at an angle of 90°, coat them with glue and glue the shelves into the cabinet. The photo on the right shows how the shelves are glued. But so that the gluing points are not conspicuous, it is better to turn the sides down.

Making furniture for dolls with your own hands is no less fun than playing with it later.
In addition to shelves, you can also make a crossbar for hangers. It can be made from bamboo skewers, for example, you can try using a juice straw, wire, etc. Hangers can also be twisted from colored wire or cut from juice bags, plastic bottles etc.
Finishing is a creative process
Next comes the finishing touches. You can paint the cardboard with watercolor or acrylic (preferably) paints, glue it with wrapping paper, fabric, felt. Can be imitated mirror surface- cover with foil (food foil, for example). If you want to make a “plastic” surface, look for water bottles desired color, cut off the neck and bottom, and use the “body” as a finishing material.

Finishing is a creative process, but first, use simpler, softer, thinner materials; they are easier to work with
Handles can be made from wire, beads, or long beads. For toy cabinets Larger sizes can be found with buttons or buttons. We glue all this “beauty” after we have “lined” the cabinet.
Doll wardrobe made from newspapers
You will need old newspapers, PVA glue with a brush, a glue gun, a couple of pieces of wire or thread, wrapping for cabinet finishing or paint.
We roll up tight tubes from newspapers, coat them with PVA around the edges and leave them to dry. Then the tubes can be glued together. For this operation would be better suited glue gun There are two ways: first collect large blocks, then cut them into fragments of the required length, or immediately cut the tubes of the required length and immediately glue the blanks to size. The second way is more painstaking, but there is less waste.

The finished cabinet walls must be fastened together. To firmly fix an angle of 90°, it is better to use a thin wire. First coat the joints with glue, then use wire to pull the walls together. If the wires are in the way, they can be removed after the glue has dried.

Using the same technology, the bottom, top, and shelves are glued. The doors will need to be made a little differently. To make them open, two strips about 1.5 cm wide are cut out of tape. Tape is glued along the edge of the door so that a little more than half hangs in the air. We glue the door to the wall with this loose tape, but so that there is a gap of 2-3 mm between the wall and the door (it’s just tape there). This will make it possible to close the doors. We fix the glued door on the other side with a second strip of tape.

The second way to secure the doors is with wire. Only this time it should be tough and thick enough. Cut a piece that is 2 cm longer than the height of the cabinet. Immediately make a loop on the wire on one side using 1 cm. Bend the loop at an angle of 90° to the wire. We make holes in the bottom and roof, pass a wire through the bottom, the loop remains at the bottom. We put the door on the wire, using the outer tube instead of hinges. Slightly bending the wire, we thread it through the hole in the cabinet roof, bend the excess, fixing the door. We repeat the same operation with the other door. Please note that you need to attach the door with tape before finishing the cabinet, but you can attach it with wire after.

There are still some little things that need to be said a few words. Cabinet legs and handles can also be made from paper straws. You just need to roll them from the paper you use to decorate the toy. Roll it into a tight roll, glue the edge with glue, then cut it into pieces of the required length and glue it in the right places. Instead of tubes there may be wooden sticks, beads, etc.
Doll bookcase or shelf made of rulers
You can make furniture for dolls with your own hands from school wooden rulers. They are good because they are already processed and have the same width and thickness. You can find it at an office supply store the right size- larger/smaller, wider/narrower - optional. For example, for making a doll bookcase you need 6 rulers 15 cm long.

You will also need a jigsaw for the job. If you have an electric one, great; if not, a manual one will do, since there’s not too much work. You also need fine-grain sandpaper, glue (PVA or wood glue) and paints (acrylic or gouache).
We cut segments from the rulers: 4 pieces of 6 cm, one - 8 cm. Sand the edges until smooth, and also remove the markings and barcodes. Between the two rulers we place the shelves (which are 6 cm each), on top we leave approximately the same distance - under the lid (a segment of 8 cm). We coat the joints with PVA or carpentry glue, connect them and tighten them with masking tape, and leave them for a day. When the glue dries, glue the most last detail- cover on top. Actually, the shelf itself is ready, all that remains is to paint it.

To obtain an even and bright color, it is better to cover the structure with white and paint it after drying the right shade. Also, do-it-yourself doll furniture can be decorated in.
Furniture for dolls: photo ideas
You can make furniture for dolls with your own hands from the most unexpected materials. How to use newspapers and wooden rulers you've already seen. But you can make tables, chairs, armchairs, sofas, beds, shelves, cabinets, etc. from ice cream sticks.
Garden bench or sofa - depending on the finish
You probably already understand why this material is good - it has rounded, processed edges, is the same in size and is well processed. If the sticks seem too rough, sand them down smooth using fine-grit sandpaper.
Clothespins make good armchairs and stools. They are disassembled into halves and joined using wood glue. Curly products are obtained in almost a few tens of minutes.
A chair, a table - can also be made from clothespins
Wooden clothespins are almost always used to make doll furniture. But no one forbids taking plastic ones. Working with them is exactly the same, only the difficulty is that wooden ones are easier to modify by changing the thickness, shape, etc. If the product is simple and does not require any modification, you can use plastic ones. They are more varied in shape and size, and are already painted, so there is less fuss with them.
As your skill increases, you can move on to more complex material- plywood or wood. The difficulty is that turning and cutting out miniature parts requires filigree precision, perseverance and takes a lot of time. But you can do whatever you want.


Corner desk for a doll….just like the real thing


Wardrobe for dolls made of plywood - very high reproduction accuracy


Making furniture from cardboard is a fashionable activity today; it has long been widespread in the West, so on the Internet you can find master classes in photos and videos, “patterns” for furniture, as well as stories on blogs of those who are already realizing their fantasies with might and main, and a lot of wonderful examples for inspiration. And in bookstores there are books that tell in detail about the process.
Cardboard furniture is made using a certain technology, so that it is strong enough to serve for its intended purpose (tables, chairs, chests of drawers, shelves), and not just stand in the corner as proof of your creative usefulness.
Limitless possibilities for creating shapes and decorating surfaces - painting, painting, decoupage, volumetric decoupage, covering with fabric and God knows what else - allow you to realize the most fantastic ideas, the embodiment of which you will never see in furniture stores. The technology is not particularly expensive, the materials are inexpensive, and almost anyone can try their hand at this type of applied creativity.
In addition, I think that after acquiring the necessary skills, experience and your own experience, you can try to organize a business producing furniture from cardboard.

You will need raw material, that is, ordinary packaging cardboard. If you have recently purchased household appliances or furniture and haven’t thrown out the boxes yet, let’s put them to use. If you don’t find anything suitable at home, walk to the nearest store and ask them to give you the packaging container.
Required tools and materials:
1. Brown and brown wrapping paper white(for gluing outside and inside)
2. A stationery knife for cutting cardboard (change blades regularly to ensure clean cutting quality) or scalpel, jigsaw
3. Hot glue gun and glue sticks for it, be careful when using it, because. hot glue (acts instantly)
4. PVA glue
5. Liquid glue “Moment” (fast-acting), used for applying glue to large surfaces, the cardboard does not get wet and there is no need to use a weight
6. Fast-acting wood glue (5 min.)
7. Universal wallpaper glue
8. Parquet varnish to make furniture waterproof
9. Protective tape, paper for gluing the “ribs” and a damp sponge
10. Tracing paper or craft paper
11. Metal ruler 50 cm, where gradation zero is equal to the beginning of the ruler, metal ruler 80 cm or 1 m (used for cutting)
12. Centimeter
13. Pencil, eraser, brushes (for glue)
14. Sandpaper for processing (grinding) cuts
Types of cardboard
In the manufacture of cardboard furniture, packaging cardboard is used, which can be found in furniture stores, electrical and household appliance stores, and car garages.
The thickness of the cardboard, which is measured in layers, plays an important role. The cardboard layer is the little waves that make it up. As a rule, the more such layers, the stronger the cardboard. Depending on the type of furniture and/or part of the model, one-, two- and three-layer cardboard is used in the manufacture of furniture.
Single-layer cardboard is most often used for filling internal walls models with rounded, curved shapes; To fill the inner walls of models with straight lines, it is preferable to use two- or three-layer cardboard. Also, darker-colored cardboard is usually more durable than light-colored cardboard.
The front side of the cardboard is smoother, on which you can find inscriptions, the back side is less smooth.
It is very important to take into account the direction of the “waves” of the cardboard; the strength of the furniture depends on this. Usually, when duplicating the walls of a piece of furniture (consists of two identical parts glued together), the first is “cut out” on cardboard, where the layers (waves) are directed vertically, the second, on the contrary, where the layers are horizontal.
Any cardboard will be useful for making furniture. As a rule, it is measured in layers (these are small waves that can be seen on the cut): the more layers, the stronger the cardboard. You can find one-, two- and three-layer cardboard: single-layer is most often used to fill the inner walls of objects with round, curved shapes; two-layer and three-layer - for filling the inner walls of objects with straight lines. Cardboard has a front (smoother, on which inscriptions are written) side and a back (less smooth).
Kraft paper
Kraft paper Brown Used outside furniture only. It is glued with wallpaper glue to the finished form (furniture). It must be torn, and under no circumstances cut with scissors. This treatment is needed in order to make the surface smoother and prepare it for further pasting with decorative paper.
At first, craft paper is used to cover all the edges and seams of furniture, then the entire area of the furniture.
White craft paper is used to cover the entire surface of furniture, when subsequent decor is made in light colors from thin, transparent paper. If you don’t have white craft, you can use a dark one and then cover it with one layer of white actill paint).
P.S. Some people replace kraft paper with tracing paper (paper for patterns), it is also thin and cheaper (it also needs to be torn, not cut), and for gluing corners use protective tape (sold in a roll), which is glued with a wet sponge.
Cardboard cutting
To cut cardboard, you can use a jigsaw (most simple model with blades for cutting metal). Its use saves time and results in clearer shapes, as several layers of cardboard can be cut at a time (front, inner and back walls, having previously secured them with paper tape). Using a jigsaw, do not try to cut out the shape in one go, it is better to bring the line to the corner, move the jigsaw and continue cutting, taking it a little further from the corner. Then trim the remaining corners with a cutting knife.
When using a cutting knife (cutter), to ensure clear lines, you need to take a heavy metal ruler, which is placed on the cutting line and drawn with the knife.

Shape and size of furniture
When you draw your furniture, consider not only the harmony of shapes, but also their balance. It is very important. Furniture with a large protrusion that is not proportional to its base will not be stable. In the case of symmetrical furniture, you can draw only half of the model, the other half of which will only have to be transferred to cardboard. You also shouldn’t forget about the proportions of the depth and width of future furniture, and, of course, about its use.
Furniture consists of at least 3 elements: a front, a back wall and one or more internal elements. Internal elements are pieces of cardboard on which notches are placed, into which the transverse parts are then inserted, making up the skeleton of the furniture. Their number depends on the depth of the furniture, as well as on the desired stability of the furniture, depending on its shape, e.g. curved or with different levels of depth. For furniture 30 cm deep, one internal element is sufficient.
It is also necessary to think about the future use of your furniture in order to determine its structure: furniture on which an alarm clock or TV is placed is strengthened differently. All this affects the number and location of notches on the internal element of the furniture. Also, when designing furniture, you should always keep in mind 0.6 cm of furniture “clothing” (pasting with kraft paper and decorative paper), which will be added in the final result over the entire surface of your furniture.
Where to begin?
Don't go straight to the closet complex shape or a chest of drawers with many drawers and shelves, you need to start with something small in order to understand the technology, understand the details and not burn out halfway through. You can use ready-made patterns from books or websites, or you can come up with something of your own. It will be very interesting to try your hand at furniture for the nursery, for example, a small table or shelf, or a stool. If you involve a child in this activity - New furniture will become the most beloved, because it will be made together with mom or dad. In addition, it is light and safe, and when decorating, your child will finally be able to paint a table or chair without fear of ruining the furniture.
To make a small table, you need to cut out two pieces from durable cardboard in the shape of the future table top (a regular rectangle, circle, oval or something else) and cut strips of cardboard with a width equal to the desired thickness of the table top (about 7-10 cm). Then apply hot glue to one of the surfaces and glue strips of cardboard folded like an accordion with the edge to the base. The more strips you stick on, the more durable your table will be.
As a result of this operation, you will get a kind of cellular surface. Cover it with the second piece of the tabletop and glue it. Then cover the sides with strips of cardboard, and to get smooth edges, cover the edges of the base with paper.
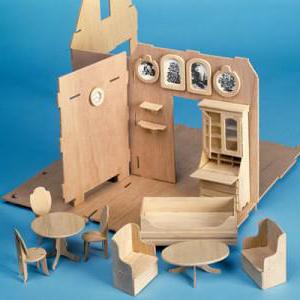
There are a lot of varieties of houses for Barbie dolls in the store, but, unfortunately, there are very few options for furniture; if there are any, they only have a crib or a table. We decided to make the furniture ourselves, using cardboard furniture plans (for dolls). If you love creativity and are practically on friendly terms with it, then you can try your hand at making the house itself, which will save your budget significantly. Let's try to use this article to answer the question of how to make cardboard furniture for dolls.
Making from cardboard
As in any home, the living room comes first, let’s start furnishing it. The first thing we'll start with is the sofa. We need a pattern of cardboard furniture for dolls; it can be prepared from plain white paper. Next, cut out 1 piece from thick corrugated cardboard. the bottom of the sofa measures 10 x 20 cm. Back wall also in quantity 1 pc. size 13 x 20 cm. Side backs in the amount of 2 pcs. size of 1 piece is 8.5 x 10 cm. The blanks are ready, now you need to make the sofa soft and bring it closer to reality. To do this, we use foam rubber, the thickness is at your discretion, but remember, if it is thin, then several pieces need to be cut out and glued together. In the case of foam rubber 1cm thick, it will be enough to cut out 1 piece of the back and sides, and 2-3 pieces for the bottom are better. We trace the finished blanks on the foam rubber and cut them out, then we glue the foam rubber and blanks with any available PVA glue.
The sofa can be upholstered in any way (leather, suede, fabric), that is, you can simply use what you have available. We cover it with regular fabric. The foam sides face inward, so they receive special attention.
After all the parts are ready, they need to be glued into one structure; to do this, use Moment glue, or something else with strong fixation.
Decorate the sofa soft pillows and an additional seat. To do this, cut out parts equal to the bottom from foam rubber in the amount of 2 pieces. and sew the cover in the same dimensions, insert the foam rubber through the hole and sew it up. Use the same principle to make the backrest and pillows. From a piece of woolen fabric, make an additional warm blanket for your doll. The sofa is ready, you can safely bring it into your doll house.
Cardboard chair
We create a chair from cardboard in the same way as a sofa. Quantity from 2 pieces. Take the dimensions of the patterns from the sofa, the only thing you need is to reduce the length of the back and bottom of the sofa.

Making a cardboard bed for the bedroom
No bedroom is complete without a bed. And in children's house Need a crib for a doll. Let's make it from thick cardboard. To do this, we will prepare patterns: bottom 26 x 18 cm, side back 9 x 8 x 18 cm. Cut out 1 piece from cardboard. We use a side panel in the form of a trapezoid; you can use your own imagination or use a regular rectangle measuring 18 x 8 cm.

From foam rubber we cut out 3 pieces of the same size for the bottom and 2 pieces for the side. We glue the foam rubber to the cardboard base and cover it with fabric. We also make the legs for the bed from cardboard. To do this, we cut out 4 squares measuring 5 x 5 cm and make cuts approximately 1 cm on either side at a distance of 0.5 cm from each other. We twist the square into a tube and bend the cut strips to the side, using them to glue the leg to the bed. We do this with all the legs. We make pillows for the bed; instead of a blanket, you can use a piece of fabric. The bed for the doll is ready, we put it in the bedroom, and you can put the doll to rest.
Making a chair from cardboard for the kitchen
We continue the topic of how to make furniture from cardboard for dolls, and furnish further Dollhouse. In order to make a chair, you will need thick A4 cardboard.

First, prepare a diagram and transfer it to cardboard. Mark the folds. Proceed to pasting the chair blank with material or leather and remember that on the back the seams are hidden on the front side, and on the seat - on the back. The doll's chair is folded along the dotted lines; these places can be slightly bent before pasting. We attach the seat with strong adhesive. If desired, decorate with ribbons or additional decorative materials.

Dollhouse kitchen table
What's a kitchen without a table? We continue to make crafts from cardboard. We make furniture for dolls only from dense material.

You can use a cardboard sleeve for the table leg. Or you can take regular cardboard and roll it tightly into a tube. We cover the workpiece with colored or white paper. We cut out the tabletop in the shape of a circle and also cover it with colored paper. We connect the tabletop and the leg using a glue gun. We decorate the table with a tablecloth from pieces of material and, if desired, make napkins. The kitchen table is ready.
Cardboard cabinet for a doll house
Developing the topic of how to make cardboard furniture for dolls, we solve the problem of scattered dresses and other things.
For work we will use a ready-made cardboard box. Using stationery knife We remove the top and bottom flaps, leaving only the side flaps; in the future they will serve as cabinet doors.

Covering the inside of the box suitable color, you can use self-adhesive wood-look wallpaper.
We prepare templates for the shelves and cut them out of cardboard. Consider the dimensions based on your box, measuring the height and width along the inside. They must be pasted over with the same color as inner part closet Connecting glue gun shelves.

In the next section of the closet, glue a cocktail tube and make hangers from paper clips. The outside of the box can also be covered with paper or painted. On one door, as an option with a mirror, you can glue a piece of foil. Fill the closet with things and install it in your house.
TV made of cardboard
What's a home without a TV? To create it, we will need, as with all products, thick cardboard. We prepare two identical parts measuring 15 x 12 cm. Glue them together. For a plasma effect, you can cover a cardboard TV with black tape. If you don’t have this on hand, plain black paper will do. We begin by gluing all the side parts first, and then only the flat panels. The leg can be made from a regular felt-tip pen cap, and we also decorate it with tape.

You can take two as a stand matchbox and glue them together, additionally cover them with plain paper and only then decorate them to match the color of the TV. Using hot glue, we attach the leg to the TV and to the matchbox base. Cut out from any children's magazine beautiful picture, slightly smaller than a TV screen and glue it to the plasma. We place it in the house and make your doll happy.
With the help of the article, we examined the main options for arranging a cardboard house and answered the question of how to make cardboard furniture for dolls.

Based on this, fantasize, come up with your own options and delight your children with new ideas.
Is regular cardboard suitable for furniture production? Is it possible to make high-quality chairs, stools, tables, bedside tables and other elements from it, without which it is difficult to imagine a modern home?
On the one hand, everyone knows that cardboard is not a very mechanically stable material, so rarely does anyone imagine that furniture made from it will be strong and reliable.
But this is a fact; cardboard can be used to make not only cabinets and beds for dolls, but also chairs that can easily support the weight of an adult.

Such interior items will last a long time, they are environmentally safe. But the main advantage is different: anyone can create furniture from cardboard, realizing their wildest fantasies.
Ideas
A careful look around will help you determine where cardboard furniture is most suitable. The smartest place to start is in the children's room.

Sets of children's furniture, both for games and for regular use, are produced by many companies, which means that everything can be reproduced independently.

Tables, chairs, ottomans and stools are made from cardboard for children. A toy castle, in which a child can fit freely and can play in it, suggests itself.

The same can be said about numerous shelves, bookcases, racks, chests of drawers, and toy boxes.

If you move from the nursery to the living room, the first thing that will catch your eye is dinner table with chairs. All this is made from cardboard, and it turns out beautiful, even fashionable. You just need to use correct methods assembly and selecting suitable materials.
Note! DIY chandelier - original design ideas. Instructions +100 photos!
Even novice self-taught furniture makers can make racks or cabinets for dishes. What can we say about small items?

A variety of drawers, shelves, organizers and other elements that are found in abundance in every room can be assembled from corrugated or single-layer cardboard, giving them a stunning appearance.

With some practice, you can produce real masterpieces of furniture art from cardboard. It is enough to get acquainted with the activities experienced craftsmen to see how complex, multifunctional and unexpectedly original products made from seemingly ordinary paper can be.

From small items to office kits
Cardboard, as a material for furniture production, is rapidly becoming fashionable. Entire trends in such furniture art are being created, each of the companies operating in this market works in its own style.

It’s easy to order almost everything, from original lamp For desk, right up to the table and even to bulky furniture for books, documents and clothes.

It should not be surprising that cardboard is able to withstand mechanical loads. Paper, as everyone knows, is made from cellulose, which, in turn, forms the basis of wood.

And everyone knows the strength of wood and the broadest opportunities its application. Therefore, to ensure the strength of cardboard products, it is enough to assemble them properly. Moreover, there is a lot of cardboard on the market specifically designed for these purposes, as well as different types glue, paint and other finishing materials.


On the street, like at home
Owners of cafes and restaurants have recently been actively using cardboard chairs and tables as furniture for summer areas.


This is an extremely reasonable decision. Cheap, beautiful, and even with the prospect of trouble-free disposal if the need arises.

Naturally, cardboard furniture does not withstand exposure to water well, but saving it from rain is not so difficult by placing it under awnings.

How and from what to make cardboard furniture yourself?
Corrugated cardboard is used to make furniture. This is a product that consists of alternating layers of smooth and wavy paper glued together. At the bottom and top of this cardboard there is plain paper. Its strength depends on the quality of the paper and the number of layers (from one layer or more, usually up to seven).

Which corrugated cardboard to choose for certain furniture? The less load, the fewer layers. For a lampshade, a single-layer one is quite suitable; for a bookcase, a five-layer one is preferable.

It should be remembered that cardboard has a front side and a back side. White products are considered to be of higher quality, light brown - less, although this rule does not always work.


Set of tools and accessories
To fully work with cardboard, you should stock up on:
- scissors of various sizes;
- office knives and/or medical scalpels;
- metal (plastic will not work) rulers, from 30 cm to 100 cm;
- a special self-healing cutting mat, or simply a sheet of plywood of a suitable size;
- simple pencils;

- awl;
- hot melt glue and a special gun for it, PVA glue, Moment glue and other types of glue;
- brushes for applying glue;
- sandpaper;
- damp sponge;
- varnish for interior work
- gloves to protect your hands.

Naturally, cardboard is needed, but it must be selected in accordance with the requirements of each individual project.

You should be ready to buy additional tools, supplies and accessories, since it is simply impossible to take everything into account at the stage of organizing the process.

Where to start?
You should start with organizing your workplace. Normal lighting will be required, several square meters on the floor (there may be a separate table), shelves for tools and accessories.


As for projects, you should start with simple things in order to gain experience and get a feel for the material. Then, after the technique has been perfected, you can begin complex projects.

Photo of cardboard furniture in the interior


In order to make a sofa out of cardboard with your own hands, the first step is to decide on the size and shape of the structure, because in fact, you can make a wide variety of furniture of the most varied shapes from cardboard. Once you have decided what kind of sofa you want, you can start cutting components designs. To do this, take cardboard boxes (of which you will need a lot) and cut out all the parts of the sofa from them according to a pre-made template (pattern).
After this, we cut out many small rectangles from cardboard and glue them in those places where the greatest loads usually occur during operation, that is, on the back and seat of the future cardboard sofa. You can use regular office glue or PVA glue as glue.

Now we glue all the pieces of cardboard together and leave them for half a day so that the glue dries completely. It is advisable to press down the structure to be glued with something heavy so that after drying, bumps and irregularities do not appear on the surface of the cardboard.

After this, we cover the finished dry structure with paper, foam rubber and cover it with fabric. At each stage we make sure that the glue dries completely. And only then do we proceed to subsequent work.

As a result, we will get this interesting sofa, consisting of two parts. On the back side there are Velcro strips on the upholstery that secure both parts of the sofa to each other. If necessary, the sofa can easily turn into two armchairs.

And here is another sofa made of cardboard, the manufacturing technology of which is similar to that described above. Only in this case, the cardboard was not covered with anything (neither cloth nor paper), but was placed on metal carcass. It’s difficult to say how convenient such a sofa will be to use, but since this model was developed by a well-known design company, I can assume that such a creative cardboard design can become almost the most important decoration of the interior.

And another interesting cardboard sofa made of cardboard boxes, inside of which lies some dense material. The author of the idea forgot to mention what exactly is inside this structure, so that it would not collapse under the weight of an adult, but I think you can come up with some of your own options, based on what materials that can withstand loads are at hand.
