DIY decorative fencing. Cheap fence for a dacha with your own hands How to make a fence yourself

Read also
It is very important that at the dacha the eye enjoys not only the plantings, but also the surrounding environment. About, and we have already talked about, it’s time to talk about how to make fences for your dacha with your own hands. Settlement without them dacha area is not possible and therefore it is better to take care of creating a strong and good fence. And it’s even better that it fits into the overall picture of what you create on your site.
DIY garden fences cheap
Don’t let the length of the fence or its height bother you. Let's start with the fact that it is easy to make a fence with your own hands and quite inexpensively, because if you have the desire and basic knowledge“fence theory”, then you can safely move on to the next stage - the choice of materials.
Country fencing can be made from:
- wood;
- picket fence;
- metal profiles;
- grids;
- yes everything, anything!
You just have to choose what you like best and fits into the overall design.

Wooden garden fence
Wood is one of the the best materials. It looks noble, can withstand bad weather, can be purchased without problems, and at the same time it is environmentally friendly.

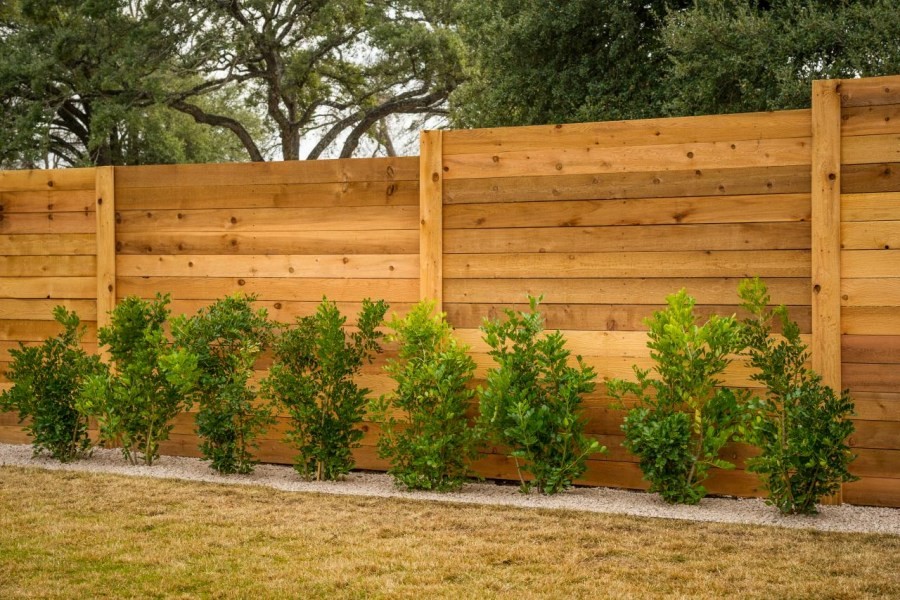
It is not necessary to purchase a pre-prepared board. Just take out the supplies and scraps that have accumulated in the backyard and are still suitable for use - for example, ranch fences allow the use of uncut and uneven boards. You only need to dig in wooden poles along the intended path and nail the boards to them in a horizontal position.

This is a fairly simple and cheap fence for a dacha, and if you take into account its environmental friendliness, then you should give preference to just such fencing.
In addition, depending on the length of the board, you yourself choose its direction, so you can build either a ranch fence or a simple vertical or horizontal fence, which has long proven itself.

To install a wooden fence with your own hands you will need:
- beam;
- boards;
- nails;
- hammer;
- shovel;
- sand.
If desired, you can add cement and bitumen to this list if you want the timber to be installed as stably as possible.
The principle of installing a wooden fence is very simple. You dig holes to install the support beam and fill them with cement or cover them tightly with sand, compacting it. This way the supports will not deform under the load of the boards and will become more stable.

Next, all you have to do is nail the boards to the posts. If you want to attach the boards vertically, then you will have to stretch and nail two planks between the supports, onto which the boards will then be attached. If you still want to see a ranch fence on your property, then it is enough to immediately attach the boards from pillar to post. More details in the video Ivan Galkin:
Just don’t forget that wood has its own shelf life and doesn’t like moisture. Therefore, be sure to paint the fence after construction and periodically inspect it for damage in order to repair or replace the board in time.


Picket fence
Picket fences are the most popular type of wooden fence. And no wonder, because the picket fence is so easy to install, economical to purchase and beautiful when finished.


Before starting construction, it is necessary to mark the area where the building will be located, determine its height and the frequency of installing the picket fence. Although we install a fence for protection, if we close the area tightly, we can deprive the plants of light, which will lead to crop failure.

The set of materials for building a picket fence is similar to what we presented above:
- timber for supports;
- board for horizontal screed;
- cement;
- sand;
- nails or screws.
Tools can be different - from a shovel with a hammer to a screwdriver and an electric drill. Only the speed of construction will depend on this, but not the quality of the fence.

First you need to install the pillars, which will become the basis of the fence. Therefore, dig holes for the timber at an equal distance from each other, but no further than the length of the board that will serve as a screed. After this, install the supports and fill them cement mortar.
While the solution hardens (and this will take at least 3 days), you can proceed to the installation of sections. To do this, we cut the board to a length sufficient to attach its ends to the support. We place the sections on supports using nails or self-tapping screws and then attach a picket fence to them at an equal distance.
As you can see, the process of building a fence is quite simple and does not require any special construction skills - just patience to wait for the solution to harden. Then you can create a fence to your liking.


Well, to understand the intricacies of working with a picket fence and its installation, we recommend watching a video master class Andrey Krylov:
Metal profile fence
And yet, despite the beauty and cheapness of the picket fence and wood in general, it has one drawback - such a fence is short-lived and maximum term its service is only 15 years. Therefore, many, wanting to save money, are looking for a more durable, affordable and strong material - metal profiles.
Due to its strength and availability, corrugated sheeting has long been wide application from summer residents. It is used for garden beds, roofing and, of course, fencing.
Metal profiles do not have the most aesthetic appearance, so most designers categorically bypass corrugated sheets when creating beautiful and original fences. But its accessibility and ease of use plays into the hands of summer residents, allowing them to good fence for a do-it-yourself dacha.
The construction of such a fence is not much different from others. You will need the same support posts and boards for the horizontal screed, on which the profile itself will be attached.

And since metal profiles are still not the most popular material for creating a fence, it’s worth dwelling a little on basic requirements for its installation:
- The distance between supports should not exceed 2.5 meters. It’s better to stick to a more frequent, half-meter installation. This is due to the fact that the profiled sheet is quite flexible and will be deformed under the pressure of the wind, losing its beauty and, most importantly, strength. Therefore, the shorter the sections, the better the quality of the fence.
- The supports must be buried at least 1.5 meters into the ground. Despite the flexibility of the metal profile, the sheet itself is quite heavy and requires stable support. That is why it is recommended to cement all supports at the base.
- It is best to use not a beam as a post, but a pipe with a diameter of 6-8 cm and a wall thickness of at least 2 mm; such supports will definitely become a good basis for a stable and strong fence.
- It is recommended to use 3 horizontal logs when installing the profile - top, bottom and middle. This way the fence will be more resistant to deformation and will better hold its shape under any pressure.

And so that you can be convinced of the simplicity of building such a fence, we invite you to watch the channel’s video master class We do it ourselves 36, where they share with us all the tricks of working with metal profiles:
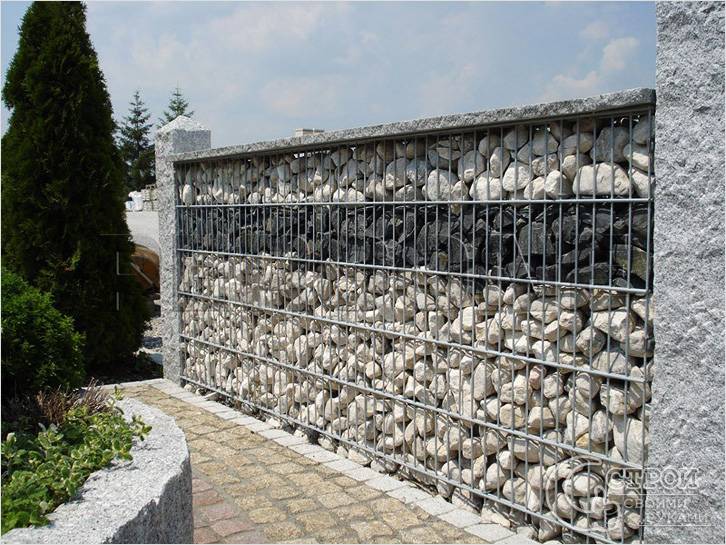
Mesh fence for a summer residence
And yet, one of the most budget-friendly options is a mesh fence. Like any metal product, the mesh tolerates most natural phenomena. And even rust can be prevented by timely treatment. Therefore, fences made from it are quite durable.

Fence mesh comes in several types:
- Chainlink, which is sold in rolls, treated with polymers to prevent corrosion and can be easily installed between posts without unnecessary partitions,
- Grooved, formed from wire with a cross section of 6-7 mm and bent by a wave. It has a strong weave. And thanks to it, it keeps its shape well.
- Welded, has a smaller wire cross-section than in the case of corrugated wire, but due to welding it is stronger. True, using it for a fence will be more expensive than in the case of chain-link.
A fence from any mesh can be made in two different ways:
- Stretch the fabric around the perimeter and attach it to the support posts.
- Stretch the mesh over the frame, and then assemble the fence from the resulting sections.


Allows you to keep track of your pets
Both methods have their own characteristics, so it is impossible to single out one of them as more profitable or simpler.
So, for example, by simply stretching the mesh from pillar to post, you will reduce the time for preparing materials. After all, you will only need to drive in the support, determine the height of the future fence and stretch the mesh, attaching it to the posts with wire.
This method is easy to implement and practical if you are short on time and want to make a temporary fence.
And yet it is worth considering that for a chain-link mesh, the posts will have to be placed at intervals of 1.5-2 meters, and this will increase the budget for the material. While for a corrugated mesh a distance of 3-4 meters is sufficient.

But if there are differences in height on your site, then this is the only solution if you have chosen mesh as the material. Sections are already prepared frames from metal profile, which brings us to the limitation - if you set them in descending order, there will remain open space under the fence, which does not add either safety or aesthetic beauty to the site.
Installation of sections is simpler than stretching the mesh fabric. Ready-made frames are simply attached to the installed poles, equipped with the necessary anchors, or even welded to them.

As you can see, the choice of grid and method depends entirely on your desire to improve the area, the time you have and, of course, the budget allocated for this.
To figure out which material is right for you, you can take a look at a detailed master class on selecting materials and installing them in a fence.
If you want more clarity and understanding of how to do everything correctly, with explanations seasoned master, then it’s worth watching the video tutorial from the channel RemontHelp.com:
The grid itself consists of cells, i.e. your area will be clearly visible from the street. Therefore, it is usually recommended to use this material only between areas so as not to block the plantings from light.

Original ideas for a fence at the dacha from scrap materials
Every practical summer resident will consider it his duty to save as much as possible and use everything that remains from other projects. Therefore, before you start building a fence with your own hands, we suggest you think about whether it’s worth rushing to the store to buy a mesh or picket fence? Maybe we can make do with improvised materials?
Then let's see what we have accumulated over the entire time we owned the dacha? And is it possible to make decent fences out of this trash?
There is only one answer - yes, you can.
AND car tires, and , and the covers from them can become a fence or its decoration. Moreover, it will be no worse or more boring than one assembled from high-quality materials.
Tire fence
Let's start with tires, for example. A lot of this stuff always accumulates, so over time the question arises of where to put it. Recycling costs money, but the fence will also bring benefits. The choice is obvious.

Somewhat eclectic

All that remains is to fill the area well and begin to install the tires on top of each other in a checkerboard pattern, as if laying out bricks, or secure them to a previously installed chain-link fence.
By the way, if you build a fence from tires according to the pyramid principle, then the soil in the protruding parts can be used for flower beds, thus creating an entire green wall.

Fence made of plastic bottles
Plastic can be considered an ideal material for a fence. After all, it decomposes in at least 60 years, which means that a fence made from it will not suffer from rain or sun. Although bottle plastic is still soft, and its shape at first glance is not suitable for building a fence, many began to give it a chance and use it for other purposes.
To enclose your entire summer cottage with such a “plastic fence”, you will need to accumulate a lot of bottles to create a full-fledged fence.
The low weight of the material makes it easily deformed from physical damage. In addition, if you have accumulated mostly transparent bottles, then such a fence will not provide protection from prying eyes. But the cost of the finished fence will be small.
If you combine bottles different color, then you can assemble entire mosaics. That's why creative personalities agree to endure shortcomings for the sake of original fence, attracting the attention of passers-by.
To create a complete fence from plastic bottles It is recommended to take the same size of material. And it can already be assembled into a wall, stringing it on a wire like a curtain, or placing it on top of each other, filling the voids with cement mortar. The result will depend entirely on your desire to strengthen the fence or make it more airy.

By the way, bottle caps will also be used. After all, you can make a movable fence from them, and even with any pattern.
This will require many caps with four holes drilled and meters of wire. Based on the colors you have, choose a pattern, and better diagram for embroidery with beads, and then simply string the lids in order, as in embroidery, in rows. Then pass the wire through the vertical holes, thus connecting the rows.

If you are simply bored with the old fence, but still want to put the covers to use, then simply screw them on with self-tapping screws, creating a bright pattern-panel on the fence. And now you already have interesting wall on the site, attracting the attention of kids and pleasing your eyes.
A master class from Soloremont.
However, an ordinary picket fence or an old picket fence can simply be painted in an original way.


Fun pencils


You create your own mood and desire to visit the dacha more often!
Do-it-yourself wattle fence in the country: a master class for lovers of rural romance
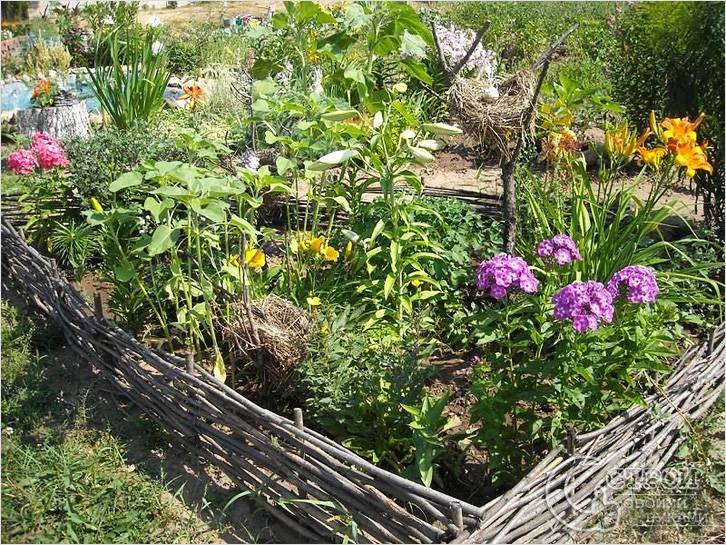
And if you have ever seen a Ukrainian farm or met huts in the south of Russia, then your heart could not remain indifferent to this peaceful romance. And it’s not even these cute, like toy houses, with thatched roof and whitewashed walls, and a wicker fence with clay hanging on it upside down.

And yet, in addition to the decorative component, wickerwork is an excellent solution even for modern dacha. Such a fence is not inferior in strength to either wood or metal. And in terms of beauty and attractiveness it will rank first among them.
And from the point of view of economy, it fits well into our criteria. After all, weaving such a fence will allow you to realize your creative side, and will also save your budget.

Flowers are clearly visible
But first, it’s worth preparing the material:
- timber or logs as a support and basis for weaving;
- material for weaving (preference is given to willow twigs, although twigs of other trees are also suitable, the main condition is their plasticity);
- gloves;
- shovel;
- sand.
If you are going to weave along already driven posts, then first dig them in and cover them with sand and compact them. After that you can start working on the rods themselves. It is necessary to steam the rods so that they become more flexible and do not break when deformed.

You can weave in different ways:
- horizontally, passing the rods in a figure eight between the pillars. This method was borrowed from weavers;
- vertically, between horizontally located logs. This weaving turns out to be more decorative than practical. That is why it is used for fences between adjacent areas, but not external ones;
- diagonally, forming an original wooden mesh. This type weaving is the most labor-intensive, because the rods must be long for the fence to be at least of medium height. In addition, it is recommended to dig each rod into the ground for greater stability.

To understand the intricacies of simple weaving and try to make your first wattle fence, we recommend taking a look at the video tutorial Oleg Bryukhanov, where he shares the secrets of creating a simple but beautiful fence.
If you prefer a fence made of sections, then the master class will be useful for you Yury Kulakevich, where he shows how to create a wicker wicker base.
As you can see, a fence is not just a protective structure that hides a summer cottage from prying eyes, lovers of other people's crops and stray dogs. A fence created with your own hands is also a decoration of the territory, allowing you to enjoy every day spent in nature, among the plants we planted with great love.
It’s not difficult to come up with a fence design; it’s more difficult to realize the idea of how to do exactly what you want. But when you also want to make money from it, you need to evaluate the attractiveness from the very beginning consumables. After all general design often collected from everything that lies idle or is sold for pennies.
From scrap materials
Now, precisely on the territory of the Russian Federation and the CIS countries, here is what you can choose from:
- Pallets;
- Used slate;
- Plastic (various containers);
- Production network;
- Cutting from a sawmill (the most budget-friendly rural option);
- Shrub branches (collected with your own hands, if available near the construction site);
- (for a fence or shed, there is no cheaper option);
- Disassembled wooden barrels(rare case, but sometimes in production workshops are forced to sell already broken barrels made of strong wood at their own expense);
- Scrap metal (if you have transport, you can visit retail outlets and collect poles, crossbars and even some decor for handmade work by weight);
- Profiled sheet. The most inexpensive;
- Concrete, cement and decorative.
How to make a cheap fence out of all this? Let's look at it in detail.
Designer novelties
Beautiful photos with original ideas: 
Simple design layout. In the photo - a homemade picket fence made of wire, hazel, willow. For a simple fence made of branches with your own hands, you don’t even need to nail anything, just make turns between the supporting parts, and the low fence will be ready very soon. It’s a pity that such designs don’t last very long. strong winds and precipitation.
A garden version of a decorative fence in a private house, assembled on your own. And the more leftover paint is used in this option, the brighter the garden itself will look. Boards can also be selected from pallets to create a simple decorative element. 
Worth noticing! Such garden fence- This is also an improvised feeder and water bowl for birds. Very original and inexpensive.
Brick, cement and glass. American new. The materials are not cheap and readily available, but it looks great. Unfortunately, such a design most likely will not last very long due to the intense interest. There will be someone who cannot repeat this. 
Copper or other metal at work. Of course, the element is not for everyone. Yes and welding work a lot of. But if you do, for example, from iron beds past eras, it will be original, free and forever. 
Plastic. Even greenhouses have been made from containers for a long time. And they don’t forget about fences. It is advisable, of course, to make small pieces from empty containers smooth material, which is then sheathed on buildings or fences. But the above method will work, just prepare a strong frame in advance. 
Euro pallet. Suitable for everything: firewood, building a shed and a fence. Interestingly, the technology for creating the pallets themselves has a drying stage. It turns out that pallets from a warehouse are an ideal building material for an inexpensive fence. And often unloading pallets are sold simply by weight. There should be no knots or defects on small boards. 
There is no need to disassemble the pallets to build the fence. The most correct thing to do is as in the photo above - set and secure each of them in turn.
Branches, tree and croaker
Very inexpensive, example in the photo: 
It couldn’t be simpler - they insert or hammer in something for support, and then weave it the way your heart desires. Everything that lies under our feet goes to work. Even dry, crooked and heavy oak branches can be the completion of the composition.
Below is a photo of a fence. From a thin branch Such a design, of course, is not particularly durable. But you can secure a ready-made homemade fence with a mesh over the entire area. 
Like this (next photo) it is much stronger, more economical and more beautiful. Livestock, forest pests or abandoned dogs will not disturb your territorial space. Moreover, the mesh can be installed not very finely, and it is enough to be one meter from the ground. Above this, such protection is no longer needed.

Mesh combined with wooden frame, carried out according to the right technology(cone-shaped wood, pillars treated with bitumen). Modest, not particularly expensive and reliable. There is no point in sinning with wood, because a fence made of absolutely any material will not last forever. And even monolithic structures are destroyed by atmospheric changes.

Carved grace. This is a small work of art. Although earlier, when most of the population of our country lived on private lands, carved elements were in every yard. This had several meanings: wealth, neatness, skill and respect for tradition. 
Below - garden fence made from pallets, treated with protective compounds. 
fence board goes together very nicely With concrete base and a pillar.
By the way, the “fence board” comes in several grades (grade 1-3). If there is a lot of crooked wood at the sawmill, then grade 3 fence boards will accumulate in cubic meters. Externally, of course, there are differences, but this is the same wood that is used in construction. It’s more of a hassle with her, but for such low price this is forgiven her. And if the 1st grade costs from 3 thousand per 1 cubic meter, the 3rd grade will cost 1.5-1.8.
It’s also interesting that cheap lumber is not bought quickly, so it’s easy to find dried, inexpensive fence boards in warehouses or yards.
Original wood processing
By Japanese technology Now you can burn fence boards, giving brown tint. Similar processing for natural material only needed once. Moreover thin layer Burnt wood is resistant to dampness, and natural processing can only be replaced with expensive paint, the service life of which leaves much to be desired. Burn several dozen boards with oxygen or blowtorch convenient, practical and original.
Slate, corrugated sheets, concrete and mesh
If you take on new slate, it would be better to order exactly flat version, designed for 1 span. Such material is easy to replace if it breaks, and it looks discreet, thorough, and more solid. 
Used slate often with a wave. It is rarely used on the front part, except for visors. However, the back side of the site, closed from the eyes of everyone and everything, also needs fencing. This is where they find a use for the old slate from their grandfather’s house or barn.
Interesting fact! Slate, produced in the 70-80s of the 20th century, is very fragile, but durable. If no cracks are created during transportation and installation, then it will remain in the fence for decades.

Classic rules for working with your own hands on corrugated sheets and metal frames. As shown in the figure, for a high fence (above 2 meters) it is more correct to make 3 logs. Well, the span is no more than 2.5 meters. 
Patterned grids. Long and painstaking work. Must be carried out according to a project or pattern. Of course, you will have to work hard, but you can sell such works. Or hire a designer if there is interest in your ideas. 
Cheap, beautiful and original. You can use everything in decorative elements: from forks to car hubs. And it doesn’t matter how it all will look in the overall picture, because different elements made of iron or other material cannot be assembled unattractively into one structure. 
Profiled sheet or corrugated sheet on wooden frame . An option for those who do not have welding skills. It is better to make the frame itself more stable, although sheets placed horizontally will give the necessary rigidity. It is advisable to treat the wood protective equipment based on drying oil.

Concrete or brick fences. There are a lot of shades here, decorative elements and, accordingly, expenses. It is more profitable to make only the base from stone, placing it in the center of each span wood, forging, sheets of flooring or even factory plastic.
Estimated cost
Let's look at the example of standard 6 acres summer cottage:
| Type of fence | Materials | Quantity of materials | Cost per unit, rub. | Amounts, rub. |
| Wooden fence with concrete base | Cement (concrete); | 11 cubic meters; | 3 thousand; | 33 thousand |
| pillars (logs); | From 50 pieces; | 450; | 22 thousand | |
| logs (timber); | 40 pieces; | 150; | 6 thousand | |
| fence board (grade 2-3). | 200-250 pieces. | 60. | 15 thousand | |
| Result: 76 thousand for building materials. | ||||
| Mesh with concrete base | Concrete; | 11 cubic meters; | 3 thousand; | 33 thousand |
| Pipes for the frame; | 89Х40; | 1500; | 78 thousand | |
| Wooden logs; | 50 pieces. 200-250 pieces; |
108; | 3.7 thousand | |
| Net. | 170 square meters. | 60. | 9.4 thousand | |
| Result: material without delivery 124 thousand. | ||||
These are prices for the central region. And if we count the turnkey supply of the above materials, then we need to add up to 50 thousand for labor and delivery.
Results
Fences made of stone, brick and decorative components cost twice as much as fences made of mesh or wood.
It’s easy to guess that it’s most profitable to do what you’ve planned with your own hands, using the same Euro pallet or used pallet. After all, when high-quality installation they look much more original. The price of the work is cheap; the material itself can be ordered from 100 rubles per piece. 1 element is a whole meter of almost assembled fence. Decide for yourself what is best for a regular fence.
Video instructions
Ivan Galkin talks about how to make an inexpensive fence.
One of the important elements country house is a fence. It defines the boundaries of the site and serves as protection from prying eyes. Increasingly, the fence also serves a decorative function. In this article we will look at how to make a decorative fence with your own hands, without turning to specialists for help.
Fencing materials
Decorative garden fencing can be made from many building materials.
Wooden fences deserve special mention:
- The installation process is simple
- The prices for the material are quite reasonable.
- This fence can be painted in any color that seems appropriate.
Stone fences are no less popular. This type of fence does not require any special maintenance after installation.
Note! A fence should not only be aesthetically pleasing, its main quality is strength and durability!
There are options for making decorative fences from plastic, concrete, brick, bottles and more. Below we will take a closer look at each of the existing ones.
Plastic fence

As a rule, plastic fencing can be purchased ready-made on the market or in a specialized store. This material has positive technical characteristics, especially thermoplasticity. Plastic fences can be used to fence flower beds, sidewalks, and front gardens. Manufacturers plastic fences use a variety of colors and shades
Here are just some of the features and positive characteristics plastic fencing:
- There are strip and sectional fences. They are ideal for marking boundaries garden path. In addition, they will be a wonderful addition to a flower arrangement.
- Each section has pegs. Thanks to this, their installation is not difficult. Using light pressure on the fence, the pegs need to be driven completely into the ground. Installation is possible both on a flat and inclined surface.
- Thanks to modern developments, such a fence can imitate a wattle fence, a wooden picket fence, masonry And so on. Typically the section height is 130–200 mm.
Decorative wooden fence

Wood is the most common material used to make decorative fences for flowers and more. The tree does not create disharmony in the garden; it looks at ease. The main advantage is the availability of the material. To make a decorative fence, you can use different lumber: branches, logs, slats and boards. However, regardless of the type of wood used, it should be carefully treated at the beginning. This is especially true for the part that will be immersed in the ground. For example, this part can be treated with liquid bitumen. The other part of the structure must be impregnated with a special solution, which will prevent rapid rotting and repel insects. Let's look at the features of manufacturing three types of wooden fences:
- Boardwalk.
- Lattice.

Manufacturing of plank fencing. Let's look at an example of making a board fencing with your own hands measuring 700x700 mm. To do this you need to prepare:
- four bars 5×5×70 cm,
- eight boards 2×10×70 cm,
- 40 wood screws or nails,
- hammer or screwdriver,
- level.
The work process looks like this:
- Supports are driven into the ground at a distance of 70 cm from each other. Using a level, the vertical is checked, and the height is also adjusted.
- Then the board is attached to the top of the block so that its edges do not protrude beyond the edge of the block.
- The second crossbar is installed at a distance of 10 cm from the bottom edge of the board.
- The entire board fence is installed in this sequence.

Manufacturing of decorative lattice type fencing. This fence is suitable for a small flower bed. It can also be used to fence a recreation area. One section in our case will be 90×63 cm. For manufacturing you need:
- two bars for support 3×3×95 cm,
- two bars for the crossbar 2×3×90 cm,
- twelve slats measuring 1x2x52 cm,
- four self-tapping screws 3×40 mm and 3×25 mm – 12 pieces.
The whole DIY manufacturing procedure boils down to the following:
- The process of assembling sections is carried out on a flat surface. It is necessary to retreat 3 cm from the top, and then secure the bars with self-tapping screws.
- Step back 50 cm from the place where the upper crossbar is attached, and then install the lower beam according to the same principle.
- The slats must be secured from left to right with a 3x25 mm self-tapping screw. Stepping back 15 cm from the support, the first rail is secured at the upper point of attachment of the crossbar and support. The slats are installed in 15 cm increments.
- Each rail is installed in a similar manner from right to left. This creates a diamond-shaped pattern.

To fence your plot or flower bed, you should make the appropriate number of sections.
Note! If you decide to make a decorative fence rectangular or square shape, then the consumption building material will increase several times.
When the fence is installed, it should be painted or coated with a protective varnish, which will protect the structure from rotting. If desired, the fence can be painted in several colors, which will make the area more cheerful.
Decorative wattle fence. As for this option, it is done quite quickly. To do this, you will need to get willow, birch or apple branches. It is best to cut them in the fall or spring. The thickness of each branch should be no more than 20 mm. The consumption and volume of branches required will entirely depend on the size of the decorative fence. In addition to the branches, you will need to prepare the following material:
- wire,
- wood screws,
- bars.
Note! Some modernize this idea and use wires or multi-colored hoses instead of willow branches!

So, all the work proceeds in the following sequence:
- Vertical supports are installed in half-meter increments.
- As a rule, you should weave starting from the first row. Using screws or wire, a vine is attached to the bottom of the support. Then it is stretched horizontally, bending around each subsequent beam/support. So that after a while, when the branches dry out, the structure does not fall apart, it is recommended to fasten each end with wire.
In principle, this is the entire technology for making a decorative fence with your own hands using the weaving method. Others are also known interesting methods making fences, more on that later.
Decorative stone fence
In this option, you can use the most cobblestones different forms. The result may be a fence in the style of the Middle Ages. With delicate flowers, the rough texture creates an excellent contrast. Such a fence will last for centuries, and this is without exaggeration. The work plan for making such a fence is quite simple:
- The first row of stones is best buried and laid on cement. It is preferable to use flat stones.
- The stones are selected to be approximately the same height. This will allow you to construct subsequent rows without less problems.
- To make the structure durable, each stone is connected with a cement composition.

Note! During the laying process, the seams should not coincide; it is necessary to lay the stones staggered.
Metal fence

Every metal fence has one main advantage, which is durability. However, metal fences will require additional annual painting, otherwise they will appearance will not please. A metal fence can be purchased ready-made and assembled according to plan. You can think over the layout yourself and, accordingly, make a metal fence yourself. Let's consider brief instructions for the production of a metal section measuring 90×55 cm. To do this, you need to prepare:
- two fittings Ø1.2 cm 95 cm long for support,
- two fittings Ø1.2 cm 90 cm long for crossbars,
- five rods Ø1 cm 39 cm long for a horizontal crossbar,
- decorative elements: six rods Ø1 cm, length 14.5 cm,
- welding machine.

Work on the manufacture of a metal decorative fence looks like this:
- From the top you retreat 5 cm from the support, after which you weld the cross member.
- Next, measure 40 cm from it and mount it at this distance bottom part frame.
- Fix the horizontal bars in 15 cm increments.
- Weld the decorative elements in a checkerboard pattern.
- Installation of the fence is carried out by pressing the supports into the ground.
Note! The distance from the bottom of the frame to the ground must be at least 10 cm.

Of course, the work on making this type of decorative fence will take you much more time. But such a fence will last much longer.
Decorative concrete fences

It is not uncommon to find massive gray concrete fence, which can hardly be called decorative. However, thanks innovative technologies a concrete fence can be the most different colors and shades, and there may be a pattern on the front part. You can make such a design with your own hands; you just need to purchase or make special molds. The work process is quite simple. Concrete is poured into the matrix for a day. After drying, the section is removed and installed. Everything is simple and consistent. Follow these tips:
- Each matrix must be lubricated with vegetable oil before pouring concrete.
- Recommended brand of cement is M250.
- To prevent the product from turning out dark, there should be less sand in the total mass, and vice versa.
- Before painting finished product It is recommended to treat the surface with a deep penetration primer.
Decorative brick fence
The most popular material for arranging flower beds, lawns, and lawns is brick. It has extremely positive properties. In most cases, it is laid in a diamond shape, resulting in a jagged fence. But this is not the only installation method. You can lay out fences in the shape of an oval or circle.

The second row is laid so that the seams do not match. Each level of brick is secured with cement mortar to ensure the structure is strong. This way you can create a beautiful decorative fence with your own hands.
2014-07-09 105

Contents
There is one psychological test: Draw your dream house. With its help, the characteristics of a person’s character are determined. Particular attention is paid to how the participant in the experiment depicts the fence in his drawing. The more massive and taller this structure, the more closed the person is, he does not want to let strangers into his inner world. Agree, it’s not for nothing that psychologists associate a fence with a mental barrier. The idea that something secret is hidden behind a high fence is firmly entrenched in the domestic mentality. The neighbor built new fence for a dacha? This means he has become rich and is hiding something from prying eyes.

Why do you need a fence?
In fact, the first thing the new owner of a summer cottage does is build a fence. This is a kind of symbol of the boundaries of private property. Anyone who is concerned about how to do beautiful fence on his hacienda, pursues a specific goal. Do you know why people even build them? Firstly, we have already decided that this is a delimitation of two territories. Secondly, protection from attacks by neighboring animals, flocks of village children dreaming of sneaking into someone else's garden. Don't discount the decorative value of a fence. After all, it's very important element decor, which should be harmoniously combined with the overall appearance of the site.

Types of fences
Exist different kinds fences, each of them performs its own design function. There is an opinion that their construction should be trusted exclusively to professionals. But if you are used to doing everything on your site with your own hands, then you can easily cope with such a task as erecting a fence. If your property is part of a guarded holiday village, then in this case you can build a light fence, which will most likely serve a decorative function.

Next, I want to tell you about the types of fences. Let's talk about the main characteristics, advantages and disadvantages. I will comment on some points from a psychological point of view. Remember what we talked about at the very beginning of the article?
This modern material, which is very popular among summer residents. It is suitable for rural areas, its main advantages are durability and reliability. In the minds of many owners, this is what an ideal fence looks like, because it will not be easy for uninvited guests to overcome it. To be fair, I will say that installing this structure is quite a troublesome task. Although there is no need to make a foundation for it, the support posts for the fence must be driven into the ground more than a meter. The individual sheets must be connected by welding, and then painted and a protective canopy from precipitation must be built on top.

Personally, I prefer the alternative corrugated fence. If you make a picket fence from this material, the result will be much better. Such a fence looks more expressive, somehow more romantic, or something. We get the same reliable and durable fence, but visually create the effect of openness.

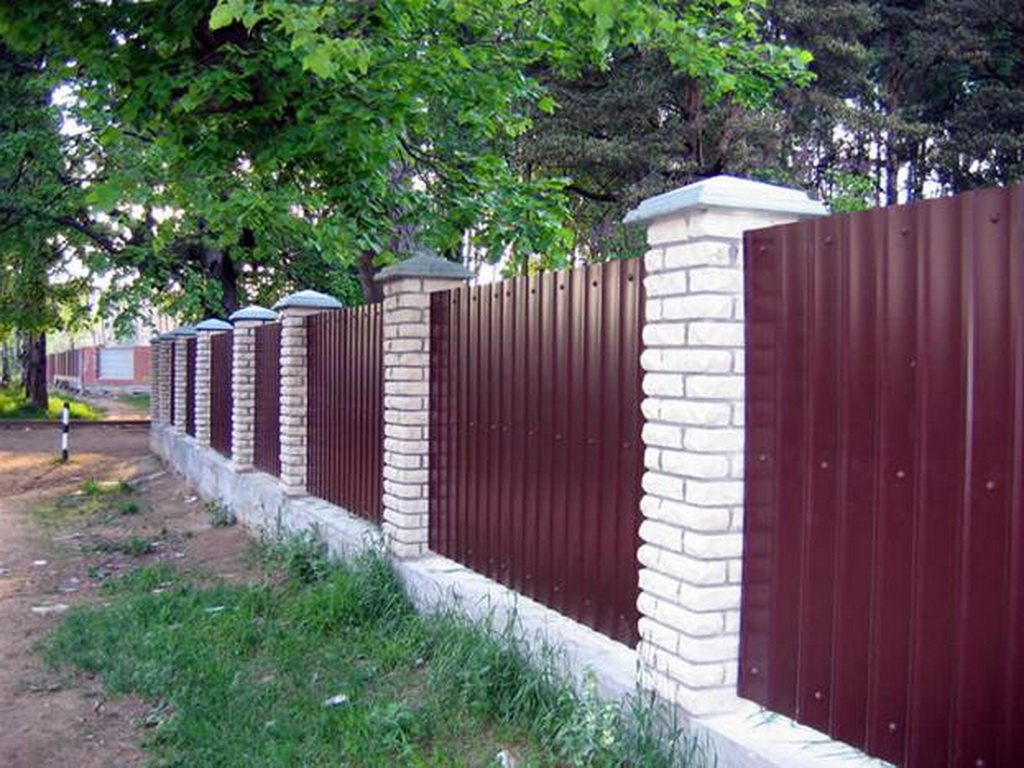
You can make a metal fence for your dacha in the form of a picket fence with your own hands. Of course, you will need to take strong posts dug into the ground as a basis, and secure separate sections of corrugated sheets between them on the crossbars. This is done in the likeness of a simple picket fence. If you want to create the effect of a more massive hedge, combine metal with natural stone or brick.

This combination somewhat conceals the heaviness of the stone and adds openness to the area. Psychologists would say that a person who chooses this option is in no hurry to show off his life, but also does not hide his soul from others.
Natural eco-material is a timeless classic. IN landscape design it is always present, and no new achievements in the construction industry will displace it. This fencing option will be ideal if your country house is a kind of fairy-tale hut - wooden frame. Main principle states: the fence should be a logical continuation of the general architectural solution. Don't be afraid of excess, feel free to add wooden dacha wooden fencing.

Do you see how harmonious the picture is? A complete atmosphere of comfort and indescribable warmth. You can put up a wooden fence with your own hands if your Vacation home located in a forest area. IN in this case it no longer matters what material the main room is built from. Against the background of green crowns, a wooden fence will be an excellent solution.

Don't believe it if someone tells you that a beautiful wooden fence won't last. Building materials must be treated with special antiseptics that will protect the tree from pests. If the technology is followed and subsequent care of the wooden fence becomes a good tradition for the owners of the site, then it is guaranteed to last for at least a quarter of a century.

You can come up with a huge variety of variations of wooden fences. Today it is fashionable to lay beams horizontally. Or alternate this “masonry” with a vertical one. The picket fence is a classic of the genre. The height of such a fence is adjusted depending on the wishes of the owners of the dacha. If you think the picket fence is too open, you can add another layer of sheathing along the inside of it. The result is a double fence.

The plants really like the picket fence. Near such a hedge, they bloom and bear fruit well, since they easily penetrate through the cracks. Sun rays. A wooden picket fence, traditional for domestic estates, looks very attractive.

By the way, it is actively used in European countries. As a rule, abroad these are low fences painted snow-white. Do you want to turn your dacha into a small Euro-capital? For example, use this simple idea.

By the way, from a psychological point of view, a gardener who surrounds his plot with a wooden fence is a very positive person. The lower the fence, the more open you are to communicating with others.
The main advantage of this variety is its relatively low cost. It is best to fence off a small summer cottage with a net. So simple design technique will visually increase the area and make it more accessible sunlight for plants. As a material for constructing a mesh fence with your own hands, use plastic, metal or metal-plastic mesh. If you are not satisfied with the appearance of such a fence, plant climbing trees along it. annual plants. Kill two birds with one stone: get a cheap but reliable living fence and decorate your area with flowers.

I really like the ethno-style in the design of summer cottages. If you want to recreate the atmosphere of a remote provincial village in your hacienda, try making a wicker fence with your own hands. This is a very simple, one might even say primitive technology, which was actively used by our ancestors a couple of centuries ago.

You can use vines, thin tree branches that bend well. A beautiful wattle fence can be created like a basket by connecting vertical and horizontal rods in a checkerboard pattern. This decorative hedge can find its place inside the site, separating the territory of the front garden or flower bed. Its advantage is that air circulates well between the rods. But such a fence is not durable; it needs to be redone once every five years.

Here, perhaps, are all the main types of fences that a simple amateur summer resident can build with his own hands. Concluding the topic, I would like to remind you once again about the simple psychological treatment. When planning the construction of a fence on a hacienda, try to find a middle ground: do not try to separate high wall from the world around you, but you shouldn’t expose your life to everyone who is curious.
Photos of fences for dachas


A dacha is, first of all, your own land. A standard six-acre dacha plot makes it possible to realize dreams of own home. And, like any property, it is fenced off and separated from the rest of the space.
Majority country houses- this is home for seasonal residence, therefore, the construction of a permanent fence is not advisable.
Saving money is the main issue that occupies the developer’s mind when deciding any dacha question. And the construction of a fence for garden house- not an exception.
But any private owner wants his fencing to be not only cheap, but also beautiful and reliable. Will an inexpensive garden fence be able to meet these expectations?
Which fence is cheaper?
The cost of the fence is affected by the choice of its size and design.
A tall fence will naturally be more expensive than a low one, and a solid fence will be more expensive than a transparent one.
A fence that is attached to dug-in or concreted posts will be cheaper than a fence mounted on a strip foundation.
Having decided on the design, we move on to choosing the material from which to build the fence.
Options for inexpensive fencing for a summer residence
Wooden fence
Building an inexpensive wooden fence is a smart option. It is inexpensive, beautiful and easy to install. There are several varieties of such fences.
- Picket fence, board (edged and unedged).
- Ranch fence.
- Wattle (intertwined rods).
The most popular material for country fence- picket fence. It consists of wooden planks with a thickness of 18 to 22 mm and a width of 7 to 14 cm. The height of such a fence can be chosen in the range from 1.2 to 4 meters. To fasten the picket fence, horizontal beams-purlins are used, fixed on wooden (oak), metal or concrete posts.

Anyone who believes that a picket fence cannot be used to make a beautiful fence is mistaken. Examples original designs There is a lot of this material.

A picket fence fixed at an angle forms an openwork fence
Estimated cost picket fences - 700 rub./m2. The final price of the fence depends on the chosen installation option. Installing a picket fence in a checkerboard or herringbone pattern increases the price of the structure by 15-20%. Strip foundation instead of simply driving posts into the ground, it adds 20-25% to the cost.
Fences made of thin wicker boards and blockhouses are more expensive (from 1000 rubles/m2). A fence made of wicker boards attracts attention with its original appearance, and a fence made from a blockhouse wins the hearts of summer residents with the quality of its wooden frame.

Wicker fence

Wooden blockhouse fencing
A fence called the Ranch came to us from the Wild West. His main feature– the use of wide horizontal boards or beams mounted on low wooden posts.

Ranch fence - cows won't get through, children will climb over
The obvious disadvantage of such a fence is the weak protection of the site from entry by unauthorized persons. It is understandable, since this fence was created for a vast area of pasture. In terms of the cost of materials and labor, a Ranch fence is comparable to the price of a picket fence.
Fans rustic style You will certainly be interested in a wattle fence - a fence assembled from hazel or willow branches. It is original, quite strong and durable. If you really want to, you can master the technique of weaving branches with your own hands in a matter of hours. If you don’t have time to do manual creativity, then you will have to pay from 500 rubles per 1m2 for the manufacture and installation of a fence.

We advise anyone who is planning to build an inexpensive fence for their dacha to pay attention to unedged boards. By freeing it from the bark, sanding it and opening it with varnish, you will get a beautiful fence for your summer cottage at a minimal price (450-550 rubles/m2).

The overlapping of unedged boards makes the fence very durable
Regarding the durability of wooden fences, the following must be said: the service life of autoclaved wood increases to 30 years. The service life of an ordinary, painted board does not exceed 15 years.
Metal fences
Metal has always been more expensive than wood, but here, too, summer residents can find acceptable options for themselves:
- Rabitz.
- Corrugated (woven) mesh.
- Welded rolled and flat welded mesh (3D).
- Euro picket fence.
- Profiled sheeting.
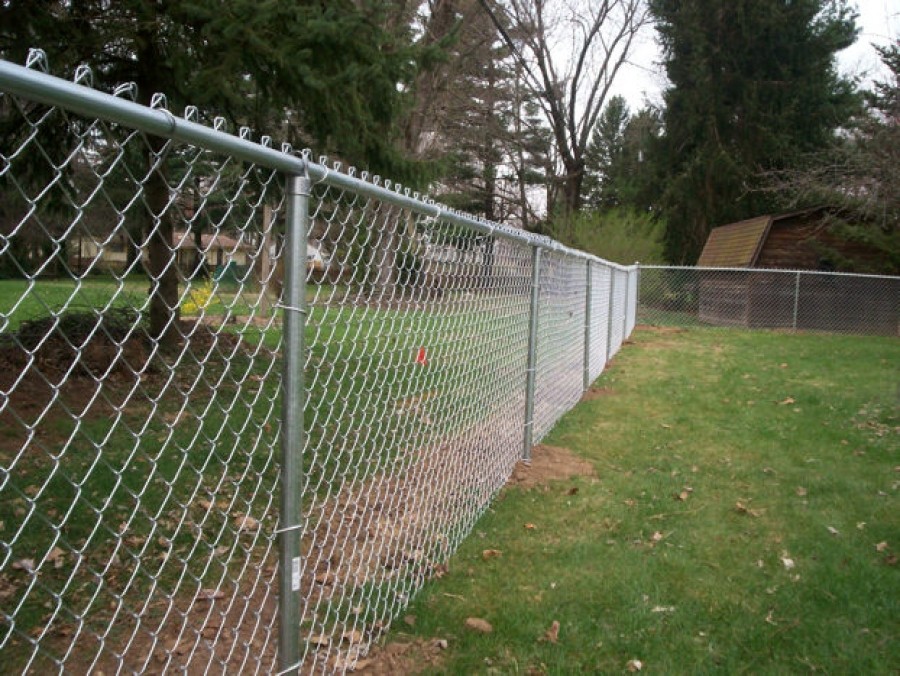
Chain-link mesh – guest from Australia
The cheapest fence can be built from chain-link mesh. It is available in different heights (1.0-3.0 meters), lengths (10-18 meters) and cell sizes (20-100 mm). To protect the wire from corrosion, galvanizing and polymer coating are used.

You can install such a fence by rolling out the mesh and fixing it to metal or concrete posts. The second option is the production of mesh sections (frames from angles or pipes) and their installation on poles.
The durability of mesh fencing reaches 30 years. They do not shade the area and create a serious barrier to uninvited guests. The average cost of 1 m2 of turnkey chain-link fence is 160-240 rubles/m2.
Corrugated mesh
It is not designed for fences, but for sifting crushed stone and gravel (screens). Steel corrugated mesh is made from bent wires using the perpendicular weave method. Main advantage of this material in front of the chain link – higher rigidity.

Corrugated (caned) mesh does not come in rolls, but in flat sections measuring 1.75 x 4.5 meters. By fixing it on the posts, we will get a high and durable fence. In terms of price, it is significantly more expensive than chain-link (400 rubles versus 80 for 1 m2). Saving on posts (the width of the section is 4.5 meters versus 2.5 m for the chain-link mesh) does not help the situation.
Welded mesh

Discussions about which fence is cheaper drew our attention to the roll fence welded mesh. The estimated cost of a turnkey fence made of this material in 2016 is 400 rubles per 1 m2.
Welded mesh 3D
Steel wire mesh (3D) in last years very popular among summer residents. Anyone who does not like chain-link fences can order a fence made from this material.

The unusual name 3D can be explained in two ways. First of all, it tells us that this grid not flat, but formed by bent wire with a diameter of 3.5 to 5 mm. The second reason - marketing ploy, fixing the material in the buyer’s mind thanks to the general fascination with spatial technologies.
Welded 3D mesh is produced in sections with a height of 0.33 to 3.33 meters and a length of 1.5 to 3 meters. The cost of its turnkey installation is from 500 rubles/m2.
Euro picket fence
The habit of adding the prefix “euro” to the name of the material worked this time too. In essence, it does not explain anything, but it sounds modern and beautiful. Popularity of fences from wooden picket fence inspired stamped metal manufacturers to create something similar. The result is a very aesthetic and durable material.

In terms of service life, wood cannot be compared with it. In addition, a fence made of Euro picket fence does not require periodic painting and antiseptic treatment. The protective polymer film used to cover galvanized steel retains its color and integrity for 25-30 years.
Installation of a European picket fence, taking into account the cost of materials and labor, starts from 800 rubles per 1 m2.

The use of European picket fences of different colors and its non-standard installation make the fence attractive
Corrugated sheeting
The undisputed leader in dacha fence construction. The reasons for its popularity are simple installation and durability. Added to this is a huge selection color range and textured pattern of the profiled sheet.

Fence made of corrugated board with imitation wood. Looks great, lasts a very long time
Considering the high demand for fencing made of corrugated sheets, we will give several recommendations for the selection and installation of this material:
- It is advisable to use corrugated sheeting with a thickness of 0.5 mm. It is not much more expensive than 0.4 mm thick flooring, but it will not become covered with dents and will not lose its attractiveness.
- If we take the distance between the supports to be 3 m, then under the influence of wind loads, the fence will begin to bend and may lose its original appearance. Therefore, the support spacing should be no more than 2-2.5 m, ideally 1.5 m.
- The support pipes must be dug to a depth of at least 1.5 m, and they must be concreted.
- The fence post must be made of a 60-80 mm pipe, with a wall thickness of at least 2 mm.
- You need to take double-sided corrugated board, polymer coating, since galvanized flooring (without painting) becomes stained after two years, loses its shine and may begin to corrode.
The cost of a fence made of corrugated sheets without taking into account the work is lower than the price of a fence made of Euro picket fence and is approximately 650-900 rubles per 1 m2.
Plastic
When thinking about what is cheaper to make a fence from, do not lose sight of such a popular material as cellular polycarbonate. It is durable and beautiful, and framed from a steel profile it creates a fairly strong enclosing structure.

Cellular polycarbonate fence
There are two options for installing polycarbonate: on steel logs (purlins) or in profile sections. The first method is cheaper. Its price starts from 1000 rubles/m2. Installation in sections is more expensive (from RUB 1,500/m2), but allows for a more durable structure.
Slate
To install the fence, you can use either flat or wavy asbestos cement slate. The first one is stronger because it is thicker.

Installation flat slate a large format (1.5x3 meters) is faster than installation of a smaller wavy one (1.75x1.125 m). The slate is placed on steel profile purlins welded or bolted to metal posts.
Slate fencing is characterized by high strength, resistance to frost and heat. It is more durable than wood and is not afraid of corrosion like metal. Significant disadvantage slate - fragility. Another disadvantage of a slate fence is its nondescript gray appearance. It can be easily corrected by painting with special paint.
The average cost of slate fences (including labor) is 800 rubles/m2.
conclusions
The first place in terms of availability is occupied by fences made of chain-link mesh (200 rubles/m2).
The third position can be awarded to fences made of corrugated board, slate, blockhouse and edged boards(700-1000 rub./m2).
Fence installation
For a fence to be very inexpensive, you need to build it yourself. The main points to pay attention to during installation:
- The load-bearing structure of the fence is made in accordance with the weight of the fence.
- The basis load-bearing structure- must be reliably deepened and fixed in the ground.
- Depending on the filling of the fence, the pitch of the supports is determined.
- Before installing the type of fence you have chosen, be sure to inquire about the technology of its installation and consult with a specialist.
The fence is installed, let's sum it up: if you wish, you can always choose a fence for your garden plot that will be beautiful, reliable, and relatively cheap.