Decorative panel on the wall: we decorate the interior with our own hands. DIY panels in various styles. Ideas, options, materials, useful tips You can make a panel from it yourself
A panel on the wall is one of the most interesting decorative ornaments, in the creation of which there are no restrictions - a complete flight of fantasy. On such an interesting topic, the editors of the online magazine site have prepared comprehensive material with a small surprise - interesting step-by-step master classes.
Decorative panel in the interior
This room design element can be created from a wide variety of materials. Many believe that exclusivity is achieved not only by creating a special design, but also by using a variety of materials in one composition. Here you should take into account the characteristics of each and their compatibility.

Carved wood panels on the wall
Wood always counts the best option to create decorative elements for any room. This material is durable and excellent appearance. Environmentally friendly elements are perfect for creating panels, or.


To create a unique interior, you can use different parts of wood. These can be either branches or small sections of the trunk. Many people use ready-made canvases. Eg, . With help special tools for (wood cutters or) each element is manufactured separately. At the final stage individual elements are collected in a special pattern.

In order for wood to last as long as possible, it must be subjected to additional processing. Varnish, paint and special compounds, which prevent rotting and the appearance of a wormhole. At the same time, buy wooden panel on the wall as in budget option, and real works of art.
Wall panel made of ceramic tiles


Mosaic elements are attached to a degreased surface. To do this you need to apply special glue. When creating your own interior model, you can use ready-made elements. They are sold in stores in kits that include everything you need.
Panel made of glass and mirror - a little journey through the looking glass with Alice
Glass options for wall panels will add variety to your room. The glare will make the room new every time. This material is recommended for use when decorating a kitchen. On flat surface glue the individual elements and form exclusive drawings. In order for the panel to look finished, it is recommended to use.
Important! This room design option allows you to clean without risking destroying the composition. Glass is the most wear-resistant material that can last for more than a year.
Recently, they have become especially popular mirror panels. But this material is difficult to process. Accordingly, you can use a variety of substitutes: special, and so on. That is, in fact, any materials that have the properties of a mirror are used.
By using glass and mirrors you can create the most amazing options decor for. Designers recommend using these types of materials to decorate living rooms.
Panels made of decorative plaster - work for real masters
To create, a special mixture is used, which is based on the use of finishing. On this moment Several types can be distinguished. In particular, they are popular. Each drawing will be in relief. Smooth options are, in fact, the creation of a full-fledged picture.

The surface is covered special materials, which facilitate ease of surface care. You can quickly change the drawings if necessary. This material is considered the most wear-resistant.
Textiles as an art form
To make panels on the wall, you can use the most various types fabrics. You can even use burlap to create a unique option. That is, you can take any fabric that you find in your bins.
1 of 5


The elements are sewn together with threads. These panel options just need to be sewn and hung on the wall. Respectively, this type can be regularly updated by changing interior features. You can create it for every season and holiday.
Wall panel using macrame technique

Weaving has been famous since ancient times. Modern knotted macrame options allow you to quickly create the most bizarre and beautiful patterns. After you knit this or that product, you need to fix it on the wall. This version of the panel attracts with its originality. Handmade considered the most popular. Needlewomen can create patterns in the national style, which will allow you to make unique interior V .
Paper panels - beautiful, elegant, but short-lived
To create decorative elements, just remember the labor lessons in kindergarten. To do this, you need to select a drawing and take colored paper or . By gluing together small elements, you create individual paintings that can be safely considered real decorations. Therefore, do-it-yourself paper panels are a fairly popular type of decoration among needlewomen. And what is important – the cheapest.
The panel can be mounted on the wall different ways. In particular, elements can be . At the same time, it is possible to use buttons and other materials.
Related article:
: what is the difference between these decorative elements, what compositions are in trend today, features of the selection and placement of interior paintings in different parts at home, tips on decorating an office, where and at what cost you can buy paintings and posters - in our publication.
Photopanel on the wall
Experts consider this species the most interesting. In order to create a decorative element, it is necessary to apply the selected material to the wall surface using a special print.


You can select a wide variety of images and combine them into a single composition. This interior design option will make the room a real place to relax. Many people strive to give their rooms the look of a beach or forest. These pictures bring peace.
Related article:
Choosing a location for installation, existing methods fastenings, the best fasteners for fixing modular paintings to surfaces made of various materials- we will look at it in the publication.
Wallpaper wall panel
There is no need to purchase new ones to create paintings. It is enough to use the waste that remains after completion repair work. All you have to do is select an image and realize it as a painting on the wall.


This way you can decorate any room. By the way, when using detergents, a bathroom panel is created.
Panels made of salt dough or 3D images from childhood with your own hands
This option is suitable for families with children. Don't forget what kids just love to do various crafts from plasticine or . There are no limits to imagination here. Each element of the picture is created separately.

Ultimately, every detail becomes an element of the overall picture. You can create a wide variety of decorative decorations.
Other types of panels
Decorative elements can be made from any materials. Including using improvised means. IN in this case It is recommended to combine materials. For example, you have wood and glass. Try to combine these materials into a single, cohesive composition. Or you can just make a simple and beautiful wall panel from.

In addition, the panels differ according to the type of premises. Only environmentally friendly elements are suitable for children's rooms. For the bathroom you need to use materials that are not afraid of high humidity. The living room is decorated in light colors. The theme of the image can be emphasized with frames and other related elements.
How to place a panel in the interior
When placing, you should consider a few basic rules:
- The panel should look harmonious with the rest. For example, if you use expressive images, then it is recommended to make the background of the remaining surfaces calmer and more monochromatic.
- We take into account the purpose of the room. The image should bring calm and a feeling of comfort. Accordingly, it is not recommended to decorate with elements that are heavy in meaning. The feeling of pressure and nervousness will not allow you to rest peacefully. it is not recommended to decorate dark tones. All images should be of joyful luminaries.
- Each element must have its place.
- The image must be holistic and complete. That is, if you decide to decorate the walls volumetric panel, then choose a place where the drawing will be visible in full size. It shouldn't be cut. This may make you feel uncomfortable.
Thus, in order to give your interior originality and exclusivity, we recommend using various types of panels. Moreover, this decorative element can be safely created without the help of specialists.
How to make a panel with your own hands from newspaper tubes
DIY decorative panel - affordable interior decoration for everyone who is interested in this technique. The video below will tell you in detail how to prepare newspaper tubes for subsequent weaving. And we will look at how to make a fan panel.

| Illustration | Description of action |
 | Prepare two semicircles from durable. |
 | According to their size + 1 cm on each side, cut a semicircle from the fabric. |
 | Glue the prepared tubes onto one of the semicircles. |
 | Cover the second part with fabric and also attach it well to the existing workpiece. This will be the face of the future product. |
 | On the back side, to give rigidity, glue a semicircle with a large diameter. |
 | Weave the first row with a voluminous braid according to the principle shown in the photo. |
 | Weave subsequent rows simply - through one tube. In our case, we got 6 rows. |
 | Then step back from the first weaving block by 2-3 cm and continue using the same technique. To prevent the work from slipping, make stops from cocktail tubes. |
 | When the weaving is finished, finish the job by sealing the tubes. |
 | Be sure to plant the last row on. |
 | Trim off any excess parts. |
 | Also shorten the main tubes so that no more than 3 cm of free edge remains. |
 | Weave a voluminous braid from tubes. |
 | Glue the resulting braid along the edge of the product. Decorate the fan with lace and a bow. |
Article
When you want to bring something new to the interior of your apartment, many begin to renovate: they change wallpaper, floors, and update furniture. And some even undertake larger-scale work in the form of overhaul with apartment redevelopment. But there are less radical ways helping to bring new energy into the interior of any room. These include the purchase of various decorations, accessories and souvenirs for the home, including vases, figurines, and paintings. All this can be found in the relevant stores. Among all these interior accessories, a separate item can be highlighted decorative panel on the wall. We’ll talk about this in this article today!
First of all, it is worth noting that this method, of all similar ones, is one of the most effective. It can breathe into the interior of any room in the apartment. new life. Placed in the center of the room or a specific area, a panel on the wall will firstly be an accent, as it will attract attention. Secondly, if properly selected in style and design, it can highlight the interior design in which the room is decorated.

Decorative panel on the wall: photos in different rooms
For any room in an apartment or house, decorated in a specific interior design style, there is a decoration in the form of a panel. It can contain any images: ornaments, drawings depicting any object, abstractions and even entire scenes. Also, wall panels can have any size and shape, which one to choose from all of them - the decision is yours.


But it is worth noting that the decorative panel on the wall is selected depending on the specifics, design and size of the room - each room has its own appearance, size and pattern.

Panel in the hallway
The panel can be placed on the wall of any hallway, regardless of size. But since most often the size of hallways in apartments in our country is small, then the panels should be selected in proportion to them. But it is also worth noting that modern interiors More and more people are gravitating towards the minimalist style, and therefore the walls remain freer. Thus, the concept of practicality gives way to the issue of aesthetic design. Therefore, even in small modern hallways you can place a larger and more stylish panel.


Kitchen wall panel
Kitchen wall panels can be made of various materials, depending on the location. The kitchen is a functional place, with an abundance of all kinds of odors and food fats in the air, therefore for its decoration it is worth choosing panels made from practical materials.

Wall panels in the kitchen are most often placed in the area above the dining table and in the area reserved for the kitchen apron.
If you want to post beautiful image in the zone kitchen apron, then a panel cannot be found better than ceramic tiles with a composition applied to it. Because firstly, ceramics are very easy to care for and generally practical. Secondly, such a design of the kitchen will make it much more comfortable, just as such a panel will give the kitchen interior warm motifs of Provence and country style.

Although any of the modern styles, you just need to choose a tile with the corresponding image.
Most often, a tile panel is placed in the center kitchen set, namely in the cooking area.


On the opposite wall, near the cooking area, a panel depicting fruits, vegetables, etc. can be comfortably placed.

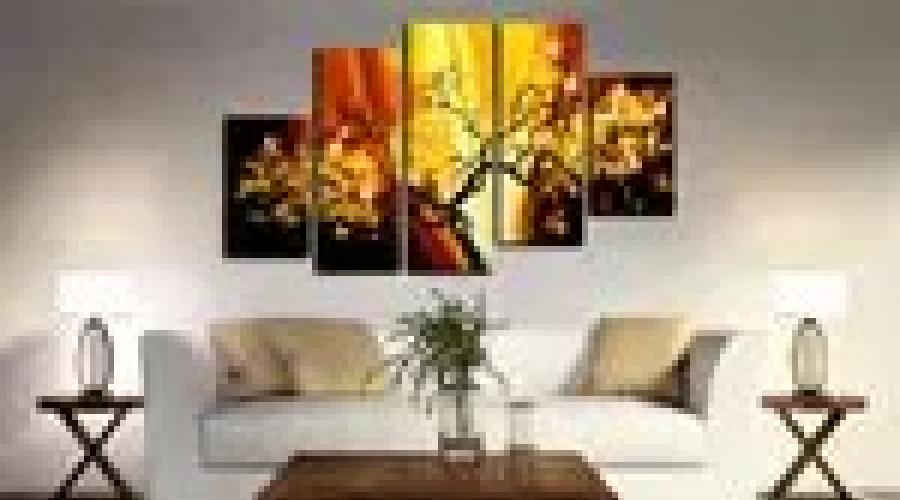
Panel in the living room interior
Since the living room is one of largest rooms any apartment, then a large panel is selected for it. Sometimes it is placed along the entire length of the wall, sometimes from floor to ceiling.

The panel may have various shapes, sometimes one whole image is split into several separate parts, resulting in a single panel from several separated parts.


The most popular images for wall panels in the living room are city panoramas, landscapes, and abstract drawings.

Sometimes geographic maps are used to decorate a living room; such a panel can be made with your own hands from a world map.
The decorative panel on the wall in a niche looks very nice. It is placed in a niche pre-made from plasterboard; lighting is often built into them; as a result, the panel will look like it is at an exhibition in a gallery.


Often the panel is applied directly to the wall, this is the so-called wall painting, this is a more expensive design option and here you definitely need certain skills and artistic education if you want to do it yourself.

But it is worth saying that this method of decoration is a real creative process, upon completion of which you receive an authentic work of art on the wall. In this way, you can reproduce a believable panorama on the wall, thereby creating the illusion of additional space.

Panel on the wall: painting
Beautiful panel on the wall in the bedroom
Since the bedroom is primarily a place for relaxation, the panels on its walls should be selected with the appropriate pattern. For this room, images of nature are chosen: the seashore, trees, flowers, birds and most often placed above the head of the bed.


Today in the bedroom they actively use the same example with niches as in the living room: niches are made above the head of the bed into which the panel is placed on the wall.

Additional lighting is built into such a niche; as a result, the illuminated panel transforms the entire bedroom.


Such a niche can also be made on the opposite side of the bed; this will always contribute to a pleasant awakening when it opens before your eyes. beautiful picture in the form of a panel on the wall.

Both ordinary beautiful wallpaper for walls and photo wallpaper can be used as panels in niches. The latter allow you to make it with any image you want - everything will depend only on your desire, since today photo wallpapers are made to order. But in most cases, beautiful ones look more stylish in a niche regular wallpaper.

Panel on the wall in the nursery
Great solution will happen if you make a children's panel with your own hands together with your child. Firstly, this will greatly entertain your child, and you will also be pleased, and secondly, it will be a memory for the future, when the children are already grown up.
Of course, panels for a children's room should be made in bright colors or purchase ready-made ones with images of various fairy-tale and cartoon characters loved by the child.


Panel for the corridor
If your apartment has large corridor, then why not make it small gallery images printed on the panel. Several panels united by a single theme will make the corridor not just a passable place, but a good exhibition hall. It can also highlight the style of the apartment if you select the appropriate images.

Bathroom panel
For a room with permanent high humidity Not all materials from which panels are made are suitable. The most common are ceramic tiles with a photo image, mosaic, horn fabric, glass mosaic, etc. These materials are not afraid of water and are easy to clean, so they are suitable for decorating bathroom walls.


A panel on the wall is an excellent and easy way bring new notes to the atmosphere of your apartment. The right image and design can highlight the style of your apartment and give it its own zest and individuality.
Write and draw whatever you want using the rope. The more textured the cord, the more expressive the result.
You will need:
Wooden plank;
Paint (for example, acrylic) and a brush or sponge;
Wood glue;
Corn starch;
Thick textured rope;
Parchment or tracing paper;
A piece of transparent polyethylene;
Hammer and small nails;
A certain number of items that you will use as cargo;
Latex gloves.
Sequence of work:
1. Wrap the board with tracing paper or parchment and draw/write with a pencil the future pattern or inscription.

2. Mix about 200 ml of glue, 3 tablespoons of water and 3 tablespoons of starch in a container. Shake well (eg with a whisk). Put on gloves and wet the rope with this mixture.

3. Cover the board with the inscription with film and lay out the inscription or drawing along the contour. Press down with available objects so that the rope does not move. Wait for the rope to dry.

4. Remove the dried rope - it should keep its shape. Paint the board and dry it. Nail the inscription to the board with nails.


Photo and source: hymnsandverses.com
2. Botanical paper panels: master class

It looks very unusual, but is done quickly and easily! An excellent option is a duet or trio of such panels.
You will need:
For two paired panels - 2 sheets of colored paper in contrasting colors;
Scalpel or small breadboard knife;
Cardboard backing or cutting mat;
Sketch pencil;
4 sticks to strengthen the upper and lower borders of the panel;
Loop cord;
4 flat push pins.
Sequence of work:
1. Draw sketches with a pencil on sheets of the same color.

2. Using a knife, cut out the design on the mat. Some parts can be cut out completely, while others can only be cut so that the paper remains in place.

3. Glue two sheets together. For greater relief and expressiveness, the cut out parts of the leaves can be bent, as shown in the photo.

4. Glue the strips on top and bottom.

5. Buttons with reverse side Attach the cords to the top bars - and you're done.


Photo and source: ohohdeco.com
3. Panel of woven napkins: master class

Take napkins of the shape and size that you like, color them to your liking, choosing colors that suit your interior.
You will need:
9 woven napkins;
Spray paint;
Masking tape.
Sequence of work:
1. Cover the parts of the napkins that you will not paint with masking tape. You can make different patterns.

2. Cover the napkins with spray paint. When the paint is dry, remove the tape.

3. All that remains is to hang the decor on the wall.

Photo and source: designimprovised.com
4. Panel made of branches and colored threads: master class

A beautiful branch found in a forest or park, plus the remains of thread - you get an unusual decorative element.
You will need:
Big branch;
Threads different colors;
Scissors.
Sequence of work:
1. Select the threads and the sequence in which you will select the colors. Cut them into equal lengths. Fold each one in half and tie it to a branch, as shown in the photo.

2. When all the threads are tied, straighten them and trim them at the bottom with scissors.


3. All that remains is to make a loop and hang the work on the wall.

Photo and source: oleanderandpalm.com
5. Mandala panel made of threads and braid: master class

Use colored threads and braid - the result will depend on your imagination and selection of materials.
You will need:
3 long thin sticks;
Threads of different colors, thickness, texture, decorative braid;
File or jigsaw.
Sequence of work:
1. Form the base of the panel from sticks.

2. Secure the middle with threads.

3. Start braiding the sticks with threads, as shown in the photo, changing the thread from time to time. Cut the threads, tie the ends and hide the knot on the wrong side of the panel.

4. When the job is complete, saw off the remaining ends of the sticks.

5. Hang the panel on the wall.

Photo and source: simplygrove.com
6. Calendar posters

If you really like the pictures from the “overdue” calendar, you can arrange them as a series of posters and hang them on the wall. As a rule, all illustrations for one calendar are made in the same style, and together they will look great.
Stock up required quantity framework the right size, cut out the pictures from the calendar, frame them and hang them on the wall.

Photo and source: thecreativityexchange.com
7. Paper patchwork

A wall panel can be made using the paper patchwork technique - it is simpler than fabric patchwork, and the effect is interesting and unusual.
You will need:
Frame with glass;
Pattern for patchwork;
Several sheets of colored and patterned paper;
Ruler, pencil, scissors and glue.
Sequence of work:
1. Choose a scheme - for example, use this one.

2. Draw the diagram on the base sheet in real size. Draw and cut out squares or other shapes from colored paper and glue them onto the base sheet according to the diagram. When the sheet is dry, the work can be inserted into a frame.
Photo and source: countryliving.com
8. Panel in the style of string art

String art is a technique for creating images from threads that are stretched over nails driven into the base. Detailed story about string art with a clear master class - here.
9. Scarf as a panel

A scarf or handkerchief can also serve as a panel - either with a bright pattern or with a monochrome pattern. Choose the one that suits your interior. In this case, the scarf is simply nailed to the wall at 4 corners. An option is to stretch it onto a wooden frame.
10. Panel paintings from wallpaper

The remains here act as paintings beautiful wallpaper. You can also use the sheets wrapping paper. Wallpaper or paper can be stretched onto a tablet purchased at an artist store, secured from the inside with tape - this will be good. For greater effectiveness, the “paintings” can be framed.
11. Panel paintings made of fabric

A series of panels made of fabric stretched over tablets can look very beautiful. You can use leftover fabric or specially pick something up at the store. stretch the fabric onto wooden tablets, securing it at the back with small nails or staples, or a stapler.
12. Panel with “scales”: master class

This huge panel required 687 cardboard circles. Not the best fast work, but the result is impressive!
You will need:
Wooden tablet/board/thick cardboard for the base;
A lot of Whatman paper or other thick paper;
Circle template and scissors;
Pencil and ruler;
Glue or stapler;
Molding for decoration.
Sequence of work:
1. First you need to cut out the circles. Draw them on whatman paper using a template and cut, cut...

2. Draw the base into strips as wide as equal to the radius circle. Attach or glue the circles row by row, starting with the bottom.


3. When the entire base is filled, trim the parts of the circles that extend beyond it and secure the circles at the edges. Glue the molding on top.

Original bright accents The interior may include paintings, photographs or panels of flowers on the walls. Decoration own apartment- this is an opportunity to realize creative ideas and express yourself through unusual decor. You can create voluminous flower arrangements yourself or order such creative works from experienced master decorators.
You can add individuality to the interior of your home by placing exclusive floral panels on the stele using other materials - twigs, fruits or ribbons.

Such works will definitely attract the eye due to their special characteristics:
- A bright composition on a plain background attracts attention;
- Delicate flowers used in the work will add calmness to the interior;
- Volumetric work looks unusual on a flat wall;
- All compositions are made by hand and therefore unique.
By posting flower arrangement on the wall you don’t have to be afraid that it will highlight harmful substances and will be hazardous to health, because all materials used are environmentally friendly.
Depending on the type of room in which the panel will hang, it may contain artificial, fresh or dried flowers, fruits, pebbles, mother-of-pearl or other or artificial materials. Collected in one composition, they will create a certain image for the room.
You can get ideas for decorating panels and rooms in general in special stores, florist catalogs, handicraft magazines, attend a master class, or look at examples of the work of designers or amateurs.
How to make a floral panel with your own hands
To decorate the walls you can order panels from experienced craftswomen, but it’s better to make such a composition with your own hands, especially since it’s not so difficult. Such a floral panel will not only be unique, but its performer will also feel proud when guests appreciate her work.

Before you start creating, you need to decide what flowers and other decorations will be used.
You can choose from the following colors:
- Artificial ready-made;
- Alive;
- Dried flowers;
- Tape;
- Paper;
- Knitted;
- Made from natural materials.
You don’t have to limit yourself to the list presented above, because some craftsmen make flowers from any available materials: cotton pads, plastic forks, fabric, dough, plasticine and other things.
Particular attention should be paid to the background, since it is it that will unite the composition into a single whole. The background of the painting should not be bright or contrasting with the color of the wall on which the panel will hang, otherwise the painting will not be effective enough.
A panel of artificial flowers - simple and effective
Most simple option creating a floral panel will involve creating a composition of artificial flowers. Even a beginner can do such work; it is only important to decide on the general idea of the composition.

Tapestry panel in the interior – great option decorate a wall in your home. We will tell you about the history of the creation of tapestries and their use in interior decoration in the article: .
The panel may depict:
- Bouquet of flowers;
- A simple picture;
- Flower bush;
- A tropical forest.
When assembling a composition, you need to pay attention to the color of the elements used so that they match each other. All necessary materials you need to prepare it in advance, so to create a floral panel with your own hands you will definitely need artificial flowers, a base (burlap, paper, plywood, cardboard), glue (Moment or PVA), a frame and glass.
Whether to use glass or not depends on individual preference. Decorative composition will be stored behind glass longer, but if you refuse it, you can place some elements outside the frame. Thus, the picture will turn out interesting and voluminous and will enliven the wall.
Original floral panel made of fresh flowers
A beautiful decorative panel can also be made from fresh flowers. In this case, the work will turn out to be more fragile and less durable, but very sensual and tender.

An original panel for a children's room can be made from wallpaper. We'll teach you in the next article: .
To create a panel of fresh flowers, you can use the following ideas:
- Attach a small vase with water to the base of the panel in the frame, in which you can place bouquets of your favorite fresh flowers;
- Glue fern leaves onto the base different angles to create the feeling of an impenetrable jungle;
- Attach wildflowers to the background with tape, such work will quickly deteriorate, but the flowers can always be replaced with fresher ones, and every day the composition will have a different look, and from dry ones you can make a different picture;
- Install a special tray with soil in which the shoots of indoor flowers will grow in a certain way.
When working with fresh flowers, we must not forget about water and special care, because they can easily be damaged and thereby spoiled general form compositions. Pictures of fresh flowers look beautiful, complemented by others. decorative elements- beads, sparkles, butterflies. You can create entire paintings from flowers or limit yourself to compact bouquets.
We do it ourselves: a panel of flowers (video)
Making a flower panel is not that difficult, you just need to be patient, prepare the necessary materials and use your imagination. In addition, the elements used can be easily found, for example, dry roses from a donated bouquet or unnecessary shoots indoor plants, make flowers from old magazines or use other craft materials.
Examples of panels made from dried flowers with your own hands (photos in interiors)


We spend a lot of time in the kitchen - cooking, family meals and intimate gatherings with friends. How to do the most favorite place the house will be even more comfortable without spending extra money, and even give new life to stray wine corks, buttons, and yellowed books? Decorate your wall by hanging a handmade mural on it! Moreover, such wall decoration does not require decorator skills.
Main themes of kitchen panels
A kitchen wall panel is a thematic decoration that allows you to create an accent in the interior or divide the space into functional zones.
The theme of the decoration should match the style of the room. For country style, and these can be paintings depicting village life, still lifes of fruits, vegetables, panels using spices, cereals, dried fruits, flowers, herbarium.
However, for classic cuisine These panels are also suitable, which are not difficult to make with your own hands.

Stylish graphic panels in a chic, strict or minimalist frame will fit in.


And homemade paintings in bright or contrasting frames with letters, words, sparkles, bows, images of butterflies and animals are suitable. You can make such panels using nails, threads, metal buttons, sparkles, rhinestones, buttons, shells, stones, newspapers and magazine pages.


– stylish retro-style panels made from newspapers, chalk wallpaper, old posters, yellowed book pages, old boards and wine corks.

Interior letters in the loft style can be ordered on the Internet, or you can make them yourself.

Three-dimensional images that match the theme of the ceramic tiles, used for cladding.
Kitchen panels using decoupage technique

A do-it-yourself panel using the decoupage technique is a real original work; it will decorate your kitchen for as long as you want.
To make this wall decoration you will need:
- Glue – PVA and for decoupage;
- Rice paper (napkins);
- Egg shells;
- Primer, brushes;
- Sponges;
- File;
- Acrylic paints - to create contours.
As for the work, it is carried out in several stages with breaks. A primer is applied to the fiberboard with a sponge - thin layer so that it dries faster. Then you need to make egg crackle, that is, an imitation of a voluminous vintage texture. To do this, the shell is crushed into small pieces and applied to the surface of the fiberboard.
Important! The shell should be cleared of the inner film before use. It is also undesirable to use those parts where there is a factory stamp.
The entire surface of the base is covered with pieces of shell, so that there are small gaps between them. After the glue has dried, you will need to prime the surface. To apply the image, paper with a selected fragment (still life, for example) is used. The secret to creating a picture is simple - the paper is placed face down on the file, watered with water, and applied to the primed workpiece. The paper is leveled, the file is removed, after which the dried image is covered with decoupage glue.
Using special napkins or rice paper, you can make a wide variety of panels - and they will look on the wall like amazing original paintings.
Kitchen panels made from scrap materials - applications and installations
A Provence style kitchen can easily be decorated with a textile panel created using the patchwork technique. By the way, such decoration can also be practical - for example, a “picture” made of fabric can be supplemented with spacious pockets that can accommodate a variety of kitchen items.

If you like using improvised means, then you can easily make a picture with your own hands from what is stored in your kitchen cabinet:
- Fragrant oriental spices;
- Coffee beans;
- Beans;
- Tea leaves;
- Bay leaf;
- Cinnamon sticks;
- Orange peel;
- Cereals (by the way, you can use any cereal – from semolina to peas);
- Orekhov;
- Even from bagels and bagels!
Such improvised (and even old) materials as:
- Origami paper figures;
- Nails;
- Old boards (as a base);
- Pieces of fabric, buttons, yarn, rhinestones;
- Bottle caps;
- Wine corks;
- Maps of your home country or region;
- Magazines and newspapers, yellowed books and atlases;
- And many many others.
Such a panel will fully demonstrate your creative imagination in the design of the kitchen and will become original decoration kitchen apron. As for the manufacturing process, everything is very simple:
- Thick cardboard is covered with lightened high-quality burlap.
- The base material sheet is tightly stretched onto the cardboard using decorative nails.
- Compositional elements, for example, cereals, are laid out on the front side.
- All materials are firmly fixed with glue.
- To hang a picture on the wall, you will need a strong cord, but you can also use a magnet if you plan to place the decoration on a metal surface.

You can also make luxurious installations for the kitchen - for example, from unnecessary cutlery. It is better if such panels are in harmony with the design of the apron - original stickers are suitable for this. Or you can make several paintings of the same type at once.

Such a DIY painting will look extraordinary in any room - the main thing is to choose the right arrangement of devices and color scheme. Bright colors are most often chosen as the basis for the plot. thick fabric, and the frame is painted wooden frame. Unneeded knives, forks, spoons are placed on top of the fabric - they need to be cleaned, degreased and painted to create a striking contrast with the background.
Experienced needlewomen have long known that wine corks no need to throw them away, because you can use them to make stylish and functional wall decorations.


Have you accumulated a lot of magazines and newspapers? Is your library overflowing with old books with yellowed pages? Then you will love the ideas for making paper panels.


A panel using flowers and plants is simple and beautiful! Such an accessory can decorate a kitchen in a classic, Provence, or country style.

Using lace, paint and canvas you can create an elegant picture.

Other techniques for creating panels - mosaic and embroidery
If you don’t want to use cereals or decorate the wall with spoons, then you can use traditional techniques - especially since their implementation with your own hands requires a minimum of skills and tools.
The most beautiful kitchen wall paintings are made using embroidery - cross stitch, ribbons, beads. There are many “kitchen” motifs - from still lifes to ethnic ornaments, including flowers, dishes, and food. Doing embroidery with your own hands will take a little more time than painting from paper, but the result will be amazing.

There is only one thing - it is not advisable to use embroidery to decorate a kitchen apron; it is better to hang it on the wall near dining table. And don’t forget to cover the picture with glass, otherwise the canvas will get dirty very quickly.
Many ideas can be realized with your own hands using mosaics. The resulting paintings can duplicate images on the kitchen backsplash tiles, or can decorate the wall as a self-contained work of art. The materials for this creativity can be rhinestones, glass, broken tiles, eggshell or , sequins and so on. The mosaic is laid out on thick paper or cardboard with glue applied on top. Then all laid out elements are varnished for strength.

Very lively modern kitchen These are panels made of buttons. They are very easy to make, and single buttons that you would hate to throw away will find their rightful place on the wall.

Making kitchen panels is a pleasant and exciting process, allowing us to look at familiar things from a non-standard perspective. We wish you creative success!