Do-it-yourself decorative plaster of walls. How to prepare a solution and plaster walls with your own hands. Basic rules for plastering walls with your own hands. Decorative plaster: preparing and applying it yourself Rough textured plaster with your own
The times of total shortages generated by the Soviet era are long gone. After all, back then decorating the walls in a room was understandable and simple. Today, a wide variety of finishing materials have appeared:
- liquid wallpaper;
- facing panels;
- modern paints.
But decorative plaster is a real breakthrough in construction and repair technologies. This is absolutely not the plaster that is put under wallpaper, but a completely new independent material.
The excellent qualities of decorative plaster do not require additional recommendations. Two rooms, even decorated by the same person, using the same materials and techniques, will never be the same. Each one is exclusive, because the pattern of plaster on the wall cannot be repeated. With its help you can create the most interesting effects, you just need to master the necessary technique. This coating is very resistant to various types of harmful influences. It is difficult to get dirty, but if this happens somehow, it is easy to wash.
The plaster is environmentally friendly and does not emit harmful chemical compounds.
In addition, it improves the soundproofing of walls. In stores, such material is sold in dry form; it is made on the basis of binding materials. Crumbs, sand, stones or fibers with the addition of antiseptics, dyes, and thickeners can be used as fillers. In this article we will tell you how to make decorative plaster on walls with your own hands, what methods and materials exist for this, and also demonstrate photo and video instructions.
Conventionally, plaster is divided into:
- interior
Facade plaster is much more resistant to aggressive environmental influences and is used for external work. The interior, in turn, is divided into:
- mineral;
- silicate;
- latex.
There is also a classification according to the type of surface that results. For example, under “roller”, “fur coat”, “rust”, etc.

In general, each type of plaster has its own characteristics in application. For example, expensive “Venetian” plaster is applied in several layers, in a special way that requires thorough professional skills; it can be coated on top with wax. This is beyond the power of a beginner, so it is better to turn to a professional.
If you still want to do the repairs yourself, it is better to choose “bark beetle” type plaster. To apply it you only need an ordinary spatula.
Even a beginner will be able to work with ordinary decorative plaster, because it is extremely difficult to spoil such a coating. And there is no need to prepare the walls too carefully - it will smooth out all the defects on its own. Such decorative plaster of the walls will also give flight to your design ideas.
Preparing walls for finishing

It is necessary to thoroughly clean the wall from the remnants of the previous coating (paint, wallpaper, etc.). The peeled areas are removed and the cracks are sealed. This will be enough for “bark beetle” type plaster, but “Venetian” and some other varieties require a perfectly flat surface.
After priming and drying the surface, it is necessary to decide whether the entire wall area will be plastered, or whether part of it will go under another coating.
Zones of different cladding can be separated using masking tape or window sealant.
Minimum set of tools:
- Spatulas of different sizes.
- Grater (wooden or plastic).
- Metal smoother.
- Containers for solution and water.
- Roller for textured plaster.

The solution should be prepared based on the recommendations on the package, then you will get the required consistency. Moreover, you need to prepare such a portion so that you can take it out at once, because otherwise the solution will “set” right in the container. This is a job that does not tolerate long smoking breaks.
The plaster must be applied with a spatula. When it thickens a little, you can go over it with a grater without excessive pressure, creating the desired pattern. It is better to practice in a small area first.
To create a unique relief, all you need is a spatula, a grater and your own hands. You can use any available means.
Most often, beginners create rain in different directions, circles, waves, crossed lines on the walls. The easiest to implement is horizontal relief. You can also use a special figured roller, then applying the pattern is much easier.
All this must be done at maximum speed, because the layer of plaster dries very quickly. It is necessary to pay special attention to the joints of the sections to avoid sagging.
If your wall was prepared for different types of coatings, then the adhesive tape in the places where the zones are separated must be removed before the plaster is completely dry; later this will be more difficult to do, and minor defects may remain.
After complete drying (usually about 24 hours), the plaster needs to be treated with fine sandpaper, which will remove all excess.

At this point, finishing the wall with decorative plaster can be considered complete. But there are people who are not happy with this and want to paint the wall. In this case, you should use only high-quality paint that is resistant to moisture, sunlight and mechanical stress.
When carrying out work, you must first paint the textured areas of the surfaces, and only then the smooth ones.
After the first layer has dried, a second coat of paint should be applied.

Decorative bark beetle plaster is increasingly used for façade finishing. Even an apprentice can apply it, the main thing is to familiarize yourself with the technology and adhere to it as accurately as possible.
As a rule, bark beetle is used for facade work, but due to its attractive texture, this type of decorative plaster has recently been used in interior design, for example, in eco style.
Bark beetle is used for finishing vertical surfaces, but if you have experience in this matter, you can even apply it to the ceiling.
Wall preparation and priming

Before applying the bark beetle, you need to putty the surface of the walls if we are talking about plastered walls. It is very practical to apply the bark beetle directly to the foam plastic previously glued to the facade of the house. Leveling will be reduced to grouting the joints.
To avoid the formation of cracks at the foam joints, you should use a reinforcing mesh when applying putty.
To achieve proper adhesion of the plaster to the wall, you should use a primer that contains quartz sand, which ensures excellent adhesion of the plaster to the base of the wall.
The products of the manufacturing company Ceresit are most in demand on the market. If you decide to purchase such a primer, then you should use ST 16 grade for decorative plaster.
The walls are coated with a primer shortly before applying the bark beetle. At a temperature of +20ºС the primed surface will dry within 30 minutes. Composition consumption – 150 g/m2.

The primer is slightly visible from under the plaster, so its color should be as close as possible to the color of the bark beetle. To do this, it should simply be tinted in a shade corresponding to the color of the bark beetle.
If the bark beetle is applied to cement-sand plaster, then there is no need to prime the surface. Simply wet the wall an hour before applying the bark beetle. To achieve maximum adhesion, wet the base with plenty of water.

You can buy a ready-made mixture on the market; it can be Ceresit CT 63 or a dry mixture, which you will need to prepare yourself. If we talk about price, then from an economic point of view it is better to purchase a dry mixture, since it is cheaper.
To prepare decorative plaster from a dry mixture, you will need a drill with a mixing attachment, water and a mixing container.
The bark beetle dries quickly and should not be mixed with water. Therefore, do a small batch, especially if you have no experience working with decorative plaster.
Taking into account the size of the marble chips, the amount of bark beetle is calculated. For the small fraction XS, the consumption is 700 g/m2, for XL – 1700 g/m2, and for XXL – 2000 g/m2. To ensure that the joints are invisible, the bark beetle must be applied to the wall in one go.
So, to prepare the mixture, pour the amount of water indicated on the package into the container. In this case, the water temperature should not exceed 15–20ºС. Add the dry mixture into the water gradually, while stirring the mixture with a drill with a mixer attachment. Leave the finished plaster for 10 minutes, and then mix again.
Only acrylic-based bark beetles can be tinted; all other types of plaster are best painted on top.

The main thing when applying bark beetle is to distribute the composition evenly over the surface. This can be done with a metal grater 30 cm long. You can remove excess bark beetle from it with a 10 cm long spatula.
The bark beetle layer should correspond to the size of the marble chips, that is, within 2–3 mm. This is an important condition, because if the layer is too thin, the primer will be strongly visible, as a result of which the protective properties of the finish will be deteriorated. Well, if the layer of plaster is too thick, then the texture of the bark beetle will not be visible and the appearance of the facade/interior decoration will suffer.
Since, as mentioned above, the bark beetle dries quickly, you will have to work just as quickly. To ensure that the surface of the walls is as uniform as possible, it is better to apply the plaster at a time. But if this is unrealistic due to the large area of the wall, then separate the strip with masking tape and apply the composition slightly overlapping the tape. Then peel off the tape without waiting for the plaster to dry. Continue applying plaster in the same manner until the entire wall is covered.
Trituration

The most important stage of work is rubbing the bark beetle. It depends on what the final drawing on the wall will be. This work should begin immediately after the plaster begins to dry (after about 20 minutes). If your palm does not stick to the wall, then you can start rubbing, which is done using a plastic trowel.

When marble chips are rubbed, chaotic depressions are formed.
Thus, you can get the desired effect:
- “Lamb” - the pattern is formed thanks to short circular movements. Thus, chaotic grooves remain on the wall, which are visually similar to lamb’s wool.
- “Rain” is the most common rubbing technique. It is created by up and down movements. So, you get vertical rain. If you rub from the upper left corner to the lower right corner, the rain will be diagonal. To keep the rubbing angle unchanged, you can mark the wall with masking tape.
- “Carpet” – rubbing should be carried out with alternating movements up and down and left and right.
If you cannot apply the plaster in one go, then do not rub it to the very edge. It’s better to finish the next part of the wall, and then carefully rub the joints. This way you can make a seamless transition.

You can paint the walls the next day after applying the bark beetle. Painting has some advantages over tinting plaster. After the bark beetle has dried without color, you can finally level the layer with sandpaper. Plaster with colors cannot be leveled in this way, as worn-out pieces will be noticeable.
Painting provides more opportunities for design work. This aspect is especially relevant when using bark beetle in interior design.
The grooves emphasized with a dark shade look very impressive. To achieve this, you first need to paint the wall a dark color. After the paint coat has dried, apply a second, lighter coat of paint. In this case, the second layer must be applied with a semi-dry roller. In this case, the paint will not penetrate into the grooves and they will remain dark. The consumption of the coloring composition is 300 g/m2.
To improve the performance characteristics of the walls (this is especially appropriate for interior wall decoration), you can coat them with varnish - glossy or with glitter.

Preparation for applying homemade decorative plaster made from putty begins with determining the room in which it will be applied to the walls. The choice of texture, collection of tools, and even the method of mixing the composition depend on this.

So, to successfully decorate walls with putty you will need:
- Putty.
- Kneading container.
- Spatula and trowel.
- Metal grater.
- Construction mixer.
- Plastic film for the pattern or bag.

Take measurements of the walls, which will allow you to roughly calculate the amount of raw material for finishing. The approximate consumption of putty indicated on the packaging will help you with this. To save money, you can purchase putty in powder form. To make the solution in this case you will need:
- 6 kg of dry putty;
- 200 g PVA glue;
- 2 liters of water.
Dilute the putty with water in some suitable container. This can be done using a mixer. You should get a homogeneous mass. Then add PVA to the mixture and bring it again until smooth.
To decorate walls in rooms with low humidity levels, you can use gypsum or cement plaster. And for rooms with high humidity levels it is better to use cement.

If the walls are damaged, then all crumbling parts must be cleaned. All recesses should be covered with cement. This way you can level the walls. If the surface is unreliable, then you should stick a plaster mesh on it, which you will subsequently putty.
After the putty layer has dried, rub it in so that the surface is even. Then the walls should be primed. Use a deep penetration composition for these purposes.
Applying homemade plaster

You can apply decorative plaster, made with your own hands from putty, in several ways:
- Scales. Apply the putty with a layer thickness of 3–5 mm, and then make vertical strokes with a spatula 10 cm wide. After the composition has dried, it can be painted in the desired color.
- Rock. Start applying a thin layer of putty from the top corner of the wall. The layer should be approximately 3 mm. Then take a metal float and place it so that one side remains in the air and does not actually touch the wall. Without lifting your hands, draw straight lines along the putty.
- Cave. Apply putty to the wall and level it. Then, with a piece of polyethylene compressed into a ball, make a pattern, pressing it against the wall. This can be done in another way by applying a covering film to the wall. It will need to be torn off from the putty in a day.
- Venetian made from putty. Place a little putty on a spatula and make uneven strokes with it. After 24 hours, sand the walls with fine-grain sandpaper. If you only need to erase sharp corners, then do it with a grid. Prime the surface and let it dry. Paint the wall with a base color, followed by a surface color. Immediately after application, it must be lightly wiped off the convex parts of the plaster using a damp rag. Ultimately, the walls should be covered with wax/acrylic varnish/gold plate.
- To create an original pattern, you can use other stamps from scrap materials. For example, pieces of foam rubber, branches, polystyrene foam, flowers, pieces of fabric, a roller wrapped in fabric, stencils, etc.
After your homemade decorative plaster has dried, paint it or open it with colored wax.
In general, this science is simple and even an inexperienced “plasterer” can do it. If you did everything correctly, the interior of your home will delight you with its originality and originality for many years.
Photo


Video
We bring to your attention a series of videos about various decorative plasters and methods of applying them:
If you want to order wall decoration with decorative plaster, we recommend turning to professionals, since the price for these products is very high. You can find out the cost of decorative plaster on the websites of companies producing decorative coatings. Also pay attention to Venetian plaster, it is great for covering walls.
Decorating a house with decorative plaster is becoming increasingly popular. Decorative plaster of walls is done not only in private houses, but also in apartments. In this regard, many are interested in what kind of material this is and what it is intended for.
What is decorative plaster? This is a special, plastic mixture, often with the addition of various kinds of stones, mica, etc. It is intended for decorating and finishing walls, less often ceilings. How is it different from ordinary plaster? Let's read its composition.
Decorative plaster is made from:
- Lime, cement, gypsum, acrylic, silicate and others - as a binding component. They ensure that the plaster adheres to the surface. Gypsum is used very rarely due to the fact that such a mixture will harden quickly. And there will be difficulties with applying a drawing or pattern.
- Fillers - most types of decorative plaster contain fillers, such as sand, mica, marble chips, pebbles, etc. They serve to give the plaster that same decorative effect.
- Additives - these can be agents that prevent the formation of foam, plasticizers, etc.
- Water is, finally, the solvent for this whole mixture.
Simply put, decorative plaster differs from ordinary plaster only in the filler. But it is these components that make it unique. What distinguishes decorative plaster from traditional types of finishing materials, such as wallpaper.
Wallpaper or decorative plaster
If you are faced with a difficult choice of material for wall decoration, choosing between decorative plaster and wallpaper that imitates it, we suggest you compare them to make the right decision.
Firstly, the price of the material. The simplest wallpaper for decorative plaster is cheaper than the plaster itself. However, not all so simple. If we add up the preparatory work for wallpapering, puttying, stripping, glue, etc., then the benefit will not be so striking. The only exception is Venetian decorative plaster. Here, “Venetian” wallpaper will cost much less than the original.
Secondly, the service life. Decorative plaster has a clear advantage here. It will serve you for at least 30 years. And some of its species are up to 50-60 years old. Wallpaper will have to be changed after a maximum of 15 years. And in most cases, within 5-10 years. By the way, do the math and include changing the wallpaper in the paragraph above about comparing prices for materials.
Thirdly, maintenance of the finish. Decorative plaster is easy to wash and clean. Not all types of wallpaper can boast of this.
Fourthly, this is the uniqueness of the resulting decorative plaster pattern. Wallpaper has a finite number of types of patterns.
We could go on and on about the advantages and disadvantages of both decorative plaster and wallpaper for decorative plaster, but the conclusions are already clear. If you want simplicity and cheapness, wallpaper is your choice. If you have the opportunity to spend money, if you want uniqueness in decor and durability, finish it with decorative plaster.
Types of decorative plaster
All decorative plaster is divided into two large groups.
Types of decorative plaster.
- decorative plaster for interior work
- decorative plaster for exterior use
These two types of plasters differ in that external decorative plaster is more resistant to ultraviolet radiation, i.e. fades less in the sun. And facade decorative plaster tolerates “wet” weather conditions much better. It is resistant to rain, snow, etc.
Due to its properties, decorative plaster for the facade of a house exists in fewer types. Therefore, we will consider options for decorative plaster for interior decoration. Because they also include options for the facade of the house.
Types of interior decorative plasters
1. Relief - so called because the pattern they create turns out to be in relief. Divided into subspecies:
- Structural decorative plaster - the pattern is obtained mainly due to the composition of the decorative plaster. Pebbles, quartz sand and the like in the mixture give the pattern a certain structure when applied. Typical representatives are decorative plasters “Bark beetle”, “Fur coat”, “Lamb”.
- Textured decorative plaster – this type of decorative plaster is distinguished by its fine grain and plasticity. Here the pattern is obtained through a special technique of applying plaster. To do this, they use both improvised means - brushes, film, sponges, etc., and industrial special products - rollers with a specific stencil design.
2. Smooth - accordingly, the pattern turns out smooth. A representative is “Venetian” decorative plaster imitating marble or onyx finishing.
Decorative plaster for interior wall decoration and facade decoration also differs in its composition. Depending on the main connecting element, decorative plasters are divided into the following types:
- Acrylic decorative plaster – contains acrylic resins. It has good protection against water and moisture, but has poor breathability. Weak abrasion resistance compared to other types of decorative plaster. Low fire safety.
- Mineral decorative plaster - consists mainly of cement, lime and gypsum. Good, natural plaster, suitable for finishing rooms with normal humidity. On the facade, in the bathroom and kitchen, it requires additional protection in the form of painting, varnishing, etc. Good air permeability makes the indoor microclimate healthy and pleasant.
- Silicone decorative plaster is a universal mixture for any premises and building facade. Good vapor permeability, moisture resistance and abrasion resistance make this type of decorative plaster suitable for any finishing work.
- Silicate decorative plaster is another universal mixture for decorating indoors and outdoors. Not afraid of water, sunlight, antistatic. But application requires skill, as the plaster hardens quickly.

We hope you understand the types and types of decorative plaster. Let's look at a photo of decorative plaster in the interior.
Decorative plaster in the interior
Using different types of decorative plaster and methods of applying it, you can achieve very different design effects. Here everyone will find the pattern that they like. However, keep in mind: often the samples of decorative plaster in the store and what you end up with on the wall may not match. After all, each application of decorative material is different from the previous one. But despite this, the resulting effects can be generalized.
Effects of decorative plaster
- Venetian plaster. It looks like a polished stone or marble surface. Apply on any surface prepared for its application.

- Travertine effect. A complete imitation of stone called travertine. The porous surface and light pale color make it an excellent room decoration.

- Concrete effect. With the help of this type of plaster, an absolute imitation and creation of the effect of a concrete wall occurs.

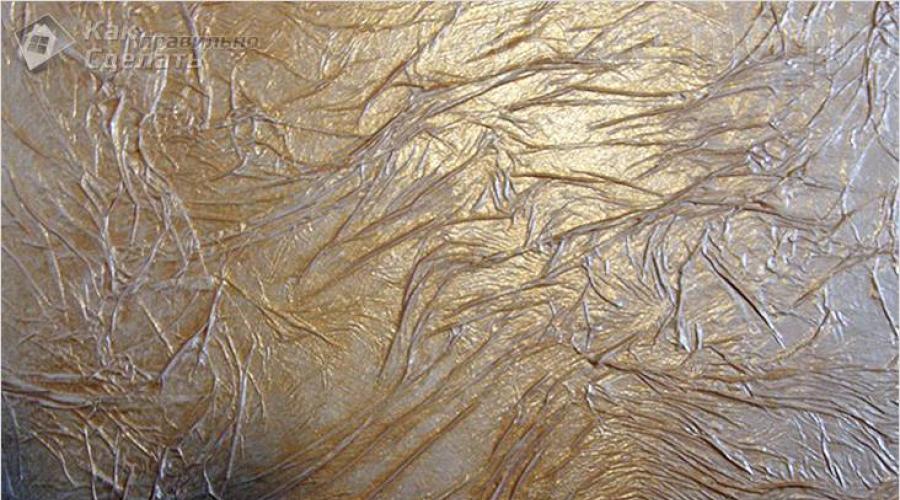
- Skin effect. For lovers of discreet luxury, this look is ideal. Thanks to its texture, it conveys well and creates the effect of a wall covered in leather. At the same time, thanks to the variety of tools, with the help of decorative plaster in the interior of the room it is possible to create an imitation of different types of leather.

- Wood effect. Incredibly accurately imitates the appearance of wood covering, thanks to the accuracy of the reproduction of small details and patterns of the plant.

- Silk effect. To create it, a mother-of-pearl coating is used, which, smoothly shimmering, creates the feeling that the wall is covered with silk.

- Brickwork effect. It is popular due to its low cost compared to real brick and its accurate imitation of the presence of brick in the interior.

- The "bark beetle" effect. Using this technique, you can get a pattern that imitates the effect of a surface damaged by a bark beetle.

- Orange peel effect. It will be an ideal option for painting under oriental design.

- Wave effect. Imitates the look of a sea wave. With the right choice of paint, it looks very beautiful on the surface.

- "Flowers" effect. Decorative plaster “flowers” is used in frequent cases and stands out among the general variety of styles of decorative plaster. When creating a pattern, the shape and appearance of the flower depends solely on the spatula used and its movements. In this case, there is no connection to color and shape. You can decorate and paint the finished wall either in one color or using different techniques.

Types of finishing with decorative plaster are very diverse. Some use ready-made, template forms, while others can create their own art and create patterns that are pleasing to their soul.
The use of decorative plaster in the interior of rooms
Decorative plaster in an apartment performs one of the main functions of room decoration. A correctly selected design of decorative plaster will make the interior even more beautiful and perfectly complement the style taken as a basis. Also, each room of the apartment requires an individual approach due to the peculiarities of its location and external characteristics.
Using this type of finishing material in the kitchen would be an excellent choice, as it is easy to clean and looks quite decent on the wall surface. Types of plaster used for decoration: Venetian, with imitation of marble or stone surface; imitation silk, plaster with small or large crumbs, etc.

The main thing that is worth emphasizing is that decorative plaster should be applied only to one wall of the room, so as not to make the kitchen too “heavy” and not spoil the design of the room.

Often, when finishing with decorative plaster, Venetian plaster or various textured types that are easy to clean are used for the bathroom.
Decorative plaster in the hallway, as well as in the corridor, forms the main impression of the apartment’s design. Speaking about the types of decorative plaster in rooms of this type, we can name the main ones that best meet the requirements (resistance to cold, moisture and good operation): velvet and silk effect, “bark beetle” effect and Venetian plaster.

Finishing the balcony with decorative plaster allows you to maintain the harmony of the design with all rooms of the apartment. Also, it performs an excellent heat-preserving function, is quite easy to operate and maintain, insulates sound and, at the same time, allows the walls to breathe. To decorate walls, various types of plasters are used, from textured plasters, with imitations of various plants and reliefs, to, for example, imitations of stone or brick.

DIY decorative plaster
If store-bought decorative plaster options are not suitable for you for some reason, you may be thinking about how to make decorative plaster with your own hands. Well, everyone can do this. In addition, you can save a lot on materials. Let’s make a reservation right away: decorative plaster made independently will not be as high quality and durable as factory-made material. But the service life of such decor of 10-15 years is quite suitable for most people. Especially considering the relative cheapness of such finishing.
So, how to make decorative plaster? It all depends on what kind of room you want to decorate with homemade decorative plaster. Or maybe you want to finish the facade? In these cases, the material used will be different.
Do-it-yourself decorative plaster for interior decoration is made either from gypsum or cement putty or plaster.
For finishing residential premises with normal humidity, do-it-yourself decorative plaster using ordinary putty is suitable. It is made like this:
- We take the same amount of starting and finishing gypsum putty. Instead of starting putty, you can use gypsum plaster. Then you will get the so-called decorative plaster from ordinary plaster. They usually mean gypsum plaster.
- Pour the mixture of putties into a bucket of water at room temperature or add them alternately.
- You can add a little diluted wallpaper glue. This will improve resistance to mold and mildew. And it will slightly increase the time you use the mixture.
- Mix everything thoroughly with a mixer or a drill with an attachment.
- The resulting mixture should have the consistency of regular sour cream.
- Do-it-yourself decorative plaster using ordinary putty is ready!
Important! Decorative plaster prepared in this way dries quite quickly. Prepare the amount of solution that you can apply in 10-15 minutes. It will be even better if two people apply the plaster: one applies the base layer, the second immediately completes the drawing.
This decorative plaster can also be used in rooms with high humidity, such as the kitchen and bathroom. But it will definitely need to be protected with water-repellent varnish.
This type of plaster is not suitable for finishing the facade. But you can replace gypsum putty with regular tile adhesive. Any cement-based adhesive mortar will be suitable for gluing ceramic tiles. For greater flexibility and increased adhesion, add a little primer to the water.
From such a mixture, for example, you can make decorative bark beetle plaster with your own hands if you add a small stone of a fraction of about 2 mm to it.
Important! Do not forget that the decorative plaster that you have made will need to be protected from moisture with façade paint.
How to apply decorative plaster
Regardless of whether you made the decorative plaster yourself or bought it ready-made in a store, applying decorative plaster is the same.
First, you need to learn how to properly apply decorative plaster. This knowledge will help you understand the process better and supervise the workers. And they will be even more useful if you do the finishing with decorative plaster yourself.
Let's prepare the necessary tools for decorative plaster:
- Construction bucket
- Trowel for decorative plaster
- Spatulas
- ironer
- Rollers for decorative plaster
- Masking tape (tape)
- Wax for decorative plaster
- Mixer or drill with attachment
- Varnish for decorative plaster
- Stencils for decorative plaster
It is possible that you do not need everything on the list. It depends on the type of plaster you have and what technique of applying decorative plaster will be used. For example, if decorative plaster is expected to be applied with a roller, then you need one. If decoration will be done using improvised means, then add them to the appropriate list.
So, how to apply decorative plaster on walls? Or maybe you need decorative plaster on the ceiling? Let's try to summarize the processes that need to be performed regardless of the type of plaster and the place where it is applied.
- preparation for decorative plaster - includes preparing walls or ceilings, preparing tools, sealing contours for decorative tape with masking tape.
- preparing decorative plaster - be sure to read the manufacturer’s instructions, if available. It contains such useful information as the consumption of decorative plaster per m2, the required amount of water and other proportions, the time of working with the mixture, the drying time of decorative plaster and much more.
Let's take a closer look at some of the nuances. Do-it-yourself decoration of walls with decorative plaster begins with preparing the base. Whether it's walls or ceilings, they should be free of large potholes, cracks or sagging. The old finish must be cleaned and the surface primed. If you want to apply decorative plaster on drywall yourself, then putty the joints and screw caps. Walls for decorative plaster are not prepared as carefully as the ceiling. The thing is that a slightly larger layer of decorative plaster is usually applied to the walls than to the ceiling. And it perfectly hides minor imperfections: scratches, peeling putty, etc.
The exception is the application of Venetian plaster. In this case, the walls, like the ceiling, should be as smooth and clean as possible.
Methods of applying decorative plaster
Do-it-yourself decorative interior plaster is applied to the prepared surface with a spatula and trowel. You can use a smoothing iron. In some cases, a spray bottle is used if spray application is intended. In any case, the technology for applying decorative plaster at the initial stage is the same. First, apply the base layer, the base. This layer is made continuous. Then it is decorated until it dries. The method of decoration depends on the type of your plaster and your imagination.
If you are doing decorative wall plaster with your own hands for the first time, practice on a piece of drywall or on that part of the wall that will be covered by furniture. As you gain experience, move on to other areas.
The technology for applying Venetian decorative plaster is somewhat different. It is applied in thin layers with a rubber spatula using neat multidirectional strokes. There can be 5-8 such layers. Before applying the next layer, allow the previous one to dry thoroughly.
Decorative plaster of the facade
Finishing the facade with decorative plaster yourself is not a difficult task. The main challenge is working at height if your home is more than one story high. The very same decorative plaster on the outside of a house is practically no different from the technology of applying decor inside the room. Let's look at decorative plastering of the facade of a house using the example of the most popular type: applying decorative bark beetle plaster.
How to apply decorative bark beetle plaster
First, prepare the surface as described above: level out large differences in height and clean. Then apply primer. It is better if it is soil with quartz sand. Prepare a mixture of decorative plaster. Apply a small layer of plaster with a trowel. Let the “bark beetle” dry a little and start decorating.
Move the trowel along the plaster using a rotating motion. Or you can only make vertical or horizontal movements. It all depends on what kind of drawing you ultimately want to get. Movements should be without strong pressure.
Painting decorative plaster
There are no special secrets in painting decorative plaster. We think everyone can cope with this task. Just choose the right paint for facade or interior work, as well as the hairiness of the roller. A solid background is made with a long-haired roller. If you want to paint only the top protruding layer, use a foam roller and paint without pressing the roller too hard against the wall.
Repair of decorative plaster
Decorative plaster periodically requires repair or restoration. Cracks, swellings, peelings and chips appear on it. It is not difficult to repair the damaged area with your own hands.
If you notice swelling of the plaster, go over the entire surface of the wall with a wooden hammer and listen to how it sounds. A dull sound will tell you which area has peeled off. This area of damaged plaster should be removed using a hammer drill, chisel, hatchet, etc. Then scrub the wall with a wire brush and prime. Before applying a new composition of decorative plaster, thoroughly moisten not only the cleaned area with warm water, but also the adjacent plaster for better adhesion of the materials to each other.
Try to apply decorative paint and repeat the pattern that was there earlier. To ensure that the difference in the pattern is not so noticeable, repair the plaster by knocking out a rectangular area.
After the plaster has completely dried, it must be repainted. This way you will mask the joints and heterogeneity of the layers.
Cracks in decorative plaster can be repaired in a similar way. The crack should be widened and all the measures described above should be carried out.
How much does decorative plaster cost?
The price of decorative plaster varies greatly depending on the manufacturer, country of origin and the type of plaster itself. The cheapest decorative plaster costs about 2 US dollars per kg/l. The best decorative plaster from famous Italian manufacturers can cost up to a hundred dollars or more per kilogram or liter.
On average, you can voice the following prices: simple relief plaster will cost about 5 dollars, and Venetian plaster about 15 per kg/liter.
Prices for work with decorative plaster vary less and depend on the type of plaster and the qualifications of the craftsman. The average price for work with decorative plaster is $10-30 per square meter. “Venetian” costs more than working with textured plaster. However, take into account the surface preparation work and subsequent protection of decorative plaster with wax, varnish, paint, etc.
Decorative plaster reviews
Our description of decorative plaster should have helped you decide whether you need such a finish and whether it suits your home. And if you answered “Yes” to these questions, then you most likely asked yourself: decorative plaster, which is better?
Reviews from real buyers and users play an important role in choosing decorative plaster. Those who have lived with decorative plaster finishing for several years and can tell you what nuances should be taken into account. Or warn against purchasing this or that type of decorative plaster, or purchasing from a specific manufacturer or retail chain.
Here are some typical reviews about decorative plaster:
We made ourselves a Venetian in green tones in our bathroom. Looks great. It wouldn't be the same with tiles. And the decoration without seams changes color depending on the lighting, it’s a sight to behold. True, the cost was considerable. But they were willing to pay for beauty.
I decorated my toilet with textured plaster. I did it myself after reading articles on the Internet and watching master classes. It fit perfectly on plastered walls, but there was no way to finish the LSU box. The glass-magnesium sheets had to be plastered on the floor, because streaks from the decorative plaster remain.
I made the plaster itself and applied it myself. The whole family decorated it and are very pleased with the result. No one else has or will have such patterns. And it turned out to be very budget-friendly, I didn’t expect it.
The thing is certainly remarkable, but the price is exorbitant. I'll put up some decorative wallpaper for myself. Cheaper and more practical.
We did decorative plaster in the kitchen. The walls look very interesting. But it would be better if the apron was made of tiles. I'm tired of washing off grease near the stove. Don't repeat my mistakes.
Decorative plaster solutions, or decorative textured coatings, do not require further processing or surface finishing. They can be applied to walls and partitions made of any material - be it brick, concrete, plasterboard, wood or ordinary plaster. But the plaster hardens very quickly, so it is quite difficult to carry out finishing work with its help on a large surface.
In addition, the use of decorative plaster to finish a wall requires careful preparation of the surface (treatment with primer, putty, and grouting materials).
Typically, decorative plaster is produced in the form of a dry or ready-to-use thick mixture. The basis of such materials includes a polymer binder, filler (marble or granite chips, sand, lime), on which the texture of the future coating depends, as well as a liquid base - water.
Dry plaster in packages
Decorative plaster often includes other additives that provide additional properties (different surface structure, protective shock-proof properties).
There are also special, separately sold additives for giving decorative plaster a particular color.

Plaster with color additives
If the coating is made in the form of a dry mixture, it must be diluted with water in the required proportion. The plaster is applied quite quickly: first with a brush, and then with a spatula or other tool, or with a special tool immediately (which one should be indicated in the instructions for using decorative plaster). Such a tool can be a roller, brush, trowel, or trowel.

Stretching plaster is always applied using a trowel, working from the bottom up. This plaster is characterized by a denser grain structure. Externally, it is very different from ordinary plasters.
The use of decorative plaster provides many possibilities. For example, using various molding tools, you can additionally create different types of texture.
Plaster consumption is measured in kilograms per square meter of surface and usually ranges from 1.5 to 3 kg.
Decorative synthetic plaster is also used for finishing both interior walls and facades. Depending on the graining and direction of grouting of such plaster, you can create an individual structure for the walls of the interior. This plaster is usually used as a finishing coat, but can be additionally coated with paint.

Decorative plaster in the room
Grout mineral plaster is characterized by a high content of natural grains and does not contain artificial resin. It has a high ability to transmit water vapor. Used for external and internal work.
Before covering the walls with decorative plaster, apply a preparatory layer of ordinary plaster, consisting of spray and primer, along the beacons. The surface of the preparatory layer is scratched, giving it roughness for better adhesion to the decorative layer. A coating of decorative mortar is applied over a well-seasoned preparatory layer. Moreover, it can consist of two, three or more layers.

First, a spray of decorative mortar is applied to the preparatory layer, then a layer or layers of primer and, if required, a cover of the same mortar.
Creating decorative plaster from ordinary
Decorative plaster “Wave”
A variety of textures for future painting can be “depicted” on ordinary plaster. For example, “waves” look great on lime-sand plaster.
To reproduce them on the surface, apply a second layer of mortar in straight or curved strips to fresh or previously rubbed plaster, notched and moistened with water, and smooth it with a spatula. This way a wavy surface is obtained.

Plaster "Wave"
Plaster "Traverine"
To create travertine (lime tuff) on the wall, a thin layer of colored mortar is applied to the prepared plaster surface. After this, smooth it with a spatula or steel trowel. The result is raised islands on a smooth, worn background - the so-called decorative “stones”.

Plaster "Traverine"
For information on the process of applying this type of paint, watch the video:
Stone plaster
To create a “boulder-like” texture, apply a plastic colored solution to the ground, quickly level it with a trowel and then trim the surface with a hard hair or bristle brush. When trimming, the brush should be held strictly perpendicular to the surface. A hard brush is needed because only it gives clear, sharply defined “boulders”.

Stone plaster
Plaster "Dune"
Under the dunes, the colored solution is also first leveled with a trowel, and then a grater is applied with slight pressure and immediately torn off. The solution sticks to the grater and, together with it, is pulled away from the surface, causing roughness to form on the surface. Externally, these roughnesses are very similar to sand dunes. If you want the dunes to be wavy, you can not tear off the grater directly, but slightly move it to the side. To obtain the texture of small dunes, the solution is first allowed to set a little. After this, it is lightly rubbed, a grater is placed on the surface and it is torn off.

Plaster "Dune"
Watch how to apply Dune to a wall in a short video:
Plaster “Furrows”
The “furrow” texture is obtained using a grinder with semicircular teeth, which is made from a steel strip or wood. It is up to 30 mm wide with gaps between the teeth of 10-15 mm. The teeth of the hammer are sharpened in one direction. Apply a low-flow solution to the prepared soil, quickly level it with a trowel, then take the rule in your left hand and apply it to the solution that has not yet set. Now you need to place the small bit on the rule with your right hand and guide it with the sharpened side of the teeth forward at an angle of 45° to the surface. This way, even furrows are obtained. Their size and shape, naturally, depend on the shape of the teeth of the bait.

Plaster “Furrows”
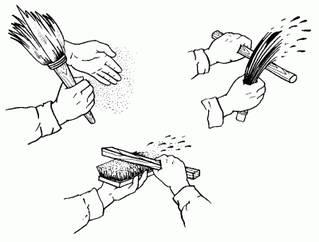
Plaster “under a fur coat”
By spraying, throwing the solution through a mesh, shaking the solution from a broom or brush.

Methods of applying plaster “under a fur coat”
Spraying through a mesh and from a broom is carried out with any solution (even with coarse aggregate). Only a solution with fine aggregate is suitable for spraying with a brush. To get a dense spray without skipping, repeat it several times until there are no areas left on the surface not covered with the solution. You can also use a special spray device (it looks like a fan).

Spraying plaster under a fur coat
Spraying on the mesh is done like this. Stretch a mesh with cells from 2.5 to 10 mm (the specific size depends on the size of the texture) onto a wooden frame measuring 100 x 100 or 100 x 50 cm. Stretch the wire diagonally from the back of the frame. It is necessary to ensure that the mesh does not bulge or vibrate during operation. Attach the mesh to the wire and tie it. To ensure that the frame is always at the same distance from the wall, nail strips 10-25 cm thick to it.

Spraying plaster “under a fur coat” through the mesh
The frame is placed against the surface of the soil and the solution is thrown through the mesh with a spatula from a falcon. Passing through the mesh, the solution remains on the surface in the form of tubercles. To ensure that your texture is the same, try to apply the solution with the same force.
When spraying from a birch broom, hold it with your right hand, and in your left take a round stick with a diameter of 4-5 cm and a length of 50-60 cm. Scoop the solution onto the broom and hit it on the stick, shaking it onto the wall surface. The size of the resulting texture will depend on the thickness of the broom rods, the thickness of the solution and the force of shaking. While working, stir the solution from time to time so that it does not separate.

Spraying plaster “under a fur coat” with a broom
To get a finer texture, spray with a brush. It is better to use a stiff hair brush or (the best option) a bristle brush. The brush is held with the left hand and, having been dipped into the solution to half the height of the hair, is brought to the surface with the bristles up. Then they pass along the bristles with a stick or board (it is held in the right hand), and the solution flies off the brush onto the surface to be plastered. A thick texture will remain on the wall, similar to the pile of a fur coat.

Brush for applying plaster “under a fur coat”
To obtain a texture similar to snow flakes, spraying is done with flakes of a creamy plastic solution. The wall will be especially impressive if flakes of white mortar are applied to colored plaster. In this case, the colored solution is first applied, leveled and rubbed, and then sprayed over it. This must be done without waiting for the plaster to dry.
To create a texture with a sponge, apply a solution of a creamy consistency to the soil, quickly level it and immediately apply end blows to it with a sponge. After this, a relief remains on the surface of the plaster, the appearance of which depends on the shape of the pores of the sponge. To prevent the solution from sticking to the sponge, it must be moistened with soapy water and lightly squeezed.

Instead of a sponge, you can use a relief roller
To obtain relief patterns on an unhardened plastered surface, you can use special stamps or any convex objects: shells, dense leaves, branches, etc. Pieces of stone, brick, multi-colored glass fragments, shells can simply be pressed into the still soft plaster. It will harden and hold the mosaic together.

To give relief to the plaster, you can use a variety of objects.
Sgraffito plaster
Another method of decorative wall decoration using plaster is called “sgraffito” (scratched). This technique involves scraping off thin layers of specially applied colored plaster. If there are several such color layers, the resulting pattern will be voluminous and multicolored, reminiscent of a fresco.

Wall finishing using the sgraffito method
Now let's move on to considering techniques for decorating walls using terrazite plaster. This type of plaster consists of a large amount of fluff lime mixed with white cement, white sand, marble chips, glass, mica and other materials. What makes terrasite plaster special is the addition of mica and anthracite fines (up to 10% of the volume of cement).

A type of terrasite plaster
Plaster-hatching
The “hatched” texture (straight or shifted strokes) with irregularities from 2 to 5 mm is obtained from fine-grained mixtures using a freshly applied solution. The solution (in the interval from 1 to 6 hours after application) must be processed by notching with nail combs or toothed scrapers. The applied cement mixture can be treated with a Troyanka or scarpel. Work on the hardened mortar begins no earlier than 6 days after its application.
Plaster "Rock"
The rock-like texture resembles crushed stone, and is made from hardened mortar with coarse aggregate, hammered with a chisel or tongue. The tongue and groove is driven into the mortar, thereby knocking out pieces and leaving indentations that form a uniformly grained surface. If the processing is carried out with a chisel or a scarpel, cutting off pieces of mortar, the surface will have the appearance of torn or chipped natural stone.
Technology of application and texture of stone plaster
Before processing, the surface of stone plaster is divided into separate “stones”. To do this, using a chalked cord, lines of rows of “stones” or rusticated “seams” are punched, as well as straps and other straight parts. After this, they begin to finish the plaster to suit one or another texture.
Texture “under a fur coat” performed with different tools. If you perform notching with bush hammers with large teeth, the result will be a coarse-grained texture, with small teeth - a fine-grained texture, and when forging with a tongue and groove, a particularly coarse-grained texture will be obtained. Keep in mind: with large and long spikes of bush hammer teeth, the texture is deeper and larger.

Under shading The work with grooves is done with a bush hammer, only instead of teeth it should have blades. The depth of the grooves will be determined by the size of the teeth. The first forging is carried along the line marked by the cord, and the subsequent ones are parallel to it. To obtain a texture with the entire surface divided into strips, you need to use a trojan or gear.

Bouchard and Trojan
Texture “under the dunes” on stone plaster it is done with a chisel. First, the surface of the wall must be cleaned with steel brushes or rubbed off with stones. And then from a well-compacted and rubbed surface of the plaster, you need to cut off a thin layer so that small depressions are formed.

Types of chisels
Under torn stone or roughly chopped sandstone invoice made with tongues, chisels, scarpels. First, apply a solution to the surface in a layer of 4-6 cm, compact it and divide the surface into “stones”. When the solution has set, they cut through or perform rustications, and then treat the surface as necessary to obtain the texture. A chisel or dowel is driven into the applied hardened plaster and pieces of the mortar are broken off in different places to form large irregularities. If you want to get the texture of hewn sandstone, use a chisel to chop off small pieces of plaster.

Fur coat finish and torn stone finish
Coarse-grained and fine-grained textures received in two doses. First, cement mortar is applied - in small or large throws - then a mortar for stone plaster is prepared and applied in a layer up to 10 mm thick over the set layer of soil. The top texture can be fine-grained or coarse-grained, depending on the filler.
Application of Venetian plaster
To achieve the best result, the surface to be covered with Venetian plaster should be as smooth as possible, uniform (white) and non-absorbent. You cannot apply plaster to wood and metal - over time, the coating will crack.

Venetian plaster
Tools for Venetian plaster
To prepare and cover walls with Venetian plaster, you will need the following tools:
- two brushes - maklovitsa and flute,
- roulette,
- long ruler
- level,
- pencil,
- syringe dispenser,
- measuring cups,
- containers for mixing materials,
- mixer,
- ladder,
- bucket with water,
- sanding paper (no. 120 and 220),
- grinding float,
- two stainless steel smoothers 250 and 200 mm wide,
- wide and narrow spatulas made of forged polished stainless steel.
It is advisable to round off the working edges of the tools and polish them with fine-grained sandpaper, completely removing scratches, burrs and other defects.
Before applying Venetian plaster, make sure the base is thoroughly prepared. If the base is not properly prepared, cracks may appear on the surface that cannot be repaired.

Stages of applying Venetian plaster
The depth and transparency of the coating is achieved using a special application technique.
The master applies several thin layers of coating to the wall, consisting of randomly located spots of material. The combination of many such spots and their layers creates the illusion of depth in the pattern of natural material. The number of layers varies from 2 to 10, but the total thickness hardly exceeds 1 mm. Each layer must be smoothed (pressed) manually with a spatula, float, or grater until a completely flat, smooth and glossy surface is obtained. Even an experienced specialist takes almost an hour to work with 1 m² of one layer.
The first layer is usually made of a material that contains finely ground marble chips. It is applied to the surface with a steel trowel or spatula in the same way as putty. After 4-6 hours, covering and glazing layers can be applied to this layer, which will create the texture of the coating pattern.

Applying the first layer of plaster
If you need to get a matte finish, then the second and subsequent layers are made of the same material as the first. The glossy surface is obtained using a finely dispersed material mixed with the selected dye.
When starting work, use a spatula to apply a small amount of material onto the working surface of a long trowel. Now start working from any top corner. Proceed in the same way as when applying finishing putty, applying the mixture in an even layer. Cover areas near the floor using a bottom-up motion. Press the trowel firmly against the wall, holding it at an angle of 10-15° to the surface. Make sure there are no gaps.
When the first layer has dried, begin applying the next one.
First, mix the coating material: add dye to it (if you bought a “semi-finished product”) and mix everything thoroughly again.
Next, apply a small amount of material along the edge of the short trowel with a narrow spatula and spread it in random strokes using short arc-shaped movements. Each movement should be approximately equal to the length of the iron. If a sag forms on the wall at the end of the movement, disperse it with a straight-line movement at an angle to the sag line. Alternate the movements of spreading and accelerating and randomly change their length and direction. Apply the coating on the floor using arcuate movements, starting from the bottom. Finish when an area of approximately 0.7 x 0.7 m is covered with the second layer.

Stage of applying Venetian plaster
Now level the coating in this area with long strokes of the trowel in random directions. Every 2-3 strokes, clean the ironer and wipe it with a damp cloth. Increase the pressure and tilt of the smoother plane to 20-25°. The result should be a uniform thin layer.
After 10 minutes, begin to smooth the coating with the edge of a wide (200 mm) spatula. Movements with a spatula from top to bottom should be slightly crossing. As gloss appears (this occurs from heating and polymerization of the material), release the pressure on the spatula. If this is not done, the resulting crust may be damaged.
To finally polish the surface, you need to smooth it with a clean trowel. At the same time, it is pressed firmly with both hands and held at an angle of 5-12° to the plane of the wall. When polishing an area near the floor, direct the strokes of the trowel from bottom to top and slightly cross them.

The next stage of applying Venetian plaster
When finished, proceed to apply the second layer to the next area, repeating all stages of the operation sequentially.
The pressure on the stroker is released at the beginning and end of the movement (as when scraping). This allows you to change the thickness of the material layer. When smoothing and glossing, the movements of the trowel should cross the boundaries of adjacent areas. To get the desired texture, change the size of the trowel, the length of the strokes, the spaces between them, as well as the force of pressure on the tool.
When working in corners, openings, ledges and other difficult places, direct the spreading movements from the border line into the area. If necessary, use a spatula instead of a smoothing iron.
While the second layer is still wet, begin applying the next layer in randomly placed spots. At the same time, the entire finishing cycle is repeated in sections. Apply as many layers (moleno of different colors) as needed to achieve the desired result.
If you accidentally damage the surface, use a narrow spatula to apply the first layer of material to the area and around it. When it dries, repeat the entire operation of applying the next layer.
You can use the room after all the work is completed within a day, but it’s better not to rush. The walls will dry completely in a week.

Venetian plaster
After all layers have dried, you can cover the walls with natural beeswax. It will enhance the shine of the coating and give the feeling of an optical illusion. Waxing gives the coating additional moisture resistance. There is no need to apply wax to some plasters produced today: all the necessary components are already contained in the material.
Wall decoration with decorative plaster: 10 types of textures with your own hands
Decorative plaster compositions are the most popular material for unusual wall decoration. They allow you to create truly original interiors. The cost of such plasters is quite high. But we can easily save our repair budget if we apply them ourselves. It is not so difficult.
The main thing about decorative mixtures - what do you need to know?
Decorative plaster (DS) is a composition for finishing wall surfaces, consisting of a binder and special fillers. The first can be mineral (lime or cement) and synthetic (various resins - acrylic, polyvinyl acetate and others) components. The function of fillers is usually performed by marble or granite chips, quartz, white sand, as well as combinations of these materials. DSh with a mineral binder and coarse-grained additives are recommended for treating walls outside. But compositions based on a synthetic base and fine fillers are more suitable for interior finishing activities.
The described decorative compositions also contain pigment. It gives the mixture the required color. The pigment can also be synthetic and mineral (natural). Natural additives - indigo, ocher, cochineal, yellow lead, azurite, ground malachite, vivianite, charcoal and others, are prone to rapid burnout of the flame. In addition, compositions with natural pigments are expensive. For this reason, plasters with synthetic coloring additives have become more widespread.
The texture of the described coating is formed using all kinds of granules, fibers, flakes, and small gold balls. The most popular types of diaphragm among home craftsmen are considered to be:
- Venetian compositions;
- flock mixtures (silk effect coating);
- bark beetle (walls after applying plaster become like tree bark);
- coatings with rain and rock textures;
- compositions with marble chips;
- textured compositions to imitate stone.
DS is available in the form of dry mixtures (they are diluted with water before use) or ready-to-use without any additional steps. The effect of using both types of plaster is the same. At the same time, ready-to-use compositions are more convenient for home craftsmen who decide to decorate the walls with their own hands.
Rules for treating walls with plaster - prepare thoroughly
Before using DS for its intended purpose, you need to understand the peculiarities of working with such compositions. First of all, let's find out what tools we need. Everything is simple here. We buy a scraper, a trowel, a drill with a mixing attachment, a grater, brushes, trays, rollers, combs, and spatulas of different sizes. You may also need other tools used for finishing work.
Then we begin preparing the walls for plastering. Their surfaces must be absolutely clean, dust-free and dry. If the walls are riddled with cracks, you will have to repair all existing defects. If necessary, we knock down the protrusions on the surface to be decorated and fill the depressions with a suitable composition. After this, prime the cleaned base. This operation will protect the coating from moisture, deforming stresses, temperature changes, and strengthen the load-bearing layer.
We choose a primer taking into account what kind of decorative composition we use. Carefully read the instructions for the plaster! It indicates the recommended soil type. A few more important points. The primer layer should have a thickness of no more than 20 mm. It should be compacted very well. If this is not done, the uniformity of the texture of the applied paint will be disrupted. In some cases, the layer of soil must be kept on the wall for several days, periodically spraying it with water.
If the plaster is applied to plasterboard, wood, plywood sheets, wood boards (chipboard, OSB), they must be treated with deep penetration primers. Such bases are prone to deformation when decorative mixtures are applied to them. Also note that most modern DLs set within a few hours. However, it takes 24–36 hours for them to dry. And complete hardening of the decorative composition is observed after 7–8 days.
How can the decorative composition be applied?
There are several options for processing DH walls. The most popular methods of applying the composition are given below:
- spraying technique;
- spraying;
- pulling (creating a relief with a trowel).
The easiest way for craftsmen to create the required coating is by spraying. This technology is simple and straightforward. We take a suitable tool (for example, a brush or even a regular broom) in one hand. We dip it in the decorative composition. We take a stick in the second hand. We bring a broom (brush) to the surface to be treated. We hit the instrument with a stick. As a result of the impact, splashes of the decorative mixture fly onto the wall. We get a coating with sprays and flakes of different sizes. We are waiting for this layer to dry. Then we repeat the procedure described above. We apply as many layers as we need, smoothing each of them with a roller or other device.
A variation of the classic spraying technique is the so-called Italian plastering. The procedure for performing the work will be similar to that described above. But when decorating in Italian, we don’t need to wait for the previous layers to dry. The next portion of the solution is applied to a damp surface. Note! This method of decoration involves applying layers of different shades. That is, if we first use blue plaster, a mixture of a different color is applied on top of it. The result is an original decor that can decorate any home.
Spraying technology is a quick and effective way to finish walls with a decorative mixture. But to implement it, you need to rent or purchase a special installation. DSh is poured into such equipment, and it applies plaster to the surface.
Spraying is carried out continuously. Work always starts from the top of the wall.
The spraying technique is indispensable when we use DP of different fractions and want to achieve a unique aesthetic effect. With its help, you can finish the walls in one tone, and the slopes on the windows and other architectural details in another. Nuance. Apply the composition to the main surfaces in a layer of about 3 mm, to the auxiliary surfaces - no more than 1 mm in thickness.
Plaster mortar is often applied by stretching. This is an easy way to decorate walls. It is performed using a steel grater or a regular trowel. Finishing is done strictly from bottom to top. We hold the tool in relation to the surface being processed at a 60-degree angle. After applying the composition, we form the required pattern and texture using a plastic grater.
In the next section we will look at common techniques for treating walls with decorative mixtures. With their help, we can easily make the interior of our home individual and very attractive.
Rocks and rain on the walls of the home - we’ll do it ourselves
Now let's see what techniques are used to create decorative relief surfaces using DS. There are many of them. A common option is to form the texture of the rock. This technique is ideal for beginners. The procedure is as follows:
- 1. We prepare the wall according to the algorithm already known to us.
- 2. Treat the surface with a decorative composition. Apply it in a layer of up to 3 mm using a trowel.
- 3. Distribute the broadband along the wall (as evenly as possible). We create the pattern we need using the same smoothing iron.
Movements with the tool can be very different - horizontal, crosswise, herringbone, vertical and so on. We ourselves choose the appropriate relief and shape it. In the event that the planned drawing does not work out, we quickly smooth out our artwork and try to create the original rock again. Note! The smoother should be washed after processing each individual area. Otherwise, it will simply stick to the plaster.

It is a little more difficult to apply DS with rain. But this technique guarantees a more effective drawing. The technology for creating rain is as follows. We mark the walls. We draw lines on them at a certain slope. They must have the same angle of inclination. And we take the distance between them within the size of three smoothers. Apply masking tape to the lines. We begin to apply the plaster from the upper corner of the surface to be decorated in inclined strips. We fill the space limited by two masking tapes. The working tool needs to be pressed slightly against the wall.

As a result, we will get a decor that looks like a hedgehog. But we want rain. Everything here is elementary. We wash the instrument. Apply it to the plastered surface and smooth the mixture in one direction. Then, by analogy, we cover the remaining strips with the solution. When the wall has dried, we remove the remaining minor defects and irregularities from the wall using sandpaper or an abrasive mesh. At the end of the work, we admire the rain that decorated our room.
5 other techniques for creating relief images
Application of decorative plaster of different types can be carried out using other methods. Let us briefly describe the most common types of wall treatment with the compounds in question:
- 1. Boulders. To create such a picture, we need to apply DF to the primed surface with a trowel. And then trim it with a brush. We hold the latter in relation to the wall at an angle of 90°. If you want to get sharply defined boulders, use a hard brush. A tool with soft bristles allows you to create blurrier designs.
- 2. Wave. We make cuts on the wall and spray it with water. Apply the plaster in zigzag stripes. Then we smooth out the resulting waves with a spatula or grater. This technique is often used when using Venetian plaster.
- 3. Travertine. We collect portions of the finishing mixture tinted in a certain color onto a spatula. We throw them on the wall. After this, smooth the surface.
- 4. Broken stones. We treat the walls with plaster. We are waiting for it to harden. We drive the tongues into the coating, breaking off small pieces of it. We get stones with crevices.
- 5. Furrows. The technique involves the use of fry with semicircular teeth. The distance between the latter should be 1.5 cm. Be sure to sharpen the teeth before applying the DS. Apply the plaster composition to the wall. We smooth it out right away. We apply the rule to the mixture and at an angle of 45° the grinder (sharpened part). We create furrows. The type of the latter will depend on what kind of fry (with what shape of cloves we use).
You can try more complex methods of applying DS. For example, shading-combing.

This technique is performed only on a fresh coating, which is processed with a metal brush. After using it, wait a day and remove loose pieces of plaster from the wall. Remove excess parts with a rag, spatula or ordinary sponge.
Apply the decorative mixture with a roller - features of the operation
Wall finishing can also be done with a paint roller. Although this tool is used for decoration quite rarely. It is not used when working with Venetian plaster. But for other decorative compositions (structural, textured) it is quite suitable. The finishing algorithm using a roller is as follows:
- 1. We repair and clean the walls. We prime them twice.
- 2. Prepare the solution. Pour it into a wide container.
- 3. Dip the roller into a bath of solution.
- 4. Using sliding, smooth movements, apply the composition to the wall. Be sure to leave small indentations from the ceiling, adjacent walls and floor.
We apply the plaster in strips at a time. The movement of the roller is from top to bottom. If the paint does not adhere well to the surface to be finished, moisten the painting tool with water. By pressing the roller with different forces, we obtain one or another coating structure. Its final appearance, in addition, depends on the speed of movement of the tool along the surface.

Choose the appropriate method and technique for applying decorative compositions and feel free to get to work. You will succeed!
Do-it-yourself decorative plaster is not as difficult as it might seem at first glance. Wall decoration with decorative plaster is now gaining great popularity. This option has become a serious competitor to conventional wallpaper when carrying out repairs. There are different types of plaster for interior decoration. The main difference is the texture and method of application.
Types of decorative plaster can be as follows:
- structural, which contains inclusions of a certain size;
- textured, which allows you to form a smooth relief surface;
- Venetian, imitating marble.
Before applying decorative plaster, you need to carefully study the features of each option and application technology.
Structural
Methods of applying decorative plaster to obtain a structure involve the use of heterogeneous granular compositions. A type of material is obtained by adding small pebbles, quartz fragments, wood fibers, etc. to the plaster. The finishing material is made from cement and limestone. Synthetic latexes or silicates are also added to the composition. It is better to select the composition from ready-made mixtures. This is the only way to achieve good results. When mixing the components yourself, a good result is not guaranteed.
To prepare high-quality plaster, it is better to use ready-made mixtures
Finishing walls with textured plaster is easier if you use compositions based on aqueous solvents. This is due to the fact that before applying decorative plaster with your own hands, you will not have to “evacuate” the apartment’s residents. The water-based material does not have a strong odor.
Finishing walls with plaster of this type is easy. This is due to the high ductility of the material and its obedience during operation. The technology for applying decorative plaster is simple and convenient. Work can be completed immediately. There is no need to prepare the mixture, since it is sold already in liquid form in jars or buckets.
 Using decorative plaster you can create any structure in different shades
 The application technique is as follows:
- You need to prepare materials and tools for decorative plaster. For the structural composition you will need a roller, trowel or spatula.
- Before laying decorative plaster, you need to prepare the surface. A perfectly flat base is not needed. The thickness of the plaster layer and its structure can hide small defects. First, the surface is cleaned of dirt, dust and grease. After this, the bulges are knocked down and large cracks and potholes are covered.
- A clean and dry base is strengthened with a primer. With it, decorative paints and plasters will adhere better to the surface. This layer also prevents the exchange of moisture between the base and the finishing material. You can begin applying decorative plaster yourself only after the wall primer has completely dried.
- The principle of the work performed is suitable for all compositions: mineral, silicone or silicate based. Plastering is carried out using a trowel or spatula in one layer. The coating is applied to the wall using circular or linear movements.
- After application, the layer must be allowed to dry. At the same time, it is necessary to control that the room maintains a constant temperature and humidity, and that there are no drafts. Failure to comply with these rules can lead to deterioration in the quality of the decorative layer and the appearance of cracks.
 To apply the composition and create a structure, use a roller or spatula
 Do-it-yourself structural decorative plaster of walls is perfect for finishing common spaces, for example, an entrance hall, a kitchen or a corridor. In some interiors, it can harmoniously fit into the space of a bedroom or living room.
Before starting work, be sure to read the manufacturer's instructions. It indicates a more specific application technique and how to use the material correctly.
Textured
The method of applying decorative plaster with your own hands allows you to obtain an original texture. The boundary between textured and structural plasters is drawn rather arbitrarily. Methods for applying the composition in question make it possible to obtain complex options. For example, imitation wood, crumpled paper, natural stone.
 Imitation stone
 This option is suitable for almost any room. Making decorative plaster of a textured type allows you to support any design.
Most often, lime flour is added to the composition as the main ingredient. But you can also find polymer-based plasters. Polymers improve performance characteristics. This composition does not crack when dried. In work, polymers allow you to create a more relief and interesting pattern.
The finishing properties largely depend on the fillers. Fibers of different materials, granite or marble chips are introduced into the textured solution. The consumption of decorative plaster largely depends on the complexity of the chosen pattern.
 Textured plaster can be selected to suit any design
 How to apply textured decorative plaster:
- Before applying the solution correctly, you will need to prepare the base. The inner surface is treated in almost the same way in all cases. Here the requirements are the same as for the structural composition: absence of contamination and severe unevenness.
- Before working with decorative plaster, you need to coat the wall with a primer. This layer should be allowed to dry.
- After the primer, a base paint is used, which is applied with a brush. There are compositions on sale that combine two functions: a primer and a substrate. They are worth buying to reduce time costs and simplify the process.
- Decorative wall plaster, the application technology of which involves the use of a spatula, trowel or brush, is laid in 1-2 layers. The thickness depends on the complexity of the terrain. The more interesting it is, the more solution will be required. It is not recommended to apply a layer thicker than 20 mm at a time.
- A master class on decorative plaster should be completed with a finishing layer. Transparent paints, which are also called glaze paints, are used as such a composition. They not only protect the surface, but also give it a pleasant pearlescent shine. Options for applying decorative plaster can also consider using paint, impregnation or special wax as a final layer.


Decorative plaster, the pros and cons of which should be read separately, will give the premises a complete and unique look. The advantage of this composition is its high plasticity and the ability to give the finished surface a rather complex texture. But the coin also has a downside: the difficulty of application. Getting an original drawing is not so easy. You may first need to take a master class on applying decorative plaster from an experienced craftsman.
This will help you understand how to properly and efficiently plaster brick walls inside the house and surfaces made of other materials.
Venetian
This type of decorative plaster for interior work allows you to create an imitation of marble. The texture turns out very beautiful. The material is perfect for almost any room.
 Imitation marble
 The composition is sold in ready-made liquid form. The weight of a can or bucket usually ranges from 7 to 25 kg. The plaster contains marble flour and slaked lime. An aqueous emulsion is used, which avoids unpleasant odor during application.
Before plastering brick walls, you will need to level them. Decorative plaster can be applied to the walls only after the base is perfect. This type of material does not tolerate shortcomings. This is the difficulty of working with Venetian plaster.
If necessary, the solution can be painted in any color. With this plaster you can create amazing mosaics or entire paintings with your own hands. The advantages also include environmental friendliness and safety. The composition is suitable even for the bedroom. The surface is fireproof and wear-resistant. After application, the layer dries quite quickly.
 Venetian plaster allows you to finish the walls like marble
 Training in decorative techniques may look like this:
- First you should prepare the materials and tools for applying decorative plaster. Here you will need a medium-sized spatula and sandpaper with very small particles.
- After cleaning the surface, begin leveling the base. It must be perfect. First of all, get rid of chips. After this, you need to smooth out the cracks and depressions using cement-sand mortar or putty. To eliminate defects as much as possible, apply a leveling layer of Portland cement-based plaster. The thickness of the layer is determined depending on the severity of base defects. On average, 20 mm will be enough. Evenness is controlled using the beacon rule. To do this, before starting work, special strips with a certain pitch are installed on the wall. Another option for leveling is plasterboard sheets.
- The leveling layer must be allowed to dry. After this, you can apply the primer. This will allow the finishing material to better adhere to the wall.
- Venetian plaster is tinted before application. After this, take a spatula and begin to apply the mass to the base with thin strokes. The entire surface must be treated. If necessary, the solution is applied in several layers. The maximum thickness per application cannot exceed 12 mm.
- After application, allow time to dry. It is important to control the temperature and humidity conditions. It is recommended to close doors and windows to prevent drafts. Violating this rule will result in cracks appearing on the surface when drying.
- When the surface is dry, begin cleaning. To do this you will need sandpaper. The work is performed in a circular motion. Everything should be done very carefully.
- The last stage is protection. The finished layer must be coated with special white wax in one layer.
 The Venetian plaster finishing technique involves applying the mass in small strokes
Which is better?
There is no exact answer to this answer. Each case must be considered separately. In one case, the plaster will be better structural, and in the other, textured. The choice should be made depending on the interior of the room. But it is worth taking into account the experience of the master and his skill. Before choosing decorative plaster, you need to objectively assess your capabilities. For example, an option such as Venetian coating is not for everyone.
 Creating the texture of marble chips
 Application to ceilings
When renovating your home, you need to take care of more than just the walls. Carrying out work on the ceiling is more labor intensive. Here you will have to constantly raise your head, which can be very tiring. The general principle is practically no different from the technology for walls.
 The thickness of the plaster layer on the ceiling is 5 mm
 There is only one difference. If on the wall the maximum layer thickness for a structural and textured mixture is 20 mm, then on the ceiling it is reduced to 5 mm. To level the base, it is recommended to use drywall rather than special compounds.