Decorative cage in the interior. Bird cages in the interior or birdcage in the interior. Provence style decor
Read also
Hello!
For work we will need:
- Drawing of a cell in two projections and a sketch of a decorative motif
- Wire. Main (I used aluminum, 2.0 mm) and auxiliary (I used nichrome 0.9 mm). With a cage height of 19cm, 10m of aluminum wire was used.
- Plywood 0.4cm
- Pliers
- Jigsaw
- Drill
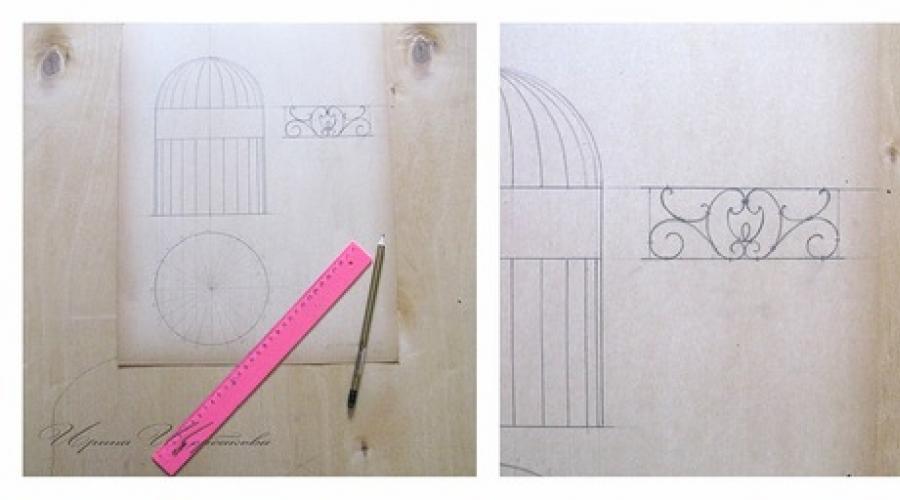
We draw the cell in two projections. Find out the circumference of the base
Divide the circumference by 4 and get the length of the motif decorative insert. We draw out the dimensions of the motif and draw a pattern in it, taking into account the pitch of the knitting needles and taking into account that the motif will be repeated, and it is necessary to provide for fastening the motifs together.

We bend two circles from the main wire - this will be the bottom and top of the decorative insert. We firmly clamp the ends together.

Based on the sketch, we bend the elements of the pattern from the wire. When the motif is completely ready, we fasten the elements together with auxiliary wire.

We bend the motif around the circumference of the base. One of four parts is ready.

We bend the second part and similarly make it arched. At this point I became impatient and wanted to quickly attach the motif to the circles.

We complete 2 more motifs and attach them to the bases of the decorative insert.

Bend a small circle to secure the top of the cage spokes. First we attach the four main ones.

We fasten the remaining spokes of the dome in the same way.

Let's start making the base. We draw a circle on the plywood, the radius R of which is equal to the radius of our wire circles. On this circle we mark the centers of the holes, dividing it into required amount(I have 24) equal parts. We make the radius of the base itself R+5 mm. We drill holes for the spokes, select a drill so that the spoke enters the plywood with force.

The cage dome is ready, wooden base ready too, it's time to connect them. We measure the knitting needles with a margin according to the sketch. We bend the hook and attach it to the lower base of the decorative element, directing the end of the knitting needle into the hole in the base.

It is more convenient to secure the main knitting needles and then add subsequent ones. Having measured the required distance to the base, we bite off the knitting needle from below with wire cutters and bend it.

We leave a span of 2 links - a door. The door should be curved. We make a loop for fastening at one end of the workpiece and bend the workpiece around the circumference.

The blank turns into a curl - a decorative element. We make two mirror parts.

We connect the loops with a knitting needle. The hinges of the door itself are on the right.

Add the missing spokes in the door and bend the base of the doorway.

To the base of the doorway we add two spokes from below, taking into account the size of the door itself. We also thread these knitting needles into the wooden base and bend them. We secure the door. That's it, the cage is ready!

I offered my version of the cage, yours may be completely different. Good luck in all your endeavors!


Thank you for attention!
Decorative cage made of newspaper wicker. MK
A decorative cage made of newspaper wicker is used as a decorative element. It is one of the items that has recently become quite fashionable. Until recently, the cage had an exclusively functional meaning, but more recently it has begun to be used by designers as a decorative element and its practical significance has been relegated to background. The cage, in fact, is a utilitarian thing, but in skillful hands and from a unique point of view of art, it becomes a romantic, touching and special element of decor. She is quite capable of fitting almost perfectly into an interior in Provence or country styles, and she is able to decorate modern and classic styles. And even a novice weaver can do it.
To work you will need:newspaper, magazine or cash register tubes.
- wire
- PVA glue
- aqualak
The cage can be woven in two ways: with a cardboard bottom and with a wicker one.
Method one - with a cardboard bottom:

Cut out the bottom from cardboard in duplicate the desired shape and size, we attach tubes to it from below.

Raises the tube stands and attaches the second part of the bottom from above.

Like this

Insert a long tube into the middle: plastic or wooden. We decorate the cage with various rings and zig-zags made from tubes


Raise the racks from above and pull them to the center


Paint the finished cell white.


Second method: wicker bottom

We begin to weave from eight tubes crossed crosswise

We attach an additional tube and weave according to the photo


Don't forget the door


The finished cage can be painted in any color, treated with PVA glue (1:1) and coated with aqualac. You can add it to such a cage various decorations, shells, pebbles, artificial flowers, figurines of animals and birds. By the way, a decorated decorative vintage cage will be an excellent attribute for wedding decor or a wonderful decor for serving festive table. By the way, in Europe there has been a real hunt for this kind of bird house, because lovers of vintage things are trying by almost any means to acquire an antique or simply an old, but unusual decorative cage and, thanks to it, create an original retro decor.
There is an item: a cage for keeping birds. But there are no birds and no desire to have them at all. Should I throw away the cage or give it to a poultry farmer? Wait to make hasty decisions. If your hands are at least a little fond of making something, and your head (if you want) can have some really good ideas, you should think about using this empty cage in the interior. And who knows, maybe you won’t even be able to imagine that you ever wanted to get rid of such a wonderful thing! Let's take it in order: sit down and think (turn on the computer and find a topic of interest) what might be more useful for your interior. Perhaps you just need:
- Birdcage Chandelier
- Table lamp
- Vintage candlestick
- A cage as a support for indoor plant
- Cage-decorative element
Let's look at each of the proposed ways to use a birdcage in the interior. And only then will you draw your own conclusion in what form you will use this thing.
Birdcage Chandelier - if you are tired of all these ceiling colossus that clutter up the space above your head, then this option is for you. Lightweight, breathable, transparent... There are many advantages, and besides, the mood is such that you want something unusual. Well, if not in an apartment, then you can certainly experiment at the dacha!
Light, free, easy to breathe... And this cage chandelier only adds even more lightness to the interior.

Look how such a chandelier looks laconic even in the toilet room, where there is nothing superfluous.

A birdcage chandelier can be complemented with completely simple objects, even birds made of newsprint!

If your cage has been lying somewhere in the attic or closet for a very long time and belonged to your grandfather, who loved birds, then this is not a reason to be upset, but quite the opposite. Traces of time, namely scuffs, peeling paint and rusty rods, are what you need. Nowadays, old things with traces of “lived days” are in fashion. Of course, you still have to refine these advantages and make some efforts for this. For example, wash off the dust, remove peeling paint, perhaps even coat it with fresh clear varnish. For such an antique cage, select details that match its appearance: an antique-looking incandescent lamp and a twisted electrical wire in a special textile braid.

If you like things with “traces of years gone by,” don’t strain yourself too much when putting the cage in order. Let its appearance speak for itself that this thing has history.

But the birdcage can be painted. If the cage is metal, you will need paint that matches the material.

If desired, the cage chandelier can be supplemented with chains, with the help of which it will be held on the ceiling, and electrical wire can be hidden under a specially sewn fabric cover, such as burlap. (Of course, after consulting with a competent electrician about safety.) You can also simply cover an already tired small one with a cage. ceiling chandelier with pendants. The interior will change and the mood, perhaps, too!

There are bird cages various shapes: square, rectangular, round, elongated, small, larger - that is, different. That’s why they make wonderful chandeliers!

A birdcage chandelier easily fits into any interior: from the most simple to the luxurious.

This cage chandelier will be able to decorate or . Such a light look will refresh any interior. You can try to make such a chandelier with your own hands. You need a birdcage (or its stylization) and glass beads or transparent beads strung on strong threads. Excess partitions around the cage can be removed using special tools. And attach threads with beads to the remaining rods using hot transparent glue. Add artificial flowers for decoration.

This unusual cage chandelier will decorate a bedroom decorated in a shabby chic style. This style is suitable for those who value not only practicality and convenience in the interior, but also the subtle beauty of colors, elegant details and delicate shades.

In a children's room, a birdcage chandelier will become additional decor, and will also support the “feathered” interior created in the room. In addition, you can come up with something else for the children's room that will delight your child, for example, a roach Indian headdress made of feathers.

A cage chandelier can be used in any living space. So, a small cage chandelier can be attached to the ceiling in the hallway, in the pantry or in the dressing room.

An additional accessory to a cage chandelier can be a metal chain.

If you want to place bird cage chandeliers inside, then do not use them for lighting. a simple lamp incandescent to avoid heating and fire of the “inhabitants of the cell”.

Decorating a cage chandelier with “birds” is the most natural and suitable option. The chandelier becomes “lived in,” and birds not only do not spoil the interior, but, on the contrary, add a light and lively touch to it.

Of course, the interior may also have chandeliers stylized as birdcages. These chandeliers are distinguished by the fact that they are more massive and stronger. Can be decorated with anything: forged elements, crystal and even beautiful natural stones.

Table lamp - perhaps there is one in your house desk lamp, the lampshade of which only spoils the interior. Here is an option to replace it. You can decorate your new lamp with artificial ivy. To make such a table lamp, you can also use a forged blank, which can become the base.

Watch a master class on how to make a chandelier or table lamp from a birdcage that will decorate your room.
Candlestick cage -just place the candles inside, after placing a ceramic plate on the bottom of the cage.

Cage as a support for a houseplant
- will become a real decoration for a summer balcony or loggia. All you need to do is pour some soil into a tray and plant a few seeds of a beautiful bindweed in it. And in the fall, you can bring the cage into the apartment and transplant your favorite indoor climbing flower into it. 
The cage is a decorative element in the interior — you can come up with many options for using a birdcage in this direction. Here are some of them:
Butterflies, artificial flowers, birds, small toys can be easily mounted on an openwork mesh and hung in the room or placed to decorate it.

Airiness, lightness, weightlessness and, as a result, the same mood of everyone who sees this piece of furniture.

If you are the happy owner of a forged birdcage, it can become an interior decoration in itself. Complement such a thing and somewhat “soften” the rough appearance forged product artificial flowers that completely imitate real ones will help.

For young and sophisticated natures, decorating a birdcage with colorful butterflies is suitable. They will create a summer mood.

A decorative cage can be made not only of metal. Both vine and even paper are suitable for its production. See how to do it:
This decorative cage can decorate any room and even the hallway, if the appropriate interior is created there.

On summer veranda suburban (or country house), on a balcony or loggia, hang stylized small birdcages from the wall or ceiling. Don't forget to fill them with flowers country flower beds. (Flowers can be placed in small jars of water and made so that they are not noticeable).

And if you don’t have a birdcage, but you decide that you need one in your interior, you’ll have to look at markets where they sell old things. You might get lucky.

You can place a composition made of natural or artificial materials in the cage.

To create styles such as country (including Provence) and style, stylized bird cages are used to decorate the interior and add charm.

Birds cut from wood or cast from metal can be an addition to such cages. Scuffs on decorative items are signs of time and will only decorate any country interior.

A decorative birdcage painted white goes well with floral prints on fabrics and beautiful handmade lace.

A birdcage in the interior gives it a sophisticated, elegant and even elegant look. Try it!

And a pink checkered pattern, of course, will help create a romantic atmosphere in the bedroom or

Such compositions can decorate a shabby chic style bedroom.

And this “cage” can be woven with your own hands from rigid wire.

Watch this video for a master class on how to implement this idea.
Choose in what form you will use the birdcage in the interior. Just remember when decorating this item to treat the matter with soul, do this work with good mood. And then everything will work out!

A decorative cage is a wonderful interior decoration, which you can create with your own hands using quite available options using the step-by-step guides below.
It is noteworthy that such an accessory can successfully fit into almost any style, and you can make it with your own hands. However, first you need to decide which material for making this creation you are more inclined to use - wood or metal. Step by step guide to create cells from these two materials will certainly help you with this.
To create metal version, you should stock up on certain ingredients.

The basis is drawings of our future creation and sketches of a decorative motif. Please note that cell drawings must be made in two projections.
Two types of wire - main (aluminum) and auxiliary, you can use nichrome. Vary the thickness yourself, but it is desirable that this parameter for the first material be about 2 mm thick, and for the second no more than 0.9 mm.
Plywood half a centimeter thick.
Jigsaw and drill
Needle nose pliers.
Drawing a cell in two projections along geometric formula find the circumference of the base. We divide the resulting length by 4 and get the length of the decorative insert motif. Now all that remains is to draw out the dimensions of the motif and designate the pattern, taking into account its repetition and uniformity of step.

Now you should bend two circles from the main wire, which will become the bottom and top of the decorative part; the ends must be firmly clamped together.

Now you should make a pattern from the wire, according to the sketch. All elements of the pattern are fastened together using an auxiliary wire, the thickness of which is obviously two times less than the main one.

Now we bend the pattern motif around the circle, as a result we get one part of the cell.

We do the same with the second part, making it arched.

Two more should be done along the same path decorative motif and fasten them together, resulting in a circle.

Now we move on to the design of the upper part of the cage, creating step by step the rib parts of the dome.


Now it’s time to make a base out of plywood, which should first be marked with a pencil. The plywood circle should have a radius equal to radius wire circles. Now on the resulting plywood circle you should mark the radius and divide the part into several equal parts. Let's drill holes for the spokes, using drills that will enter the base with difficulty.

It's time to connect the parts together


When attaching the spokes, be sure to leave a span of two links in order to end up with a hole for the door.


You can use absolutely any type of decoration as decoration.


How to make a decorative cage with your own hands from wood
The second option is the ability to do unusual item interior made of wood.

The finished height of such a cage does not exceed 20 cm, so you can place it wherever you wish. For production you will need:
Thin wooden sticks, you can use small wooden skewers.
Thick cardboard, thickness at least 2 mm.
Glue, scissors.
Styrofoam.
Knife for cutting foam.
Pencil, ruler.
Acrylic paint.
Brush.
Various materials to decorate your creation to suit your taste.

We cut out two identical parts from foam plastic, approximately 10x10, 2 cm thick. We mark “nests” for placing sticks, it is desirable that the distance between the marks is at least 1.5 cm.

The length of the sticks should be no more than 15 cm, and their number should be 24 pieces. Sharpen them sharper.


Now the following parts should be cut out from cardboard:

They should be attached to the foam end-to-end.

Let the glue dry and cover all parts of the cage, including the bars, acrylic paint selected color. The white version will look best.

The final touch is to decorate the received house as you wish!
Decorative details stand out and complement the interior. This type of craft, such as a do-it-yourself decorative cage, is becoming very popular today and is in extraordinary demand.. Exquisite works carry a light spring atmosphere, comfort and a touch of romance, especially when done with soul. Let's take a closer look at how to make a decorative cage with your own hands.
Decorative cage made of kebab sticks (MK)
Today, the presented accessory is used not only as cages for birds, but also for decorative candles, vases, compositions of fresh or artificial flowers. The master class will help you make a decorative cage with your own hands.

For work you need to prepare the following items:
- wooden sticks of small thickness;
- thick cardboard;
- polystyrene foam 2 cm thick (parameters 20x10 cm);
- PVA glue;
- knife, scissors;
- acrylic paints;
- You will also need a pencil, ruler, and brush.
After everything necessary materials and the tools are collected, you can begin work, dividing it into the following stages:
1. The first step is to use a knife cut two identical foam pieces , parameters 10x10 cm.
 Necessary materials
 2. On foam plastic with a pencil marks are placed so that the sticks on it stand at the same distance. We retreat 5 mm from the edge of the foam, the distance between the marks is 1.5 cm.
 Putting marks
 3. Sticks that will act as rods future design, should be 15 cm in length and sharpened on both sides, in thisYou need 24 of these sticks .
 Wooden sticks
 4. At the next stage you need to carefully drip glueat every mark and insert the sticks.
 Insert the sticks into the foam
 5. On the bars from above put on the second element foam plastic also according to the marks. Everything must be done very carefully and slowly, so as not to damage the foam or break the stick of glued foam.
 Attach the top base
 6. Next from cardboard parts are cut out , such as Bottom part(4 pcs.) 10.2x2.3 cm, top part (2 pcs.) 9.8x2 cm, roof (2 pcs.) 11.5x7.5 cm, upper triangular part (2 pcs.) 6x10.2x2.3 cm.
 Details with dimensions
 7. Cut out glue the parts one to one and to the foam. For greater beauty and to cover the joint, you can glue a stick 11.5 cm long to the roof.
 Glue the resulting parts
 8. After the design is ready, let's start painting . All parts are painted with acrylic paint inside and out. You can use one shade or several, depending on the chosen style. After drying, you can create a scuffed effect.
 Painting the cage
 9. Our creation is almost ready, the final stage is a decoration . A floral motif, which can be made of paper or fabric and decorated with beads, sparkles and other attributes, is perfect for decoration.
 Final result
 Thus, we received a beautiful, and most importantly unique and one-of-a-kind product created with my own hands. This accessory will decorate your home with its elegance and will certainly attract admiring glances.
On video: DIY decorative house
Metal bird house (MK)
Metal crafts look especially attractive and rich. Before making a decorative cage with your own hands, you need to prepare all the materials that will be used in our work.
Components for work:
- design and sketch of a decorative motif;
- The material will be two types of wire: aluminum - about 22 mm thick, auxiliary - 0.9 mm, for example, nichrome;
- plywood sheet – 0.5 cm;
- You will also need a drill, thin-nose pliers and a jigsaw for the job.
1. First of all, you need two copies draw a cell to get the circumference of the base. We divide the resulting length by 4 - as a result we get the length of the decorative insert structure. Next, we draw out the parameters of the motif and decide on the pattern.

2. Aluminum wire is needed bend two circles , respectively – the top and bottom of the cell. The pattern elements are connected with additional wire.

3. The pattern motif is folded along the circumference, this way we get the first part of the decoration. Using a similar pattern, we make the second circle.

4. At this stage, using drawings create the upper rib parts domes.

5. The plywood base must match the radius of the wire circles. On it with a pencil places for wire are marked , then holes are drilled.


7. You can decorate our cage with any decor. Decorative cages with flowers look especially impressive, they look quite romantic, creating an atmosphere of warmth and home comfort.

Decorative cage in the interior is fashionable and current trend in design. The variety of shapes and decor allows everyone to choose the most suitable option for themselves, which will favorably emphasize the style of the room and decorate any home.
How to make a cage from paper tubes (video)
Cells made of different materials (35 photos)


Among the new products that can be used in interior design, it stands out for its special charm and interesting appearance decorative cage. Such a product, be it metal, wood or even paper, will enliven the space of the room and will be indispensable for recreating vintage, romantic styles, such as Provence or English interior. And, best of all, what’s so interesting is that you can make it with wire and wooden skewers yourself.
DIY decorative cage
The need for lessons and master classes that focus on making DIY decorative cage, appeared because the price in the store for such accessories cannot be called low. The cages that collections from well-known companies offer us cost incredible amounts of money, but the mass market will also force you to fork out more. Whereas, having purchased all the necessary materials and collected the most simple tools, you can make a craft, the cost of which will be several times less than purchased.
Another advantage of a self-made craft over a purchased one is that you can create your own design ideas, do not repeat with existing interiors, create completely new images. What can it be used for? decorative cage? Buy or making it means getting a wonderful candlestick or lampshade for a lamp, a flowerpot for a lamp, decorating gifts or interior compositions.

In addition, such weightless and openwork cells will immediately create the necessary romantic, gentle atmosphere. They are very easy to use for a task, for a birthday or other holidays; such decor is often used at wedding outdoor ceremonies and receptions at open space. Can be supplemented metal constructions with fresh flowers, birds made of fabric, or you can hang them on tree branches, putting surprise gifts inside for guests.

options, how to make a decorative cage there are many, everything is determined not only by the task you set for the product, but also by the material with which it will be easiest for you to work. For example, paper crafts are quite simple, I have light weight, which will allow them to be used, for example, for the task, . You can put sweets and flowers in them for a present; besides, even a child can handle paper cages. But, of course, wooden ones, and even more so metal models They look much more presentable. Plus, their size can vary from miniature to huge, almost covering the entire wall, depending on how you see the future interior composition in your imagination.

Let's consider the method of making metal crafts as the most visually attractive. Before you start working with the material (and this will be metal wire), you will need to draw a life-size drawing of the future craft in two projections - a side view and a bottom. You need the bottom to determine not only the wooden or cardboard bottom itself to which you will attach the wire walls, but also to determine the circumference for the twisted decorative elements that run across the cage.

First, a frame is formed, two circles are made required size, they are attached to pieces of wire that form the arch. You can secure all the elements to each other using more thin wire or by soldering (if you are not afraid of working with blowtorch). Decorative elements are made separately: the wire is cut into small pieces, they are bent according to a template, also drawn in full size, and connected to each other. By applying the resulting tape to the bottom circumference, you can give the element the correct round shape. After all the wires are in place, you need to form a door, if the project requires it, and then cover the entire surface of the frame with paint to hide the joints. We also paint the bottom of the resulting cage or line it with fabric or colored paper. Flowers made from satin ribbons, small felt birds, and so on will help to decorate the craft for interior decoration. As a result, you will get a product no worse than designer ones decorative cells, photo which are included, among other things, in our article.
Decorative cells in the interior
Usage decorative cells in the interior may be limited only by the style of the room, but not at all by it functional purpose. Of course, for the laconic modern interior such decor will be inappropriate, but for a romantic style it would be correct to place a cage not only in the bedroom or living room, but also in the kitchen, and even in the bathroom.

Examples that show good options placement of such decor are posted above. However, all the photographs from our material today can be used as a guide for placing such decor in the interior. Wall or tabletop, hanging on a chain or standing on the floor, it will certainly refresh the room and give it the appropriate mood.