DIY dehydrator from a plastic box. Dehydrator - "a house of dancing sweets. Drying cabinet step by step
Read also
Who among you likes dried meat? Probably faced with the problem of how to make it at home in the apartment. Today we will solve your problem and tell you how to assemble a dryer for meat and food with your own hands. In it you can dry fish, fruits, mushrooms, socks, as well as various other useful things.
To begin with, we will purchase a box with a lid, an M8 threaded rod, an exhaust grate, nuts, washers and a fan.
We glue the adhesive tape along the top of our box and make markings for the holes.

We drill holes with a diameter of 9mm.

We cut the rod into 5 parts and install it in the holes. Fasten with nuts and washers.

We try on the grate for the hood in the far corner of the lid.

And we cut it.

But we replace the fan from the old computer with a fan for forced exhaust. It was possible from a computer, but the power is too small and I don’t really want to mess with the power supply.

We cut a hole for the fan and drill holes for fasteners.

We fix the fan.

And at the output we get this design.


You can dry everything you want in it. Need heating? Add a reptile heating mat to the structure. You feel hot? Freeze water in plastic bottles, fill a drawer with them and you are provided with air conditioning for the night. Dry the mushrooms - replace the rods with removable grills.
It turned out to be a very useful bag. Overall, assembly took a couple of hours. For the money came to 1300r., But it can be cheaper.
It's no secret that I make almost all the blanks in the Vigor electric dryer.
It is equipped with a heating element, a fan and a rheostat. When the rheostat operates at the set temperature, the heater and the fan are turned off.
In the case of the minimum set temperatures, switching on is too rare, and many types of recipes just need to be dried at room temperature.
Drying just in the breeze is too long, so I decided to assemble my dryer from improvised means.
The main elements of the future dryer were: a plastic container and a fan lying around in the garage.
A hole is cut in the edge of the container according to the size of the fan.

The fan is fastened by friction. Additional reinforcement made of silver tape.

Holes are cut under the lid of the container into which I inserted pieces of a round glazing bead - these are the crossbars to which the meat will then be hung.

The future basturma is hung on strings in front of the fan. Then the top is closed with a lid. I loosely covered with foil leaving a hole for air to escape.
As a result, we get a closed volume with constantly circulating air. At the same time, such a fan is very quiet and can be driven around the clock. The drying time of basturma is significantly reduced, and various insects and animals will not get to the meat.
At the same time, there is no heating, and therefore the meat does not dry out. This is especially true for sausages from which fat is rendered when heated.
In principle, if there is a desire to dry something with simultaneous heating, the dryer can be supplemented with a 50-watt incandescent lamp.
Here is such a fairly easy-to-make dryer I got.
In the following articles, there will be recipes for beef basturma and dry-cured sausage dried in this dryer.
I finally assembled a chamber for curing / drying delicious meat and sausage products. A kind of result of the love of a hedgehog and a snake.
The task was to strictly maintain the temperature and humidity in the chamber where sausages and other balyks are dried/cured for a long time. Although in our Geyropas meat is a thousand times safer and more proven, botulism and other mold do not sleep and try to get through Aeroflot flights.
Was taken:
outdated refrigerator
Temperature controller STC 1000 (Amazon 20 EUR)
Humidity controller DHC 100+ (Amazon 50 Euro)
Humidifier Orbegozo – Ultrasonico (Amazon 40 euros)
Exhaust fan for toilet (Amazon 20 euros)
A pair of boxes for wiring and sockets for a couple of euros in a construction store
And like everything

The temperature device adjusts to the desired temperature fork in any increment (for example: from 12 to 18C) and will keep it in the chamber. If it falls less than necessary, it will turn on the heating element (mat, lamp for reptiles, etc.).

The temperature will rise - the refrigerator will turn on.
The humidity control device works on the same principle: turns the humidifier on and off, i.e. keeps the desired humidity plug in the chamber.

Devices the size of a pack of cigarettes. I crashed them into electrical boxes, screwed sockets on the back, everything about everything - an hour of work.
I checked it for 4 weeks on drying sausages, setting the camera with several third-party temperature / humidity meters, everything worked like their native Chinese - for days, without noise and dust.
The sausages dangling in the photo lost 45% of their weight in 19 days and were orally destroyed. Everyone is alive, and even slightly well-fed.
Well, my hands itched to break something ... I cut two holes of 10 cm from the walls of the refrigerator. He inserted an exhaust fan into one, and he flies the other beautiful mesh.

In the absence of a compound drying product, the chamber can be used as a dryer. (aesthetically - dehydration).

An air flow of 97 liters per minute dried 6 chickens after wet curing for smoking in 45 minutes. withered a piece of beef tenderloin (sunzhuk) in 2 days.
I got a new toy - I made a dehydrator.
"What the hell is this?" you ask. Ooooh, it's a thing!
If you say in Russian and understandable language, then this is an ordinary dryer. These are freely sold on the Internet and home appliance stores.
How it works - air is forced from the room into the drying chamber, which then exits a special hole, taking with it particles of liquid from the product.
They dry mainly fruits, berries, mushrooms, thin slices of meat and even fish.
The most widely known apparatus in Russia is the Sukhovey - many families have one. But what happened to me is a truly universal thing!
I must say right away that the idea is not mine! I have live friends who are capable)) The king of sausages and syrniki Peter pacho last year described in detail and told how to make a dehydrator. I remembered the idea, and then for some reason I constantly stumbled that something needed to be dried, but nothing.
No, I used to calmly use the oven for these purposes - I turned on convection without temperature. Or if you wanted to quickly - convection, minimum temperature and ajar door.
Now, hehe, I'm whining again - I don't have an oven (temporarily, temporarily, for half a year already and xs when it appears). So it is very necessary to make a drying box.
The second magic pendel in favor of the dehydrator happened from the Hare - I periodically, and everything would be fine, but the picnic-garden season began - there are regular guests in the house and a refrigerator always full of pots and bowls. I simply do not have the opportunity to allocate a whole shelf for dried meat.
That's all, guys, I've assembled a dehydrator! On the knee, with pink instruments and female hands right in the middle of the living room)))
The hare performed feats with a fence and didn’t give me a normal screwdriver in my hands - he needed it himself, so he helped me only at the very end.
What nnada:
- plastic container or box with lid
- threaded rod on M6 or M8
- nuts and washers suitable for the diameter of the rod
- ventilation grille
- forced draft fan
All this goodness cost me a little more than a thousand rubles: 516 rubles a huge box on wheels and 700 rubles accessories (4 kg of nails for a suddenly fallen fence). Forced exhaust can be found cheaper, and so many nuts are not needed.
Forced exhaust is located at the bottom - we mark the place. The ventilation grille is located as far as possible from the hood - ideally on the lid of the box, but my lid was uneven, so the place for the grille will be on the wall opposite from the hood at the top. We also mark the place for the hole. (if anyone is interested, I drew this with a special glass pencil, but you can use a marker or scratch it with something sharp).
We cut holes for the hood and ventilation grill. In fact, the easiest way to do this is with a special circular saw-crown - the largest diameter is 10 cm, just for all built-in hoods and grills this size. BUT! The screwdriver was busy, and I was embarrassed to take a drill. There was an idea to use a jigsaw - I was afraid that the plastic might crack. I went a longer, labor-intensive, but accurate and accurate way. With an ordinary hand drill and a thin drill, I made holes around the perimeter of the circle of holes (I put a piece of rubber under the bottom so as not to spoil the floor, and a piece of paper so that the borders could be better seen).
And then with an ordinary kitchen knife I cut through the jumpers between the holes. If you heat the knife with a lighter, things will go much more fun.
We insert the ventilation grill into place, we also install the hood, it still has special holes for fasteners. (Dada, there are male hands in the frame - the Hare came to look at the process, give valuable advice and mock pink pliers.)
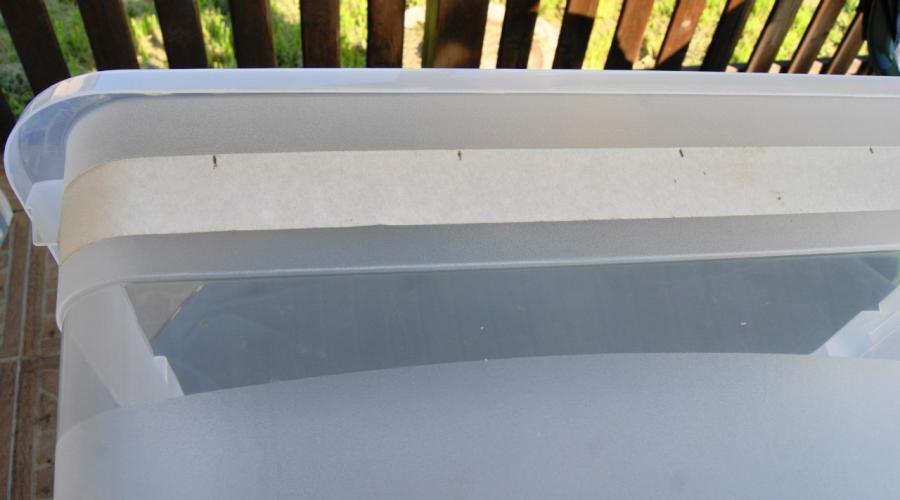
On the side of the box along the top, stick masking tape and make markings for the holes for the bar. We drill (yeah, with a screwdriver much faster).
It remains to cut the threaded rod to the desired length. The shortest rod in the store is a meter. I would just cut it in half, but the Hare suggested not leaving long ends sticking out. While I was thinking about going to a neighbor for auto-dismantling and asking for help with a grinder (thanks, of course), the Hare sawed everything with a hacksaw.
It remains to insert the rods into the prepared holes and secure them with nuts and washers. Alternatively, instead of ordinary nuts, you can screw on wing nuts - this way it will be more convenient to remove the rods if you have to dry something bulky.
That's it, the drying box - the dehydrator is ready!
Now the first launch!
Here, for example, easiest fried chicken recipe.
Remove the chicken fillet from the bone, remove the skin, films, if necessary, rinse and dry with napkins or a towel.
Mix coarse sea salt with coarsely ground black pepper. There you can also add crushed dry chili pepper, a sprig of dried sage or rosemary. And for a delicious aroma and delicate taste, pour one third of a glass of cognac or port wine on 2 kg of salt.
We take a container suitable for salting. I am now using a large bowl, and I insert a colander into it - the salt will spill out through the holes just a little, but the liquid from the chicken will drain better.
Pour salt with spices and alcohol on the bottom and lay the chicken fillet in layers, sprinkling with salt. From above we also fall asleep with a salt mixture. If not enough - just pour a couple of handfuls of pure sea salt.
We put in a cool place for 8-12 hours. During this time, the meat is salted, absorbs the aromas of spices and becomes like rubber.
We rinse, wipe off excess water, put it on a hook (ordinary chrome hooks for kitchen rails fit perfectly) and hang it in a box along the bars (or you can hang it by twine).
We plug it into the outlet and “forget” for a day or night. Of course, you won’t be able to forget - in the room where such a unit will work, it will be very pleasant to smell of jerky, spices and cognac)) Well, the forced exhaust hums a little. Not like in the toilet - there the ventilation shaft resonates. And then quietly as noisy as a cooler in the system unit.
Here, the difference in appearance is meat after salting and after a day of drying.
To taste - absolutely the same as if I were, but much faster. If you go further, then the dried fillet can be cut into slices, laid out on a wire rack, placed on rods in a dehydrator and dried to a translucent state.
Now about why this box is universal:
You can dry everything there - any fruits and vegetables, pieces of meat.
You can put a grate with parchment on the bars and dry smaller products - mushrooms and berries.
In such a box, you can put a whole stick of sausage and dry it thoroughly. Yes, many use a dry wind or have adapted an air grill for drying, but try putting 30 centimeters of sausage or a whole lamb into it!
An indisputable plus of the box is that the product in it is closed on all sides. You can install ventilation with dampers and make the dehydrator almost airtight.
100% fly protection! And how else to carefully and safely wither the fish?
The box is quite compact, but roomy - withering 8-9 kg of meat at a time is not a question!
If you suddenly need warm air inside, you can put a reptile mat on the bottom and set the desired temperature.
Well, and another bonus - fill the box with bottles of frozen water, plug it into the outlet and get an "air conditioner" for the whole night.
Express-drying socks yourself come up with))))
And you can also modify the design with a special adapter with a timer - let the hood turn on and off at specified intervals.
And finally - why the "house of dancing sweets"? This name was given to the dehydrator by Hare, when in the middle of the night he drove into the kitchen to drink some water, and under the even hum of the fan in a translucent box, dried chicken swayed merrily, each piece on its own)))
The dehydrator is my first step towards cold smoking and sausages. More experiments coming soon!
Enjoy!
Alexey Mitrokhin
A A
Drying and drying are ancient ways of harvesting meat. Today, a lightweight nutritional product plays the same role for fishermen, hunters, tourists. Dried delicacy is popular as an appetizer for beer, a festive table. Cooking cold-dried meat at home does not require special skills or technical means.
Recipes for the preparation of a dried product include the use of an oven or an electric dryer. Traditional cold drying is designed for the complete absence of equipment. The main thing is a cool, well-ventilated area, where there are no small pests.
Suitable for cooking beef,. Fresh pulp is selected, blotches of fat are acceptable. Bones, cartilage, tendons, films are excluded.
This is enough for classic cold drying, although salt and spices are sometimes added for taste. To cook jerky, spices and brine are a must. They work to improve taste and as preservatives.
Ways to dry meat at home
Numerous nationalities, naming dried and dried meat in different ways, used similar cooking methods.
Drying meat in a rustic way
The rustic way of drying meat at home can rightfully be considered the simplest:
- or lamb cut across the grain. For snacks, the pieces are made small. For preservation and subsequent addition to dishes - larger.

- For a day, the layers are aged in the refrigerator in brine (a recipe for any marinade for smoking is suitable).
- For drying, the meat is hung in a cold room with good circulation, closed from the sun and insects. If there is a chance that flies will get in, wrap each piece with a double layer of gauze or other natural cloth.

Complete drying will require at least 1 month.
Ready dried meat can be wrapped in parchment and stored in a dark, dry, cold place for as long as you like.
Cold drying dried meat on video:
Biltong
This delicious dried meat recipe originated in South Africa. The hot, dry air naturally cooked the dried delicacy.
For 1 kg of pulp, prepare a mixture of:
- salt - 2 tablespoons;
- ground coriander - 1 tbsp;
- ground black pepper - 1 tsp;
- granulated sugar - 1 tsp
You will also need 6% vinegar and water.
Cut the pulp into thin (no more than 1 cm) strips across the fibers. Tap a little with a wooden mallet, sprinkle with vinegar, roll in a mixture of spices, put under oppression and leave in the refrigerator for 12 hours.

Mix 6 parts of water and 1 part of vinegar, put the salted layers into this solution for 5 minutes. Thoroughly soaked in cold marinade, hang them to dry in a well-ventilated, dry, shaded area.
In about a day, the dried biltong will be ready. The cooking time depends on the humidity of the air. Store biltong in a tightly closed glass container.


Realistically bring to life this Turkic recipe for jerky at home in the kitchen. You will need:
- beef tenderloin - 1 kg;
- fenugreek seeds (chaman) - 0.6 kg;
- salt;
- garlic - 300 g;
- ground chili, paprika - 150 g.
Sprinkle the washed and dried beef with salt on all sides and refrigerate for a week. Turn every day, grease the sprinkled places. The salted pulp will feel hard and dry to the touch.
Take out a piece, rinse, leave to soak in cold water for 6-8 hours, then put it under oppression for a day.
Make a paste of chaman by mixing the seeds with water until the consistency of thick sour cream. After standing for 8-10 hours, add crushed garlic, ground pepper.
Spread the spice paste on the pressed piece. The layer must be at least 5 mm.
The hot method somewhat speeds up the process - hold the basturma in until the paste dries. The cold method assumes that the piece is immediately hung to dry. At first, the paste flows down, drips. The layer must be restored until completely dry.
Cold drying takes from 2 weeks to 1 month. Ready dried basturma has a dark color, the spice paste hardens. You can store the delicacy by wrapping it in parchment.