Country homemade products are new. Homemade products for the garden, drawings, descriptions. Types of rafter systems
Read also
All dacha owners one day think about decorating it, adding something special to the atmosphere. Of course, you can go to specialized stores and buy whatever your heart desires. But if summer residents want their vacation spot to be unique and inimitable, then it will be much more interesting to make the decorations with your own hands. Jewelry made independently will give the owners both a creative mood and aesthetic pleasure.
Choosing original ideas for a summer residence
Each dacha owner, if desired, can find a lot of different ideas for decorating his site. To make most decorations, only available materials and minimal costs will be enough. And old, unnecessary furniture and interior items will inspire creativity even more. Often seemingly completely useless and forgotten things can come in handy. Country designers use in their work everything that comes to hand: broken old furniture, unnecessary toys, various bottles and dishes, car tires, leftover building materials and much more.
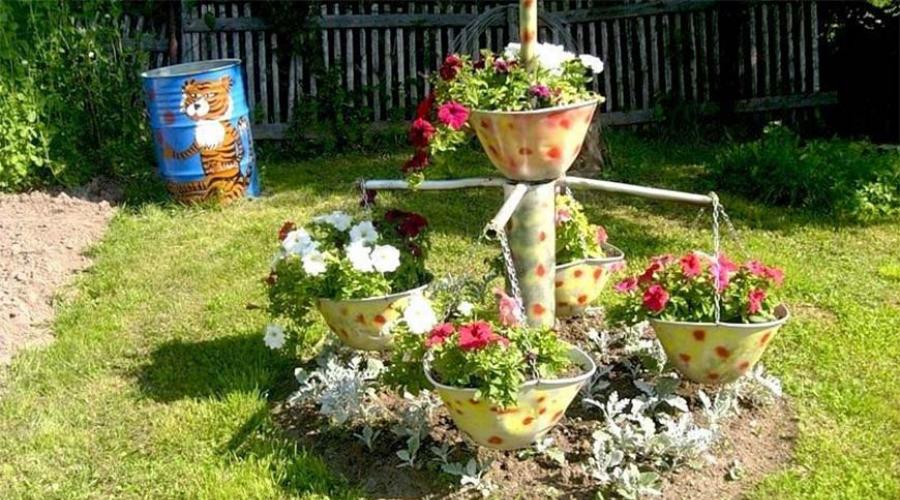
No dacha decoration is complete without intricate, interesting flower beds. You can add uniqueness to flower arrangements by planting them in old containers. These can be barrels, pots, and even carts. Many summer residents build various picket fences for flower beds.


Original paths on a summer cottage will always add coziness. They are made from timber or stone. And leftover materials can always be used to build another composition.


Bottles and plastic jars are especially popular among country designers. From them it is easy and simple to build many interesting sculptures, decorations for flower beds, and borders. There are no limits for imagination here.


You should definitely place a bird feeder in your dacha. Children usually love to watch birds. And with a feeder, birds will be a frequent visitor to your summer cottage. It can be made from a plastic bottle, from an unnecessary block of wood, or from twigs.


Without much difficulty, you can make a variety of figures that will bring comfort and individuality to the countryside atmosphere. For their manufacture, you can use a variety of design solutions and materials. For example, polymer clay, remnants of polyurethane foam, gypsum and other building materials. Once you start creative work, it will immediately become clear that nothing is impossible.


Crafts from improvised materials
The most popular among available materials for crafts are bottles, various plastic jars and boxes. Before starting work, you should definitely think through the details so that the result is truly beautiful and does not resemble a pile of plastic waste.
Plastic bottles are easy to cut and can be easily shaped into the desired shape. And if you cover the result of the work with suitable paints, you get bright, unique decorations for your dacha. For example, you can make figures of animals (pigs, cows, bees) or fairy-tale characters. By making such decorations, you can unleash your creative potential, and each time the crafts will become more and more perfect. With a large amount of unnecessary plastic, not only crafts, but also furniture are made from it.

If you have a glass cutter among your tools, you can make original pots from glass bottles. Such crafts look very stylish and easily fit into any design. Candle stands can be made in the same way.

Bottle caps can also be useful for decorating furniture, decorative fences, creating compositions and even curtains. You can also use containers from chocolate egg toys.

The remains of natural stone are perfect for decorating a pond in the country. A small pond will add unique comfort to the atmosphere of the dacha. Flower beds, crafts or a recreation area will look good around. If the pond turns out to be large enough, then it can be decorated with an interesting bridge.

Every motorist always has old tires. You can simply paint them and make bright bases for a flower bed, or you can show your imagination and cut out various shapes.

Arrangement of a play area at the dacha
When landscaping and decorating your summer cottage, don’t forget about the children. They need their own territory for games and entertainment. Children of any age love swings. They can be made from regular boards and rope, or you can use metal chains and old tires painted in bright colors. It’s easy to build slides and swings from scrap materials. The main thing is that everything is strong and reliable.
For kids, you will definitely need a sandbox. Its borders will look interesting from multi-colored bottles or wooden frames. A sandbox in the form of a ship or car will look original. It is recommended to make an awning over the sand to protect from the bright sun.


Children will certainly love having their own playhouse in their summer cottage. Benches, a table or other furniture can be placed inside. It all depends on your imagination. The house can be decorated with a bright flower bed or homemade decorations. Usually the children themselves are happy to take part in decorating their territory.


Ideas for decorating a fence at the dacha
The uniqueness of the dacha plot is best emphasized by its fencing. A fence is not only the protection of the territory, but also the so-called calling card of the owners.
A simple wooden or iron fence is trivial. It definitely needs to be decorated. You can decorate the fence with a variety of materials: flower pots, crafts in the form of animals, painted landscapes and anything you can imagine. For example, unnecessary brightly colored rubber boots will look original as pots.
You can decorate the fence with old disks. They reflect sunlight and look interesting in any lighting. You can also apply different patterns to the discs.
A fence made of round timber, painted to look like colored pencils, looks impressive. This fence can also be used to fence off a children’s area in a dacha.

Any fence will look cozier if some climbing plants grow along it. There are various species that grow very quickly. For example, decorative beans or morning glory. You can plant vines. They grow much slower, but also look more expensive. There is no comparison in this case with wild grapes. Grape leaves gradually change their color and retain their beauty until frost. It looks original when the “grape fence” turns into a canopy. This design gives the fence an antique look.

Flowering shrubs planted along it will become beautiful decorations for a low fence. You can combine plants with different colors and flowering times.
In the evening, different lanterns on the fence look beautiful. It’s also possible to make them yourself from scrap materials. Or you can simply place candles in painted glass jars attached to the fence. The main thing is that the flame does not reach the fence.

Lovers of drawing will have a lot of room for imagination. You can draw anything on the surface of the fence: nature, scenes, cartoon characters, ornaments, small patterns in the form of flowers, butterflies, ladybugs. It’s easy to draw on any fence, but it’s easier on a fence made of corrugated board.
Compositions made from lids, shells, stones, and dishes look original. It’s easy to make plastic flowers from the bottoms of bottles and paint them in rich colors - they will look beautiful on a wooden fence.

We design flower beds and flower beds
Flower beds will help transform your dacha plot and add color to its atmosphere. When choosing plants, you should definitely take into account their individual characteristics. First of all, you should decide on the “soloist” flowers, that is, the main plants in the flowerbed. The choice can be made of three or four types.

Decorating flowers with ornamental grasses and interestingly shaped leaves looks beautiful. With them, the flowerbed will be original, even when the flowers are not blooming. But you shouldn’t try to place many different plants in your garden. The territory of the site should look holistic and harmonious.
Of course, it’s not enough just to plant flowers beautifully. Flowerbeds also look more original if they are decorated around them. The composition must be complete.

Flower beds can be decorated using any unnecessary items. The article already mentioned that it is not difficult to make small flower beds from old tires painted in bright colors. You can use a wheelbarrow, cart, an unwanted beehive, or even an old car. The main thing is that everything is done carefully and aesthetically. If desired, you can add decorations to the flower garden in the form of homemade bees, butterflies, and interesting stuffed animals.

You can make a small fence around the flowerbed. To make it, you can use plastic bottles or cups, fencing made of tyna, and stones. The flower bed looks beautiful and smoothly turns into a lawn.
Setting up a relaxation area
The dacha must have a comfortable place to relax in the fresh air. This issue must be approached very responsibly. It all depends on the preferences and desires of the owners. This could be simply a laid out area with a table and comfortable chairs or hammocks placed in the shade.
A gazebo, which can be made from the remaining building materials, will look impressive on any summer cottage. Gazebos whose walls are decorated with climbing plants look beautiful. Bright soft pillows or blankets look cozy as decorations.

Swings can be not only for children, but also for adults. It won’t be difficult to build a wide wooden swing for relaxation or make a hanging one somewhere in the shade of trees. For convenience, they can be decorated with soft pillows.

You will definitely need a barbecue in the recreation area. It can be made, for example, from an old barrel. For evening and night time, flashlights can be provided.

When designing and decorating a dacha plot, it is worth remembering that a dacha is a place of rest from the everyday life and bustle of the city. It should be comfortable and calm here, and the environment should be pleasing to the eye. It is important not to overload the area with crafts or some design solutions; everything should be in moderation. Imagine, create, surprise!


Often, country crafts amaze our imagination not only with their originality, but also with their practical and elegant approaches to the remnants of various materials that every summer resident has in the barn. We have collected practical and exotic ideas for a garden using scrap materials that show a new approach to the remains of plastic pipes in the garden.
A simple sun lounger with a frame made of plastic pipes is a must-have for any summer resident. 
Assembly diagram for such a sun lounger.


When there are not many pipes left and there is no builder you know who regularly supplies them, then you can advertise that you are ready to buy plastic pipe scraps for a symbolic price. In addition, there are projects where very little pipe is needed, such as decorating old furniture.

From plastic pipes of small diameter you can make shelves - storage boxes in the country.

Traditionally, plastic pipes are used to create greenhouses and greenhouses.

Plastic pipes are also useful for those who keep chickens.

They make convenient chicken feeders.

If you like this principle of feeders, you can make your own modification of this simple device.

Plastic pipes are useful for creating a simple canopy in the country.

If you have a puppy, then you can make such a small enclosure for him.

Let's not forget about cats, who also love to go for walks.

Even a country cart can be assembled using plastic pipes.

Or even a bike trailer. Most likely, you still need to adapt to driving with such a trailer. But it's better than driving a bike with a bag of hay on the frame.

You can even make a fence from plastic pipes. It’s hard to consider this a budget option, but maybe the owner of the fence got the pipes for nothing.

Let's move from amazing exotic ideas to understandable practical ones. Smart cuttings of plastic pipes will help us tidy up the garden tools in the shed.

Small pieces of plastic pipes of various diameters will help you conveniently place the tool in the garage.

Even small scraps of various pipes will be used by a thrifty owner.

Let's get acquainted with beautiful ideas for a summer house made of plastic pipes. From a large diameter plastic pipe you can make a beautiful mosaic flowerpot or vertical flower bed. From thinner pipes you can assemble a mobile stand for a garden hose.
 Garden chess pieces made of pipes and boards made of paving slabs will create an atmosphere of relaxation in the garden. A cheerful flower garden made from scrap materials will enliven a boring fence with bright flowers of petunias planted in it.
Look how beautiful garden lamps made from scrap materials can be.
More details on how to make such an unusual lamp with your own hands can be found in the article “How to make a beautiful lamp with your own hands from a pipe”

Briefly, the technology for creating a lamp is as follows: using a hand drill, both through cuts and surface strokes are cut out, which create a more interesting volume in the lamp; parts of the lamp are bent using heating with a hair dryer. It is strongly recommended to use fluorescent and LED lamps in the lamp, which hardly heat up. You can even use Christmas tree garlands inside the pipe. The peacock would definitely look gorgeous with such lighting.
Don’t miss this wonderful opportunity to make useful and beautiful crafts for your dacha from scrap materials that you have lying around as useless trash in your shed.
After purchasing a country plot for a summer residence, the question of how to build a country house with your own hands becomes urgent. Well, building it yourself is quite possible, unless, of course, you are planning a huge “palace” that requires the involvement of construction equipment and a team of professionals.
Usually compact buildings are chosen for a dacha, but, nevertheless, the house must have everything necessary for rest - rooms, kitchen, veranda. The latter will become a favorite place for an evening pastime all family. It is very important to make the country house cozy and comfortable, so you need to think through all the nuances of its arrangement.
The optimal material for a country house building is wood, and the principle of construction is a frame structure.
Of course, the first thing that will need to be done is to decide on the location and size of the building, draw up a project, and plan further work.
Proe ct of a small country house
The size of the future house largely depends on the area of the summer cottage, the number of family members and the financial capabilities of the owners. If you plan correctly, draw up a successful project and choose inexpensive but high-quality material for construction, you can save space, money and work time.
 In any case, the first steps are drawing up a project
 Most often, a country house has a size of 5.0 × 6.0 or 4.0 × 6.0 m. Larger buildings are erected much less frequently, and mainly in cases where they are planned to be used year-round. But this, most likely, will not be a country house, but a full-fledged country house.
The layout of the house may have to be carried out based on the requirements that can be established by the board of the gardening association, therefore, when purchasing, you need to find out about such nuances in advance. The following distances are most often required:
- The house must be installed at a distance of 3 meters from the border of the neighboring plot, and from the fence separating the plot from the general passage (street) - 5 meters.
- In order to ensure fire safety, a stone house is placed at a distance of at least six meters from another stone building, and ten meters from a wooden one. If the house is wooden, then it should be installed at a distance of no closer than 15 meters from another wooden building.
- To prevent the house from blocking neighboring buildings from sunlight, if it is placed on the eastern, southern or western side of the site, it is located at a distance from another residential building at least equal to its height.
Usually, to install a country house, the highest place in the area where Water will not collect when snow melts or from heavy rains. Increased humidity under the house will never benefit any building material, but it will always have a negative impact on the overall strength and durability of the structure.
Most often, the following construction technologies are chosen for the construction of country houses: frame-panel construction, log houses, walls made of blocks or bricks.
For summer cottages, designs of one-story houses with closed or open verandas or terraces are predominantly chosen. Often a building has an attic space used for storing garden tools and other things that seem unnecessary in everyday use, but which can always be useful in the country. However, it also happens that in some projects there are no attic floor beams at all, and then the roof slopes simultaneously serve as a ceiling.

If the family is large, and the area of the plot is not as large as we would like, then you can plan a two-story house that takes up very little space at the base. In this case, the first floor can be used as a living room, terrace and kitchen, and on the second floor you can arrange cozy sleeping areas for the whole family.

Not at all necessary in a dacha building, build a full second floor, since its role can be perfectly fulfilled by an attic superstructure. By decorating it with natural materials, you can create a wonderful, healthy country atmosphere.
Country houses are mainly used in the warm season, starting with the arrival of spring and ending in autumn. Therefore, they do not require enhanced insulation of walls and roofs, but devices for heating the premises must still be provided - in case of cold nights or a drop in temperature during unstable weather. Typically, electrical appliances are used as heaters, for example, convectors or infrared film emitters, but sometimes owners even prefer to install fireplaces or cast iron heating and cooking stoves.
By the way, if you plan to build a real fireplace or brick stove, then they must be included in the project being compiled.
There are also ready-made versions of country houses, sold complete in disassembled form, which simply need to be delivered to the site and assembled. Any such set of parts must be accompanied by detailed instructions, which outline the procedure for carrying out the work, basic technological techniques and connection diagrams of individual elements and assemblies.

For the owner of the site, who has basic construction skills, it will not be difficult to assemble a similar country house on your own. The main advantage of this option is that the kit often already includes everything necessary for the building’s electrical network, its ventilation system, and even for installing the water supply.
Video: a small, neat country house that lives up to its name
What type of house to choose?
Having decided on the approximate plan of the future house, you need to choose the material for its construction. This choice will determine not only the appearance of the building itself, but also the comfort of staying in it, as well as the costs of its construction.
- The traditional material for a country house is wood, which will create a favorable microclimate in it, filling it with the smells of the forest. A wooden house can be built using a frame method, from timber or logs. The disadvantage of wooden buildings is considered to be the high fire hazard of the material.

However, wooden houses have always been built, and many of them have stood for centuries. Today, there are special fire-retardant impregnations on sale that significantly reduce the risk of fire in wooden buildings. And in general - the most important thing here is not the material, but the human factor - it is people’s neglect of basic fire safety requirements that in the overwhelming majority of cases becomes the cause of fire.
- The construction of a brick structure will cost much more, but it can with good reason be called a full-fledged house, which can be used not only in the summer, but also, if necessary, in the winter, if you install a stove in it. Brick buildings are much less susceptible to fire and, with high-quality masonry, will last a very long time. Their disadvantages include a more complex and lengthy construction process, requiring special skills, and the high price of materials.

- Very often, different materials are used when building a country house. For example, a house is built from wood, but on a foundation made of concrete, brick or blocks.

This option can be called optimal, since a foundation made of moisture-resistant materials will create optimal conditions for the construction of walls made of wood, thus becoming a reliable foundation for the house.
It is this last option that is worth considering, since it is the most popular of all types of country houses.
Stages of construction of a country house
Materials for building a country house
If you don’t want to bother with calculations, then it’s better to purchase a prefabricated ready-made model of a house that has a certain area, for which you only need to prepare a place.
In all other cases, you will need to purchase building materials. Their type, size, volume, total number - all depending on the size of the planned building, which is determined by the project.
Prices for various types of timber
Foundation material
For any type of foundation you will need the following materials:
— sand, crushed stone, cement;
- third-grade board and timber for formwork;
- brick or concrete blocks;
— waterproofing material (roofing felt);
— expanded clay of the middle fraction.
Wall and roof material
Since wood was chosen for the construction of the walls, other materials will be selected based on this:
— bars and boards of different sizes, depending on the design parameters;
— fastening elements — nails, self-tapping screws, bolts, studs;
- corners of different configurations, metal plates - for fastening nodes;
— vapor barrier film;
— insulation — mineral wool, ecowool or expanded clay;
— to cover the roof, it is better to choose a lightweight material — ondulin or corrugated sheeting.
Once the installation location for the future house has been determined and the materials have been purchased, you can proceed to laying out the foundation. True, first you will have to decide on its type.
Country house foundation
Even when erecting such a small and light building as a wooden country house, you cannot do without a foundation. In this case, one of two types is ideal for these purposes - a columnar and strip foundation. Which one to choose depends on the preferences of the builder.
- A column foundation will be a less expensive option, as it will allow you to seriously save on building materials. In addition, such a foundation can be completed independently, without outside help, which will also save some money.

You can find out in detail how to build it correctly by following this link to the corresponding page of our portal.
- To create a strip foundation, you will need not only a larger amount of materials, but also a fairly long period of time. This is not surprising - a trench will need to be dug along the entire perimeter of the future house, waterproof it, install a reinforcement structure, build formwork and fill the foundation pit with concrete. And after that, whether you like it or not, it will take another month until the filled tape completely hardens and gains brand strength.

However, strip foundations are still very popular among individual developers. This option is convenient because it allows you to make a basement under the house, however, to do this, the foundation walls will have to be raised above the soil surface by 700 ÷ 800 mm. is described in detail in the article, which can be found on our portal by following the link provided.
If a columnar foundation is selected, then it is recommended to remove the top layer of soil by 150 ÷ 200 mm from the site, which will be located under the house and around it by 500 ÷ 600 mm. Then pour a 30 ÷ 40 mm layer of sand into the resulting pit, which should be compacted. A layer is laid on top of the sand cushion mid-fraction crushed stone and is also compacted, and the remaining space must be filled with expanded clay of the middle fraction. All these procedures are done to ensure that small rodents cannot get close to the house. They cannot stand expanded clay (especially small clay), as it contains a large amount of dust and has a loose surface.
 Fine expanded clay is an excellent rodent repellent
 To protect the house from the penetration of large rodents or other uninvited guests from the animal world, it is advisable to cover the space under the house with a metal mesh with cells no larger than 10 mm.
Construction of a frame structure
 For a country house, the best choice is a frame structure
 A frame house can be placed on either a columnar or strip foundation. Construction always starts from the foundation, which must be reliably waterproofed two or three layers of laid roofing material.
- If the project includes a veranda, you must immediately separate its zone, over which a roof will be erected, but there will be no solid walls. To support the roof over the veranda, you can use the racks of the general wall frame. Another option - veranda will be attached to the house separately.
- Without exception, all wooden workpieces must be treated with antiseptic compounds and fire retardants. These impregnations will increase the resistance of wood to fire, to decay, will prevent the appearance of insect nests or colonies of microflora representatives - mold or fungus.

- After the workpieces have received proper preparation and are completely dry, during construction, a lower frame (crown) is first made, which will be laid on the foundation and will subsequently be used to install the floor.
In order for the floor to be reliable, it is necessary to use high-quality timber of the required cross-section for the frame. If funds allow, then it is better to choose wooden elements not according to the “lower limit” of dimensions, but by placing a certain margin in their cross-section.
The table shows the optimal dimensions of timber for a frame house:
- The frame support beams are mounted on crown bars located along the perimeter of the foundation, at a distance of 600 ÷ 700 mm from each other. They are secured using corners or by inserting. If the elements are large in cross-section, they can additionally be fastened with metal brackets.

- When the lower frame with support beams is ready, the wall frames are made. They can be assembled separately, and then, when finished, lifted and secured to the framing bars.

Another option is to lift the frame directly into place. For example, if a house is being erected independently, without helpers, then it will be very difficult to lift the finished frame from the tent alone to the height of the frame, install it evenly and temporarily fix it until it is finally secured. This means that each of the bars will have to be placed separately.
- The size of the bars for the wall frame posts must be at least 100x100 mm, but it can also be mounted from boards with a cross-section of at least 50x150 mm.
The bars are secured to the lower frame using powerful corners that can hold them in a vertical position. It is best to use self-tapping screws rather than nails for fastening - the difference in price is not so significant, but the quality and reliability of the assembly is incomparably higher.
- When installing vertical racks, you need to immediately mark the location of the openings for windows and doors. It is best to leave the area where they are to be installed free in the frame, and install the part of the wall with the window opening separately.

Then, when the upper strapping block is installed and secured to all other vertical posts, the area with the window opening is secured to the space left for it.
- All four walls are assembled in the same way. At the corners, the side posts are fastened together with corners, or instead of two separate ones, one common corner post is mounted. It is recommended to support it with diagonal struts on both sides - they will add rigidity to the entire wall structure.

- The doorway is installed in the frame immediately. It is reinforced with an additional rack, since a door suspended on hinges has a certain weight, which must be calmly supported by both the reinforced opening and the entire wall frame.

- If you plan to sheathe the frame from the outside with clapboard, then this is the next step. The sheathing will give the structure additional rigidity, which will allow the installation of the attic floor to continue and

Installation of the floor can be carried out immediately after the outer wall cladding, but only if the roof will be covered on the same day. It is highly undesirable for your freshly laid flooring to get wet if it rains unexpectedly at night. Therefore, it is better to first resolve the issue with the roof, and then calmly deal with all other construction activities inside the house.
Roof construction and roofing
Types of rafter systems
A few words need to be said about the types of rafter systems, since, moving on to the construction of the roof, it is necessary to have a general idea about this, to know which design is better to choose.
There are two types of rafter systems - hanging and layered.
Hanging system
The hanging rafter system is distinguished by the fact that it is installed only on external load-bearing walls and has no other supports. It is perfect for erecting over a small country house building. In order to lighten the load on the wooden walls and on the foundation, hanging rafters are fastened with ties.

The hanging structure itself consists of a transverse beam, which also performs an overlapping function, and can simultaneously serve as a frame for lining the ceiling, as well as rafter legs that form the roof slopes.
Layered system
A layered system is installed if the house, in addition to external walls, has internal permanent partitions that will become additional support points. This scheme can also be used when constructing the roof of a country house, if it has a large area and its rooms are separated by walls built on the foundation.

When installing this system, the load on the load-bearing side walls becomes weaker, so it will be possible to use fewer retaining elements. It is perfect for attic structures that will be used as living quarters.
Floor beams
 An important structural element is the floor beams
 The beams are laid exactly above the vertical posts of the wall frame. In order for them to fit tightly on the upper strapping belt, grooves are cut out on their edges. The size of the grooves can be calculated based on the formula shown in the figure.

The beams are secured to the frame structure of the walls using nails or self-tapping screws, and in addition they are sometimes fixed on both sides with metal corners.
Having completed the installation of the ceiling beams, you can proceed to building the roof truss system. For safety reasons, temporary plank flooring is laid on the floor beams to ensure comfortable movement along the attic plane during installation of the rafters.
Installation of the rafter system

The roof truss system can be mounted using different sequences of fastening its elements:
- First option. It is necessary to fasten the outer pairs of rafter legs on the ground, then lift them onto the harness and install them ready-made on the gable walls of the house. And then connect them with a ridge beam, and mount the remaining pairs of rafters on it.
- Second option. To begin, install the middle posts along the gables, then fasten them with a ridge beam or board, onto which the rafters are then attached.
- Third option. In this case, pairs of rafter legs in their upper part are attached to each other with a ridge plate, and their lower side is fixed to the wall frame, which in this embodiment will act as a mauerlat.
The cross-section of beams or logs used for rafter legs must be strictly maintained - depending on the rafter length between two support points, and depending on the step between adjacent pairs of rafters
| Maximum permissible rafter leg length (in mm) | Rafter spacing (in mm) | |||||||
|---|---|---|---|---|---|---|---|---|
| 1100 | 1400 | 1750 | 2100 | |||||
| Section of the rafter leg (in mm) | ||||||||
| bars with cross-section | logs Ø | bars with cross-section | logs Ø | bars with cross-section | logs Ø | bars with cross-section | logs Ø | |
| up to 3000 | 80×100 | 100 | 80×100 | 130 | 90×100 | 150 | 90×160 | 160 |
| up to 3600 | 80×130 | 130 | 80×160 | 160 | 80×180 | 180 | 90×180 | 180 |
| up to 4300 | 80×160 | 160 | 80×180 | 180 | 90×180 | 180 | 100×200 | 200 |
| up to 5000 | 80×180 | 180 | 80×200 | 200 | 100×200 | 200 | - | - |
| up to 5800 | 80×200 | 200 | 100×200 | 200 | - | - | - | - |
| up to 6500 | 100×200 | 200 | 120×220 | 240 | - | - | - | - |
It should be noted that the attachment point for the rafters in its lower part will depend on the angle at which they are fastened to the ridge and how long they are.
If the rafter is long enough and protrudes beyond the load-bearing walls, then a notch is cut out on it, with which it will be installed on the strapping beam (). An example of such a notch is shown in the picture:

If the rafter ends at the edge of the load-bearing wall, then its lower edge is cut at a right angle to the Mauerlat, and the leg itself can be fixed to it using a special fastening plate, a sliding support, an angle, a bracket, nails or long screws.

If the house is very small, then after securing the rafters to the frame, tying them with ridge beams or boards, you most likely will not have to install additional supporting elements.
Detailed information about the exact details can be obtained from a special publication on our portal by following the recommended link:
For installation of additional reinforcing elements of the rafter system, the material can be selected in accordance with the recommendations indicated in the table:
Prices for various types of fasteners for rafters
Rafter fasteners
Roofing system
After the rafters and additional elements form the roof slopes, you can proceed to the installation of the subsystem for the roof deck.
- The first thing that needs to be done on the outside of the roof, after installing the rafters, is to lay a vapor barrier film, securing it first with staples and then with counter-lattice strips on the rafters.
The film is laid perpendicular to the rafters, starting from the lower eaves of the roof. The overlap between two adjacent strips must be at least 200 mm.

- The main batten is mounted perpendicular to the counter-lattice, onto which the roofing material will be attached. The installation step of the guides depends on the type and size of the sheets of roofing material.
If a soft roof is chosen to cover the roof, then instead of sheathing slats, the slopes are covered completely - with plywood, and then with waterproofing sheets of roofing felt, which are overlapped by 150 ÷ 200 mm and glued together with bitumen mastic. Another option is to use soft bitumen decorative tiles, which are laid using a similar technology.
- The following roofing materials are most often used for wooden houses (depending on the steepness of the roof slope).
- The selected roofing material is laid and secured onto the prepared base. The work starts from the cornice, and if the first row is laid from right to left, then all other rows are installed according to the same pattern.
Some types of roofing materials have a strictly specified installation pattern in direction, which cannot be changed. This must be indicated in the instructions supplied with them.
Also, for any type of sheet roofing material, the amount of overlap in the direction of the slope (usually 150 ÷ 200 mm) and the number of waves (relief protrusions) in the horizontal direction along the roof are determined.
- Almost all roofing materials are secured to the sheathing using special nails or self-tapping screws with waterproofing gaskets.

- It is very important to correctly select and secure the ridge elements of the roof, otherwise it will leak at the first rain. Typically, the ridge element is selected from the same material as the covering of the roof slopes.
- Next, the eaves of the roof are finished - this can be done with wooden or plastic lining. Sometimes special plastic elements - soffits - are used for these purposes.

- Then elements of the roof drainage system are installed on the wind board - funnels, gutters on brackets, pipes, etc.

- Next, the gable sides of the rafter system are sheathed. Most often, wooden or plastic lining or even planed boards are used for this.
For the lining, a special profile is fixed around the perimeter of the pediment triangle, into which the panels prepared and cut at the desired angle will be installed. Installation is usually done symmetrically - from the middle post to one side and then the other - then the cladding will be smooth and neat.

By the way, install the lining, Besides, you can do it horizontally, in a herringbone pattern, or come up with a more complex pattern.
Detailed information about the technology can be found in the article posted on our website by clicking on link.
Now, having finished the external finishing of the roof and being confident that rain will no longer get inside the country house, you can move on to installing windows and doors, insulation, flooring and wall cladding.
Installation of windows and doors
- Window frames are mounted in the frame openings left for them and leveled. For preliminary fixation when placing the frame, spacers made of wooden blocks or slats are installed between it and the opening bars.

Then, after checking the correct installation, the frames are attached to the wall frame with metal strips. The remaining gaps between the frame and frame bars are filled with polyurethane foam. After it dries, the excess is cut off, and platbands are installed around the windows on the outside of the wall, which will close the unsightly appearance of the gaps and give neatness to the overall appearance of the house.
- It is best to install the door together with the door frame, if it has sufficient rigidity. This will make it much easier to align the entire structure with the level in the wall doorway.
 It is best to install the door as a block - together with the frame and leaf
 When exposing the door frame, if necessary, to achieve a clear vertical position, place wedges (inserts) made of wooden slats. The door frame is secured to the frame in the same way as window frames, using metal strips, and the gap is filled with polyurethane foam.
Having installed all the windows and doors, you can proceed to installing the floor.
Installation and insulation of floors

To begin with, the temporary flooring from the boards (if there was one) is removed from the lower frame, and then you need to install the subfloor.
- To do this, cranial bars are nailed or screwed onto the frame supporting beams. They are necessary for laying transverse subfloor boards on them.

- Next, boards cut to exact size or plywood 8 ÷ 10 mm thick are laid on the skull blocks - this flooring will serve as a subfloor.
- The subfloor laid on top is closed hydro- paro— insulating film, which should cover both the load-bearing beams and the entire floor plane. Individual sheets of material are laid overlapping (by 150 ÷ 200 mm) and taped at the joints with waterproof tape.

- Next, insulating material is laid or poured onto the vapor barrier film. If you do not want to have neighbors who like to live under the floor, then it is better to use expanded clay of medium or fine fraction, or ecowool, to insulate the floor - these toothy pests simply do not live in such materials.

- Another layer of film membrane is laid on top of the insulation, which is nailed to the supporting beams with staples. The installation principle is exactly the same as on a subfloor.
 The floor is finished!
 - The entire structure is then covered with thick plywood or wooden floorboards.
Prices for thermal insulation materials
Thermal insulation materials
Measures for additional thermal insulation
When the floor is completely ready, the walls of the house are insulated and sheathed from the inside. If the building will be used only in the warm season, then the insulation will still not hurt - it will work as an insulator of the premises from heating in extreme heat. Therefore, it is recommended to lay a thermal insulation layer not only in the walls, but also in the ceiling, and if it is missing, place insulation along the internal slopes of the roof.

- First, a vapor barrier material is attached to all walls and ceiling beams. Then the ceiling is covered with clapboard, plywood or plasterboard.
- After covering the ceiling, the walls are insulated. Insulation mats are laid between the frame posts. It is necessary to ensure that the mats fit as tightly as possible against the bars of the wall frame, so that there are no gaps left.

That is why mineral wool is most often used as insulation - after being tightly laid between the racks, it will straighten out, completely filling the entire space. The material is usually selected so that the thickness of the mats and the thickness of the frame posts are the same.
- After this, all walls are again covered with vapor barrier film.

- The next step is covering the walls with wooden paneling, plywood or. The latter, during the subsequent decorative finishing of the walls, can be painted with water-based paint or covered with wallpaper.

- Next, the attic floor is insulated, where the insulation is placed between the floor beams.
If the ceiling is sheathed on the side of the house with plasterboard or clapboard, then we must not forget that you cannot step on it, since the sheathing will not support the weight of a person. You must move carefully along the floor beams.

- If the attic is planned to be used for storing various garden supplies, then a flooring made of boards or plywood with a thickness of at least 10 mm should be secured on top of the insulation on the floor beams.
- The finishing touches of the interior decoration will be the installation of platbands on windows and doors, ceiling and floor skirting boards and closing the corners with fittings.
Extensions to the house
The last stages of arranging a country house are installation work on the veranda and porch.
If a place is left in advance for the veranda on the frame lying on the foundation, then a board is laid on this space to cover the floor (material for open areas is used), a fence is installed and a canopy is mounted.

If the foundation is raised high enough above the ground, then a porch is also attached to it.
Building a country house with your own hands is a completely doable task, but it will be quite difficult to do without helpers. Therefore, it is best to seek help from a knowledgeable craftsman who has experience in such work, will always give useful advice and show how to correctly install certain components in the structure of the house. You can “mobilize” your relatives and friends - it is possible that a knowledgeable person will be among them.
Video: building a country house using frame technology
The time spent at the dacha, as a rule, is seasonal and relatively short in duration: usually it is 1-2 days off and, if you’re lucky, part of the vacation during a certain period. In such conditions, the issue of a comfortable life, even if it does not fade into the background, still takes on a slightly different meaning. Today we will talk, as the name suggests, about an outdoor toilet - more precisely, about its own construction.
A toilet in a summer cottage, even if the construction of a residential building is still in the future, must be built: the needs of the human body do not know everyday conventions and can make themselves known at any time, even if you only visit for a couple of hours to weed and water the beds . That is why a toilet is always installed first on a new site.


In the most general terms, an outdoor toilet is a compact booth where a person can not only retire, but also reliably hide from the weather, as well as a certain volume where waste products of the body are collected. As a rule, this is an ordinary cesspool, deep enough and spacious enough to require the services (paid, by the way) of a sewer as little as possible.

However, there are other, structurally more complex options. It is according to the method of waste disposal that the main classification occurs. Next we will come back and talk about other types of outdoor toilets.
First, let's look at the outside of the toilet, so to speak, the types of stalls and methods of making them that are most suitable for DIY construction.
Classification by cabin type
The booth or cabin of a country toilet in most cases belongs to one of four types:
- “Birdhouse”,
- Hut, or “teremok”,
- hut,
- House.
Each of them has its own advantages and disadvantages, as do the materials used for their construction - wood, metal profiles, slate, brick, as well as their combinations.
When planning the construction of a toilet, you do not need to come up with its design yourself: each type has long been developed by specialists and tested many times, and the drawings are available and contain optimal dimensions that allow you to maintain compactness and ensure ease of use.
“Birdhouse”
Let’s start traditionally with perhaps the simplest, and therefore the most common, option, called a “birdhouse” due to a certain similarity with a bird’s house: the same parallelepiped extended upward with a pitched roof sloping back.
 Typical birdhouse toilet
As can be judged from the presented drawings and photographs, the design of such a toilet is simple and consists of a frame covered with suitable material, with a single door in the front part. For the frame, a wooden beam is most often used; from the same beam or a smaller section, diagonal struts are made to give rigidity to the structure, and then everything is sheathed with boards. At the joints of the boards, narrow, 30-40 mm, “flashing” strips are traditionally stuffed to prevent air from blowing out of the cracks that are sure to form over time, no matter how tightly you fit the boards to each other.


Use of building materials
Wood is the most accessible material, which is easy to process and does not require special skills or special tools.

Metal is another matter: this material is perfect for our purposes, however, to install a frame from a profile pipe, you will need a welding machine and good electric welding skills. The cladding is made with sheets of corrugated sheets, which are fastened with self-tapping screws or rivets. You can’t do this without an electric drill, a screwdriver or a riveter.


Often they choose the “middle” option: a wooden frame is sheathed with metal sheets or a metal frame with chipboard or USB boards: often the determining factor is the availability of suitable materials, for example, remnants from a “large” construction project.

The usual slate is also sometimes used as the walls of a country toilet, at least as a temporary option until the main construction is completed. Slate is most often used as a pitched roof, although, of course, the “metal” version is no worse.
Sometimes the “birdhouse” is covered with boards, which are then lined with roofing felt or other similar material. This, of course, is not the best option, but can be implemented as a temporary one.
Building brick toilet walls is a good, solid and expensive option. Such a solution can often be seen already at the stage of improvement of the territory, when all residential and utility structures have already been built. A toilet made of the same brick as the rest of the buildings in the yard will look harmonious in the overall exterior.
Usually we choosing lamps for the garden in order to admire its views with the appearance of stars in the sky. In the classic version, lighting is installed near the gate and entrance to the house. Plus, in the garden, lighting emphasizes paths, places to relax and any corners that you want to highlight on your site; even flower beds, with the right lighting, can be transformed into something interesting and memorable. When planning a lighting system, you need to take into account many little details and really important points. If there are young trees in the garden, you need to take into account the fact that they will grow up, and then you will have to change some parts of the lighting.
What can be illuminated?
1. Login. If it turns out that you have a small area, then you can use a powerful wall lamp to illuminate it. By the way, it turns on using a motion sensor.
2. Place of passage. It must be illuminated with uniform light that falls on the road and a narrow strip along the edges. One way to illuminate the road is to use gliding light; it adds the effect of intertwining shadows. And for the safety of you and the guests who will certainly be in your garden plot, you should pay attention to stairs, railings, curbs and all places where the height exceeds 10 centimeters.