What is a multi-level stretch ceiling? Correct installation of stretch multi-level ceilings. A selection of photos with interesting design options
Read also
Multi-level plasterboard ceilings have recently become increasingly popular among people, primarily due to their attractive appearance. However, this property is just the tip of the iceberg, since these ceilings are truly universal and allow you to solve many technical and design problems.
Today we will discuss with you how you can assemble multi-level ceilings of varying complexity from plasterboard - we will do this in detail, indicating many points that may be omitted in other articles. In general, this instruction will be very useful for beginners in the world of frame structures.
Preparing for work
It's no secret that without preparatory measures no work will move forward normally. Therefore, we will begin our story with those moments that precede the work process.
Inspection of the premises
When you first look at the room, you should assess how difficult the repair will be due to the presence of the following factors.

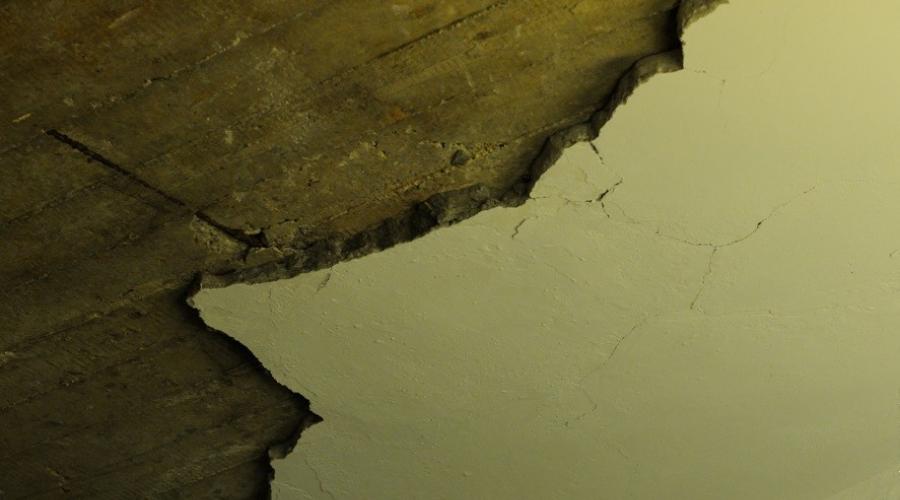
- First of all, we look at the previous coverage, if any. Peeling plaster, for example, will require prompt intervention from you, since during installation and operation, pieces of it may fall down. Of course, the plasterboard structure will not suffer much from this, but it can quite frighten the person in the room. It is possible that, having crumbled, it will weaken the fixation point of the suspension. And we won’t even talk about what happens if part of it falls on the installer’s head, so everything is clear.
- If such a picture occurs, then arm yourself with a hammer drill with a spatula attachment and go ahead (read more)! The work is very dusty and quite dangerous, and you will also have to sweat a lot, removing heaps of construction waste from the apartment. Therefore, be sure to carry out all work using protective equipment - this is, at a minimum: a hat, or better yet a helmet, gloves, goggles, a respirator and closed shoes.
Advice! It is important to remember that according to our legislation, it is prohibited to throw construction waste into common containers, and you must organize the delivery of waste to the landfill yourself. However, in practice, we often see silhouettes cruising in the dark from the entrance to the trash can or independently repairing the road surface in the yard!
- Next, we look to see if our ceiling is leaking anywhere (see). The presence of frankly wet areas or simply dry yellow stains on the surface obliges us to check the condition of the roof, heating risers, water pipes, sewers - in general, everything where a leak may appear. If you skip this stage, then you risk that the entire repair, after a short time, will go down the drain.
- The last of the most important things to immediately pay attention to is the geometry of the room. Assess how difficult the repair will be, and estimate whether you can handle it yourself, without the involvement of qualified labor. Multi-level plasterboard ceilings are not only parallel planes located at different heights, but also those that can be located at different angles in relation to each other, for example, the sloping surfaces of an attic ceiling.

- You also need to pay attention to the presence of all kinds of beams, columns and other elements that greatly complicate the process.
- If the ceiling is assembled from reinforced concrete slabs, before assembling the frame it is necessary to seal all joints between the slabs using plaster or polyurethane foam. This is required to improve sound and.
Otherwise, if the house is standing, you can start preparing for work.
Preparing materials
Now let's look at the materials without which it will be difficult to assemble a 2-level plasterboard ceiling.

Directly the drywall itself. What do we need to know about this material now?
Firstly, it is available in three types, each with its own name:
- GKL– standard gray sheet, intended for installation in dry rooms. The material, like others, is hygroscopic and vapor permeable, which helps to establish a natural microclimate in the room.
- GKLV– differs from the previous one not only by the letter “B”, but also by a different color – green. The material has significant resistance to moisture, namely, it is impregnated with antiseptic compounds that prevent the formation of mold. You should not consider it waterproof, since it absorbs water just as well. Used in bathrooms and kitchens, subject to subsequent high-quality finishing.
- GKLVO– this material has increased fire resistance, and it is intended for installation in places where high temperatures reign, that is, in your home it will be useful to you, perhaps somewhere in the area of the boiler or chimney.
Secondly, we would like to note the difference in the thickness of the sheets, of which there are also three:
- 12.5 mm - these sheets are called wall sheets. They have sufficient mass and greater strength. If desired, you can mount them on the ceiling, provided the frame is reliable.
- 9.5 mm – . These sheets are characterized by greater flexibility and less weight, which is good news when working at heights. In 90% of cases, ceilings are sheathed with this option.
- 6 mm - arched, or, as it is also called, designer plasterboard. It has great flexibility, which allows it to be easily bent along tight radii. The disadvantage of the material is its price, so many people prefer to work with the previous options, soaking and milling them.
There are other differences, but they are not that important, so we move on.
Let's present the rest in table form, for greater convenience:
|
|
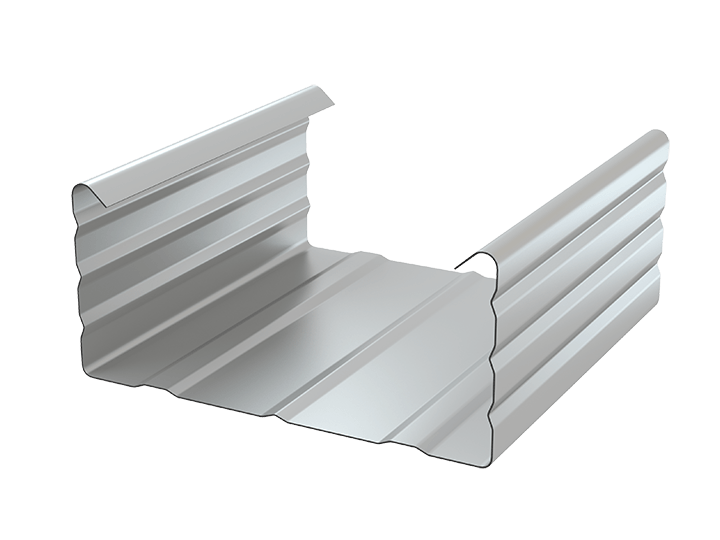
These profiles form the basis of the frame. They are U-shaped and three meters long (there are other sizes, but very rarely). The end section is 27 by 28 mm. The thickness of the metal can vary and differs depending on the manufacturer. Choose tougher options, with a steel thickness of 0.5-0.6 mm. |
|
|
And the second type of profile required to create the frame is the main one, with parameters 27 by 60 mm. As you can see, the dimensions are selected in such a way that the elements fit together easily. |
|
|
Next comes the fittings, which allow you to connect the frame elements, set their position and give them rigidity. First on the list is direct suspension. This simplest, but very versatile part is a perforated strip of metal that is attached to the ceiling and holds the PP profile.
|
|
|
This element is popularly called “crab”. It is intended for transverse single-level connection of frame elements. In principle, assembly can be carried out without it, but any homemade options either reduce the strength of the connection or create unevenness on the plane, so we recommend their use. |
|
|
It often happens that the length and width of the room are larger than the length of the profile, namely 3 meters. Then this profile needs to be lengthened, which is what this element is used for. Usually, not a lot of them are required - we will tell you how to calculate them correctly below. |


There are also other elements that will make the work easier in one way or another, but they can be easily replaced, so we have named only the most necessary ones.
Fasteners
Separately, let’s say a few words about consumables, that is, fasteners:
- Steel, galvanized wedge anchor– this fastener is used to connect the frame with a reinforced concrete floor. Never use plastic dowel screws. This is prohibited, and not so reliable. We can only attach a guide profile to the walls.

- If the installation is carried out in a wooden house, then all connections to the bases are made using the most ordinary, hardened wood screws. Installation in this case is a real pleasure for the installer. No dust for you, no drilling, just you, a screwdriver and geometry...

- : It is worth purchasing more of these screws, as they are used when attaching sheets to the frame. They differ from the previous ones by more frequent carvings.

- "Bedbugs"- These are self-tapping screws with which the parts of the frame are connected to each other. They can be with a drill or a point, but it is better to choose the second option. As an alternative, some people prefer self-tapping screws with a press washer, but working with them is somewhat more difficult, due to the frequent defects in the slots for the bits.
The list of materials can be continued, if you set a goal to immediately putty the drywall, but since this has nothing to do with the topic of today’s article, we will skip this information. We will list the tools for work as we describe the installation process, so as not to delay the introductory part too much.
Installation of a multi-level structure
It's no secret that when mastering something, you should always move from simple to more complex. We will do the same, because without knowing how to make a simple plane, you can’t even dream of assembling a curved figure.
Before starting work, you need to draw a small drawing on paper, which indicates the dimensions of all elements, calculates the location of the profiles in the frame, marks the installation locations for lighting equipment, and draws the figure that you want to see in the end.
The more complex the figure on the ceiling, the more attention you should pay to the accuracy and scale of your drawing. By spending time at this stage, you will save a lot of time during assembly.
If you have no experience in drawing and design, then look for ready-made solutions on the Internet, or use free online calculators. All these measures together will give a good result.
Single-level horizontal plane
And now we read carefully and delve into it, using our spatial imagination as much as possible. If this is a little difficult, then watch the video that we selected on the topic.
- The first thing we need is a tape measure, a pencil and a water level. If there is a laser axle builder available, we use it - it’s faster, more convenient and you can work alone.

- So, according to the project, the height to which the false ceiling will fall is usually taken into account. This should take into account the dimensions of all communications remaining under the casing, unevenness of the capital surface and the height of lighting fixtures, if any, are built into the structure. Our task is to find the lowest point in the room and make sure that the design height recedes downwards from it.
- A laser level will allow you to check almost the entire plane, whereas when working with a water level, only the corners are checked - which is sufficient in the vast majority of cases. If doubts remain, then add a couple more centimeters to the indentation, unless of course the height of the room is greatly affected by this, but as practice shows, no one will be able to notice the visual difference between 250 and 249 centimeters.
- We mark the level with marks at an arbitrary height from the ceiling in all corners of the room. Next, all distances from the base ceiling to the resulting marks are measured. The smallest value will be the lowest point - in this corner we retreat the planned distance, measure the distance to the previous mark with a tape measure and correct the difference in all other corners.
- When working with a level, just hang it from the ceiling and turn it on. Using an extended tape measure, you can “feel” the entire ceiling. Further actions are similar.
- The marks at the corners are connected by lines using a tapping cord with dry paint.

Attention! If the length of the wall exceeds 6 meters, then it is recommended to put an additional level mark in its center to avoid sagging of the thread when pulling.
- The markings are ready and installation can begin. We take the PPN guide profile, apply it exactly with the bottom edge along the line, drill it along with the wall and attach it to an anchor or dowel screw. In this manner we go through the entire perimeter of the room.

- For this work you will need a hammer drill and a concrete drill of the appropriate length. The drill is usually used with the following parameters - 6x110 mm.

- Next, we look at which direction is most convenient to place the sheets of drywall. Usually they choose transverse, relative to the length of the room, if the total length does not exceed 3 meters, and longitudinal, if it exceeds - now we will explain why.
- As already mentioned, in such cases you will need to lengthen the profile. There is a way to avoid installing an extension cord in each belt or get rid of them altogether. To do this, we need to divide the ceiling area into sections, the length of which will be equal to 3 meters, that is, if the width of the room is greater than this value, we will only need to lengthen the sectional profile.
- Wrapped? For clarity - in other words. Let's assume the dimensions of the room are 5 by 4 meters. We put marks on parallel walls from the total adjacent distance of 3 meters. Using these marks we install one profile, which, naturally, needs to be lengthened. The resulting section, perpendicular to the installed profile, is filled with PP profiles trimmed by 3 centimeters, in increments of 60 centimeters, since this value is a multiple of 120 centimeters, that is, the width of the sheet.
- The length of the plasterboard sheet is 250 centimeters, that is, it can also be installed transversely, making a step between the profiles of 50 centimeters, but then the long edges of the sheets will be attached not to the main, but to the transverse profiles, which is not good.
- If the width of the room is less than or equal to 3 meters, then it is easier to insert the main profile between the guides.

- We hope we were able to explain it clearly. In general, the next stage is filling the frame with a supporting profile. As you might have guessed, you need to make cells with a size of 50x60 centimeters. We first mark the main profile (in increments of 60), trim it if necessary with metal scissors and install it, aligning the central axis with the mark, and tying the frame together with self-tapping screws.

- Then the profiles are attached to the ceiling using hangers and simultaneously aligned to the plane. To do this, it is convenient to use a nylon thread stretched across.

- The final touch is the installation of crossbars, which are attached to the main profile using “crabs”. The work is quite tedious, so many people prefer to limit themselves to only the joints of drywall sheets. This design has a right to exist, but keep in mind that it is better then to buy a good, durable profile.
Afterwards, the process of covering the plane with plasterboard begins. This work is simpler for installers than assembling the frame.
Its main difficulty lies in lifting and holding heavy sheets in weight. Professionals use special lifts for these purposes, and for one-time work you can invite a couple of assistants.

During installation work, you will definitely need to cut the sheets into pieces of the required length. For a direct cut, use the most ordinary stationery knife, which is used to cut through the top layer of cardboard along a rigid guide, then break the sheet and make a cut on the back side.
If you need to cut holes in the sheet and make them shaped, use a special drywall saw or an electric jigsaw.

It is most convenient to make round holes in sheets for lamps or acoustics using metal wood bits.

Drywall sheets are attached to all profiles with which they intersect, including guides. The fastener spacing is 15-18 centimeters, which corresponds to a span - an old Russian measure of length. The measuring span is the distance between the tips of the thumb and index finger.
Advice! When positioning the sheet, make sure that its edges are located exactly at the centers of the profiles.
Adjacent rows of drywall are placed at intervals relative to each other so that the seam is not continuous. This measure significantly strengthens the bond of the structure and prevents the formation of cracks on the surface in the future.
Inclined planes

Now we know the basic principles of working with profiles and drywall, so in the future we will do without repetition, focusing only on the most important points. Next up is the multi-plane attic ceiling.
Most often, the ceiling of this room consists of three planes: horizontal and two inclined, but there are also pitched options without a horizontal:
- This form is quite difficult to cover, especially if the craftsman does not have enough experience and does not have developed spatial thinking. We will look at two types of ceilings that can be arranged here: vaulted and straight.
- The main difficulty of such work is that it requires the evenness and correctness of the geometry of the room and the ceiling, but often the sheathed rafter system cannot boast of such parameters and you actually have to build a new frame for the entire room.
- First of all, you need a reference point from which you can base your measurements. The easiest way is, if the walls of the room become such, you need to sheathe them so that all the corners in the room are exactly 90 degrees, the walls are strictly vertical, plus it would be nice to additionally focus on the plane of the central window, if there is one.

- This solution is more suitable if the roof of your house is gable.
- So, we determine the level at which we want the vault to adjoin the walls, and we make perimeter markings of the level, as we described in the previous chapter.
- We measure the lengths of the side walls and find their centers. At these points we screw in the screws halfway or forget the dowels - this will be the central axis of our rounding.
- Next, we assemble a compass from a piece of wire of the required length and a pencil and draw a semicircle. If the dimensions of the room do not allow this, then you can make a kind of spire by shifting the axis to the sides, making the figure actually consist of two intersecting circles.
- Now, according to the markings, a guide profile is attached, but it is specially prepared. For straight sections of walls, its sides are bent towards the ceiling at the desired angle. To install along curves, the profile must be cut in a certain way - the base and one side.

- The most difficult thing to set is the central guides. To do this, additional load-bearing parts are installed from the same plasterboard, the shape of which should follow the bend. These elements are screwed along its lower edge.
- Afterwards, in increments of 30-40 centimeters, a supporting profile is installed, to attach it to the central guide, pieces of the PPN profile are used. For fixing, homemade corners are assembled from the same PPN profile as in the photo with the frame above. These parts are assembled using a cutter.

- Next, the drywall is screwed on. The radius of such a ceiling is usually not very steep, so you can easily bend even a dry sheet of 9.5 mm drywall. Along the joints during assembly, pieces of PP profiles are inserted for reinforcement.
In general, if you managed to assemble a curved frame base, further work will not cause any particular difficulties.

It’s not much more difficult, and maybe easier, to assemble a 2-level plasterboard ceiling in the attic, with corners.
- First we assemble the frame of the walls, as already mentioned.
- Next, we determine the angle of inclination of the side parts of the ceiling. To do this, first draw a horizontal level of its upper part and find its center, which should correspond to the middle of the floor.
- We make horizontal markings on the wall frame, determining the connection point between this and the inclined planes, although its height should ideally already be set to this point and have a guide profile inserted on top. Now we look at which angle follows our markings so that nothing interferes and it is convenient to attach to the load-bearing elements of the roof.
- We mark all this on the walls, draw lines and attach guides.
- Between them we establish the main profiles and act in a manner already familiar to us.
- Separately, it is worth saying that it is worth very carefully setting and strengthening the profiles at the junctions of the corners. Look at the photo above - the ribs of the adjacent belts are tightly connected without gaps.
Ceiling with box

The next design we'll look at is very versatile. Having mastered the principle of its construction, you can build not only a box, but also a three-level plasterboard ceiling, and options with niches and overhangs in the center of the room.
So:
- We need to build, in fact, two planes, but at different heights. We can go in two ways: first hem the upper level, and then attach the lower one to it, or vice versa - the upper part of the ceiling will be tied to the lower one. The second option is more preferable, since all horizontal loads will fall on the main floor, while in the first, especially curved figures are partially associated only with drywall.
- We mark the lower level on the walls, and on the ceiling, using a tape measure and a pencil, we mark its boundaries.
- We install guide profiles along all designated lines.
- At the outer corner of the box we stretch a parallel nylon thread, which will be our main guide.
- We cut the drywall into strips according to the height of the box and attach them vertically to the profile on the ceiling, aligning the bottom edge exactly along the thread, read: this edge should be perfectly smooth.
- We screw a guide profile to the plasterboard along the bottom edge from the inside. This could have been done before installation - whatever is more convenient for you.

- As a result, we get a closed contour from the guide profile, the internal space of which is filled, like a regular plane. If the box is short, then only the main belts are installed, but if it is wide, then cross members and reinforcement of the structure with hangers will be required. Look at the place - each object is unique and always requires some imagination from the assembler, which indicates some creative component of this work.
- The upper level is assembled exactly like the most ordinary plane, while the guide profiles will be fixed to the vertical jumpers, which need to be secured behind the vertical part of the box in increments of 40-50 centimeters, until it is hemmed from below.
Figures on the ceiling
In conclusion, having compared everything that you have learned, you can already imagine how all kinds of stars, clouds and other decorative parts are assembled on a plasterboard ceiling (read more). Therefore, we will not go into too much detail.
But there are several techniques by which the work can be simplified:
- If the height difference is small, then the frame can be assembled only from a PP profile, as in the photo above. Its width is 6 centimeters, plus drywall - the total is 7 centimeters. In this case, the profile is attached to the leveled base with its side, and in the places where the main frame profiles are attached to it, it will be necessary to cut off the stiffeners. This solution is suitable for almost any figure.
- If you want even smaller differences, you can cut out figures from drywall and wrap them in several layers. In this case, there is no need to build an additional frame, but it is worth taking care that the profiles above the first level are located as often as possible within the boundaries of the future figure.
- The last option is more complex, since it is no different from what we used when assembling the box. All curvilinear figures are also assembled with a profile cut, however, the element that is attached to the lower edge of the vertical sheet is cut through on both sides.

Making figures of various shapes requires the master to be able to bend sheets. As already mentioned, it is most convenient to work with arched drywall.
The second most difficult method is cutting the sheet every 5-7 centimeters or milling it using a circular saw. The last one - the longest in terms of time - is soaking the sheet and giving it the desired shape according to the template.

Finally, we will make a small photo gallery with ceilings of varying complexity.
This concludes our story about how to make a second level of plasterboard ceiling. To summarize, we repeat that the work is quite creative, and sometimes you have to literally come up with new ways on the fly, adapting to the shapes and geometry of the room. To fully understand this, you must assemble at least one ceiling. We hope the information provided was clear and useful to you. Good luck in your work!
Modern technologies make it possible to create unique finishing materials for walls, floors and ceilings. Multi-level structures are becoming an increasingly popular design option for ceiling spaces around the world.
You will learn about the pros and cons of multi-level ceilings from this article.


Peculiarities
Plasterboard suspended structures are used to arrange the ceiling space and its zoning. You can mark the boundary of a particular zone in different ways - color, level difference, lighting contrast.
As a rule, multi-level structures are used to create a spectacular and original interior. They look good in spacious rooms where a regular ceiling is simply lost. Multi-level structures mean two- and three-level plasterboard ceilings.
To create such a ceiling, one or two levels are additionally built along its perimeter, which may have niches, ledges, and figured edges. Based on the design style, the ceiling cornice comes with beveled edges, round or rectangular.


Drywall, like any other material, has its disadvantages:
- installing a multi-level ceiling reduces the height of the room by at least 40 mm, so such structures are usually installed in spacious rooms;
- Drywall is not intended for contact with water. Even the so-called moisture-resistant (green) drywall only tolerates high humidity in the air, but direct contact with water is contraindicated for it;
- the duration of installation of a plasterboard ceiling depends on the complexity of the structure and can take from several hours to several days;
- Drywall is a “dusty” material, when working with which be prepared for a lot of dirt and waste.


Kinds
Ceiling structures made of plasterboard come in several types. The simplest - basic - are single-level ceilings. Two- and three-level structures are considered types of complex ceilings.
Each type is characterized by its own advantages. For example, a single-level design is suitable for decorating the ceiling space in a small room. Often, single-level ceilings are used as a frame for installing a second tier.
Regardless of the type of suspended structure, a profile made of durable material is always used as a base. Most often, the frame is made of aluminum, wood or metal-plastic. The resulting frame is covered with plasterboard and lighting fixtures are installed.


When installing a multi-level ceiling, you should know that the area of the new level will always be smaller than the previous one.
Unlike single-level ceilings, installing multi-level ceilings is more difficult. This is due to the shaped base, the manufacture and installation of which is much more difficult than installing a single-level ceiling.

Simple multi-level structures, in turn, are divided into the following subtypes:
- frame. Their appearance is a two- or three-level figured box located along the entire perimeter of the ceiling. As a rule, such a hanging box can easily accommodate built-in lighting equipment and even utility lines. Often the design of three-level ceilings is supplemented with LED strip located on the inner walls of the box;
- diagonal. In this case, the new “floor” is placed diagonally from opposite corners. It is worth noting that the division visually can be different in area depending on the design idea. The shape of the levels can also be curly or wavy;


- three-level designs They differ from two-level ones only in the number of suspended layers. Moreover, the more there are, the stronger the base should be. Different levels are painted in different colors or the border between them is decorated. Of course, arranging a multi-level ceiling is much more difficult than a simple one. The biggest difficulty for the installer is drawing the lines along which the curly and wavy levels will subsequently be built. That is why it is better to entrust the installation of a multi-level ceiling to experienced specialists who know exactly how to bring the designer’s idea to life;
- zonal. Such ceilings mean dividing a room into several parts. For example, a work area and a relaxation area.


Design
The stylistic design of the ceiling space must fully correspond to the design of the room. The ceiling will always be visible and therefore represents the most important part of the interior of the room.
This or that ceiling design allows you to achieve a certain effect: increase the space, divide the room into parts, create a pleasant atmosphere in the room.


The use of spotlights is widely popular when decorating multi-level ceilings. With this type of lighting, you can visually increase the parameters of the room and hide imperfections. Using a hanging chandelier you can unite the space, but spotlights, on the contrary, will help to “break” the room into several zones.
A multi-level ceiling is often supplemented with LED strip. A backlit ceiling will look especially impressive in a living room or hallway.


Designers offer unique solutions for multi-level structures - this hanging figures with lighting. If the size of the room allows, then you can combine different types of lamps, different in brightness and light. This approach to ceiling design allows you to delimit space and is often used to zone a room.
When creating a multi-level ceiling, different colors are almost always used to paint the levels. The main task is to choose shades that will harmonize with each other without breaking out of the general style of the room. In addition, the ceiling should not irritate or draw attention to itself. It is best to use neutral shades - beige, white, pink, light brown.
A combination of stretch and suspended ceilings is quite common., due to which the methods of original design of the ceiling space are significantly increased.


Recently, in the design of multi-level ceilings such original solutions as “starry sky” or photo printing are used.
The “starry sky” is obtained by installing the main fiber optic lamp above the structure’s canvas. This ceiling will look great in a bedroom or children's room..
Photo printing on canvas involves applying an image using special technologies. Often, stretch fabric with photo printing is used to decorate certain areas of the ceiling structure. The choice of pattern largely depends on the main theme of the room, the degree of illumination, and the interior.


The most popular are floral motifs, geometric shapes, and abstract designs.
Today, manufacturers offer an ultra-modern new product - 3D ceilings. The perfectly conveyed three-dimensional effect allows you to turn any, even the most creative idea into reality.
It is worth noting that light shades in photo printing make the room spacious, while dark areas seem to hide the height of the room. However, a well-designed dark pattern can become the highlight of the room.
The use of photo printing allows you to implement the most complex design projects and make the ceiling truly unique.


Another popular type of multi-level ceiling design is application of fiber optic cable, the placement of which in a certain order allows you to create delightful ornaments and designs. This design is called light painting and opens up endless possibilities for interior decoration.

To extend the life of a multi-level ceiling, it is important to know the rules for caring for it. It is enough to wipe the ceiling with a dry, clean, soft-lint cloth from time to time. If too much dust has accumulated, the surface can be vacuumed.
Because drywall does not tolerate moisture well, it is not recommended to wash it, otherwise the material may swell and deteriorate. If the dirt is too ingrained into the coating, you can rub the stain with a slightly damp cloth dipped in water or a special product.
Old stains are the most difficult to remove. In some cases, the only way to get rid of dirt is with a new coat of paint.
Remember that light-colored ceilings easily leave streaks and stains, so the cloth or brush for cleaning should be clean.

Beautiful examples in the interior
In addition to all the advantages described above, the plus of multi-level ceilings is that they look equally good in the bedroom, living room, kitchen and even hallway.
- Kitchen a multi-level plasterboard ceiling requires additional protection from moisture. It is best to paint it with waterproof enamel or cover the surface with PVC film. If the size of the kitchen allows, you can use plasterboard partially, for example, only above the dining table.


- Living room– the most popular place for installing suspended plasterboard structures. Two- and three-level ceilings will become a real highlight of any interior. It can be a classic version, luxurious Empire style, delicate Provence - it’s your choice! Modern designers often decorate the ceiling in a loft-style room, diluting the ceiling space with plasterboard beams. For a room in the Art Nouveau style, it is better to choose a multi-level design with straight, clear lines.


- For suspended ceiling in the bedroom soft, smooth shapes and delicate tones are preferred. It is appropriate to use unobtrusive images - stars, sky, floating clouds, abstract drawings. Glowing fiber optics or fluorescent patterns will help create a romantic atmosphere in the bedroom. It is better to abandon variegated colors, bulky structures, bright or too dark designs - such ceilings will interfere with relaxation.
Modern materials for finishing walls and ceilings help create an original interior space. Multi-level plasterboard ceilings allow you to create a real masterpiece. They contain several types of shades and different lighting methods. Thanks to them, the design acquires stylish notes that will not leave anyone indifferent.
Similar decorations can be found in the living room, bedroom or kitchen. The design of multi-level ceilings in the interior can be varied. 
The main thing in this matter is to observe the height of the ceiling and the area of the room. For small rooms, it is necessary to select a design that contains a minimum number of parts.
Using 3D technology, you can add realism to your ceiling design. For example, a fresco depicting angels is quite often used in a classic interior.

For the high-tech style, the image of the starry sky or abstraction is most often chosen. Thanks to them, the interior does not look boring and dull. This design emphasizes the taste of its owners. 

Multi-level ceiling at home
Making a multi-level ceiling with your own hands is not difficult. To do this, you need to prepare the following tools and materials:
- metallic profile;
- drywall;
- screwdriver;
- self-tapping screws;
- putty;
- water-based paint;
- flat spatula;
- hammer;
- building level.

The photo of a multi-level ceiling shows the stage-by-stage creation of the structure. It includes several points:
- First of all, you need to measure the dimensions of the ceiling.
- Next, the metal profile is installed. Self-tapping screws are used for this. Fastening is carried out every 10 cm.
- Notches are made on the surface of the gypsum sheet, which will add elasticity to the material during the design formation process.
- When all the metal parts are in place, the installation of drywall elements begins.
- The final stage will be caulking the seams and joints of the finished structure.
- When the solution is completely dry, you can proceed to painting the ceiling.

As you can see, creating an exclusive room design is quite simple. The main thing in this matter is to show a little imagination and patience. 
Photos of multi-level ceilings


/ What are multi-level ceilings made of and what do they look like?
What are multi-level ceilings made of and what do they look like?
The ceilings in the apartment always receive a lot of attention. It is only at first glance that it seems that no one is looking at them. In fact, the ceiling attracts attention as soon as a person enters the room. To make this surface spectacular, you can build multi-level ceilings, which will not only attract the attention of your guests, but will also serve as decoration for the room.
What is it and what does it look like
This design can have several different incarnations and, accordingly, different design features. There are simple designs, and the network is also very complex, the construction of which will take more than one day. The most popular were:
- Three-level solutions. In them, the planes are located at three different levels. It is very difficult to assemble such a structure, and most often, the installation of such ceilings is entrusted to professional finishers, without trying to do it yourself.
- A border or one small plane around the entire perimeter of the room is the most common option for such structures. It is easy to make and installation does not require complex tools or special technical skills. You can do everything yourself.
- Complex geometric shapes in one or two planes, occupying only part of the ceiling surface. You can make such figures either yourself or turn to the masters if the planned composition is quite complex.
They look very impressive and much more interesting than standard flat one-level solutions. Several examples of what multi-level ceilings look like are presented in the photo below.


What are they made of
Most often, such compositions are assembled from plasterboard sheets. This is a very convenient material for creating any volumetric structures. Ceilings assembled from gypsum plasterboard have already become a kind of renovation classic.
This material is best suited for independent construction of several planes at different levels. It is easy to work with, and the price of simple designs will be very low. A few examples of what simple ones can look like are shown in a few photos below.


However, more complex designs can be made, which can cost significantly more. It’s true that they look much more impressive. In addition, they are often supplemented with built-in lighting, which further decorates the ceiling and at the same time can be a functional element - it can be used as a night lighting option.

When the price of finishing with plasterboard becomes quite high, you can think about using other materials that are no worse than plasterboard for such work, but are somewhat more expensive. Drywall is not the only option for such finishing; you can easily order multi-level stretch ceilings. At the same time, the most interesting thing about such solutions is that a composition of several planes will not cost much more than a regular, single-tier one.

They are assembled in a manner similar to plasterboard solutions - for each individual element a frame is installed on which an outer covering of textile or PVC film is stretched. How they look like this in the interior can be seen in the photos below.


The last option for implementing such solutions will be combined ceilings. They can use several types of surfaces at the same time, which are combined with each other. More often than others, there are combinations of gypsum plasterboards and tension coverings. This symbiosis turned out to be very successful - on one side there is a hard matte surface, finished with plasterboard, and on the other, a perfectly smooth tension coating.


Advantages and positive aspects
Several levels will give the premises visual volume. They, contrary to popular belief, can be installed even in not the highest rooms. The main thing is to properly plan the entire structure and not overdo it with the number of volumetric parts.
Appearance has become the most important advantage of such ceilings. They are much more attractive than standard planes without any frills. In addition, the presence of several tiers will allow you to hide all utility lines that were previously in plain sight. If necessary, you can cover the air duct system from the air conditioner or heater.
You can create figures of any shape on the ceiling. There are no restrictions and the only thing that can get in the way is a lack of imagination. In such a situation, the Internet will save you - there are tens of thousands of options for designing the floor plane that you can implement at home.
Lighting will not only decorate your home, but will also become a completely functional design element if you apply a little imagination and desire. You can highlight individual parts of the structure or tiers of the ceiling with light.
Zoning of large or not very large rooms can be done not only by different designs of walls or floors, but also by delimiting pieces of furniture. Ceiling volumes can also be used for this. At the same time, the floor area remains free and no additional furnishings are needed.

Stretch ceilings in a modern interior help not only to speed up repair work, but also to qualitatively decorate the ceiling surface, making it beautiful and harmonious. An excellent option for apartments or private houses is multi-level stretch ceilings. They are complex structures that transform the interior.
You just need to decide on the number of levels, their shape, color and texture of the coatings. And you can install such a ceiling with your own hands, if you approach the work responsibly and arm yourself with the necessary tools.
Advantages
As a rule, people prefer to install multi-stage systems in apartments and houses for a number of objective reasons:
- Exclusive appearance. Any multi-level suspended ceiling is designed for a specific room, so it is unlikely that you will be able to find a similar structure. Each specific case is associated not only with the characteristics of the room, but also with the wishes of the owners and lighting features.
- Dividing space into zones. If you need to highlight certain areas of the room, ceiling structures of this type are an ideal option.
- Attractiveness. The different materials, shades and textures used for the manufacture of tension systems significantly expand the possibilities for implementing design tasks.
- Easy to care for. You don't need to use any special tools to. It is enough to regularly carry out wet cleaning, cleaning surfaces from dust and other contaminants.
- Durability. High-quality installation in compliance with all rules will extend the service life of the multi-level structure by more than 10 years.
- Moisture resistance. PVC film is a material that can hold large volumes of water. It is advisable to install such coverings in bathrooms and kitchens. Even here you can install a multi-level suspended ceiling, if the height and area of the room allows.
Types and variations of multi-stage systems
Such designs differ in the number of levels, design and complexity of technological work. For example, you can install a system of two tiers, making the base of the ceiling surface from the tension fabric. Three-level ceilings are also installed, including complex curved elements and many shades.
The variety of types and variations very often makes it difficult to choose one or another ceiling. Among the common ones are the following:
- Straight step. It is more used as a technical necessity, when it is necessary to hide electrical wiring and communications under a tension structure.

- Wave along the wall. It is used to highlight a specific area in a room or as an emphasis on the placement of lighting fixtures. The wave looks original, repeating the pattern and level of the floor structure and the shape of the furniture. Then the canvas hanging over the furniture is installed on the lower level, with lighting installed in it.

- River– this is the installation of two “waves” in a room opposite each other. In this case, the central part of the ceiling is higher. The waves can be made of matte or satin fabric, and the river itself is usually decorated with gloss.

- installed around the perimeter of the room. As a rule, lighting is mounted in a niche, and a large chandelier is placed in the middle (if it is a living room or hall), or they simply fix an even stretched fabric of bright color, getting the so-called.

- Ledge in a semicircle. It has been used more often than others recently. Using this solution, you can highlight part of the ceiling above the TV or bed in the bedroom, as well as the dining area in the kitchen.

- Podium under the chandelier. The name speaks for itself. If the lighting fixture is large in size, you can separate a central part for it on the ceiling using a multi-level ceiling.

- Snail it looks elegant on the ceiling, but is not often installed because it is expensive and suitable only for large rooms.

We have listed the most common options. Of course, there are many other types. For example, light strips, 3D canvases that seem to float above the room. In any case, each multi-level ceiling is a unique design, unlike any other.
By playing with colors, shadows, incorporating films of different textures and lighting elements into systems, designers manage to achieve impressive effects. Painting on the ceiling in the living room or the starry sky in the bedroom - aren't these pictures worth bringing them to life? An unusual ceiling will become the pride of the owners and the envy of guests who come to the house. Therefore, it is definitely worth incorporating multi-level ceilings into the interior.
Design lighting options
To make your multi-level stretch ceilings impeccably beautiful, you should try to combine several different types of lighting fixtures in one system.

Thanks to the functionality of stretch fabrics, you can easily install spotlights on the ceiling or install an LED strip around the perimeter.
Important! The power of the light bulbs should not be high. Otherwise, deformation of the coating due to exposure to high temperature cannot be avoided.
The backlight can be decorated in one of the following ways:
- LED strips. Similar elements are installed around the perimeter of the room, or used as lighting for individual tiers.
- Spot lighting. This is the most common option, the peculiarity of which is to focus attention on certain areas of the ceiling.
- LED panels- a modern look, which in a short period of time has become a leader among the possible variations of artificial lighting.
- Floating lines. They will help the plane acquire an interesting and unusual design, and will also delimit the space into zones.

As an option, you can mount a chandelier with a podium in the center of a large room, and use LED lighting or install spotlights around the perimeter. You will get an original three-level stretch ceiling.
Do-it-yourself installation of a multi-level system
Multi-level ceilings can be installed independently. However, such work has its own nuances. But if you follow the sequence and basic rules, you will be able to build a beautiful structure.
Possible difficulties
Installation of tension fabric
The canvas is mounted last as follows:
- A baguette is fixed to the inner vertical surface.
- The room is heated with a heat gun to a temperature of 40 degrees and PVC film is fixed to the harpoons in the corners.
- Heat the canvas with a gun to 60 degrees and insert the harpoons into the baguette using a spatula until it clicks.

As the fabric cools, it begins to tighten, creating a perfectly smooth and even surface.
Then holes are cut in the canvas for lighting fixtures, which are framed with reinforcing rings to protect the canvas from spreading and deformation.
Now all the work has come to completion.
Modern materials are increasingly becoming part of our lives. Finishing of premises can be carried out not only by special repair teams, but also on their own, thanks to available raw materials and consistent instructions. A minimum of time and waste, beauty and attractiveness are the result of installing multi-level stretch ceilings.
Complex multi-level ceiling video instructions