What is needed for covering walls with siding. Do-it-yourself siding finishing step-by-step instructions. Vinyl siding - cheap and fast
Read also
Among the new finishing materials for exterior cladding, siding is in great demand. It gained such popularity for its large selection of textures and colors, ease of installation, practicality and durability. Its most important advantage is that you can do the installation yourself. However, you should know some of the nuances and rules for using this finishing material. In our material we will tell you how to cover a wooden house with siding, and also list the nuances of cladding buildings made of other materials with vinyl siding.
Features of the material
On the Internet you can find a variety of photos of this finishing material. The thing is that vinyl, metal and fiber cement siding are available for sale. The finishing of the façade of a building is usually done using vinyl products. This finish is suitable for houses made of wood (logs or timber), brick or aerated concrete. Vinyl cladding is made on the basis of polymers, which improve the performance characteristics of the walls of any home.
To decorate your brick home, you can use basement siding. A photograph of this material is presented below.
Sheathing a house with this finishing material is beneficial for the following reasons:
- This is a fairly durable product that can withstand any weather conditions, be it wind, rain, snow.
- Reasonable cost is an additional advantage of the material.
- High aesthetic performance.
- Large range of textures and colors. So you can easily choose the right product to match the style and color of your home.
- The material easily tolerates temperature changes.
- The product is not flammable.
- The finished facade is resistant to high humidity and dampness. Mold and mildew will not appear on it.
- The material is easy to care for. The walls of the house can be washed with water.
- Installation of the product is quite simple and quick, so covering the house with your own hands will not be difficult.
- It is possible to cover a log house with siding.
- A house covered with such panels can last for decades.
Siding installation rules

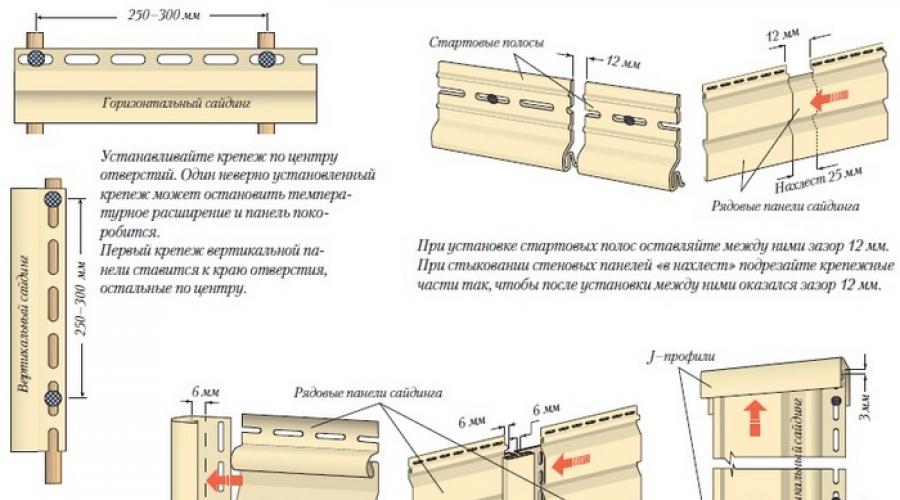
- The panels of a vinyl product cannot be rigidly fixed. The thing is that the vinyl from which the panels are made is susceptible to temperature deformation, that is, when it freezes, the material contracts, and when heated, it expands. Size variations can be up to 1%. That is why all the mounting holes are elongated so that the panel can move. Fasteners should not be screwed or driven through siding. They are only allowed to be mounted in the center of an elongated hole. In this case, the self-tapping screw is not screwed in all the way, but so that the gap between the fastener head and the panel is 1 mm. If this rule is not followed, the panel may become deformed or crack due to temperature changes.
- It is worth leaving a gap of at least 10 mm between the ends of the panel and the guides themselves so that the product does not bend during thermal expansion. If installation is carried out in hot weather, the gap can be reduced slightly. If installation work is carried out in the summer heat, the material should be protected from direct sunlight.
- In principle, siding can be applied to a house at any time of the year. However, if work is carried out at temperatures below -10°C, then it is worth considering that the material becomes brittle, so it can easily crack when cutting. To prevent this from happening, it is better to use a grinder to cut panels in winter.
Components

It is impossible to install siding on a wooden house or any other structure without a complete set of additional components. As a rule, the number of these elements can be calculated independently or with the help of the seller, knowing the area of the sheathed surface, the overall dimensions of the facades, the type of roof, the total number of windows and doors.
So, do-it-yourself installation of siding on a wooden house or other structure is carried out using the following parts:
- External corner. This element is installed on the corners of the house not only for beauty, but also because all the ends of the panels must be sewn up. The height of the element is 3 m. When calculating the number of parts for one corner with a height of more than 3 m, a small margin is added for joining the elements.
- An internal corner is installed in a house with a complex configuration with such corners. In addition, these elements are used on the overhangs of the cornice at the junction with the wall, if the cornice is also hemmed with siding. If the cornice will not be hemmed or the finishing was done earlier with another material, then a finishing strip is installed in this place.
- Wind board and soffits are elements for finishing the eaves of a roof.
- The starting strip is mounted at the bottom of the facade. From there they begin to install the panels. The number of starting strips is equal to the perimeter of the house minus the doorways.
- The special J-profile is used in places where there are differences in heights, in areas where a house meets extensions, as well as on multi-level roofs.
- When answering the question of how to cover a house with siding, it is worth noting that you cannot do without a window trim. It is mounted around window and door openings. In addition, you will need special sills for windows.
- A drain plate with a width of 40 cm is mounted immediately above the base. If this width is not enough to cover the protrusion of the base, then flashings are used.
- If the wall of the house is more than 3.66 m long, then one panel of standard length will not be enough to cover the facade. In this case, you will need a connecting profile.
- The number of vinyl panels for cladding a house is calculated based on the area of the facades minus window and door openings. It is worth adding 10% to the resulting value as a margin for trimming.
- To attach the siding you will need galvanized self-tapping screws. Their length should be 3.5 cm. The total number of fasteners is calculated taking into account that there are 2 screws for every square meter of the wall.
Advice: to prevent rusty stains on the panels from the self-tapping screws in a couple of years, it is better to use fasteners with a rubberized head.
Price

The cost of finishing consists of the cost of materials and components, as well as the cost of paying for the work of a team of installers
If you want to know how much it will cost you to cover your house with siding, the price consists of the cost of the material and components, as well as the cost of paying for the work of a team of installers (if you do not do the work yourself).
The cost of siding for exterior facade decoration is directly related to the type of product. Thus, the price of vinyl panels can be from 4.92 USD/m². You will have to pay a little more for metal siding. Its price starts from 5.6-7.3 USD/m². Additionally, you will have to pay extra for panels with a wood texture or for a popular brand.
If you decide to hire a team of workers to perform exterior finishing work, then when answering the question of how much it costs to sheathe a house with siding, you should take into account the following prices for the services provided:
- Cladding a house with basement panels without insulation costs 13.9-16.1 USD/m². The same work with insulation will cost 19.4-24.2 USD/m².
- Facade work without insulation using metal siding is paid at the rate of 10.5-14.5 USD/m². If insulation is carried out, the price will increase to 12-19.4 USD/m².
- Vinyl siding is the cheapest to work with. For cladding without insulation you will pay 8-13 USD/m². For work with insulation you will have to pay 9.6-14.5 USD/m².
Preparatory work

Before covering a wooden house with siding, the walls must be cleaned of dirt, all protruding parts must be removed, and the surface must be treated with fire retardants and antiseptics. It is also worth sealing all cracks and cracks with polyurethane foam or mortar. When facing a house made of foam concrete, it should be treated with a deeply penetrating primer.
Before covering a log house with siding, you need to inspect the walls and replace areas with mold, damage from insects and rotten logs. It is also worth carefully caulking all the cracks and treating the wood with protective compounds.
Installation of sheathing

To understand how to properly cover a wooden house with siding, you need to know how to properly install sheathing on it. For these purposes, you can use wooden slats or metal profiles.
Important: it is prohibited to mount the panels directly on the wall, since there must be a ventilation gap under them. This will prevent condensation from accumulating on the surface of the walls of the house.
For a wooden house, a frame made of wooden slats with a cross-section of 40x60 mm is usually used (wood moisture content is 15-20%). The slats are treated with an antiseptic and dried well. To fix vinyl or metal panels to a brick or concrete house, it is better to use a galvanized drywall profile.
The frame guides are attached to the house at a certain pitch. It is mandatory to install profiles or slats in the corners of the building, around openings, above the base under the starting strip and in the upper part of the facade. The pitch of the vertical frame posts is 0.3-0.4 m.
Insulation and waterproofing

Houses made of aerated concrete and wood must have waterproofing installed. Installation of thermal insulation material is optional. It is better to use a special vapor barrier membrane as waterproofing.
If insulation is not carried out, then the membrane is attached directly to the walls of the house under the frame so that there is a gap to the siding necessary for its ventilation. If insulation is to be installed, it is placed between the frame guides and attached to the wall with dowels with large heads. The membrane is mounted on top of the thermal insulation layer. After this, the frame slats are attached again to provide a ventilation gap between the insulation and the finishing material.
Siding finishing

- First, the drainage system is installed on the basement of the house.
- After this, the corner profiles are attached. They are firmly fixed in the upper hole, then the fasteners are screwed into the middle of the elongated hole.
- Next, a starting strip is attached on top of the drainage system. It should be 5 mm higher than the bottom of the corner profile.
- J-profiles and special window trims are fixed around windows and doors. The corners are filed at 45 degrees or overlapped.
- Docking strips are installed in pre-calculated places and leveled. When installing the plank, it is important to leave a gap to the base and cornice of at least 0.5-0.6 cm.
- A finishing strip is installed under the roof.
- Next, the first row of panels is attached to the starting bar. The panel is fixed at the top with self-tapping screws in the center of the elongated hole. The fastener installation step is 40 cm. You should not fasten it rigidly; the product should move freely to the sides.
- This is how all subsequent products are attached, and the top row ends with a finishing strip.
How to cover a house with siding with your own hands - video instructions:
Often the appearance of a wooden house begins to lose its attractiveness over time. The tree deteriorates from exposure to rain, frost and sun. To restore it to its former beauty, people often cover a wooden house with siding with their own hands. This material is lightweight, so it will not put a strong load on the foundation. It is quite easy to install if you prepare the necessary material and tools in advance. Finishing with siding will be inexpensive, and a wide range of types will allow you to choose the one that suits you.
How to choose siding for finishing a frame house
Nowadays, walking down the street, it is impossible not to pay attention to the neat multi-colored facades of buildings. This appearance on city and village streets appears precisely thanks to siding. The base and cornices are also made using this material, but its main purpose is to decorate the facade of the house.
Main advantages of the material:
- Siding is not afraid of the sun's rays; it is resistant to ultraviolet radiation.
- Quite durable.
- Wide range of colors.
- The material is not afraid of heavy rains because it is moisture resistant.
- It is easy to install, so you can do it yourself.
- Combines perfectly with other materials.
- If siding is used correctly, it will serve you for a long time.
- Polyvinyl chloride, metal, and vinyl are used as raw materials for the manufacture of siding.
Even if your house is many years old, and its appearance has deteriorated over the years, then everything can be covered with siding. Moreover, in this way the appearance of the house can be made unique. For example, finishing with wood will give your home warmth, while finishing with stone will give it seriousness and solidity. The choice is yours.
Vinyl
This material is based on durable plastic. It can be smooth or imitate wood. There is a huge range of colors to choose from, including shades of natural wood.
Table: advantages and disadvantages of vinyl siding
Wood
This type was the first to appear on the market. Noble, expensive and environmentally friendly material. It also has excellent thermal insulation, but it will not last long and requires constant treatment with antiseptics.
Aluminum
Most often used for finishing retail premises, as well as public buildings. The main advantages are:
- fire resistance;
- waterproof;
- strength;
- ease;
- long service life.
But you need to remember about its shortcomings. These include absolute instability to mechanical damage. Even during transportation, dents may appear, which are almost impossible to get rid of.
Cement
No worse than artificial stone. In its production, high quality cement is used, to which small elastic fibers are added.
When finishing the facade with this material, you need to use a special mask to avoid inhaling the dust generated during cutting.
Table "Advantages and disadvantages of cement siding"
Steel
It can be found on the facade of a residential or public building. The panels are coated with a layer of polymer or powder painted. There are smooth and embossed.
Table "Advantages and disadvantages of steel panels"
Zinc
Appeared quite recently. Has a gray or black anthracite color. It has the same advantages and disadvantages as steel siding, but the price is much higher, so it is rarely found.
Ceramic
For its manufacture, silicate materials with the addition of fiber are used. Such panels are first hardened and then covered with a special hypercoating (inorganic or silicon-acrylic dyes), which is their ceramic surface. This allows you to maintain the attractive appearance of the siding for a long time, and protects them from the aggressive effects of sunlight.
This type of siding has other advantages:
- increased heat and sound insulation;
- fire resistant;
- environmentally friendly material;
- lasting;
- does not fade;
- does not require special care.
However, ceramic siding costs much more than plastic or steel counterparts. Installation requires a strong frame due to its large mass.
Siding for the basement
When creating a basement finish, a durable polymer is used, which is mixed with various substances. It is made under high pressure. Visually, it can look like natural stone, brick or wood. Thick, moisture resistant and durable. It is easy to install. Has a wide range of shades. In addition, it does not change its properties with prolonged exposure to the sun and various weather conditions.
There are a huge number of types of siding, and all of them are perfect for finishing a wooden house. The main thing here is to decide on the budget and appearance. The most affordable option would be vinyl siding, while copper and wood are suitable for lovers of luxury.
Material calculation
To avoid the situation that you do not have enough material or, on the contrary, you do not buy too much, you need to correctly calculate its quantity. Taking the correct measurements is not difficult at all. For this you will need a tape measure and a pencil.
Consider whether you need to finish all the walls of the house, or whether siding will be placed only on the facade. If you chose the second option, will you sheathe the pediment? All these points are important when taking measurements.
Home measurements
This is done in order to know exactly the surface area that will be covered with siding.
If you have facade drawings with all measurements, then there will be no problems with determining the size of the house. If they are not there, then you will have to do it yourself. Measure only the area that will be covered with siding, excluding windows and other similar structures. It is recommended to calculate the dimensions of each side of the house separately as there may be slight variations.
To find out the amount of material needed, you need to measure the height and width of each wall. To determine the area, these parameters must be multiplied. Separately, it is necessary to calculate the surface area that will not be finished with siding. It must be subtracted from the total. This will be the required amount of siding for a particular wall. Repeat these steps for other surfaces.
For convenience, draw a sketch of the house, where all the necessary measurements will be marked. Here you can mark where and what kind of siding will be located.
It is not necessary to buy an exact amount of material. Take it 10% more. A reserve is made in case of defects and the need for trimming.
Fractional elements
These are the parts that will secure the siding strips.
Table: how to calculate the number of small parts
| Name | Purpose | Unit | How to calculate correctly |
| Starting bar | These fasteners are used to mount the first row of panels. Most often at the bottom and at the joints of different options for facing materials. | Linear meter | Divide the perimeter of the building by the length of the plank. Round up. |
| Finish profile | Performs an aesthetic function. It is attached in the last row. | Linear meter | Calculate using the starting bar method. |
| Inner and outer corners | Fastening and decorative function. They are placed at the corner joints of the panels. | Pieces | Add up the lengths of all the corners of the building and divide the resulting number by the length of the part. |
| T- and H-bars | For connecting vertical joints. | Pieces | Depending on the number of joints, you need to purchase the same number of planks equal to the height of the house. |
| J-bar | Used to connect the facade and roof. | Linear meter | Add up the length of all diagonal seams. |
| Platbands | For window and door openings. | Linear meter, pieces | It is necessary to add up all the perimeters of the openings. |
In addition, you must have:
- soffits (they are used to decorate the under-roof space and roof overhangs);
- drainage;
- saw;
- drill-driver;
- hammer;
- level;
- roulette;
- pliers;
- respirator;
- glasses;
- gloves.
If you want to insulate your home, then you need to take care of this in advance and purchase the appropriate material. You will also need a wind and vapor barrier membrane, waterproofing and beams to build the sheathing. And, of course, scaffolding or a ladder to work at the top.
Video: detailed information about the material
How to cover a wooden house with siding with your own hands: step-by-step instructions
Typically, siding is used to cover a building in three cases:
- If the house was built using regular or profiled timber, the appearance of which requires additional finishing.
- If there is a need to additionally insulate the house, then thermal insulation material can be laid between the walls and the cladding.
- If the building needs restoration.
How to prepare the wall surface
To do this you need:
- Remove all protruding structures from the facade of the house (drains, window bars, lighting fixtures, etc.).
- Remove the old cladding, if any.
- Clean the surfaces of the building from dirt, mildew, mold, etc.
- Treat the walls with special antiseptics and fire-fighting agents.
- Cover communication pipes with sealant and foam.
- Clear the surrounding area (1 m radius) around the façade of debris.
Installation of sheathing
First of all, it is necessary to install wind and vapor barrier membranes. They are mounted with an overlap of 100–150 mm.
The next stage is the construction of the sheathing. For this, wooden beams are used, although sometimes a metal frame is also suitable. The width of the beam is from 2 to 4 cm, and the height is 4–8 cm. The exact size depends on whether the thermal insulation material will be laid. The moisture content of wood for the frame should be from 15 to 22%. It needs to be treated with an antiseptic and antipyrines.
Siding can be laid vertically or horizontally.
When installing the sheathing, you need to perform the following steps:
- Secure the bottom beam directly above the plinth.
- Secure the top beam.
- Stretch a thread between them as a guide.
- Place intermediate bars under the level.
- Waterproof the insulation with film, especially if it is mineral wool.
Fasten the timber with nails or self-tapping screws with anti-corrosion protection.
The most protruding point of the facade will become a reference point for vertical deviations during the construction of the “skeleton”.
When using insulation, leave small gaps that will provide natural ventilation.
Paneling
Now you can start finishing the facade with siding:
- Install the J-profile 40 mm above the end of the cladding, which will act as a starting strip.
- Install profiles that form the corners.
- Cut the siding panels to the correct size and install them. The panels are fastened to the frame using galvanized self-tapping screws. There is no need to clamp them tightly; leave gaps of 1–2 mm to prevent deformation of the cladding.
- The final stage is the finishing strip and installation of spotlights.
After covering with siding, the building is truly transformed. You have the power to give a second life to your home.
Siding can be used to cover a building for any purpose. It will hide imperfections in the surface of the walls, protect them from atmospheric influences and give the facade a decorative and well-groomed look.
This article will discuss the sequence of work on how to properly sheathe a house with siding. And, also at the end of the article there is a visual aid - how to sheathe a house with siding, video.
Tools for making sheathing and installing siding
- Hacksaw
- Construction or laser level
- Tape measure and construction square
- Hammer
- Drill
- Screwdriver
 Siding Installation Tools
 Calculation of the quantity of materials
Having measured the parameters of the external walls, carry out. The height of each wall is divided by the useful height (without lock) of the panel. The total number of rows is multiplied by the number of panels in each.
Add 5-7% of the resulting number for waste.
The length of the material for the starting strip is calculated based on the perimeter of the house, making an increase for possible joints. The finishing strip is calculated in the same way, adding the amount required under the windows.
External and internal corners are calculated individually, measuring the height in the appropriate places. The window profile is considered along the perimeter of the windows.
Connecting strips (H and G profiles) are calculated individually, depending on the number of rows on the wall and other connection points.
Surface preparation
The supporting basis for siding panels, insulation and vapor barrier is the frame. It is erected from a metal profile or wooden beam.
Before installation begins, the walls are prepared: the sills, lighting fixtures, window shutters, and storm gutters are removed. The old base is repaired: cracks are sealed with mortar, metal elements are treated with primer.
Marking walls and installing sheathing
 To hang the walls, holes are drilled in the upper parts of the corners, into which pieces of reinforcement 20-30 cm long are hammered. A plumb line is lowered from the rods and the lower rods are inserted into the prepared holes.
Important: a string is pulled between the upper and lower rods, thanks to which you can determine whether the walls are even and adjust the beacons.
To construct the frame, profiles intended for installation of drywall are used. Their resource allows them to easily withstand the weight of siding and insulation. Stands made of CD profiles are installed vertically on the base or blind area, maintaining a distance between their axes of 40-50 cm.
To make it more convenient to mount the frame, a UD profile is installed below, into which the vertical parts of the sheathing are installed.
 The places where siding fittings will be installed are additionally reinforced with paired CD profiles. Around windows, doorways, and in the upper part of the walls, lintels are installed from this profile, which has a large mounting area. The window siding strip is attached to the frame or next to it using a UD profile.
Along verified vertical lines, in increments of 50-60 cm, straight U-shaped suspensions are installed and secured with dowels. If the walls are uneven and the frame is significantly removed from the base, the suspensions are replaced with consoles made from profile scraps.
Suspensions allow you to install vertical posts strictly along a given line; they are fixed with galvanized 9.5 mm screws. Installation begins with the outer profiles, a cord is pulled between them for even installation of the intermediate posts.
On gables, siding strips are often placed vertically. To do this, the frame posts are positioned horizontally.
Fastening accessories
The fittings decorate the facade, give it a complete look and protect the joints from moisture and dirt.
 The following elements are provided for the façade cladding:
- External and internal corner
- Start strip
- Final strip
- Chamfer, panel for cornice
- Window slat
- Platband
- Gutter
- N - profile, connecting strip
 Accessories for facade cladding with siding
 For windows and doors recessed into the opening, a window strip is used. This detail covers the slope and beautifully forms the outer corner. The final strip is fixed at the frame and the socket itself.
When the windows are not recessed, but are located in the plane of the frame, platbands are used as the main fittings.
The final strip of windows and doors is installed at the top of each wall at the junction with the roof box frame. This is complete.
Attaching the starting bar
 When the frame is completely assembled, use a level to determine the lower point of the future cladding. From this point, horizontal marks are placed at all corners of the building, from them an indentation is made upward by the width of the starting strip, along which line the beating is carried out with a cord. This line is where the top edge of the starting bar is attached.
The starting strip is secured with self-tapping screws in increments of 20 cm. To do this, horizontal jumpers were placed at the bottom of the working plane of the frame.
A temperature gap of 0.5 to 1 cm is left at the junction of two starting profiles. The same gap is maintained at the place where the fittings are attached.
 It is worth noting that the beginning of installation of any type of siding begins with attaching the starting strip. also starts with her. By the way, vinyl siding is the most popular and purchased among builders.
 Further, metal siding is valued among buyers. Installing metal siding with your own hands is quite simple and easy. You will be able to install it yourself, without contacting construction companies, and will therefore save money. Guidelines regarding the installation process of this material are provided.
Insulation
 Suitable sized pieces of insulation are placed in the cells of the frame. The insulation mats can be securely fixed using mushroom-shaped dowels. On top, a diffusion membrane is attached to the sheathing, which prevents the mats from getting wet.
Expanded polystyrene insulation does not need protection from moisture.
Corner strips
 Inside and outside they are installed 0.5 cm below the bottom edge of the starting strip at the bottom, at the top - 0.5 cm not reaching the top edge of the wall. The angle is lightly secured in the upper mounting hole, after which the vertical is plumbed. Only after this the profile is secured with self-tapping screws or nails in increments of 20 cm.
If there is a need to connect two corner planks in height, the overlap should be 2 cm.
DIY siding installation
 When a strong frame is installed and the necessary auxiliary elements are secured, the cladding panels are installed quickly.
The bottom panel is fixed in the lock of the starting strip and is fixed from the middle to the edges on the frame posts. Each subsequent panel fits into the lock of the previous one, is tightly connected along the lower edge and is fixed from the middle to the edges.
Often, in the areas inspected, it is possible to make siding joints along the length, the overlap is 6-10 cm.
The last panel is most often trimmed: having entered the final strip, it should not rest against the upper edge. Using a punch, holes are punched along its edge in increments of 15-20 cm. The perforated edge is inserted into the final strip. The same technique is used under windows and where the finishing strip is installed.
How to install siding?
When installing siding, it is necessary to take into account some features, such as:

Siding, without significant effort and expense, allows you to update and insulate the facade, giving the building an elegant and more expensive look. Properly installed, it retains strength and geometric stability for decades.
Video on how to properly siding a house
Video instructions that show the installation of siding panels and components.
To give a building a stylish, aesthetic appearance, finishing material such as siding is becoming popular. For its installation, you can, of course, use the services of professional builders. However, the price of construction company services is quite high. Therefore, if you have the right tools, you can install siding yourself. For the owner of a private house or cottage, this is especially true.
The easiest way to have a beautiful front lawn
You've certainly seen the perfect lawn in a movie, on an alley, or perhaps on your neighbor's lawn. Those who have ever tried to grow a green area on their site will no doubt say that it is a huge amount of work. The lawn requires careful planting, care, fertilization, and watering. However, only inexperienced gardeners think this way; professionals have long known about the innovative product - liquid lawn AquaGrazz.
Essential power tools
The process of finishing the facade of any task with siding will be facilitated by the presence of the following tools:
- Hammer.
- Hacksaw and metal scissors
- Cordless drill (screwdriver).
- Construction level (length – 2 m).
- Marker or pencil for marking.
- Roulette, at least 5 meters long.
- Rope.
- Construction corner.
- Electric carry.
- Punch.
Of course, it is not enough to have the necessary tool; you also need to be able to use it correctly. The step-by-step instructions below for covering the facade of a house with siding with your own hands will help you avoid most mistakes. However, before you begin facing work, you should understand what siding is and what materials it is made from.
Siding and its varieties
It is no secret that the quality of any finishing work, including installation of siding, will depend on the material used. Siding is a covering material made in the form of lamellas (plates) or slats. The plates are used to finish the walls and facade of the house, and basement siding is used on the lower floors. This type of facing material is made from raw materials such as:

- Plastic. It is based on polymers made of acrylic and vinyl. The popularity of such material is difficult to overestimate. Despite the low price, it has a number of advantages. Such siding will not rot, because... it is resistant to moisture, it does not crack, it is resistant to fire. Plastic siding can be used both for finishing the house outside and inside. The disadvantage of this material is its low resistance to mechanical damage.
- Metal siding. As a rule, galvanized iron or aluminum is used for manufacturing. This cladding material has maximum resistance to fire and deformation. The disadvantages of metal siding are its weight, and as a result, more labor-intensive installation. In addition, if its polymer coating is damaged, the siding will be susceptible to corrosion. Therefore, covering a log wooden house with metal siding requires special care. The condition of the metal coating should be checked regularly.

- Wood siding. Homes with wood siding on the outside are quite rare. This type of cladding material is not as durable as metal and requires constant maintenance. Wood siding also has a very high price. However, all its shortcomings are offset by excellent thermal insulation, aesthetic appearance, soundproofness, and moisture resistance. Remember that open fire is extremely dangerous for wood siding.
- Fiber cement siding. This material has all of the above advantages. It is absolutely resistant to fire, mold, and moisture. However, it also has a significant weight, so its installation will be difficult. For example, if plastic or metal siding is installed using a tongue-and-groove method, then fiber cement siding is installed only with an overlap and only with the use of special fasteners. Basement siding made from such material is in demand.
Finishing the facade and walls of a house with siding with your own hands is a simple, but very painstaking job. When starting work, calculate the amount of material required. Do not forget that siding is used for the base in the form of slats, and for the walls and facade in the form of panels.

Preliminary calculations. Preparatory work
The approximate amount of siding required for finishing work on a house is determined based on the area of the walls, facade and other elements outside the house. In other words, the area of the walls and facade of the building is divided by the length of the siding panel. An accurate result can be obtained using a sketch of the building. Finishing long wall surfaces with siding will require joining joints; this will require an H-profile. Keep in mind that joints made in different places spoil the appearance of the house. A high-quality sketch of the decoration of the facade of the house allows you to calculate the installation of siding yourself with the least number of connections, while maintaining an acceptable cost.
Before installing siding yourself, it is necessary to carry out preparatory work to prepare the walls outside the house. To do this, you will need to remove dust and dirt, lime and remnants of other finishing materials, etc. from the surfaces to be sheathed. If plaster has been applied to the façade and walls of the house and has become of poor quality, it will need to be dismantled.

In addition, all external elements that interfere with the installation of siding will need to be removed from the walls, these include gutters, cornices, and window sills. For a wooden building, it would be a good idea to check the walls for the presence of fungus and mold.
If you plan to lay thermal insulation materials under the siding, you will need a vapor barrier film. It is used to protect insulation from condensation.
First stage. Frame
Installation of siding is carried out on a pre-prepared frame with your own hands. Metal or wooden materials are used for its manufacture. It is worth noting that metal sheathing has the advantage of durability and strength. In addition, the metal frame is better fixed on uneven surfaces. It is much more difficult to play around with machine defects using a wooden frame.
The profile is attached to the wall using hangers, and the distance between them should not exceed half a meter. This installation method allows you to set the profiles using a building level, despite the unevenness and imperfections of the walls.
If finances are limited or installation of metal sheathing is impractical, use a wooden frame.

For such sheathing, it is prohibited to use material that is flaking, deformed, or has traces of mold or rot. This is especially true for a wooden log house.
The frame is mounted on smooth, prepared walls. Siding panels are mounted horizontally on the facade of the house or its walls. Accordingly, sheathing bars or metal profiles are installed vertically. The guides are attached to the wall of a wooden house using nails or self-tapping screws. If the base is made of concrete, monolith or brick, you should use a hammer drill and dowels. Each rail or profile is set according to its level.
If, along with the cladding work, external thermal insulation of the walls is also planned, the lathing for siding is installed after all work with the insulating material. In this case, two frames will be installed: for siding and for thermal insulation. It is important that the sheathing slats are parallel to each other.
Method of working with siding
Regardless of the material from which the building is constructed, after preliminary work, do-it-yourself siding installation is carried out in the same sequence.

Work on finishing a brick, monolithic, timber, or any house begins with installing the starting panel and fixing it with nails or self-tapping screws. The next step is to install the H-rail, if provided, and install the corner fasteners. Window blocks and doorways are designed using profile J.
Starter profiles and guides must be installed flawlessly, and the step-by-step instructions serve as a guide for novice finishers. The first steps look like this:
- Initially, you need to use a level to find the bottom point on the frame, and, stepping back 5 centimeters from it, make a mark. This is done using a self-tapping screw or nail.
- Consistently, moving around the house, we screw in the screws as marks. Starting profiles will be installed in these places. Do not forget about the marks in the corners of the building.
- We stretch the construction cord between the corner screws.
- We apply the boundaries of the profiles installed at the corners to the frame slats. To do this, we apply the profile to the sheathing, and, using a pencil or marker, apply marks to its edges.
- Adhering to the cord, we make a horizontal gap of six millimeters from the corner profiles and mount the starting guide to the profile or sheathing slats.
Don't forget to leave a gap of 10 millimeters between the profiles.

This is necessary to compensate for temperature differences. A gap of six millimeters should not be made if you remove part of the nail strips in advance, and they will not rest against the J profile when there is a temperature difference. The initial profiles should only be mounted horizontally. Don't waste your time on this. Otherwise, it will be extremely difficult to correct the subsequent distortion of the siding.
External corner profiles
Do-it-yourself installation of these elements is carried out in the following order:
- We mark the soffits; it is important for us to know where their edges will be.
- We take the guide and apply it to the sheathing; leave a gap of three millimeters between it and the soffit (roof). Then we fix the guide using self-tapping screws, but its lower edge should be six millimeters below the starting profile.
- Checking the vertical installation. If there are no defects, we fasten the bottom and other places. Do not overuse fasteners in corners.
If the height of the building exceeds three meters, the profile will fit one on one. To do this, the top profile will need to be trimmed. This is necessary so that there is a gap of nine millimeters between the connecting elements.

The profiles must be connected at one level and on one side of the building. If basement siding protrudes, the profile needs to be trimmed so that there is a gap of six millimeters between them.
Internal corner profile
The methods for installing internal corner profiles are practically no different from the methods for finishing external corners. The space between the corner and the soffit should be three millimeters, and the lower edge of the profile should be six millimeters below J of the profile. If basement siding or other element protrudes from below, the profile will need to be trimmed.
Finishing window and door openings
Many novice finishers experience difficulties at this stage. The openings can be flush with the wall surface, they can be recessed, or they can protrude. The most common openings are those that are at the same level with the wall. The instructions for finishing such an opening look like this:
- We protect openings from precipitation.
- We install platbands on the openings (for each opening, two vertical and two horizontal ones are used).
- We join the profiles.
Installation of main siding panels
Do-it-yourself work on decorating the facade of a house with siding always begins with the most inconspicuous part of the building. This allows the installation technology to be developed with minimal losses.

- The panel is mounted in the corner profile and fits into the lock of the starting guide.
- The panel is fixed to the frame.
Subsequently, the panels are mounted using H-profiles or overlap one another. Installation of the remaining panels is no different from fixing the first one. When approaching the opening, the excess will need to be removed. Don't forget to check the horizon of the panels every three levels using a level.
To furnish the lower part of the house, basement siding in the form of slats is used; you should not use ordinary panels for these purposes.
In addition to its decorative functions, siding protects the house from precipitation, winds, and when laying a thermal insulation layer, from temperature changes.
If you have recently built a wooden house or want to update the old walls of a long-built home, then siding is just what you need. Siding can not only significantly transform the walls of a wooden house, giving them an original appearance, but also protect them from harmful external influences caused by: temperature changes, rain, winds, ultraviolet radiation, etc. How to cover a wooden house with siding with your own hands and save on services installers? As part of the article, we will provide step-by-step instructions for covering a wooden house with siding with your own hands, and the video and photos in the article will help resolve some issues related to DIY siding installation.
How to properly cover a wooden house with siding with your own hands: detailed instructions
Finishing a wooden house with siding somewhat different from cladding, such as brick walls. The whole point is that sheathing on wooden walls is much easier and faster than installing it on brick walls with preliminary drilling of holes for dowels for installing and fastening the sheathing under the siding.
ON A NOTE! The price of covering a house with siding per square meter primarily depends on the material from which the walls of the building are constructed.
Leveling the walls of a wooden house for installing siding
No matter how well the builders try to erect the walls of the house, in any case, these measures are unlikely to be without errors. Just in order to smooth out the builders’ flaws before installing the siding, it is necessary to make a leveling sheathing from wooden blocks or a metal profile. It is the sheathing or subsystem that makes it possible to correctly attach the siding to a wooden house without much difficulty.
If we take into account all the technological nuances, then it is impossible to do without a leveling sheathing, since any type of siding be it vinyl or metal, basement or wooden, it requires a correctly aligned subsystem for high-quality installation. In addition, if you plan to insulate the walls of the house under siding, then it is not possible to do this without pre-installed sheathing.
ADVICE! It should be borne in mind that even with leveling sheathing, if it is not installed correctly when covering the house with siding yourself, you can end up with visually noticeable crooked walls.
The sheathing step for covering a wooden house with siding must be done as often as possible, thereby ensuring that the entire cladding is given maximum rigidity. The average pitch of the sheathing between the slats is 400-600 mm, however, you can make this distance smaller, for example 300 mm, but taking a pitch of more than 600 mm is not recommended, especially for vinyl siding, since PVC panels are very fragile and easily deformed when low or high temperature conditions and mechanical loads, such as strong winds.
Do-it-yourself insulation of a wooden house under siding
If you want to insulate the facade of a wooden house, then you should take care of this in advance. You need to decide on the type of insulation that is most suitable in your case. It is advisable to use insulation of the required thickness. So, for example, if the walls of a house are built from timber 180 by 180 mm, then it is better to choose insulation, for example polystyrene foam no more than 30 mm thick. And if the walls are no more than 150 mm thick, then it is better to choose a slightly larger foam thickness, for example 50 mm.
Insulation for the outside walls of a house under siding is used in a variety of ways, ranging from budgetary ones - polystyrene foam, slag wool, glass wool and ending with mineral wool, basalt slabs, polyurethane foam, extruded polystyrene foam, etc. It is quite common to insulate a wooden house from the outside with mineral wool under siding, and also using polystyrene foam.
Experts, based on their many years of observations, recommend using slab insulation when insulating the facade of a house rather than roll insulation, since it is slab materials that can stay in place for quite a long time without noticeable movement, which cannot be said about rolled materials. Rolled insulation is quite heavy and is mainly used for insulation on horizontal surfaces. Mounted on a vertical plane, it will certainly sag over time, leaving noticeable gaps which in turn will open up access to cold air.
Dowels for installing insulation on the walls of a wooden house are not needed, and instead of them, nails of the appropriate length and a plastic cap are used, which presses and holds the slab, preventing it from sliding down. See photo below.
Fasteners for insulation under house sidingYou can also attach the insulation to wooden walls using self-tapping screws of the appropriate length and plastic caps.
IMPORTANT! If polystyrene foam or expanded polystyrene boards are used as insulation, then the joining seams between them must be foamed with foam pre-installed on the mounting gun.
Vapor and wind protection films when installing siding on the wooden facade of a house
Installation of a vapor barrier is a necessary condition when covering a wooden house with siding. The film is mounted directly on the walls of the facade, that is, under the insulation. Taking into account the technology and physical laws, the installation of wind protection is simply necessary. The vapor barrier film protects the insulation from the accumulation of moisture vapor, thereby preventing its destruction.
Wind and hydroprotective film is a unique protective technology, widely used mainly in the installation of roofs and facades. The uniqueness of the wind-hydroprotective membrane lies in its ability to retain heat and not let the cold in from the outside. In addition, the membrane structure of the film is capable of “breathing,” i.e., providing the necessary ventilation under the skin.
A film is mounted, covering the insulation on the main sheathing, after which wooden slats of counter sheathing with a diameter of no more than 30x40 mm are placed perpendicularly on top of it, which in turn provide a ventilation gap that prevents condensation from accumulating under the sheathing. See photo below.
The photo shows how to correctly install an intro-lattice under the horizontal cladding of a wooden house with sidingCovering a wooden house with siding yourself in 5 stages
Installation of scaffolding
- The first thing you need to do when covering the facade of a wooden house with siding with your own hands This is to install scaffolding and stepladders if necessary, for example, in the case of tall buildings of 2 or more floors. To do this, the space around the house must be cleared at a distance of at least 2 meters.
- It is best to rent scaffolding for the required period. You can also build scaffolding from dry, strong boards. Dry boards with a length of at least 4 meters and a thickness of 40-50 mm can be used as flooring. No cracks or noticeable knots. It is recommended to install scaffolding for installing siding with your own hands first on one side of the facade, and after covering it, move it to the next side, and so on until the entire area of the facade of a wooden house is covered.
Preparing the facade for siding installation
- The plan for preparing the façade for siding involves dismantling utilities: electrical cables and appliances, plumbing pipes, ventilation hatches, etc.
- All loose façade elements must be carefully secured.
- Next, the walls of the facade of the house should be sheathed with an overlapping vapor barrier film.
Do-it-yourself sheathing installation
- After installing the membrane protective film, you can begin installing the sheathing under the siding. For the sheathing, a dry flat wooden block 30-50 mm thick, treated with antiseptic agents or a PP metal profile 60x27x3000 mm is suitable.
- When cladding the facade of a wooden house horizontally, the sheathing is installed vertically and vice versa. The pitch between the slats should not exceed 600 mm, ideally 30-40 mm for vinyl siding and 40-50 mm for installation of metal siding.
- The sheathing slats are fastened to metal profile hangers see photo below.
- A self-tapping screw for attaching the suspension to the wall is used with large rare wood carvings of at least 30 mm in length. See photo below.
- Fastening of the leveling lathing slats is carried out using self-tapping screws with a press washer no more than 20 mm long for a metal profile and a wood self-tapping screw no less than 30 mm long for fastening wooden beams.
ADVICE! The shorter the self-tapping screw for attaching the suspension to the rail, the easier and faster it is to screw it in. Therefore, try to purchase a shorter fastener.
Insulation of the facade of a wooden house
- Insulation for installation of siding panels is carried out after installation of the sheathing. Before installing the sheathing, it is necessary to select the optimal type of insulation based on price, quality and size. Only after the thickness of the material is known can the walls of the façade be leveled with slats.
ADVICE! Remember that the insulation should not protrude beyond the subsystem. Ideally, it should be flush with the plane of the sheathing or slightly sunk into it.
- After the insulation is secured, all seams should be foamed if necessary. Next, the insulated façade needs to be covered with a layer of wind-hydroprotection.
- At this point, the insulation of the walls of a wooden house under siding with your own hands is completed, and you can proceed directly to the finishing of the siding itself.
Installation of siding on a wooden house
- Installation of panels should be done from bottom to top. Knowing the length of the panel, you can install connecting profiles. Recommended clearances must be maintained throughout for vinyl siding. So, for example, you should not tightly screw the panel to the sheathing; the gap should be at least 1 mm. The panel should seem to slide slightly on the screws. At joints in corners and connecting strips, it is also necessary to leave a gap of at least 5 mm between the panel and the joining elements.
ADVICE! It is better to screw siding panels onto small screws or nails. For example, it is better to use galvanized fasteners that do not rust and, as a result, do not leave visible stains on the surface of the facade.
- The windows around the perimeter are framed with siding, and the slopes are finished with special PVC slope strips, included in the kit or selected separately. A metal sill is installed at the bottom of the window.
- Options for lining the roof eaves include the use of a soffit panel or siding. For this purpose, a j-profile for siding is used and installed along the entire length of the cornice, the length of the panels is measured, after which the soffits are cut and inserted into the fixing profile, after which they are screwed onto self-tapping screws.
Let's sum it up
Sheathing, finishing, cladding of a wooden house with siding- This is an excellent alternative to any other facade design option. Installing siding with your own hands on a wooden house only seems difficult, but in fact, if you arm yourself with a sense of enthusiasm and optimism, you can easily, originally and quickly decorate the facade of a wooden house without involving professional installers. In addition, you can save a lot if you do the installation work yourself.
How to cover a wooden house with siding with your own hands: video instructions