What is needed for automatic watering. School-automatic watering-design. Types of automatic irrigation
Read also
Warm greetings to summer residents and gardeners! Today we will transform your site from a desert into an oasis! After all, we all know that a guarantee of a high yield of vegetables, berries, fruits and flowers is watering. The most popular irrigation option is drip (spot) irrigation. Thanks to which, the yield increases by 2 - 2.5 times, the plants grow and ripen quickly. In turn, the growth and proliferation of the weed slows down.
A drip irrigation system can be purchased in an online store, where the water supply system is automated and everything is thought out. However, the cost of this equipment is steep. But every farmer wants to get high yields. Therefore, we will make the irrigation system ourselves, without the huge costs of advanced equipment.
Below in the article we looked at several options for an irrigation system made from scrap materials; choose the best one for yourself and make it.
By the way, if you have ants in your summer cottage or garden, how to get rid of them using folk remedies once and for all!
This is interesting!!! Drip irrigation was invented in some areas of Israel. They were the driest and poorest in precipitation. Therefore, we can safely say that this type of watering was not invented out of interest or anything like that. He became a necessity.
Do-it-yourself drip irrigation. Advantages and disadvantages
The system of such irrigation consists of delivering water directly to the root system of crops. Therefore, their greenery will not be damaged. Watering occurs continuously, at certain intervals and slowly. This has a beneficial effect on plants. Since soil moisture is at the same level.

Advantages:
- Automation. It is possible to set the time for water supply and shutdown, as well as pressure. He can be both strong and weak.
- Save time. Every day a lot of time is freed up, which could have been spent on watering the ridges.
- Additional fertilizing of crops. Liquid fertilizers can be added to the irrigation system. And this has a positive effect on plant growth and increases productivity.
- Saving water. Due to the fact that moisture comes exclusively to the root, much less is required. In some regions, this is the main advantage of drip irrigation.
- Versatility. Climate, soil, crop diversity, landscape do not in any way affect the use of this irrigation.
- Supply water temperature. As it flows through the pipes, it heats up a little. This has a beneficial effect on plants and they do not experience discomfort from ice water.
- Disease prevention. Some plant diseases can be associated with drought. For example, a fungus. In drip irrigation, as we have already said, the soil near the root system remains constantly moist.
- Avoiding leaf burns. Absence of thermal and chemical burns of green crops due to root irrigation.
- Self-assembly of irrigation structure. The system is not only easy to use, but also easy to assemble. It does not have complex mechanisms. Therefore, the summer resident will be able to assemble the structure himself.
Flaws:
- Price. If you are going to purchase such equipment from a store, it can significantly reduce your budget. But you can try to make it yourself. And this will significantly save money.
- Clogged IV tubes. If a blockage occurs in the pipes, water will not flow to the ridges in the quantity that the summer resident needs. Or its supply will be stopped altogether.
- Mechanical damage. Equipment belts can wear out or simply break.
- Condensed root development. This occurs due to the accumulation of moisture in one place.
As you can see, drip irrigation has many more advantages. But there are also disadvantages, they are minor and easy to fix.
How to make drip irrigation for your garden using plastic bottles
Perhaps the cheapest watering system can be made from plastic bottles and small diameter tubes. Finding containers in the required quantity, I think, will not be difficult, and there are no difficulties in using such a system.
There are several methods of irrigation from eggplants:
- Surface watering. We hang the bottles over the plants - . A wire or metal rod is stretched over the ridge. We tie the required number of bottles. You need to make small holes in the bottom or lid. The advantage of this method is that the water enters the soil already warm, warmed by the sun's rays. Take the volume of the bottle such that the support can withstand it. It is better to hang the eggplant closer to the ground, since many plants do not tolerate water getting on the leaves, or insert a dropper tube into the hole of the bottle. We cut off the bottom, but do not throw it away, it will serve as a lid to prevent debris from getting in and water from evaporating. We make a hole in the lid for the tube and insert it at a slight angle. We turn the container upside down and hang it up; of course, you can place it with the neck up, but this will be less convenient.

In reality it looks like this:

Dropper tubes are convenient because you can control the water flow rate
- Underground root irrigation
1. The next option is simpler. We dig a plastic container between the bushes with the bottom down 10-15 cm, after making holes 3 cm away from the bottom. You determine the number of holes yourself, depending on whether the weather is dry. There can be either 2-3 or all 10. If you plan to close it with a lid, then you need to make a hole in it. So that after all the water has gone, the bottle does not crumple under the ground.

If cucumbers and tomatoes are irrigated on clay soil, the holes will most likely quickly become clogged. Therefore, first put a stocking on the bottle or lay a piece of burlap on the bottom of the hole, you can also sprinkle it with straw.
Important! The water should not immediately go into the soil, but should be used up gradually over several days. This is the whole point of this irrigation method.
This is how watering plants works:

You can also bury the eggplant with the neck down, making holes just above the lid. We cut off the bottom, but I advise you not to throw it away, but to cover it on top so that the water is not clogged with debris and does not allow evaporation. The optimal tilt angle is 30-45 degrees.

You can replace the plastic structure with a 5-6 liter eggplant, then there will be enough water for about 5 days of watering.
2. A simple method with a special nozzle. Now this option is common among summer residents. The only thing you need to do is buy them in specialized stores for gardeners. The nozzle has an oblong shape with holes, which is screwed onto the neck of the bottle instead of a cap. There are volume restrictions up to 2.5 liters; this method will not work for a 5 liter eggplant.

In action it looks like this: the cap is put on, and now it needs to be stuck into the ground next to the bush along with the bottle. You don’t have to cut off the bottom; after the water runs out, you can unscrew the tip and fill the container with water and repeat the manipulation.

Plastic containers are also actively used in greenhouses to make a structure with a rod. This makes it possible to water the bush at a certain distance.

The finished design looks like this:

Using these structures you can feed plants. To do this, you need to dilute the fertilizers in water according to the instructions on the packaging, which must be strictly followed. The solution will be evenly distributed near the roots, allowing the plant to successfully absorb it.
An irrigation system using plastic bottles is an excellent alternative, and in some cases even a complete replacement for traditional irrigation. Making such an irrigation system yourself will not be difficult, because the necessary materials are almost always at hand.
Do it yourself watering with your own hands from plastic pipes
With such irrigation, you only need to ensure that there is always liquid in the system and that the shut-off valve is opened in a timely manner during irrigation. The advantage is that the installation process is quite simple. And the cash costs during the acquisition of the necessary material are reduced.
Installation
You only need a few different-sized pipes. This directly depends on the area of plantings. A fine filter and a barrel to collect liquid are also required.
First you need to accurately outline the layout of the ridges and the irrigation system. After this, it will be possible to calculate the exact quantity and cost of equipment.

- The container is placed on a hill of 1-1.5 meters. This will provide the required water pressure.
- A pipe (larger in diameter) is removed from the container. It is laid along all the ridges and to the end of the garden. A plug is installed at the end of the pipe.
- Smaller pipes are then attached to the pipe. Holes are pre-drilled in them. The entire structure is supported by a start connector on the side of a large pipe. The ends of the pipes are also capped to prevent water from leaking out.
Now the system is installed! Now you need to open the water supply tap so that your beds with tomatoes and cucumbers, as well as other plants and bushes, receive enough moisture.
Drip irrigation from medical droppers
Of course, this is the same economical design. It has its advantage if different varieties of crops are planted on the site. And they are watered in different quantities. The downside is the periodic flushing of clogged droppers. But you can’t do without this with any drip irrigation equipment.
Installation
You will need to purchase:
- disposable medical droppers;
- hoses for distributing water over ridges;
- stands for storage containers;
- shut-off and connecting fittings for hoses and droppers (taps, plugs and tees).

It is better to take dark-colored equipment, then the droppers will be protected from algae.
- First you need to lay out the hoses over the area with the ridges.
- The first end of the hose is connected to the pressure line. The second one should be muted.
- The main is connected to a barrel of water. It is raised at least 2 meters above the ground. Then the necessary water pressure will be provided to the entire garden.
- After all the pipes are connected, it is necessary to make notes in which places the droppers will be located.
- We make holes and insert medical droppers into them. The other end is brought to the roots of the crops.
- Well, for a longer service life, it is worth installing fine filters in front of the supply line.
This design has many advantages: significant water savings, watering occurs independently, you just need to open the tap. Moisture does not get on the leaves of plants and this is not the whole list. In a word, with its help you can simplify the entire process of caring for a plant.
We make an irrigation and watering system from pipes
When installing a main pipeline from a water tank to an irrigation site, pipes and fittings made of the following materials are used:
- polypropylene;
These pipes withstand contact with water perfectly, do not corrode, are chemically neutral and do not react to the flow of fertilizers through them. To irrigate a small area, in most cases a diameter of 32 mm is used.

Main pipes must be plastic. And what type you will need, choose for yourself.
It is necessary to connect tees at the points where the lines are drained. And connect drip hoses or tapes to their side outlets. For this you also need to purchase adapters. They are attached using metal clamps.
For additional convenience, after each tee you can install taps that will regulate the water supply. This is convenient when different vegetables are grown in the garden.
I suggest watching a video of another option for installing a spot irrigation system using PVC pipes. This method is very simple but effective:
Another option for drip irrigation from polypropylene pipes:

Installation:
- We install the barrel on an elevated platform. This will help get pressure to supply water.
- We attach the main pipe (32 mm in diameter) to it. It will supply water to the distribution pipe.
- A PVC distribution pipe is laid along the entire perimeter of the garden.
- Holes for taps are made in it. This can be done with a screwdriver.
- Taps are inserted into them. And drip tapes or hoses are already installed on them.
System installation is ready!
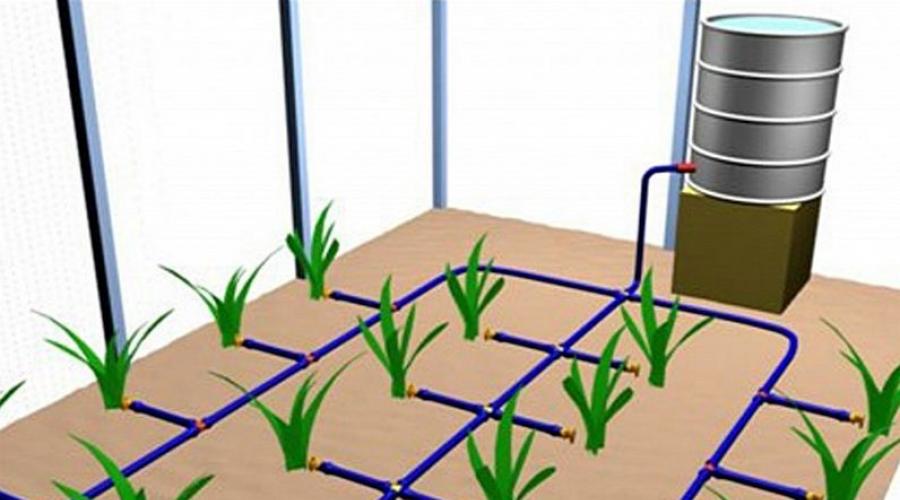
How to equip your own spot irrigation in a greenhouse
Drip irrigation in a greenhouse is a little more difficult to install than watering for an entire garden. Therefore, it would be better for the greenhouse to use surface drip irrigation.
Installation:
- You need to purchase a PVC garden hose. Its diameter should be 3-8 mm.
- We attach dies to it.
- Regular buckets are suitable for containers with water. We make a hole in the bottom of each.
- We tighten the spout with a standard plug. It can also be sealed with a thin rubber band.
This irrigation system is very convenient if you are at your dacha on weekends. It folds freely and also unfolds.
In the photo below you can see a diagram of the automatic watering of the greenhouse.

Here is an example of a simplified design without connecting elements:

That's all for us. We tried to consider the most common homemade irrigation designs. Which one to choose depends on your preferences. Or maybe you think it’s better to buy an irrigation system in an online store - it’s up to you to decide.
And we wish you a rich harvest in your beds!
We all love fresh fruits and vegetables that grow in our gardens and summer cottages. But it is impossible to grow them without regular watering. This opportunity can be provided by a dacha irrigation system made of plastic pipes. Why plastic? This is a relatively inexpensive material that can be installed with your own hands, without using bulky electromechanical devices and tools. In addition, plastic pipes are superior to metal products in their basic characteristics.
There are various options for forming an irrigation system, each of which has certain features and fundamental differences.
This is the least expensive method of irrigation, in which water is supplied to the plants from a source through dug grooves. The entire system is located on the surface of the soil, so the question of how to water your dacha with your own hands is practically non-existent. Water is poured into the soil directly next to the plants. With this method of watering, the roots are deprived of some oxygen, so it is undesirable to carry out such irrigation.
Sprinkling
Water moisturizes the plants, reaching them in the form of sprayed drops. This spraying is created using special sprinklers installed in certain areas of the site. Sprayers can be static or rotating. Such watering does not harm the soil structure, which is well and deeply moistened. In addition, the above-ground parts of plants are also saturated with moisture, which increases their productivity. As a disadvantage, we can note the unevenness of water spraying during watering in strong winds. The problem can also arise if there is insufficient water pressure in the main line.

Drip irrigation
This is the most rational and economical method of irrigation, during which water flows directly to the roots of plants through a drip tape connected to an irrigation pipe. Such watering is possible even from a storage tank if there is no water in the main pipeline. Air access to the roots is maintained, and the soil structure is not affected.

The disadvantage of the drip system is the likelihood of frequent clogging of the pipe due to soil particles and various debris getting into its holes.
Subsoil irrigation
This is a dacha irrigation system made of plastic pipes laid inside the soil layer, at a depth of about 30 cm. Holes are made in the pipes through which water flows to the roots of growing plantations. The system is good for greenhouses and stationary plantings where regular digging is not carried out. However, you can lay the pipes once, and then plant annual plants in relation to their location. Subsoil irrigation relieves the summer resident from the need to loosen the soil surface. This also has a beneficial effect on the supply of oxygen to the roots.
The openings of the pipelines can become clogged, so it is necessary to provide a filter at the entrance to the irrigation pipe.
Advantages of plastic pipes
Typically, polypropylene products and HDPE pipes are used for irrigation in the country. If you make a choice between these options, it is recommended to give preference to polyethylene products, since their installation is simpler, and the pipes themselves have exceptional strength and durability. Let us list their main advantages, thanks to which plastic pipes have gained popularity and appreciation among summer residents:
- The inner walls of the pipes are exceptionally smooth, which eliminates the formation of deposits inside the pipelines. This achieves better throughput with smaller diameters of the pipes themselves;
- The strength of the pipe walls ensures the safety of the products even if they are exposed to relatively heavy garden equipment;
- Plastic products are more durable than their metal counterparts;
- Plastic is inert in relation to an aggressive environment such as soil, so pipelines can be laid even inside the soil layer;
- HDPE pipes do not collapse even with;
- Installing polyethylene pipes for irrigation at your dacha is extremely easy to do yourself. There is no need to use electrical equipment or any complex tools to connect sections of the highway and insert additional elements.
We described how they are mounted in a separate article with a video example.
If you are interested in how to make a street one, then various options for its manufacture are described on our website.
And about the correct design of a compost pit.
Automatic and manual irrigation control
A do-it-yourself irrigation system at the dacha can be configured with the possibility of manual, semi-automatic or automatic control.
Manual control is the simplest. The system, in this case, consists of a pressure pipeline to which rigid or flexible hoses are connected. Watering is done manually. The order in which water enters the hoses is carried out by opening the ball valves.
A semi-automatic system involves manual control of the water supply to the common main. Next, the system distributes water through the pipes independently, and also regulates the pressure and flow of water.
Tip: At any time, you can switch from a semi-automatic system to automatic watering without turning off the water supply shut-off valve.
An automatically controlled irrigation system for a dacha plot fully automates the process of irrigating the plot. A person may not be present at the dacha at all, but at this time the plants will be watered at a given time, with a strictly defined amount of water. Sensors responsible for measuring temperature and humidity will give a timely command to stop watering if the temperature drops or soil moisture rises to normal levels.

Installation of irrigation system
To lay the irrigation system, polyethylene or polypropylene pipelines with a diameter of 20-40 mm can be used (usually the main line has a larger diameter, and the outlet lines are smaller). The connection of HDPE pipes to system elements is carried out using compression fittings. This work does not require tools. Polypropylene products are joined using a soldering iron, so the presence of electricity in the country is mandatory. Both types of pipes have sufficient rigidity and durability, allowing you to operate the irrigation system without dismantling it in the winter.
Let's look at how to lay pipes in a dacha for irrigation correctly. Such a gasket can be superficial or deep:
1. Surface Mount involves placing all pipelines on the soil surface. Such a system is assembled very quickly, and if breakdowns occur, they can be eliminated very quickly and conveniently. But there are also disadvantages. The surface location of pipes increases the likelihood of accidental damage. It also becomes more difficult to move around the area. And pipelines can become easy prey for criminals if you only visit your dacha occasionally.

2. Deep installation plastic pipes for irrigation in the country. This option is more preferable, so we will consider it in more detail:

An irrigation system assembled with your own hands from plastic pipes will provide your area with moisture for many years, saving you from monotonous and routine manual work.
The video will tell you in detail how to make watering at your dacha using plastic pipes, indicating all the necessary elements of the system.
Owners of summer cottages shoulder an unbearable burden, because they have to care not only for the vegetable garden, but also for the greenhouse, garden, lawn and flower beds.
To maintain them in appropriate condition, you need to spend a lot of time and effort. After all, each object requires constant monitoring, as a result of which many different activities have to be carried out. Watering is especially labor-intensive. But this work can be simplified if you automate it.
Characteristics of automatic watering systems
This solution has a lot of advantages: the gardener not only gets more free time, but will also be able to save on water consumption, which will only benefit the plants, since it increases productivity and improves the appearance of the plants.
However, success in this matter largely depends on how often and how evenly watering is carried out. Having realized the usefulness of such an invention, many gardeners turn to specialized companies offering automatic watering systems.
However, summer residents who have “golden hands” often decide to make automatic watering with their own hands. The most relevant use of automatic irrigation systems is for those owners who own large suburban areas.
Those who have experience using automatic watering systems note many advantages at automatic watering:
- Choice of watering time, for which you can set the required operating interval.
- Correct installation of the system ensures that after the next watering a crust will not form on the ground, and this will provide the plant root system with sufficient oxygen.
- By correctly determining the location of irrigation circuits, the summer resident can be sure that even the most inaccessible areas will be provided with moisture.
Among all the advantages that a humidification system provides, the main one is that when using an automatic watering system, water consumption is reduced.
After all, thanks to it, water is delivered directly to the roots of plants, so the summer resident does not have to pour water onto empty plots of land. Proper organization of watering plants allows several times increase the harvest, which can be noticed already in the first year of using this system.
Disadvantages of an automatic irrigation system
 However, such irrigation systems cannot be called ideal due to the presence of certain disadvantages. Of course, you will save money if you decide to carry out all the work yourself.
However, you will still need to spend some money to purchase special equipment and materials. The cost of individual components is, as a rule, lower than ready-made automatic watering systems.
However, it is possible to correctly assemble these elements only if a person has experience as a mechanic and electrician.
Can become a serious problem for a summer resident operational problems plumbing system or its complete absence on the site. But even here you can find a solution - repair the water supply system, and if this possibility is not considered, then you can use alternative sources of water.
Automatic watering: types and possibilities
 Today there are quite a lot of systems for organizing automatic irrigation in the country that you can make yourself. They all differ in their purposes of application: drip irrigation; sprinkling; subsurface irrigation.
Drip irrigation. The drip irrigation system is advantageous in that it allows for minimal water consumption. The main elements for its production are polypropylene and plastic pipes and rubber hoses, which are installed between rows of flowers, plants or beds.
They are laid out as much as possible closer to the landings, so that when used, ensure the maximum amount of water that will flow to the root system. To supply water to the ground, special droppers are provided, which are built in along the entire length of the pipe.
As a result, with this method of watering, the leaves and stems remain dry, and this is undoubtedly a plus for the plants, since they will not get sunburned.
The minimum water consumption when using an automatic drip irrigation system is ensured due to the fact that the water flows directly to the irrigation site.
As a result, it is not wasted on irrigating other unnecessary areas. All this only benefits the summer resident, since it extends working life systems, and also allows you to save on water consumption.
Sprinkling
 Automatic watering systems operating on the sprinkling principle are also often used by many summer residents. When used, moisture is supplied to the plants in the form of splashes, covering evenly the entire area.
The effectiveness of this system is ensured by the fact that not only the soil receives a sufficient amount of moisture, but it is also possible to maintain an optimal level of air humidity. In such conditions, plants are provided optimal development conditions, so they easily restore leaf turgor in extreme heat.
But when using this method of watering, the summer resident will have to constantly monitor so that moisture goes into the ground. Uncontrolled use of the method can lead to the fact that after sufficient moisture of the soil, puddles will begin to appear on its surface, and after they dry out, an earthen crust will begin to appear.
As a result, much less oxygen will flow to the plants. You also need to consider that it is best to use this method in the evening or early in the morning when the sun is not so hot. This will help protect the plants from burns.
This method of watering attracts the attention of many gardeners because, along with watering, it allows carry out liquid fertilizing. Because of this feature, such automatic watering systems are most widespread in lawn care.
Subsoil irrigation
 A less common option is the subsurface irrigation method, which also differs very difficult to implement. Most likely, an ordinary summer resident will not be able to make it himself.
After all, this system refers to specialized options for automatic watering, which is used to irrigate specific plantings or ornamental trees. When using this method, moisture is supplied in the same way as in the case of drip irrigation systems.
The difference is in the use finely perforated pipes, ensuring the flow of water into the soil, which are buried in close proximity to the plants.
Therefore, if this irrigation system is properly organized, then all plants will be provided with sufficient moisture, while the soil surface will remain dry all the time.
This, in turn, eliminates the appearance of an earthen crust, which will provide the root system of plants with sufficient oxygen throughout the entire summer season.
When thinking about which type of automatic irrigation system to choose for your site, it is very useful to first study information about for which plants it is most effective to use a specific watering method.
It is recommended to use sprinklers to care for flowers, trees and lawns. In this case, water will be supplied to the irrigation site from special sprinklers.
Irrigation using drip systems is most effective when caring for shrubs, flower beds, alpine slides and hedges. They can be used when growing seedlings in greenhouses, as well as when caring for plants in the garden.
Installation of a drip system - what is needed for this
 Only those owners who have running water on their property will be able to use the automatic watering system. In its absence, it can be adapted for these purposes any container, which will have to be installed at a height of at least 1.5 meters above the ground.
If you cannot fulfill this condition, and you do not have the opportunity to install them yourself, however, there is a small body of water next to you, then you can turn it as an alternative to running water.
A standard automatic irrigation system is equipped with the following main components:
- drip tape;
- pressure regulator;
- controller;
- distribution pipe and various fittings.
Drip tape is usually made in the form thin wall PVC pipe, which begins to round the moment water flows through it.
From the inside to her IVs are connected, placed at an equal distance from each other. When determining this interval, the type of plants that need irrigation is taken into account.
In cases where water comes from the city water supply, it may be necessary pressure regulator. If water flows with fluctuations, this can lead to deformation of the pipe, and when the pressure increases, there is a danger of its rupture.
The controller is made in the form of an electronic unit, and its main task is to ensure automatic configuration of the system.
This element significantly simplifies the operation of automatic watering systems, since thanks to the available programs it is possible to determine the optimal time intervals and automate the switching process system at a specified time, without requiring human intervention.
In cases where you need to make a do-it-yourself automatic watering system to irrigate several areas, say, flower beds located at a certain distance from each other, then to use the system you will need distribution pipe.
The owner can choose one of the following installation methods - above or below the ground. As a rule, pipes with a cross section of 3.2 cm are used for such tasks.
During the assembly of automatic irrigation systems as a connecting element fittings are used. They are necessary for the installation of each section, from the water supply point to the irrigation point.
Automatic watering system design
 You can automate the irrigation system for your summer cottage using a controller that can be powered by mains power or batteries. Using the latter energy supply option is not very unprofitable due to the limited operating resource.
Therefore, it is advisable to purchase a used more expensive models, operating on direct current. It is recommended to install them in places where they will be provided with special conditions. This could be, for example, a basement or a barn.
The main thing is that they are as close as possible to the supply tap or water container. If we talk about the technical equipment of the installation site, then here you will need to install special mounting box, which will contain all the valves and electrical appliances.
However, not all summer residents are ready to spend a lot of money on purchasing an expensive system for watering flowers in their country house. In this case, you can save money and make it yourself. Then you will have to turn off the supply tap at the right time.
As a result, the water will begin to flow by gravity, however, for this you will have to carry out some work:
- You will need a fairly large tank, which must be installed at a height of at least 1.5-2 meters above the ground.
- The automation system will be replaced by the law of physics, when water from the container begins to flow under the influence of pressure.
- In cases where it is difficult to organize the flow of water by gravity, you can install a pressure regulator.
An automatic watering system can be equipped certain control devices, with which you can set a schedule for automatic watering of plants throughout the summer season.
So, you will save yourself from unnecessary time-consuming work, as a result of which you will not have to go to the dacha every day to water the beds and flower beds. Instead, you just need to come to your site 1-2 times a week to make sure that the system is working properly and that there is enough water in the containers or that there are no problems with the water supply.
Every summer resident knows from personal experience how difficult it is to maintain a personal plot. After all, you have to solve many issues, including regularly watering garden crops.
However, you can save yourself from this time-consuming work if you organize your own irrigation system. There are several such systems, and each has its own advantages.
Therefore, in order not to make a mistake with your choice, you need to decide which plants you need an irrigation system to water. After this, if you have certain skills, all you have to do is purchase the necessary components and assemble an automatic watering system at the dacha with your own hands for use.
The area near the house is a vegetable garden, greenhouse, garden, flower bed or greenhouse; caring for it constantly takes a lot of effort and time. Most modern inventions are designed to make life easier for people. During the hot season, watering takes a lot of energy; this procedure requires daily repetition. Automatic watering at the dacha with your own hands will greatly simplify the process of caring for your site, and the result will be much better: water consumption will be significantly reduced, while the appearance of the plants and the yield will be much better.
Before you start creating your own automatic watering system, you should pay attention to the fact that there are three different types of design for this miracle of engineering. Despite the similarities in operation and minor differences in design, they are still quite different and are intended for different purposes. Let's look at the question of what is intended for what, and how to make automatic watering with your own hands.
An automatic watering system can be of three types:
- Rain or surface watering. This system is the most common type of irrigation. Special nozzles connected to pipelines spray water in the form of raindrops. This is a fairly effective method of watering, but it is not suitable for every type of cultivated plant - most vegetable crops require exclusively root watering. Therefore, this type of watering is used only for lawns, berry gardens, flower beds and other areas with vegetation that is not picky about the type of watering.
- Drip irrigation system. The main advantage of such a system is its efficiency - the liquid is supplied to each plant drop by drop through special capillary pipelines. The supply is carried out continuously, day and night, thanks to this, water resources are saved and efficient irrigation is carried out. This system is used directly for fruit and berry plants; it is not practical to use this system for watering flower beds and lawns.
- Subsoil irrigation of the site. This method is one of the varieties of drip irrigation; just like the one described above, it uses a dosed but constant supply of water into the soil. This system is advisable to use for watering areas of long-term use, such as tennis courts, football fields, rolled lawns, which are used by people for constant movement on them. One of the main advantages of this system is that its parts are hidden inside the soil. At dachas, such a system is practically not used.
Most often, dachas use a combined irrigation system that combines rain and drip systems - this applies to professional engineering structures of this type. A do-it-yourself automatic watering system is almost always a simplified version of a drip or rain irrigation system.

Do-it-yourself irrigation system development
It is not difficult to organize automatic watering of the garden with your own hands. First you need to take a site plan to scale. If it is missing, it needs to be drawn on graph paper or on a large checkered piece of paper. Place all large plants, beds and buildings on paper.
- Configuration development. Mark the location of the water source and irrigation zones on the plan. Along the way, you need to draw the passage of the main pipeline. If you plan to spray with sprinklers, you need to draw their zones of action. They should intersect with each other and there should be no unwatered areas.
In the case when plants are planted in rows, it would be more advisable to use drip irrigation: the cost of equipment and water consumption are much less. When developing a drip irrigation scheme, the number of irrigation lines depends on the distance between the rows. In the case where the inter-row distance is more than 40 cm, one line is required for each. If the distance between the rows is less than 40 cm, watering is one line less.

After drawing all the sections, you need to decide on the length of the required pipelines, you need to calculate how many and what water distribution points you have, decide on the equipment - the number of hoses, tees, sprinklers, droppers and pipes. Is a gearbox and pump required, is a container required, and what kind of automation will be installed in what place. After the stage of calculating the necessary materials and designing the system on paper is completed, you can begin installation. The irrigation system that was designed on paper begins to be implemented on your site.
- Construction. Firstly, what you need to decide on is the laying of pipes. There are two ways to lay a pipeline: bury it in a trench or lay it on top. At the dacha they usually lay it on top, since watering here is seasonal and the entire system is dismantled in the fall. With rare exceptions, the system at the dacha is left non-removable; if the system can withstand low temperatures, it can simply be broken or stolen by ill-wishers.
They try to make the automatic irrigation system for the site of a permanent residence as inconspicuous as possible, so the pipes are buried. In this case, trenches are dug at least 30 cm deep. This depth is optimal in order not to damage the pipes during excavation work. You just need to remember that all equipment remaining for the winter must withstand low temperatures.
Branches go from the main water pipelines for irrigation. It is best to make all connections and assemblies in hatches with covers: since leaks most often occur in connections and tees. To find a leak, digging a trench is not the most pleasant task, but when access to problem areas is easier, system maintenance is greatly facilitated.
The last step, depending on the chosen irrigation method, is to install water distribution devices into the hoses, everything is connected and checked.
- Accessories. All piping throughout the site is made from polymer pipes. Pipes made from this material do not react to most fertilizers, are corrosion resistant, reliable and easy to install (they do not require any installation equipment). HDPE (low-density polyethylene) pipes are the most popular. To all the advantages described above, it is worth adding UV resistance: they can be laid on the surface. You can also use LDPE (high-density polyethylene), PVC (polyvinyl chloride, but this material is afraid of ultraviolet radiation) and PPR (polypropylene, the disadvantage of this material is that its connection must be carried out by welding and eliminates the possibility of dismantling).
For an automatic irrigation system in a country house, garden, or greenhouse, a pipe with a diameter of 32 mm is usually used. If a large number of beds must be watered, it is recommended to take a pipe with a diameter of up to 40 mm.
HDPE pipes are assembled using compression fittings (with threaded gaskets). Pipes made of this material are able to withstand the pressure in the water supply of a multi-story building, so they can withstand the pressure for watering the site without problems. The advantage is that at the end of the season they can be dismantled and assembled and used again the following year.
If the choice falls on drip irrigation, drip hoses or tapes must be connected to the main line; you can attach ordinary droppers to the hoses (a hole is made and a small device is inserted into it). For rain irrigation, sprinklers are installed. They come in different structures and are capable of covering areas of different sizes and shapes - rectangular, round, sectors. A DIY lawn watering system is also easy to install.
Work on the installation of an irrigation system
When the plan for automatic watering at the dacha is ready, you need to transfer it to the site.
- DIY drip irrigation system
Automatic drip irrigation at your dacha can be arranged as follows:
- You need to take a large number of bottles with a volume of 1.5-2 liters. If the system will irrigate moisture-loving plants, a larger container will be required.
- At a distance of 3 cm from the bottom, several holes are made on the walls using a nail.
- Bury the bottles upside down between the plants at a depth of 10-15 cm.
- If necessary, add water through the neck.
Such lawn and garden waterers save resources and provide the soil with sufficient moisture.
How can I water at a higher level myself? At a minimum, you will need engineering skills and experience with tools. If you know how to calculate the working pressure, you can dig trenches, install pipes at the desired angle of inclination, connect them, set a timer, filters, etc., then you should get to work. Otherwise, it is better to trust the professionals.
- Automatic rain watering system for gardens and cottages
Installation of this watering irrigation system will not cause much trouble in implementation. Installation steps:
- The irrigation hose must be replaced with a network of pipelines covering the entire plot of land, vegetable garden or greenhouse.
- Mount sprayers at the ends of the dead-end pipeline. Various models can be found at a hardware store.
- Replace the standard water supply tap with an automatic valve. Equip the device with a power-on timer.

- Subsoil irrigation system for a summer residence
It is quite difficult to implement this irrigation system at your dachas on your own. For a simple description of the circuit, you will need something like this:
- It is necessary to make trenches 20-30 cm deep with a distance between them of 40-90 cm.
- Lay polyethylene porous pipes in the trenches through which water will leak.
- To prevent water from going deeper, tapes are placed under the pipes.
- For automatic operation of the system, you need to install a solenoid valve/precipitation sensors/drain valve.

Creating an automatic irrigation system at your dacha yourself is quite a difficult task. Careful attention is required, creating a diagram, organizing the water supply and, if possible, connecting automatic control. You can turn to specialists for help, but it is quite possible to assemble an automatic irrigation system yourself. You just need to think carefully about the functionality. A wide selection of materials on the modern market will allow you to design an automatic watering system suitable for your site.
Every year, owners of suburban areas are faced with the fact that the lawn, which delighted the eye with fresh greenery in the spring, loses its brightness by the end of May and gradually becomes brownish-yellow, although it is still only summer and far from autumn. To solve this problem, you need to water your lawn at least once a week. This is a rather labor-intensive task that requires regular expenditure of effort and time. An alternative solution is automatic watering of the site using Rain Bird technology.
Are you planning to independently develop a project for a suburban area and install the system yourself? Then this article will be useful to you. Rain Bird automatic watering will help organize uniform and timely moistening of the lawn to avoid drying out of the grass and gradually strengthen the root system.
In this article we will tell you how to independently develop a project and then install an automatic watering system on your summer cottage with your own hands. Its correct use allows you to water the lawn evenly and in a timely manner, avoid the appearance of dried grass and strengthen the root system.
Advantages of an automatic irrigation system:
| You save water. Due to the programmable controller, automatic watering is carried out at a time when evaporation is not very large. Regular and timely irrigation of the lawn helps the plants stay beautiful and healthy. Excellent results after just a few uses. | |
| You save money. Thanks to the Rain Bird automatic watering system, plants are watered according to their moisture needs. This eliminates additional costs for grass care. Additional measures are simply not required. Timely watering and cutting the grass is the basis of lawn care, allowing you to achieve its magnificent appearance for a long time. | |
| You save time. Automatic watering technology relieves you of a number of hassles and worries associated with caring for plants and gardens. Forget about it. Now you have more time to relax and communicate with loved ones. Enjoy your weekend or vacation with the peace of mind that your lawn is receiving proper care and control. |
Scheme for designing automatic irrigation
In the diagram below you can consider the elements of an automatic watering system, as well as where they are used in a suburban area.
Static sprinklers for automatic watering of small areas
Static sprinklers are used to water shrubs, flower beds and small lawns. They are installed at the same level with the ground. When water pressure appears, the sprinkler rod extends, and when watering is completed, it automatically retracts.
 |
 |
 |
 |
Irrigation radius is from 1.2 to 7.6 meters, operating pressure is 1-2.1 bar.
Rotating nozzles allow you to effectively distribute water in cyclic jets with low rainfall. They spray water evenly, reducing erosion and soil erosion.
Rotors for automatic watering of medium and small areas
Rotors are recommended for areas with a small to medium area. Water pressure lifts the rod to the surface. This is how watering is carried out. The rod lowers automatically after completion of work. The irrigation sector can be adjusted from 40 to 360°.
The technology allows you to create a “rain curtain” for optimal water distribution. This guarantees quality lawn care. Rotors with check valves are used to avoid waterlogging in areas with elevation changes.
Rain curtain technology helps to properly distribute water for irrigation, which guarantees excellent lawn quality. Rotors with check valves help avoid waterlogging in areas with elevation differences.
Valves
Special solenoid valves are controlled by a controller and open to supply water to the sprinklers.
The Low Flow DV DRIP valve was designed specifically for drip irrigation systems.
Even with low water consumption, the device functions perfectly. DV and HV solenoid valves are a good option for small areas of private households.
 Valve Application |
 |
 |
 |
| LFV - Low Flow | H.V. | D.V. |
Controllers for automatic watering
Using the controller, the signal to open or close the water supply is transmitted to the system valves.
Timers installed on the water tap are characterized by ease of setup and programming. They effectively regulate even minimal water flow. Automatic systems include sprinkler shutoff devices that operate when it rains. These elements assess the level of precipitation and, if necessary, automatically block the water supply, allowing you to save it and eliminate the risk of waterlogging of the soil.
 |
 |
 |
 |
| ESP-RZX | ESP-Me | WP1 | WP6 |
 |
 |
 |
 |
| 1ZEHTMR | Rain sensor RSD-Bex | Wireless rain sensor |
Humidity sensor soil SMRT-Yi |
Automatic watering microirrigation
- Emitters. Rain Bird self-piercing emitters consume from 2 to 68 l/h. This guarantees ideal watering of beds, shrubs, trees and flower beds. To make installation more convenient, use the XM-TOOL.
- Drip hose. It is designed for drip irrigation and is available in two versions - for installation above or below ground. The element is suitable for irrigating beds, trees and shrubs, as well as hedges.
- Start-up kits for micro-irrigation. They contain a filter, a pressure regulator and a low-flow solenoid valve.
- Microirrigators. Such devices are recommended for watering bushes, flower beds and flower beds. Micro-sprinklers are connected using a distribution tube with a diameter of 6 mm. The irrigation radius is adjustable.
 |
 1. Emitters. The consumption of Rain Bird self-piercing emitters is from 2 to 68 liters per hour. This provides excellent watering of shrubs, beds, flower beds and trees. For ease of installation, use the XM-TOOL installation tool. 1. Emitters. The consumption of Rain Bird self-piercing emitters is from 2 to 68 liters per hour. This provides excellent watering of shrubs, beds, flower beds and trees. For ease of installation, use the XM-TOOL installation tool. |
 2. Drip hose. A special hose designed for drip irrigation is well suited for watering beds, hedges, trees and shrubs. It is available in two versions: for laying underground and on the surface. 2. Drip hose. A special hose designed for drip irrigation is well suited for watering beds, hedges, trees and shrubs. It is available in two versions: for laying underground and on the surface. |
|
 |
 |
| 3. Start-up kits for micro-irrigation. They include a pressure regulator, filter and low flow solenoid valve. | 4. Microirrigators. These micro-sprayers are perfect for watering flower beds, bushes and flower beds. Connected with a Rain Bird dispensing tube with a diameter of 6 mm. Adjustable watering radius. |
Accessories for automatic watering Rain Bird
All elements for self-installation of an automatic watering system can be ordered from the company