Drawings of knives with full size dimensions. DIY hunting knife. Karambit knife drawing
The proposed drawings of knives with dimensions show that each product is individual, it is unique, and good “in its own way.”
We decide on the shape of the product.The knife manufacturing technology is the same for any of the selected options.
This?
Or this one?

Or more?


Selection of material:
- steel, R6M5 (tool steel) has sufficient hardness and holds an edge well. You can use 65G (carbon steel) or a piece of spring steel (a clean plate without corrosion, from a used one, must be used) car spring worth refusing). Select the plate in such a way that after roughing the intended contour of the finished product is preserved
- We recommend using wood (oak, walnut, pear, birch, beech, mahogany and other species) to make the handle
- rivets with a diameter of four or six millimeters
- brass or bronze plate three or four millimeters thick
Tools, accessories:
- set of drills
- set of files (flat, round)
- sandpaper (number one hundred twenty and two hundred forty)
- sandpaper and electric drill
- clamp
- workbench and vice
Manufacturing technology.
- Transfer the drawing of the knife from paper to metal plate, strictly maintaining all dimensions.
- We grind the workpiece along the selected contour. We make holes for rivets.
- We draw out the slopes of the cutting edge of the blade. We fix the resulting workpiece to the workbench (you can use screws in the holes for the rivets). Using a flat file or emery, we grind the metal at the desired angle (each side) to the center of the workpiece (the future edge of the blade). After finishing the rough processing, we proceed to finishing processing using sandpaper.
- Hardening. We make a fire in the yard. When a good heat has formed, place the knife blank in the coals of the fire. The heating process lasts about fifteen minutes. Every two or three minutes we take out the workpiece for a few seconds. The steel should heat up to a cherry red color. Check the readiness of heating using a magnet. If the steel is no longer attracted to the magnet, heating must be stopped. We lower the slowly heated workpiece into the oil (cutting edge down) by two-thirds of the width of the blade and hold for about a minute, the oil should go out. Then we completely immerse the rest. If the smoke stops coming out, remove the workpiece. You need to do this without rushing.
- We bake in a preheated oven. The heating temperature is four hundred degrees. We stand for forty-five minutes.
- Finishing. We grind and polish the blade. We cut out an oval from a brass plate and make a hole for the shank of the blade. We make a handle from the selected type of wood, in which we drill holes for rivets. We collect all the details. Once assembled, we grind and polish the handle.
Drawings of knives with other sizes can be found in the article
A hunter definitely needs a gun and a knife. If there are no questions regarding the application of the first, then there are questions regarding the second different opinions. Some believe that a knife is necessary for finishing and cutting up a shot animal, as well as for protecting against an attack by an animal.
Others use this item, first of all, to chop branches, cut bread, open cans of canned food and perform various household work, but cutting up game is an occasional task. Thus, it turns out that there is no universal blade. Any man can create hunting ones.
What is the product
Sketches of knives for DIY production
Hello, friends!
Today I want to talk about how to make various shapes and knife designs. It is known that a knife is not only a melee weapon and an irreplaceable hunting paraphernalia (I deliberately do not mention kitchen utensils as a household necessity) but also an integral part of our historical past, its pride and beauty.
In principle, an ordinary sharp piece of iron has no value. If you simply sharpen a steel plate, then it will remain an ordinary sharp steel plate, a soulless instrument for cutting living and inanimate flesh. The value of a true work of art lies in the soul that the master put into his product. And this concerns not only edged weapons, but also any other human activity. Every thing made with love and inspiration contains a piece of the soul of the person himself and therefore it itself is a little alive. The ancient masters knew this well and gave their creations names, treating them as some kind of living substances.
In our technologically advanced times, everything is put into flow: part to part, screw to screw, and we get an extremely necessary, but completely soulless product. However, some are irrepressible creative personalities, are still making living things. I hope you, the readers of this article, are one of them. Below I have posted drawings of knives of various configurations, according to which you can make your own “living weapon”. What material to make weapons from has already been discussed a lot on this site, in articles, etc., but perhaps someone has their own suggestions.
And so in these drawings only general dimensions: length, width and height, do everything else to your taste, I just want to show what shape can a knife be made?. I know one person who is simply obsessed with. Over the course of twenty years, he has accumulated a huge collection, ranging from rough and clumsy first handicrafts to simply amazingly beautiful, I’m not afraid of this word, masterpieces. Moreover, this man, no matter how much he was asked, did not sell a single knife, and categorically refused to make it to order.
Now he is already retired, all the walls of his apartment are covered with stands on which his homemade favorites are placed. Sometimes he takes some kind of knife and examines it for a long time, sometimes he whispers something and strokes it. Don't think so, he's not crazy, he's a normal, cheerful and talkative old man. It’s just that he probably really animated his knives and treats them as living creatures, but frozen in space and time.
MAKING KITCHEN KNIVES
Having remade a lot of cold, piercing and cutting things, I suddenly noticed that there was no sensible food in the kitchen.kitchen knife. Well, then let's start making it. First, let's decide on the workpiece: you can take 65G or 95X18 steel. I do not consider other options due to their lower quality and low prevalence. If there are problems with the workpieces and subsequent hardening, you can simplify the process by using a piece of a saw blade or other metal-cutting tool for the knife.On an emery wheel we give iron the required form. First scratch the outline of the knife according to the template. I use cut out fiberglass templates for this.
By deleting excess metal, add shine using a circle with sandpaper.

Having drilled two or three holes with a diameter of 3 mm for fastening, we get this:
Now it's time to work on the handle. Some use plastic for these purposes, some use caprolon, some plexiglass, some metal. But top scores are obtained from simple tree- durable, comfortable, and pleasant to hold. For preparation it is taken wooden leg from the chair.Cut in half with a hacksaw

These two halves will be the handle of the knife. The fastening is done using rivets made of aluminum wire.

Having firmly attached them to the iron, we drill the mounting holes and place them on M3 screws for subsequent processing.

To give the handle a preliminary shape, we use an abrasive grinding wheel.

Already something similar to a knife. Now you can replace the screws with rivets.We finally shape the handle with a rasp and polish it with a strip of sandpaper, first coarse-grained and then finer.
The cost of throwing knives varies online. But if you decide to master this science, you will need not one knife, but at least five. Calculate for yourself how much money it will cost you. Is it possible to make a throwing knife yourself? There is nothing complicated here! I outlined for you the most popular models and indicated all the sizes. Download the drawings of throwing knives and I’ll teach you how to use them.
I'm posting a few drawings for now. I will add new ones as soon as possible. Write in the comments what models of throwing knives interest you. I'll do it and post it.
Throwing knife designs: "Cobra"
Manufacturer: "Gunsmith" (Zlatoust). The only model in the company's line of throwing knives. There used to be more. The reason is simple: CEO company is a professional knife thrower. He spent several years developing this model. Cobra is well balanced, inexpensive and colored red (easy to find in the grass).
The drawing shows the main dimensions of the Cobra throwing knife. Blade thickness 5.00 mm. Weight 145 gr.
This is what Cobra looks like live

Throwing knife drawings: “Gadfly”
Manufacturer: Rosoruzhie (Zlatoust). Distinctive feature line of knives with the “Rosarms” mark - cord wrapped handle, EI-107 steel, leather sheath.
 The drawing shows the main dimensions of the Gadfly throwing knife. Blade thickness 5.00 mm. Weight 210 gr.
 This is what “Gadfly” looks like live

Throwing Knife Blueprints: "Strike"
The same manufacturer "Rosarms". The large throwing knife “Udar” (290 mm) is designed for long-distance throwing.
 The drawing shows the main dimensions of the Udar throwing knife. Blade thickness 5.00 mm. Weight 272 g.
 This is what “Udar” looks like live

Download the drawings of throwing knives in one archive from the link. And if you decide to make a stand for throwing knives yourself - just do it!
How to use drawings?
Print it out, stick it on thick cardboard and cut along the outline. Then place it on a metal plate and outline it with a marker. Then everything depends on whether you have a tool. You can cut it out with a hacksaw, and select the rounded parts with a grinder.
You can also select slopes on a throwing knife with a grinder, make them with a file, or use a belt grinder. Don't put on much beauty. If you have already bought polished factory metal in a store, then you know that after several throws the knife becomes covered with scratches and loses its original appearance.
The most important! Remove all the burrs from the blade and do not sharpen it so that bread can be cut - there is no point, and if you throw with a grip on the blade, you may end up without fingers.
P.S. In the summer we open a knife throwing school with step by step videos lessons. For subscribers of our store - free. You can subscribe. You will also receive a gift for subscribing there. Good luck!
All throwing knives from Chrysostom.
Every hunter understands that without special knife you can’t do without it - you can use it to split a splinter for a fire, repair equipment, and process prey. Thus, this device is truly universal. And you can make it this way yourself to your taste.
Materials and tools:
1. Emery stone.
2. Diamond needle file.
3. Drill.
4. Drills.
5. Files.
6. Abrasive bars.
7. Current rectifier.
8. Soldering iron.
9. Grinding wheel.
10. Metal for a knife. It is advisable to choose high-speed tool steel.
11. Wood for making a handle.
12. Rivets.
13. Brass or bronze plate.
Operating procedure:
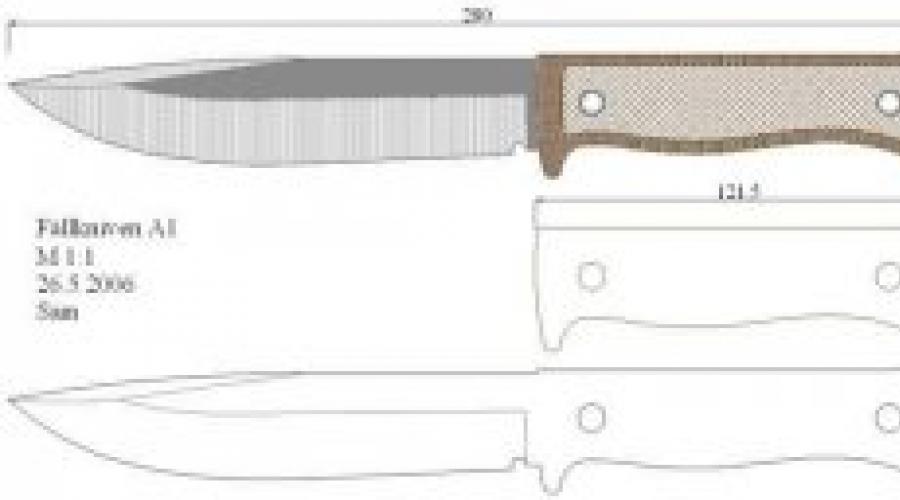
Any work begins with a drawing. Moreover, in in this case You will need two drawings - the knife itself and a separate blade with a shank.

Now you can carefully cut out the blade layout. The basis for the layout is paper as strong as possible. Superimposed this thing onto the hacksaw material and outlined as clearly as possible.

The workpiece is placed on an emery machine and ground along the contour. It is important to remember that the transition point from the blade to the shank should be semicircular - this will help increase the strength of the product. Before grinding, it is recommended to prepare a container with water into which you should dip the metal more often - thereby reducing the risk of overheating.

It is quite difficult to make correct holes for rivets on alloy steel. At this stage, you can contact specialists. However, if you have a current rectifier at hand, the procedure can be quite successful using electrolysis.

The next stage is just as difficult as making the holes for the rivets. Making blade cuts is not always possible right away, so it is recommended to practice on some unnecessary materials. Concave slopes are easiest to remove using sandpaper, but with a flat wedge everything is much more difficult. It is advisable to start with slightly curved lens-shaped slopes. The main requirement for them is the same width, angle, simultaneous and clear completion. We should not forget about the fragility of the overheated blade, periodically cooling it in cold water.

To improve the through cut of the product and eliminate the risk of corrosion, you need to grind and polish. To do this, take a rough stone that can grind off all the irregularities. The slopes, as well as the cutting edge, are leveled using a suitable block. After this, a vulcanite disk should be installed on the emery. An alternative is a felt circle treated with abrasive paste.

To make a sleeve you will need a brass plate 3-5 mm thick, from which an oval is cut. When calculating the dimensions of the oval, proceed from the parameters of the knife itself. The bushing will look best in the form of a stop that protrudes above the handle by more than 5 mm. Don't forget about the hole for the shank. You can solder the sleeve to the base of the blade by soldering and grinding off the tin deposits with a needle file.

Now you can start making a handle from the wood you like. The shape is chosen according to personal taste. It is fastened to the shank using rivets. After this the tree is processed protective composition and is left to dry.

The final stage– engraving, decorations, sheath sewing. All these procedures are carried out based solely on preferences, as well as the purpose of the knife.