Drawing of a wooden hanging shelf for a garage. We make shelving for the garage with our own hands. stage. Metal cutting process
Over time, under the roof of any car garage, a whole arsenal of various household supplies and household items accumulates, for which there is no place in any home environment, nor in the pantry.
To prevent the formation of a chaotic dump, the space inside the garage must be properly organized. And this can be done using a homemade shelf and rack system. It will allow you to neatly and rationally place things stored in the garage and thereby create the most comfortable conditions not only for car care, but also for solving everyday household problems.
Principles and possibilities of arranging a car garage
The main purpose of a garage is to store a car. This means that first of all, the car owner must eliminate possible attacks on the property stored inside, that is, ensure the safety of the latter. An equally important issue is the correct climate regime in the garage space - the condition of the car should in no case depend on the vagaries of the weather or the appetites of harmful microorganisms such as fungus or mold. Another principle of organizing the situation in the garage - ergonomics - says that everything under the roof of the structure should always stand, lie or hang in its place, without interfering with the passage, travel, cleaning or car care process. With all this, it is imperative that the premises be clean and tidy, which are the key not only to the health of the car owner, but also to his safety when visiting the garage and performing all kinds of business or repair operations.
In accordance with these principles, at the first stage of arranging a garage you will need:
- Install a reliable locking system on gates and windows, if any.
- Insulate the structure of the building or organize high-quality heating interior space in the cold season.
- Carry out interior decoration with reliable, durable and easy to clean materials.
After finishing finishing works you can start final stage arrangement - organizing the interior of the garage. To do this, you need to draw up a detailed plan of the premises and determine what and how exactly will be stored in it, in addition to the car.
Garage plan for passenger car with calculated dimensions
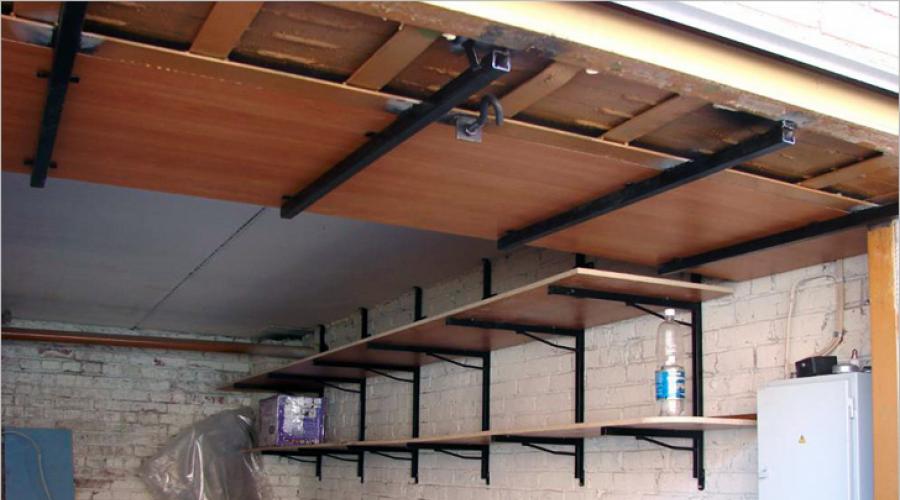
As a rule, the wall farthest from the entrance to the garage is allocated for racks and shelves. If the dimensions of the room allow, it is advantageous to equip the side walls with shelves. Special attention in case of shortage free space In the garage, you should pay attention to the space under the ceiling, as well as above the car itself. Shelves equipped on the upper level will allow you to unload bottom part premises, taking on things that need to be used from time to time.

Wooden shelves on a metal frame under the garage ceiling
The configuration and dimensions of the racking system depend on the size of the garage and the needs of its owner. The materials from which the shelves will be made must be strong enough to support the weight of the items being stored. For example, tiers can be made of thick plywood or boards, and the frame can be made of metal pipes or corners, but other options are also possible.

Wooden shelving system for a garage
The method of assembling and installing the rack system depends on the material used to decorate the garage, as well as the design features of the structure itself.

In many cases, shelves are hung on walls, and racks are installed directly on the floor. However, shelves can also be hung from the ceiling, while to increase the stability of a separate rack, its frame is often equipped with fastenings for walls, floors and ceilings.
Open Hanging Garage Shelving System
- When calculating the parameters of a racking system, several points should be taken into account:
- The distance from the bottom shelf to the floor is taken to be at least 20 cm. This significantly simplifies the process of cleaning in the garage.
- The width and height of the shelves must correspond to the dimensions of the items being stored.
It is advisable to perforate the shelves in order to improve ventilation, as well as to avoid the accumulation of dust and dirt.
Self-production of shelves and racks for the garage You should thoroughly prepare for the arrangement of the garage space.
- For this you will need:
- perform structural calculations;
- select and prepare materials;
When planning a shelving system, first of all you need to make at least an approximate list of items stored in the garage, not forgetting to estimate their weight and dimensions. You should also draw a plan of the garage, on which, on a scale accurate to the centimeter, you need to indicate the design parameters of the structure (height, width, thickness, pitch and number of shelves). Afterwards, it remains to carefully consider the method of assembling and installing and fixing the shelves or a separate rack.
Please note: The choice of the type of shelf and rack system and the method of its installation and fastening largely depends on the properties of the materials from which the garage is made. So, if the walls of the latter are metal, you will have to tinker quite a bit with hanging shelves, while the simplest attached shelving will save the garage owner from complex manipulations with fasteners, garage insulation etc. Most convenient option- plastered brick walls. In such a garage, you can give free rein to your imagination and install a combined shelving system with many useful functions for your household.
Material Selection: Key Points
Materials for creating a shelving system for a garage are selected based on considerations of ease of assembly, as well as reliability and practicality in operation.
So, for shelves intended for storing heavy and large items, you will need a reinforced frame, for the creation of which a metal corner or a profiled pipe is best suited.
But in this case, the garage owner cannot do without the skills of cutting, drilling and welding metal. In addition, the latter needs protection from corrosion, and this is associated with additional financial costs.
Wooden blocks 40–50 cm thick can also be used as a frame for garage shelves or racks. Working with wood is much easier than with metal, but you still have to take care of protecting the material from mold, rot, humidity and other aggressive operating factors. As for the material for making the shelves itself, the most practical solutions
- worth mentioning:
boards with a thickness of 2 cm; Edged board is one of the cheapest and easiest to use materials. Garage shelves made from planks will last for many years. But to increase ease of use and increase their service life, they must be sanded and covered with antiseptic and paint, which will protect the material from mechanical damage
- , pests and rotting.
Plywood is a practical and inexpensive material with high strength and durability measured over decades. Working with this material is not difficult, however, when making shelves it should be sanded with fine sandpaper and coated protective layer paint or varnish. This will prevent the plywood from getting wet, drying out and cracking under the influence of dampness, temperature changes and aggressive chemicals.
- particle boards.
Chipboard is a cheap and easy-to-use material, but difficult to use. When making shelves from chipboard using varnishing or painting, it is necessary to protect not only the working (upper) and lower planes, but also the ends, as well as the holes for bolt fastenings and perforation. At the same time, the latter require increased care when performing due to the structure of the material.
Please note: A quick but rather expensive option for arranging a garage is to purchase ready-made plastic or metal perforated shelves with factory fastenings or a prefabricated shelving frame. In the absence of sufficient funds, the most reasonable solution would be to independently manufacture the structure from materials prepared at the discretion of the garage owner.
Design calculation
First of all, it is necessary to determine the location of the racking system. If we are talking about several small shelves, you can make a sketch directly on the wall, while drawing a frame shelving will have to be done on paper.

Sketch of hanging shelves on the garage wall
When planning the structure you should consider:
- dimensions and weight of items placed on shelves;
- the necessary amount of free space for passage;
- the dimensions of the spaces between sections and the vertical spacing of the shelves;
- methods for attaching shelves to the walls or ceiling of the garage;
- the need to attach the racking system to the floor or ceiling.

Calculation of an attached shelving system for a garage
If a rack is installed in the garage, it is advisable to select its height according to the height of the room. Regarding wall or hanging shelves, it is convenient to calculate them from top to bottom. If the dimensions and layout of the garage allow, the width of the shelving tier is selected along the entire length of the wall with a margin of 5–10 cm for ease of installation. The optimal depth of the rack is 50–60 cm, although for large items ( car tires and disks, spare parts, boxes, etc.) it would be reasonable to provide wider shelves.

Closed Hanging Rack for Garage
The height of the tier can be different and is selected according to the needs of the garage owner. It is practical to place the widest and deepest shelves at the bottom. It is more convenient to store heavy and bulky items here, which are easy to reach if necessary. On the other hand, deep shelves can also be installed under the garage ceiling. After all, on the upper tier it is very convenient to store large but light items or rarely used items. In addition, it is convenient to divide individual tiers into sections, which will facilitate sorting of stored goods.

Drawing of a simple shelving system for a garage
Please note: It is not advisable that the width of the shelves, especially from thin material, exceeded 1–1.5 m. This will lead to a decrease in the strength of the structure and sagging of the tiers. As for the length, it is convenient to start from a size of at least 60–80 cm, otherwise the shelves will be inconvenient for storing long items. The vertical pitch of the racking system is taken according to the required storage height. For example, the height of the lower tier can be taken as 70 cm and used for storing car tires, rims, large containers, etc. If you add another 2 tiers of 50 cm each, the total height of the rack will be 1.7 m. In a garage with a ceiling height of 2.5 m, the topmost shelf of this design will have a 60 cm pitch, taking into account the 20 cm distance from the floor to the lower tier .
Tools and auxiliary materials
To independently manufacture, assemble and install a racking system, you will need a considerable arsenal of tools, as well as auxiliary materials. The tools for completing the task contain:
- building level;
- tape measure and marker;
- screwdriver;
- electric drill with hammer drill function;
- jigsaw;
- circular saw with metal blades (if the frame of the rack is made of steel angle or profile pipe);
- welding machine (for welding elements of the metal frame of the rack);
- hand tools (construction angle, pliers, hammer, screwdrivers and wrenches).
Please note: A welded rack frame is difficult to manufacture, so bolted connections are often preferred to welding.
The list of auxiliary materials should include:
- dowels or anchors (for attaching a wooden or metal frame to garage structural elements);
- self-tapping screws for wood or metal or bolts with nuts (for attaching shelves to the frame);
- drills for concrete, wood and metal;
- primer and paint for metal and wooden elements designs;
- priming brush;
- sanding paper.
Please note: In some cases wooden shelves It is more convenient to fix it on the frame using special glue.
Making your own shelving system
Self-construction of shelves or racks for a garage is carried out with subsequent assembly. The operating algorithm is as follows:
- By using circular saw or a jigsaw, frame elements are cut from a steel angle, profiled pipe or wooden block: racks, transverse and longitudinal crossbars, amplifiers.
- Markings are made on the vertical posts of the rack to install transverse and longitudinal crossbars under the shelves.
- If we are talking about shelves, on the horizontal crossbars that will hold them on the wall, the attachment points are marked with dowels or anchors. Next, they need to be transferred to the wall and holes of the appropriate diameter and depth must be made with a hammer drill.
- On the frame elements for bolted connections, holes of the required diameter are made using a drill with a metal drill.
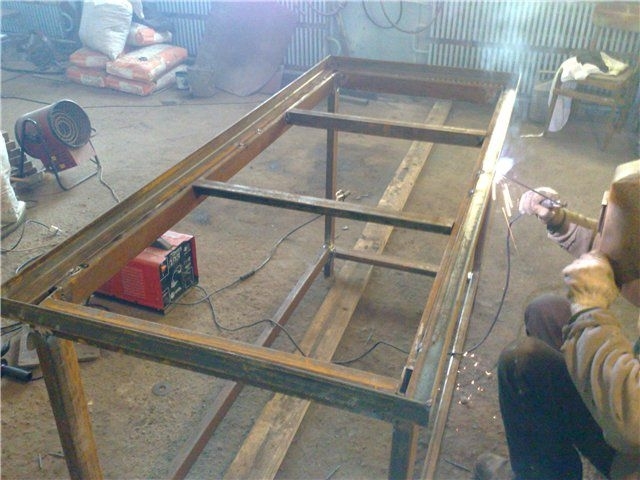
- If the choice fell on a welded frame, the elements of the latter must be joined with neat seams.
- The metal frame is sanded, primed and painted. It is also advisable to sand, prime and paint the wooden base of the shelving system to protect it from mold and rot.
- Shelves of the required size are cut out of chipboard, plywood or boards, after which their surface must be perforated.
- The shelf frame is attached to the wall or ceiling of the garage, after which the shelves are fixed to it using glue, screws or bolts.
- Assembling a separate rack is carried out in several steps:
- installation of side racks;
- fastening of transverse and longitudinal crossbars, as well as amplifiers;
- installation of shelves on the frame.

Homemade shelving system with a metal frame and chipboard shelves
How to make shelves yourself
If there is not enough free space in the garage to install a separate rack, the room is equipped with shelves. The latter may be:
- hanging;
- mounted.
It is rational to install hanging shelves in rooms whose walls are made of materials that are difficult to process or are unable to bear additional loads. In this case, the shelf frame, which is usually made of metal, will be attached to the ceiling. The latter must be strong enough to withstand the weight of not only the entire structure, but also the items stored on the shelves.
Please note: To reduce the load on the ceiling, it is advisable to equip the frame of the structure with wall fastenings.
The production and installation of hanging shelves is carried out in several stages:
- After taking measurements, three elements should be cut from a metal corner or profile pipe: the main longitudinal beam, vertical racks and horizontal bars.
- Holes are made on the main longitudinal beam for fastening to the ceiling or side walls of the garage.
- Horizontal crossbars are welded to the vertical posts or secured with bolted joints.
- Using welding or bolting, the frame is attached to the main supporting beam fixed under the ceiling.
- Horizontal crossbars that rest against the wall are equipped with fasteners (corners) for reliable fixation.
- Shelves are cut out of boards, plywood or chipboard according to pre-calculated dimensions. Before installation, they must be perforated and equipped with holes for fastening to the frame.
- Using bolts, the shelves are mounted on the frame.

Hanging shelf system with a load-bearing beam fixed to the garage walls
Please note: If the garage ceiling is made of concrete or other material of sufficient strength, the load-bearing beam can be dispensed with. But in this case, you will have to attach each of the vertical frame posts to the ceiling plane.

Installation of a shelf frame on a concrete ceiling
Wall shelves are made in the following way:
- After taking measurements from a metal angle, profile pipe or wooden beam horizontal supporting beams are cut out for each shelf, vertical posts and horizontal crossbars.
- Horizontal crossbars are equipped with mounting holes and fixed to the supporting beams.
- The beams are mounted on the wall using anchors or dowels.
- Shelves cut from boards, plywood or chipboard and pre-sanded and painted are fixed to the installed frame using bolts or self-tapping screws.

Wooden wall shelves made of wood mounted on a brick wall
Please note: To mount the shelf frame on the wall or ceiling of the garage, it is convenient to use special brackets that are sold in the store. Wooden base the rack is additionally reinforced at the nodes with the help of metal corners or spacers.
Video: self-production of a racking system
Additional amenities in the garage
If the garage is spacious enough, it can be used not only as a warehouse for spare parts, tools, building materials and all kinds of household rubbish, but also as a home workshop. To do this, you need to add devices to the environment that greatly increase the convenience of performing various technical operations. Such devices include:
- Workbench;

Homemade workbench for working in the garage
A workbench is a very useful piece of furniture in a garage, which is a table equipped with drawers, shelves, bedside tables and technical devices for performing various household or repair work(vice, electrical outlet, local illumination, etc.).
- washing;

Washing and hob in a car garage
Washing - practical and useful solution, which will ensure uninterrupted water supply in the garage, necessary not only for washing hands, but also for car care, as well as activities related to indoor cleaning.
- inspection hole;

DIY garage inspection pit
An inspection pit is an extremely necessary device for a garage in which the car will not only be stored, but also repaired.
- vegetable storage (cellar);

Cellar (vegetable storage) in the garage
If there is not enough free space in the house, the garage can be equipped with a vegetable storage facility, in which it is convenient to store vegetables, pickles or foods that require special temperature conditions.
- closet;

Wardrobe built into shelving system in garage
A cabinet built into the shelving system in the garage will not only allow you to neatly place various small items, tools or spare parts, but also limit access to them.
- ventilation, heating, etc.
Ventilation and heating in the garage are necessary if the room is used all year round, and not only for storing cars, but also for performing repair and household work.
Please note: the arrangement of a garage space entirely depends on the needs and financial capabilities of its owner. Moreover, almost any of the necessary equipment for car care or housekeeping can either be purchased at finished form, or make and install it yourself, significantly reducing cash costs.
Solutions Gallery
 A universal wall for storing tools, auto parts and household equipment in the garage. A wooden shelving system for arranging a garage space.
  Storing power tools in the garage on a special shelf
Many useful ideas are born directly in the process of arranging the garage. For example, the racking system can be made collapsible, some of the tiers can be equipped with sides or sections for storing various small items. It is noteworthy that it is very difficult to immediately plan everything that may be needed in the process of car care and solving household problems in the garage. Therefore, it’s worth starting with the most necessary things, for example, with shelves or a rack, a workbench or a cabinet, which will optimize the space in the room and make it easier to carry out everyday work on car and household care.
Many people store not only their car in the garage, but also spare parts, tools, and even canned goods. Sometimes it becomes increasingly difficult to find the right item in the most spacious room. It's time to organize your space and put things in their place. You can go to the store and buy beautiful and convenient shelving, shields, tables with many drawers. But if you have an angle grinder, a drill, or a welding machine, then you can make shelves in the garage yourself.
Not all of the tools listed will be useful. Even metal does not have to be connected by welding; bolts will replace it. In addition, there is another affordable and easy-to-work material - wood. Many people prefer to deal with it or combine it. There are many options for creating a storage system. It is not necessary to repeat exactly what was proposed; you can take the idea and adapt it to your specific needs. Everyone has different chances to acquire what they need, design tastes, and room conditions.
A wealth of possibilities - which shelves and racks are appropriate in the garage
There is a wide variety of designs sold in the store. A wide range of DIY materials are available. Purchase option has an important advantage - the thing remains to be installed in place and filled with tools, spare parts, etc. A homemade product is attractive because it allows you to adjust it to the dimensions of the garage and your needs, and choose the method of execution.
A car enthusiast needs space for a car, for winter and summer tires, a place to store spare parts and various little things. The garage is usually also a workshop where minor car repairs are done. Tools are placed in it, but not in drawers, but so that everything is accessible and you don’t have to waste time searching for the right thing. A shield is ideal for this purpose. The easiest way to organize everything you need is racks and shelves.

The convenience of the latter is that they have different designs and dimensions, so they are suitable for any place in the garage where the owner wishes to place them: a wall, a corner, under the ceiling. They store things that are not needed for work very often. They find in the room separate place for storing various liquid substances. The shelf is made closed or with sides so that the container does not fall on the floor and the product does not spill.
Racks are made using several assembly options:
- 1. Stationary - designed for a specific place in the room. It is assembled and attached almost permanently to the wall, ceiling, or floor.
- 2. Mobile - a cart on casters that allows you to move around the garage. It is important to control the load and not clutter it with too large things.
- 3. Collapsible - the design allows for the ability to be moved to any other place. They also change the height and location of the shelves, width, and layout.
- 4. Hanging – rarely used. Fastening is carried out to the wall and ceiling, which is not always easy and convenient.
- 5. Rotating - resemble a CD rack. Very practical thing for storing various small items - screwdrivers, keys, nuts, bolts, etc.
Wood and metal are used for manufacturing, and occasionally plastic. The most practical designs are combined ones, with a steel base and shelves made of wood or polymers. If the garage rack is planned for a long time, it is made of iron, which has increased strength and durability. It's faster and easier, cheaper to make from wood. To prolong life, they are impregnated with antiseptics, coated with nitro enamels for external works.

When starting to plan actions for the manufacture of shelves, do not forget about the principles of its placement in space. Safety comes first. The design and dimensions are chosen to be convenient for use, without the risk of injury. The dimensions should ensure storage of everything necessary, at the same time stability, and no sagging of the shelves. If the length is too long, they bend under the weight. There is a risk that one day the shelves will break and all the contents will fall.

The racks are planned in such a way that no more than 15 kg of weight will be placed on one linear meter. Based on this, choose the number of shelves, their geometric parameters. When designing products for self-production, they make sure that all the contents of the garage, previously stored on the floor, fit on the shelves. They are made spacious, even with some reserve, because the number of things is miraculously constantly growing.

Maximum length- one and a half meters, or better yet the usual 1 m. For a single shelf, the maximum width is 60 cm, and in a multi-tiered structure - no more than 30 cm. If it is not yet clear how, what and where to place, preference is given to collapsible products. If necessary, change the location and height. They can later be easily converted into stationary ones.
A rack for your garage is designed on paper, using ready-made drawings as a guide, or they are made original project. Be sure to indicate parameters based on the size of the box. This product will fit perfectly into the space. Usually placed along one wall, occupying the entire area. Leave about 10 cm on the sides for ease of installation. The height reaches the ceiling so as not to lose a single centimeter. The design consists of three main elements: vertical posts, shelves, crossbars. To increase the rigidity of the frame, cross members are sometimes used.

The distance between the two main supports is no more than 1.5 m and less for storing particularly heavy items. The material and its rigidity play an important role. In a long rack, intermediate posts are added, which will provide additional stability. The height between adjacent shelves is chosen depending on the items that are intended to be stored. The largest parameters are for wheels. The depth is determined independently. To do this, they provide for what will be placed. Narrow ones are inconvenient for large items, and very wide ones make it difficult to get something you need.
The heaviest and most voluminous things are placed at the bottom, respectively, the places for them are wide and high. The shelves at the top are narrow and low, they are designed for smaller items. The distance from the floor is about 0.5 m, and if you use the standards of furniture makers - 37 cm. This will allow you to sweep, place and remove tires, cans, and heavy spare parts without difficulty. Specific dimensions are developed by the owner, who knows what and where he will store. Professionals recommend making holes in the shelves for ventilation and to prevent rust.
At the design stage, the method of connecting parts and fastening are determined. Welding is used, usually for metal structures, and bolts for wood. Both technologies successfully cope with their purpose, but the first involves the production of a non-separable product. When rebuilding in a garage or moving to another, they are extremely inconvenient to move, and there is no guarantee that they will fit in size. The main advantage is reliability; in order to destroy it, you have to cut it.
Bolted connections do not provide such rigidity, but the structure can always be disassembled and moved in parts to another place. They are used not only with wood, but also with metal, although less often. To ensure the stability of the rack, it is additionally fixed to the wall.
Features of using various materials
Design and practicality determine the raw materials used to make the structure. Metal and wood are mainly used. Cost plays a significant role. Iron is expensive, but if you buy everything in a store, it won’t cost much less than buying a ready-made rack. Various leftovers available at home, as well as recycling collection points, where they sell at prices slightly higher than they accept, help out. Wood is cheaper, but it requires high-quality wood; it won’t work with many knots.

Plastic is used to store small items. It is suitable for individual shelves and in combination with other materials on shelving. The big disadvantage is that it is fragile, breaks easily and is damaged. It is not advisable to store metal objects or tools.

Garage conditions are not conducive to long-term operation wooden products. With constantly high humidity, frost, and sometimes heat, wood is not comfortable. The material is treated before use protective compounds against mold, pests, fungi. It is better to take hardwood, such as oak. It is more difficult to work with, but it is very strong and durable. For connections, instead of nails, it is advisable to use self-tapping screws, which prevent the structure from becoming loose. Several methods are used:
- standard for carpenters - in a quarter or half-paw;
- butt with reinforcement metal corners, overhead plates;
- bolted - you will need a drill to turn the holes.
The racks are equipped with 50×50 mm timber, and the crossbars are the same or slightly thinner – 50×30 mm. Suitable for flooring:
- boards from 20 mm;
- plywood 10 mm or more;
- laminated chipboard - the ends are treated with silicone to protect against moisture.
For a metal frame use:
- 1. Angle 3–4 mm thick with a shelf 25–45 mm – depends on the planned load. Very durable material, heavy, expensive.
- 2. Profiled pipe with dimensions for racks 40x40 mm, for crossbars - 40x25. The metal is thinner, but more difficult to bend than angle iron.
- 3. Combination of materials. The racks are made from a rectangular pipe; corners are used for the crossbars.
Metal racks are assembled in one of the following ways:
- weld;
- connected with bolts;
- use crab systems.
When preparing metal for welding, it is not necessary to trim it - it takes a lot of time, and there is not much difference with a butt joint.

When bolts are used, the shelf and side panel assemblies are mounted separately, then assembled into a single unit. It is advisable to tighten 2 bolts in each place to eliminate play. Crab systems are two plates with recesses for pipes. They are placed in grooves and then tightened with bolts. Such a product will not withstand heavy loads, but it saves a lot of time on preparing holes.

A profiled pipe is easier to process - it is thinner than a corner. M6 or M8 bolts are used; it takes a lot of effort to make holes with an electric drill. Proceed this way: first use a drill of a smaller diameter, then expand it with a thicker one. The tool will have to be constantly sharpened or replaced. To make them less dull, periodically cool them with water.
Product options for storing tools and accessories More often in car boxes you can find wooden racks made by yourself.
- This is explained by a number of reasons:
- the costs incurred are less than for metal ones;
- assembles quickly and easily without welding;
serves for a relatively long time, the strength is acceptable. Steel rack is the most reliable design . It is more expensive compared to those made from other materials, but it is very strong and durable. Cheaper when used for shelves natural wood , or slabs from it. The easiest way is to make shelves on which to conveniently store tools.

other items. The only requirement is that they should not sag from the placed load.
- Assembly sequence for a simple wooden rack:
- 1. Cut blanks from timber for vertical posts. For crossbars, thinner slats or boards are used. 2. Assemble the sidewalls and form the frame. Connect with one of available ways
- , which are described above. 3. Shelves are made from chipboard according to size. To prevent them from swelling from moisture, the ends are carefully processed. They are attached to the crossbars with self-tapping screws; for reliability, metal corners are used.
- 4. The entire structure is treated with an antiseptic and primed. Cover with varnish or paint.
When there is metal on the farm, a steel frame is made. It will last longer, and the shelves can be made of wood. Use rectangular pipes, and for crossbars - a corner. They are welded to the racks, but to make the rack collapsible, they are screwed on. This will allow you not only to move the product to another place, but also, if necessary, to change the height of the shelves.

Prepare the parts and assemble the rack in the following sequence:
- using a grinder, cut the necessary elements to size according to the drawing;
- the locations of the shelves are marked on the racks;
- they are welded or bolted together, controlling the right angle so that the structure does not come out crooked;
- Traces of corrosion are removed from the steel frame (with a brush, rust converter) and painted;
- Shelves are cut out of wood, painted, and left to dry;
- secured to the frame with bolts.
Regarding the last operation. It is much more rational to weld the corners end-to-end to the vertical posts, so that its shelves look inward. Then they simply lay pieces of boards, chipboard, and plywood on them. They will hold securely without additional fixation.

A practical option a stationary rack that does not stand on the floor, but is mounted on the wall. The material does not matter, the technology is identical:
- Markings are made for fasteners, holes are drilled, dowels are driven in;
- pipes or beams are cut to size;
- racks are attached strictly vertically to the wall;
- they are connected to each other by longitudinal crossbars according to the height of the future shelves;
- they make a similar front part, only it will stand on the floor;
- The two parts are connected to each other, the shelves are laid and secured.
These are general diagrams of garage shelving. It is impossible to foresee all the options - as many experts as there are so many solutions. The main thing is not to be afraid to experiment, use any available materials, and the result will definitely come.

Simple shelves made of wood and metal
Racks require quite a lot of material and are bulky, so they often resort to a less complex option. To make the shelves convenient for use, they are made no more than 1.5 m wide, up to 0.6 m deep, and 0.3–0.6 m high (for multi-tiered ones).

For wooden structure use bars that are marked according to a pre-made diagram. The racks and frame are made from them. Planed boards and plywood are used on the shelves. Secure with self-tapping screws and corners.

Volumetric and massive equipment is stored on metal products, so welding is preferred. The blanks are cut to size and joined into a continuous structure. Shelves are made from sheet steel or wood.

All different hanging models mounted on the wall or ceiling. They are installed on anchors, which allows them to be removed and moved to another location. Ceiling ones are located near the ceiling on which they are fixed. They are suspended from hooks or anchors embedded in the ceiling. Usually such shelves are easily removed. They are not very popular; they are built when there is not enough space. They are not suitable for storing heavy and bulky items because they are unstable.
Step-by-step instructions for creating shelves in the garage are presented in the video.

The main purpose of a garage is to store cars. However, this does not prevent car owners from using it for other purposes: storing canned goods, tools, household appliances, unnecessary items, and car parts. Over time, mountains of various household supplies accumulate in the room. The garage is slowly turning into a chaotic dump, and there is less and less space. This is a sign - it’s time to properly organize the space by installing shelves in the garage. They will allow you to rationally place things, save useful space, and improve the interior of the room.
Garage with convenient system storage when everything is in its place
Making garage shelving with your own hands is quite simple. You need to prepare tools, buy some materials, and free yourself a few hours from work. In this article we will look at detailed instructions, some tips, and recommendations for arranging such a structure.

Shelves with storage shelves

Permissible loads on homemade shelves to the garage
Before planning the shelves for the garage, you need to determine a more convenient way to attach them. Today, the two most popular methods are welded and bolted. Welded technology is usually used for metal structures, bolted - for wooden structures. Both technologies work well. Such garage shelves are easy to use and can withstand heavy loads. However, they have some disadvantages.

One of the options for shelving with a frame made of profile pipe and plywood shelves
Welded shelves are non-removable. If the layout of the garage or its purpose changes, simply disassembling the product will not work. Transporting welded shelves is also inconvenient. Their weight can exceed one hundred kilograms. The main advantage of this design is its reliability. Welding seams firmly fix the elements together. It is not at all easy to achieve their destruction.

It is better to connect a wooden garage rack using nails rather than self-tapping screws, so they are less likely to come loose
Bolted racks are less stable. They cannot provide sufficient rigidity. For stability, the structure must be additionally attached to the wall. However, this method of fastening has a significant advantage – mobility. The shelves can be disassembled, assembled, and made into hanging shelves various sizes. It is impossible to give a definite answer to the question which technology is better. Each person will have their own parameters that are important.
Deciding on the design

Scheme of a simple garage shelving
Making your own garage shelving is quite easy. The most important thing is to clearly define own desires, needs, plan the design, type of construction in advance. Anyone can do such tasks, especially if they have a great desire to do something with their own hands.

Drawing of a rack made of pipes with wooden shelves
The design of the racks has three elements: vertical posts, shelves, crossbars. In some cases, transverse tightening is used. They are not required. They are needed only to increase the rigidity of the frame. To determine the exact design option for the future rack, follow these recommendations.
- The depth and height of the shelves are arbitrary. These parameters are selected only based on the purpose of the niche. Each shelf can be designed to store a specific type of item. It is better to decide all this in advance;
- The distance between the vertical posts must be selected based on the rigidity of the material. For very heavy accessories, the distance should be about 1.5 meters. For rack long length you need to prepare intermediate vertical posts. They will make the system more resilient;
- The lower shelves should be at some distance from the floor. Approximately 50-70 cm. Should be stored on them heavy objects. Optimal height the remaining shelves will be 37 cm. This is the most rational height, often used in the manufacture of any furniture structure.

Drawing of a metal rack for a garage
It is always easy to decide on design features. Garage owners simply take into account the dimensions and features of the things that will be stored in the structure.

Option for small garage with a workbench
It is a little more difficult to choose a product design. The garage is intended for practical purposes. However, this does not mean that its interior should be boring and ugly. Can be easily done in a garage attractive interior for little money. In particular, you can decorate the design of the shelving regular paint. Today there are paints designed for any material. The color for painting should match the overall color scheme premises. Colored plastic boxes for storing accessories and tools will become a kind of decoration. They are inexpensive and allow you to create perfect order.

Transparent and multi-colored plastic boxes for garage shelves
Choosing material

Durable metal shelves for the garage

DIY wooden shelves in the garage
The choice of base material plays a huge role in the design, stability of the frame, and practicality of operation of the structure. The rack can be made from different raw materials, which have their own advantages and disadvantages. Let's look at the main types of materials and their features in the table.
| Material | Advantages and disadvantages |
| Metal | Many car owners prefer metal for its durability. This material is durable and can withstand heavy loads. It can only have a negative impact high humidity. In normal climate metal constructions will last almost forever. Another advantage of such raw materials is ease of care. The products will need to be periodically simply wiped with a cloth to maintain cleanliness. The main disadvantage of metal is its high price. However, many people have unnecessary pieces of metal at their dachas or with friends. Docked metal elements usually with the help welding machine. It is not recommended to use it without proper experience. |
| Tree | Wood is a noble, useful raw material. It makes excellent hanging shelves, racks, and storage systems. Wood has a very beneficial effect on respiratory system human, has an attractive appearance, and is easy to process. When making storage systems, you can use oak, pine, and birch. The frame should be secured only with metal bolts. Wood is relatively inexpensive. It can be purchased at any construction hypermarket. The downside of this option is that it is difficult to care for. The tree gets dirty, can darken, and rot. It should be constantly looked after. This is not always convenient. To reduce such negative consequences It is recommended to use special impregnations. |
| Plastic | A good option for storing various small items and light-weight accessories. Plastic began to be used for making shelves relatively recently. It can withstand no more than 75 kg. This is worth considering! The advantage of plastic is light weight, mobility, ease of care, low price. The downside is fragility. It is easy to damage and beat. For storage metal tools plastic will not work. |
| Combination of two materials | For example, wood and metal. This is an excellent option for creating a multifunctional storage system. This way you can save money, diversify the design of your garage, and simplify the process of manufacturing the structure. You can combine almost any type of raw material. |

Metal rack, collapsible with plastic containers
The benefits of making it yourself
Many people ask a completely logical question: is it better to make shelves in the garage on your own or buy ready-made option On the market? Let's look at the main advantages self-creation garage storage system.

Collapsible racks have an aesthetic appearance and are convenient for installation and dismantling
Possibility of developing a unique design. For many car owners, a garage is a real pride. I don’t want to put ugly furniture in it. Standard shelves are also not very attractive. In this case, you can take on the work yourself by inventing unique design. Ideas for implementation can be found on the Internet. But it’s better to give free rein to your own imagination.

The idea of arranging a garage from the inside with your own hands
Making hanging shelves and racks on your own is not as difficult as it seems. Any man with at least minimal experience working with tools can do this task.
The manufacturing process will not take much time. Lack of free time is the main reason why car owners buy garage furniture in a store. However, manufacturing a storage system does not require a huge amount of time. It’s enough to set aside a few hours and call a friend for help.

Homemade shelves and racks for the needs of the garage owner
Shelves can be made according to personal plan. Only the car owner himself knows what size, depth, height he needs the shelves. Find perfect option It's almost impossible to find in a store. Everything is standard in hypermarkets. It’s better to put in a little effort, spend time, but create the most practical thing possible.
Small financial costs. Warehouse furniture is quite expensive. Even the simplest models will cost a large sum. Self-production – The best decision in order to save money. Many of the necessary spare parts can be found on your farm.

Wardrobe built into shelving system in garage
Required Tools

Necessary tools for making shelves
To ensure that the process of making shelves takes a minimum of time, you should prepare the tools in advance. You don't need much: a set wrenches, pliers, hacksaws for wood, metal, hammer, screwdriver, hammer drill, jigsaw, grinder. Almost any good owner has all of the listed items. The selection of basic materials will depend solely on the choice of each individual. It can be plywood, metal pipes, bars, chipboard, plastic, and much more.

Popular options for shelves for storing tools in the garage
Manufacturing process: step-by-step instructions
- Preparing the work site. Making a rack is a dusty job. Need a lot of space. To do this, it is better to remove the car from the garage. Tools and expensive items should be covered with film. Next, you need to prepare the tools and put them nearby. It is advisable to enlist the help of a friend. Together, the work will be completed as quickly as possible.
- Preparing a plan. For ease of work, it is better to draw a plan of the rack in advance on a simple piece of paper. You should also note the measurements of each shelf there. When preparing a plan, you need to take into account the specific things that will be stored on the shelves. Don't have to do it standard design. Several different elements can be combined in one system.

Holders and mesh shelves

Installing mesh shelves on the side wall of the garage - quick option for light objects
- Purchase of basic raw materials. It can be wood, metal, plastic. When choosing, you should take into account the characteristics of the material, its maximum load, and practicality. When purchasing, do not save money by choosing raw materials Low quality. It will not last long and will bring a lot of problems during operation.
- Cutting frame elements. The main elements can be made of a wooden block, a steel angle, or an ordinary pipe. Racks, amplifiers, crossbars are cut using a jigsaw or circular saw.

We start making the rack from the base
- Applying markings to racks. Vertical elements need to be marked. This will help in the further installation of the crossbars.

Making grooves for shelves using a router
- Drilling holes. Using a drill, make neat holes on the markings. This is typical when using bolted fasteners. When choosing a welded frame, all elements are joined with seams. Without proper experience, the seams may turn out unsightly. It is also important to follow safety precautions when working with welding. You should read more about this in the instructions for the welding machine.

We install the shelf in the grooves and additionally fasten it with self-tapping screws
- Making the shelves themselves. For them, plywood, boards, and chipboard are usually chosen. It is important to follow the measurements exactly.
- Assembling the frame, fixing the shelves on the frame. The frame is assembled gradually: first the side posts, then the crossbars, then the amplifiers. Only then the shelves. They are fastened with bolts and self-tapping screws. The fastening must be strong.

Installing the rack on the base
- Making it attractive appearance. The finished rack can be painted, decorated with designer forging, or covered with film. The choice of designer accessories is purely individual. At the same time, you just need to remember about practicality.
Video: DIY garage shelving. Collapsible / Demountable Garage Storage Shelves. DIY.
Not every car owner or master has the opportunity to have a spacious garage or workshop and store all the tools and small spare parts in it, and this causes a lot of inconvenience. Sometimes rooms are so small that it is impossible to place ordinary shelves near the walls. There are very original solution The problem is making them hanging. They are placed along the walls only in the working position, and the rest of the time they are attached to the ceiling. The only condition is that you must have at least basic carpentry skills.
Required materials and tools
For manufacturing you need a circular saw, you can use a hand saw or an electric jigsaw. You need a drilling machine, a drill, a set of drills, wood glue and a set of hardware for fixing the elements. Such shelves are mounted in unheated rooms, the dimensions are consistent with the pitch and width of the rafter beams.Shelf manufacturing process
Draw a sketch of the shelf detailing each element. You will need a few details.1. Base. The length is equal to the height from the ceiling to the floor.
2. Bottoms and sides of drawers. Dimensions are selected taking into account the expected number of tools and spare parts. The distance between the shelves is approximately 30 cm, the amount is a multiple of the height of the shelf. In our case, 8 boxes will be installed.
3. Details of the stop fixed to the wall. In our case there will be two rows of boxes, we must keep this in mind when drawing up the sketch.
4. Partitions, turning bars, etc.
The number and nomenclature of elements may change taking into account the model you personally come up with.
First stage

Work begins with the manufacture of part of the shelves fixed to the wall. Using a circular saw, cut a large sheet into pieces and prepare all structural elements.

Cut off part of the sheet, it will be firmly nailed to the wall, cut out six elements to fix the three load-bearing brackets. Our plywood is thin; it will be glued together in the future to increase the strength of the parts. Accordingly, not three, but six parts are required.
Drill holes in them for the rolling axis, cut off the corners that will interfere with lifting. Holes are made in all parts; after gluing, their depth doubles. Before drilling, the parts are firmly fixed, in this way coaxiality is achieved.


Due to the fact that the shelves are movable, one corner must be cut so that it does not touch the base while lifting the structure. The boxes are fixed with special elements, which, when lifted, constantly keep them in a horizontal position. If you do not remove the corners, they will rest against the wall of the shelf and the device will not function. You can cut along a radius or a straight line, it doesn’t matter. The main condition is to ensure free rotation.
Proceed to assembling the blanks into a single structure. First, attach two strips to the shield, and then fix the sides. It must be secured with dowels and self-tapping screws, and special carpentry fixed nuts must be inserted into the holes of the axles. Attach the assembled part to the wall; use a level to maintain horizontality. It should be fixed very firmly with dowels, check the reliability. The part must support your weight; it holds the entire structure.


Second phase

Start sawing the parts for the pivoting drawers, but you need to remove two corners of the sides. Side walls will be double, accordingly, it is necessary to double the number of blanks.
Assembly is done according to the method described above; you can only use self-tapping screws, but then it is recommended to increase their number.
The finished boxes will then be attached to the back panel of the shelf and will be able to constantly maintain a horizontal position when it is lifted. This effect is achieved by the peculiarities of their fixation.
The back side of the drawers is attached to the back wall with piano hinges or any other hinges; they create a movable fulcrum. On the opposite side of the box there is a through hole for the second axis of rotation.
Sanding machine treat the surfaces of the drawers, attach the hinges to the bottom.
Prepare long planks. They will be located on the sides of the drawers and fixed to them with hinges. The length of the slats is equal to the length back wall.

Drill holes for the hinges. In our case, a plastic pipe is used as a hinge; the same holes should be prepared. The location of the holes depends on the distance between the boxes.
Attach the hinges of the drawers to the wall, place them evenly and in such a way that they do not touch each other when turning.

Insert the pieces into the holes plastic pipe, they perform the function of hinges perfectly. The length of the pipe is equal to the total thickness of the walls of the boxes and long slats.


Connect the two outermost elements and check their functionality: raise and lower them. They must make all movements freely and remain in a horizontal position at all times. There are problems - fix them, everything is normal - start assembling the shelves.
Assembly
At the top of the wall, fix three strong hinges and screw them to the element installed on the wall.
Screw the first drawer onto the hinges to the end of the bottom of the wall.

Insert plastic tubes into the holes and place two long strips on them. They are the ones who hold the boxes in place. vertical position when lifting the shelf to the ceiling.


Insert all the boxes into the tubes one by one and screw them with hinges to the wall.


If there is any doubt about the strength plastic tubes, then you can make a wooden axis, the outer diameter must correspond to the nominal diameter of the tubes. Cut the axle into pieces of appropriate length and hammer into the tubes.


If the corners of long planks abut when lifted, then their corners must also be cut off. To improve appearance, treat with milling machine. You can immediately increase the diameter of the holes slightly. The tubes in them should rotate freely and sit rigidly in the walls of the boxes. To reduce friction, large washers can be placed between the slats and drawers.
Drill holes in the center of each hinge and connect all the elements with countersunk bolts. This will prevent spontaneous separation of the structure. Saw off the long ends of the bolts with a hacksaw, cover the nuts with caps.


Check functionality. Everything is in order - using the same scheme, attach the long slats to the shelf part installed on the wall, tighten with bolts.


To facilitate lifting the structure, gas lifts or springs can be installed. Using the same technology, you can make a second, third, etc. shelf.
It is recommended to nail two stops to the bottom; they will support the structure at the selected angle, which will facilitate access to the drawers and improve the design of the room.
That's all complex work finished. All that remains is to figure out how to fix the shelf in the raised position. But first you need to make a wooden frame and nail it securely to the floor beams.
Reading time ≈ 12 minutes
Original shelves DIY garage projects are presented today with many options and examples with photos. They can become a decoration for the room, as well as a reliable place to store automotive equipment, parts and tools. You can make racks yourself by developing own design taking into account the required size and functionality.
Frame shelves for tires and tools
Functional garage storage system
Not only is it customary to store and maintain a car, but you can also find a lot of places to install shelves and racks. Therefore, today there are many options various designs, varying in material, shape, configuration, size and design.
They should be:
- Durable;
- Reliable;
- Compact;
- Not bulky;
- Durable;
- Functional.
Installing hanging shelves, built-in drawers and modular structures will help bring order to the garage and free up space from an impressive amount of accumulated junk mixed with tools.

Neat arrangement of things in the garage
Why do you need a shelf and rack system in a garage:

Self-made shelves are excellent option creating any design from photos, diagrams and drawings. The main thing is that the room itself is clean, spacious, well equipped and free from unnecessary trash. How best to organize this space:

Where can you install shelf storage systems:
- On the wall farthest from the entrance;
- If the room is large, you can also use the side walls;
- In the ceiling space and directly above the machine position.
Every motorist must remember that all storage installations should occupy no more than 20% of the total space inside the garage.

Optimal organization of the storage system - 1. Open brackets and hooks, 2. Rack for tools, 3. Shelves for spare parts and wheels, 4. Rack for large tools, 5. Cabinets, 6. Workbench
Types of structures
The garage can store everything from car accessories to carpentry tools and other small items. All parts that do not have enough space in the pantry and on the mezzanine must be neatly folded or placed on wall shelves or stationary racks.
Based on the type of assembly, structures can be of the following types:

Special attention should be paid to shelves intended for car spare parts, namely rubber tires and wheels. This design is:

Experts advise storing tires near the ceiling space on the upper tiers so as not to clutter the garage. To free up useful space, you can mount a rack with several shelves at once. Some people hang the wheels on the wall itself, hooking them onto a screwed-in lock.

Folding corner shelves for seasonal tire storage
According to the material they are distinguished:

When developing storage systems, you should take into account the dimensions of the garage space, the purpose and functionality of all installed shelves.
According to the method of fastening the structure, there are:

How to make original stable shelves for the garage with your own hands is shown in the video from step by step instructions from the master.
If you are planning to make garage shelves and racks yourself, have chosen the material and location, it’s time to make markings taking into account all sizes.
The assembly stages of any design are as follows:

Why is it better to assemble the structure yourself rather than purchase it? ready set on the construction market:

When creating products with your own hands, you can develop a unique design and make a structure according to individual parameters. If you follow all the rules and strictly follow the instructions of the craftsmen, the shelves and racks will turn out attractive and practical. The assembly process is shown in detail in the video below.
DIY tool shelf
This product will undoubtedly be useful around the house, as well as for plumbing and repair work in the garage. A special shield will serve as a place to store and secure essential items and small tools. The installation height is selected according to the height of the owner to increase comfort of use.

What you will need to assemble it yourself:
- Plywood board or chipboard up to 2 centimeters thick;
- Shelf material;
- Anchors to secure the entire structure;
- Brackets to fix the product on the wall;
- Electric jigsaw;
- Drill;
- Building level;
- Tape measure for measurements;
- A hammer drill with a nozzle and drills for making holes;
- Hooks for attaching tools and parts;
- Set of self-tapping screws.

Option for making a shelf-shield
Manufacturing stages:

The last step is to make holes with a hammer drill into which all the anchors need to be driven. If the installation of the shelf on the wall is successful, it’s time to arrange and hang all the parts as planned.

Garage wheel rack
Tires with this design can be stored on their edges. In this case, the shelf itself must be fixed upside down so that the fastenings on the side hold the wheels.
- Using an anchor, triangular-shaped fasteners are fixed;
- The evenness of the line can be checked with a level, and the distance between the side fastenings can be measured with a ruler (it should be 50 or 100 centimeters);
- To prevent the shelf from falling under the weight of the tires, you should choose sufficiently thick and long dies. The structure is fixed from above, after which the surface can be painted in any color (in our case, white) and the product can be allowed to dry thoroughly.
Such a holder can accommodate from two to four wheels, it all depends on the selected parameters and individual preferences.

Homemade shelf for seasonal storage of tires or tools
Additional accessories
In addition to storage systems for tools, a home workshop and car parts, the garage can contain additional amenities. Among them are:

Garage shelves made of practical wood or durable metal, made with your own hands according to variants of drawings and diagrams with photo examples, will become a real decoration of the room. After all, sometimes from a couple of oak boards and available materials you can create a real masterpiece that will amaze the imagination. The construction of a durable rack is shown in the video master class with step-by-step instructions.