DIY lampshade drawing for a table lamp. How to make lampshades for table lamps with your own hands. Fabric lampshade decoration
Read also
Cozy evenings with a book in your favorite chair, soulful tea parties with family in the kitchen, romantic dates with loved ones... And above all this is a familiar, familiar, traditional lampshade for table lamps, a wall lamp or a floor lamp standing on the floor.
Beautiful lampshades made by yourself become noticeable and irreplaceable interior items. They bring a touch of romance into everyday life and fill the home atmosphere with warmth and beauty.
The material for making a lampshade can be fabric, paper, or beads. By showing imagination and patience, you can transform an old lamp shade with your own hands beyond recognition. Such an exclusive element will make the interior individual and truly homely.
Master class on making a lampshade with your own hands
A popular material from which to make a lampshade with your own hands is fabric. Linen, silk, denim, organza - any option.
A whole piece or strips of material will do. You can simply cover the frame with printed fabric and make it plain with embossed flowers from the same material.
It is important to understand in advance where exactly your lampshade will “live”. A romantic environment requires an appropriate “companion,” while strict minimalism requires another.
Expert advice: As a basis for the lamp, you can take the frame from an old lamp. Making it yourself from stiff wire is also easy. And it’s worth choosing energy-saving lamps so that the fabric doesn’t catch fire.
How to make a beautiful lampshade with your own hands?
- We take a finished frame, for example, with a ring diameter of 20 centimeters on top, thirty-six centimeters on the bottom, and twenty-eight centimeters in height;
- select the fabric and cut it into strips, each four to five centimeters wide; only about twenty-five stripes;

- the edges of the tapes must be smooth;

- iron them well with an iron;
- wrap one edge of the ribbon around the top ring and sew it on by hand;

- now we take it down and wrap the lower ring, and again the upper one;
- when the strip ends, we secure its edge by sewing it to the fabric;

- take a new tape and continue;
- when the entire frame is wrapped, we sew “belts” for the edges;
- to do this, we take two strips of material of a different shade and cut out two strips from it, each length is thirteen centimeters, width is ten;

- iron the ribbons, bending the longitudinal edges 2.5 centimeters to the wrong side;

- then bend the strip in half;
- glue double-sided tape onto the frame hoops;

- We glue a strip of fabric onto it, slightly cutting its edge along the way so that the material lies as evenly as possible;
- We bend the second edge of the tape onto the inner surface of the case and also glue it with tape;
- In this way we decorate the top and bottom of the frame with “belts”.
You can make a border from crocheted ribbon or ruffle.
DIY lampshade made of plastic and fabric
The second homemade lampshade is also made of fabric. You can make it based on an old lampshade. Or you can transform a typical product bought in a store like this:

DIY lampshade. Photo
- the first step is to measure the circumference of the upper and lower rings, as well as the height of the frame;
- add two centimeters from each edge to the resulting dimensions so that the seams can be made;

DIY lampshade. Master Class
- take a sheet of thin plastic and cut out a rectangle or trapezoid from it - the base on which the homemade lampshade will rest;

How to make a lampshade with your own hands. Step by step photo
— cut the fabric to size, use masking tape to glue it to the table;

- glue the material onto the plastic;

Master class - DIY lampshade. Photo
— we bend the resulting part around the frame of the lampshade and fasten its edge with clamps;

- mark on the fabric the place where the seam will go;

- remove the paper clips and glue along the marked line with glue; press the joint with something heavy and let it dry;

Homemade lampshade for a lamp. Photo
- then we turn the lampshade over with our own hands and glue it inside in the same way;

— now you can glue the connection between the body and the rings;

— when everything is well fixed, remove the clamps;

- decorate the bottom and top of the lampshade using paper tape; glue it so that one edge extends beyond the ring;

— we bend the free edge into the body and glue it;


— fold a strip of fabric of a different color in length to the height of the lampshade and a width of five centimeters in half, fold the edges inward, and iron it;

— apply glue to the inner surface of the tape and glue it together;

DIY lampshade. Step by step photo
- glue the strip to the seam on the lampshade;
- cut out two strips of paper of the same width as the finished strip for the seam; then glue it to the top and bottom edges of the lampshade; fix with clamps; Glue a strip of fabric on top of the paper.
The homemade lampshade is ready.
Ideas for making a lampshade with your own hands with photos
This “floral” lampshade will perfectly complement a romantic interior.

A little imagination - and the bouquet with variegated roses is ready.

Delicate tones create a romantic mood.

A frill of white roses is the perfect complement to a strict, simple design.

This wonderful lampshade brings back memories of grandma's napkins.

These origami-style lamps will look good in a minimalist interior.

Another representative of the ancient Japanese art of creating masterpieces from paper.

Light green-blue strokes will fit perfectly into the design of green tones.


A beautiful lampshade made from postcards or pictures of a castle
 You will get a beautiful and original lampshade. We will need a picture of locks, scissors, tape, a cutter and a small lamp (lamp).


Lighting plays an important role in the home. A well-chosen light source is a combination of the correct brightness and power with the beautiful design of the lamp. A good solution would be a chandelier, floor lamp or lamp under a lampshade. But if neither the stylization of the last century nor a modern product is suitable for the interior, you can make a lampshade with your own hands!

Popular materials
Interior elements made according to an individual project are conveniently and beautifully integrated into the home environment. They are made from those materials and in those colors that are combined with the design of the rooms and are key to a particular style direction.

But appearance isn't everything. Any product must not only match the interior, but also perform its functions. Before learning how to make a lampshade with your own hands, it is important to determine what to make it from. The choice of materials is influenced by the following nuances:
- Lampshade location. Several options are common: ceiling lamps, floor lamps on a high leg, wall-mounted, table lamps. It is difficult to imagine on a bedside table the same dimensional structure as under the ceiling. In turn, a small bedside lamp will not cope with the functions of a chandelier in the living room.


- Dimensions. The larger the diameter of the lampshade, the more difficult it is to make it from small elements. If you only need a meter of material for a fabric lampshade, then for a shade made of ice cream sticks you will have to eat more than a dozen popsicles.


- Purpose. Lampshades are suitable for many occasions. They create a romantic setting for a date, a cozy intimate setting for friendly conversations, and add zest and lightness to the interior. The more light a room requires, the thinner and lighter the materials should be; the darker the lighting is planned, the denser the materials and the more saturated the colors.


- Price. Not all materials will be cheaper than purchasing a ready-made lampshade. Thus, lace, velvet, and some other noble fabrics are many times higher than the cost of a product made from scrap materials.
Lampshades made of fabrics, leather, various types of paper, fragments of wood, ropes and ribbons, beads, and metal are very popular. No less common are products from “junk” items and “alterations” that have received a new life.


Textile
Not every fabric is suitable for sewing a lampshade. Conventionally, it can be divided into two types: transparent and dense.
Transparent is intended for chandeliers and floor lamps that need to illuminate a large area. This fabric allows you to create beautiful designer lampshades without compromising the technical characteristics of the lighting. Light veils, airy items made of thin lace, and “knitted” openwork lampshades are suitable.
Transparent fabrics should be kept at a great distance from incandescent lamps, and lace fabrics should preferably be starched so that they retain their rigid shape even without a frame.


Thick fabrics are needed to create a chamber atmosphere. These include satin, jacquard, linen, matting, flock, silk, staple, fabrics with photo printing. There is also a fabric on a lighting canvas intended exclusively for lampshades of geometric shapes.
Thick fabrics are more variable in terms of design. They come in any desired shades and can have a pattern: geometric patterns, various types of cells, subjects, birds and animals, floral and plant motifs. Separately, it is worth noting leather products, corrugated fabrics and the possibility of using adhesive tapes and ribbons to form folds of any shape.


Repurposing old things will help you save on creating an original fabric lampshade. You can use holey jeans that you didn’t dare throw away, a sweater that moths have eaten, pieces of burlap and any worn-out clothing.


Tree
In the design of lamps, the base is often made of wood, while the lampshade requires less heavy materials. However, this does not prevent the use of small, light wooden parts of non-trivial shapes to create a lampshade.

These can be wicker products made from strips of wood (like a basket or box), flexible thin branches (willow, hazel, birch), thin wood cuts with a diameter of up to 10 centimeters, strung on ropes like curtains for a doorway. A lampshade looks more original, the frame of which is made from an old trash can, and the shade is decorated with even rows of wooden clothespins. Budget options include a lamp decoration made from sushi sticks or a simple and elegant lampshade made from a knitting hoop.


Solid wooden lampshades are also found on the market. These are the thinnest cylinders that retain the texture of wood and transmit light, but they are difficult to manufacture and require some carpentry skills. In addition, due to the material and production technology, they are highly expensive.
Metal
When many people hear the phrase “metal lampshade,” they associate them with bulky candelabra under the ceiling of Gothic interiors, but modern technologies make it possible to produce elegant and laconic products from aluminum and metals with similar properties. They have a variety of shapes, dome depths, and can be solid or consisting of only “ribs,” like a bare frame.

You can easily make a budget option with your own hands from wire (aluminum or copper). Aluminum is larger in diameter, suitable for products of fancy shapes, but without decorative elements. Copper wire is thinner and more flexible. It produces not only intricate lampshades, but also beautiful decor of any degree of complexity. The finished wire product can be painted entirely or in separate fragments.
To give the wire the desired shape, use a small bucket, a salad bowl on a leg, a shaped vase, a fruit basket, or any other item that can be wrapped around the top and then removed.

Another option for home creativity is a coin lampshade. If you have old money from the Soviet era at home, then these depreciated rubles can be turned into an original lampshade if you glue them together with edges using superglue. Metal circles of different sizes should form a deep bowl into which the light bulb will fit.
It is important to consider that this is painstaking work, and you will need a lot of coins even for a small product, so you should not choose this option for decorating a chandelier in the living room. But it will be very useful as a decorative decoration for a table.


Gypsum
Plaster lampshades are a rare occurrence. Semicircular and figured sconce lampshades are more often used in interiors in a historical, especially antique, style.
It’s not difficult to make it yourself. All you need is a plaster mixture, water, a medical bandage and a base on which the future lampshade will be formed. The work is carried out using the papier-mâché technique, only instead of pieces of paper, small fragments of bandage soaked in a plaster mixture are used.
After drying, the plaster product will be textured and uneven. It can be left like this or sanded with fine sandpaper until smooth.


Plastic
Finished plastic products amaze with a variety of shapes, sizes and colors. No fewer original plastic lampshades can be made with your own hands, using household items from this material. Among the popular ones are products made from bottles, cups, disposable spoons and straws. The most convenient are large-capacity drinking bottles.


Colored plastic is used to cut out small parts. For example, you can make leaves, circles, ovals, diamonds, and then attach them to the frame. Transparent plastic serves as the basis for painting with acrylic and stained glass paints.
From bottles of 5 liters or more, you get a finished lampshade if you cut off the bottom part of the container. The remaining top already has a hole for the cartridge, and the lower edge can be cut off, set on fire (heated plastic takes on bizarre shapes), and trimmed with another material. All that remains is to apply the drawing.


Paper
Paper lampshades are one of the cheapest, most convenient and easiest to make. They are lightweight and versatile. As with textiles, they can be more transparent or dense.
Lightweight and transmitting a lot of light, such lampshades are made of parchment or rice paper. Before cutting out the parts, the sheets must be smoothed with an iron. Thick lampshades can be made from cardboard, wallpaper, newspaper pages using the papier-mâché technique.

Threads
The most popular and simplest option is a product made from threads (string, sisal, twine, jute), which are soaked in a large amount of PVA glue and wrapped around a balloon or inflatable ball. Due to the fact that when the glue dries, it becomes transparent, there will be no marks left on the threads, even colored ones.
A rougher-looking and more complex lampshade is made from braided clothesline or rope. It will not be possible to give it a round shape, but a classic semicircular, cone-shaped or cylindrical lampshade will be ideal for nautical-style rooms and loft interiors. Wicker lampshades made of wicker, twine, and macrame technique also look interesting.

Available materials
With good imagination and skillful hands, you can make a lampshade from less pliable materials: beads, seed beads, scraps of satin ribbons, used disks, shells, book sheets or unnecessary music notebooks, corrugated cardboard, cupcake tins and many other little things that are no longer used.


Style direction
Choosing a specific style direction for interior design requires adhering to it even in the smallest details:
- If the interior is dominated by one of the classic trends, you should give preference to high-quality materials and noble shades. Suitable fabrics, lace, bronze, gold and silver elements, graceful shapes, white, beige, burgundy, emerald, brown, as well as ivory and shades of precious wood. A lampshade that looks as if it was inherited from an intelligent great-grandmother will look especially advantageous.


- Ethnic design implies the presence of the national flavor of a particular country. European styles tend toward primness and elegance; the Asian region is more characterized by lightness, airiness, and simplicity; oriental style embodies fairy-tale motifs, bright colors, precious jewelry, and a combination of a large number of shades.

- Russian style, contrary to ideas, is not a heap of national symbols, but wealth, solidity, beauty and good quality; American - freedom of expression and original materials, for example, a lampshade made from tabloid pages.

- Styles, close to nature, favor natural and simple materials - wood, straw, coarse threads.


- Modern directions free from restrictions as much as possible. They allow the use of absolutely any materials, waste items and the most unexpected solutions: lampshades made of rope, candy wrappers, used discs with a mirror surface, paper cups and cocktail straws. And these are just a few variations on the theme.


Master class on making
At first glance, making a lampshade yourself may not seem like an easy task, but a detailed description will help you figure it out in a few simple steps. The easiest ones to make include frameless products made of paper, twine, and lace.
To assemble a paper accordion lampshade for a chandelier, floor lamp or table lamp, you will need:
- Prepare a piece of paper (or wallpaper) 150 cm long and at least 30 cm wide;
- Using a simple pencil along a ruler, outline the “edges” of the accordion, 3 or 5 cm long;
- Assemble the accordion, focusing on the outlined lines;
- Using a hole punch, make holes in the lampshade along the upper edge and insert a ribbon or string into them to adjust the width of the upper edge of the lampshade;
- Glue the two ends of the accordion with superglue.

To create the most popular spherical lampshade You will need: 20-25 meters of cotton-linen thread (thick) or soft rope, scissors, PVA construction glue, water, a container for glue, a marker, a thick one-color inflatable balloon, medical gloves, Vaseline, a base for a lamp.
Actions are performed in stages:
- Prepare your work surface. It is most convenient to perform actions on a table covered with film;
- Dilute glue with water in a ratio of 2 to 1, and lower a ball of thread into the resulting solution. It should be thoroughly wet. If necessary, you can add more solution during operation;
- While the threads absorb the glue, inflate the ball to the desired size, mark a circle around the tail of the ball with a marker, the diameter of which is equal to the diameter of the light bulb. Lightly brush the ball with Vaseline;

- Tie the tail of the ball with a thread and wrap it in a chaotic manner until the threads run out. It is desirable that the weaving be thin and cobwebby;
- When the weaving is finished, the tip of the thread must again be secured around the tail of the ball and the excess must be cut off;
- Hang the ball in a dry place for 48 hours until completely dry. It is important to take into account that glue will drip from it, so there should be a container at the bottom.
- Puncture or deflate the balloon and remove it from the lampshade. The product is ready.


Lampshades made from round lace doilies look incredibly beautiful. They add sophistication and romanticism to the room, and at the same time are very simple to implement.
Since the basis of lace is thread, the manufacturing technology is similar to the previous version:
- Prepare a workplace and everything you need: scissors, white glue without yellowing or transparent, lace or lace napkins, water, a contrasting inflatable balloon without a pattern;
- Dilute glue with water, immerse napkins for decoration in the mixture;

- Inflate the balloon, mark the hole for the light bulb, grease the surface of the balloon with Vaseline;
- Lay out the lace circles overlapping, moving clockwise from the intended hole for the light bulb;
- Leave for 24-48 hours to dry completely;
- Secure the socket and lamp.
Frameless lampshades also include products made from metal, plastic and wooden fragments that are glued together to form a semicircular or round lampshade. For example, from coins, gears, cups, branches.

A frame is necessary for more complex products made from thin paper or fabric. It allows you to assemble lampshades of different shapes, sizes and complexity.
How to make a frame?
The base from an old lampshade is ideal for realizing your ideas.
If it is not there, you can make a new one from the following materials:
- Wire.
- Metal hangers for clothes.
- Plastic containers for drinks.
- Plastic and wicker baskets.
- Embroidery hoop.

The wire frame is the most labor-intensive, but the product made from it is reliable and strong. The main advantage of the wire is that it allows you to give the base any shape: cone, cylinder, square, tetrahedron.
For assembly you need steel wire 2-3 mm thick, wire cutters, pliers (pliers), round nose pliers, hammer, wooden block, sandpaper, enamel for painting, soldering iron.


Progress:
- Straighten the wire on a wooden block using a hammer.
- Cut the wire into pieces in accordance with the diameter of the upper and lower rings and the height of the “ribs” of the frame.
- Clean the finished fragments from unevenness and rust with sandpaper; Using pliers and pliers, give them the desired shape. The classic frame consists of two round bases of different diameters and 4-6 ribs.
- Cut the ends of the base blank at an angle and set them aside.
- At the upper end of each piece of wire for making ribs, make a small buttonhole and thread them into the upper ring of the frame. Distribute evenly.
- Wrap the ends of the wire on the upper ring and the junction of the base with the ribs with thin copper wire, press with pliers and solder.
- Use pliers to bend the loops at the lower ends of the ribs, place the bottom ring of the base on them, adjust the distance, press with pliers, wrap with wire, press again with pliers and solder.
- Cover the finished frame with light-colored enamel so that after a while the wire does not begin to darken and does not leave dirty spots on the fabric lampshade.

A frame made from old metal coat hangers is assembled according to the same principle as a wire one, but requires less effort and is less durable.
To make it, you need to untwist the hangers into long wire strips, from which parts of the desired shape and size are formed using pliers and round nose pliers. You can bite off the excess with wire cutters. The parts are connected to each other using construction adhesive, thin wire or electrical tape.
Empty plastic bottles with a volume of 5 liters or more can also serve as a good base for a lampshade if you remove the lid and cut off the bottom. The resulting lampshade can be painted, painted, and decorated with plastic parts.


Three-kopeck plastic baskets for used paper and outdated wicker baskets provide great scope for imagination. They are almost ready to be used as a lampshade; all that remains is to make a hole in the bottom for a light bulb, and if you use your imagination and decorate them, no one will recognize yesterday’s trash can in the luxurious floor lamp.


The last type of frame is also based on the use of a familiar object in an unusual way. To make a simple and convenient wooden base, you only need embroidery hoops of different diameters. The rings are connected to each other using a rope, braid or cord using any convenient knot or through holes drilled around the perimeter. You can arrange them by size in ascending order for floor lamps and in descending order for ceiling chandeliers.


How to sew from fabric?
To sew a classic fabric lampshade in the shape of a cylinder you will need a pattern, textiles, upper and lower frame rings, PVC film for lampshades or white cotton, textiles and a spool of thread in color, a sewing machine, iron, glue, scissors, clothespins, a wet wipe, weights .

Step-by-step instructions on how to reupholster an old lampshade with new fabric or cover a new frame with a cover include several steps:
- Preparation of the workplace.
- Creating a pattern drawing. It is enough to measure a cylindrical lampshade with a centimeter tape, and a conical one needs to be “rolled” over a sheet of paper to draw a pattern. Having marked the beginning, it is applied to the line on the paper so that it coincides with the mark, and rolled along the sheet, marking a new point at the top and bottom every 3-5 centimeters until the “beginning” mark touches the paper again. A second line is drawn at this point. To the finished drawing you need to add 2-4 cm along the edges, then transfer the pattern to fabric and PVC film. Cut out the part on the film.

- Pasting film onto fabric. It should exactly match the drawing, plus allowances of 3-4 cm from each edge. Now you can cut.
- Assembly. There are two options: sew or glue the cover to the base. The second one is much faster and simpler, so most people prefer it. Assembly begins by securing the lampshade to the top and bottom rings using clothespins or clips. It is important to maintain a uniform distance from the edge so that the fabric adheres well to the base. If the lampshade is fastened correctly, you need to mark the top and bottom edges, and the place where the seam joins at least two points.


- "Stitching." Remove the clothespins, unfold the lampshade, and place it face down on the work surface. Then connect at the marked points and glue with superglue. Afterwards, the product must be turned over and weights placed on the seam so that the glue sets well.
- Edge processing. This is where the allowances left at the beginning will come in handy. They are treated with glue, and then folded inward, around the base ring, and secured with clamps. This must be done alternately with the upper and lower rings.


How to update an old lamp at home?
Restoring an old lampshade will not take much time, and the result will please all the inhabitants of the house. There are a great many variations on the theme: an old children's lamp with cartoon characters can be reupholstered with new fabric and an inscription or patterns can be applied using a spray can through a stencil; in the bedroom you can make a starry sky with backlighting, and the floor lamp in the living room can be decorated with butterflies.
For decoration in the kitchen, decorating with colored paste in interesting shapes (bows, shells, spirals) is suitable. The decoration with lace napkins, metal elements in the steampunk style, and paper flowers looks original.

The decoupage technique using beautiful designs on napkins and special compositions for transferring them to fabric can save an old lampshade. Antique products are created using the same technique.
If the house has gone through global changes, the lamp should also be transformed to match the new style. Romantic light shades, floral prints, straw braids and lace frills will be appropriate in the Provence style, an industrial theme will support a modern interior, chrome surfaces and sharp shapes will fit perfectly into minimalism, techno and hi-tech, luxuriously decorated with beads, pearls, beads, ribbons and lace lampshades will find their place in historical interiors, and paper, bamboo, jute and other natural materials will appeal to lovers of national colors.


Stylish and beautiful ideas for homemade ceiling, floor and tabletop models
Designing an unusual lampshade with your own hands is one of those situations when treasures from the mezzanine and old things from the balcony can find a second life. Thus, colored scraps of fabric and jewelry can turn into a boho lampshade, and rough materials, metal and glass - into decoration for a loft-style interior.


A beautiful ceiling lampshade in a living room or bedroom can be made from lace, paper, large beads, or decorate a cotton base with fabric flowers. The kitchen theme will be supported by lamps made from old utensils, wine corks, cocktail straws, spoons, and bottles. In the nursery, you can make lampshades from halves of a globe, use wallpaper with stars to frame a night light, and decorate the room with bright small lamps in a fairy-tale oriental style.
It is very difficult to part with your favorite things, especially if they are still in working order, but have become worn out in appearance. Therefore, many try to restore such things to their former luster and freshness through repairs, or even make them even more spectacular.
In the case of table lamp shades, this is more than possible. There are a great many options for updating them and even creating them from scratch. You can come up with your own or use the ideas of designers and simply creative people who have already implemented them and shared the result.

How to make a frame for a lampshade
In old table lamps, the frame usually does not undergo such irreversible changes and deformations that it cannot be used to create a new lampshade. But a person may not be satisfied with its shape or size, and then he has to make a new one with his own hands. The question is: how and from what?
The easiest way is to use aluminum or steel wire of such a cross-section that it holds its shape well. The skeleton of the future lampshade is formed from it.
| Stages of work | Description |
|---|---|
| We cut out templates from cardboard for all lampshade diameters. It can be one if the shape is assumed to be cylindrical, two if it is cone-shaped, three or more if it is complex. We cut off pieces of wire and form circles from it according to the template. Twist the ends tightly, using pliers if necessary. |
| We decide on the height of the lampshade and the number of vertical jumpers. We cut the wire for them 8-10 centimeters longer than needed. |
| We bend the excess ends of the wire perpendicularly and wrap them around the upper and lower circle. We additionally fix all joints and mask them with electrical tape. You can wrap it around the entire frame. | |
| If the lamp does not have a stop for the socket, we modify the frame. Why do we first make a wire ring with a diameter slightly larger than the diameter of the cartridge and connect it to the frame posts with horizontal jumpers. |


The frame can also be assembled by welding or soldering. When soldering, it is better to use soldering acid instead of rosin.
Advice. Ready-made items can also become the basis for a lampshade. For example, plastic or metal wire waste baskets, wicker vases or plastic bottles. They just need to cut a hole for the cartridge.
Prices for different types of lampshades
Making lampshades with a wire frame
So, there is a frame, you can think about what to dress it up with. The first thing that comes to mind is new textile clothing.
Fabric lampshades
To make fabric lampshades, you do not need to have a sewing machine or know how to sew. But you will have to make a pattern in any case. What you need is a sheet of newspaper or whatman paper, scissors and tape.
The newspaper is wrapped around the frame, the joint is secured with tape and the excess is cut off from the top and bottom. Then the paper cap is cut lengthwise and the pattern is transferred to the fabric, leaving allowances for the hems.

The edges of the workpiece are folded inward and ironed. Its dimensions after this operation should remain slightly larger than the newspaper pattern.

We wrap the fabric around the frame and glue the joint or carefully sew it with a needle and thread. We wrap the edges at the top and bottom inward and glue them to the frame.
With tailoring skills, you can make a lampshade of a more voluminous shape. And you don’t have to be tricky with the pattern. You need to cut a rectangle out of fabric according to the height of the frame and the length of the largest circle. This is usually the bottom circle of the frame. Of course, don't forget about seam allowances.
We sew the fabric from the wrong side with the short sides to form a cylinder, the diameter of which exactly matches the diameter of the lower part of the frame. Then we bend and stitch the lower edge and put the fabric cylinder on the lampshade. We assemble its upper part with uniform folds, temporarily securing them with pins, fold them onto the upper circle of the frame and glue them. All that remains is to sew a braid or lace strip to the bottom edge and tie the lampshade with a ribbon.

You can also insert an elastic band into the upper part of the fabric cylinder - the appearance of the lampshade will be completely different.

Lampshade from an old knitted skirt. Elastic band inserted on top
In the end, you can simply put a children's skirt of a suitable length on the old frame. It can be sewn from any fabric - calico, knitwear, jeans, organza, etc. The main thing is that the color and style should be in harmony with the interior of the room.


Lampshade made from napkins
Crocheted napkins and capes now seem to many to be completely unnecessary, old-fashioned things. Well, or simply not applicable in the interior of an apartment for its intended purpose. But it’s a pity to throw away items knitted by your mother or grandmother. But you can make a lampshade out of them, similar to a fabric one. Only first, all the napkins will have to be sewn into one fabric, the shape and size suitable for covering the frame.

Advice. To prevent the metal frame from being noticeable through the openwork fabric, paint it, wrap it with tape of a suitable color, or cover it with paper/cardboard, creating a hard inner layer.
A table lamp with such a lampshade will fit perfectly into a girl's bedroom in the Provence style.
Compare these two photos.

The same fabric is used here, but different finishing techniques. And the second lampshade looks more elegant, richer. The secret is in using not a whole cloth, but strips cut from the fabric and creating the effect of folds.
| Image | Description |
|---|---|
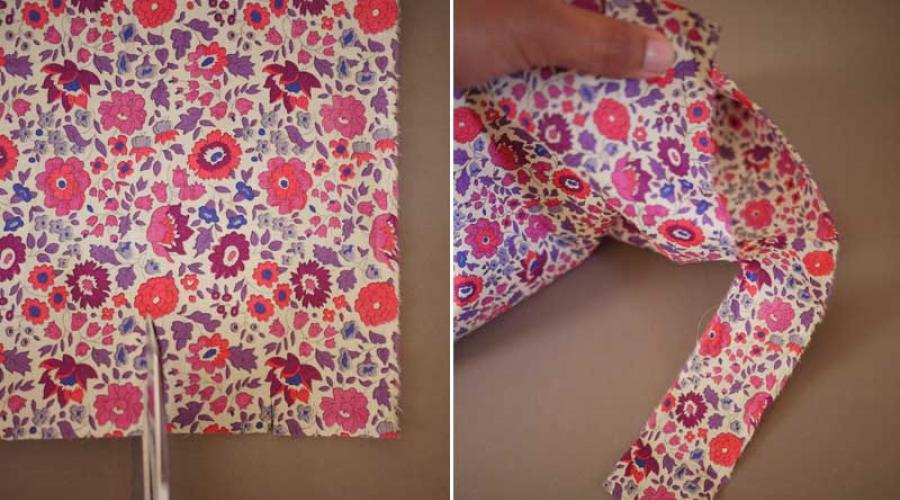
| You need to prepare a frame, thread and needle, scissors and durable fabric that does not fray around the edges. |
| The fabric needs to be cut into long strips 3-4 cm wide. Things will go faster if you simply cut it from the edge and tear it with a sharp movement. |
| The resulting strips are smoothed with an iron. If desired, you can fold the edges and press them inward, but this is not necessary. Simply trim off any loose threads. | |
| The first strip is secured to the top of the frame using glue or thread. | |
| And they begin to carefully wrap the frame in a circle, alternately wrapping the strip around the lower and upper ring. In this case, it needs to be stretched and laid with a slight overlap on the previous layer. Then the next one is hemmed to the first strip, trying to ensure that the seam is on the wrong side of the lampshade. |
| Having wrapped the entire frame, the tip of the fabric strip is hemmed from the inside. You can stop there - the lampshade already looks very attractive. Or you can make the edging with contrasting fabric. |
| A strip of this fabric 12-15 cm wide is folded on one side, the fold is ironed and double-sided tape is glued to it. |
| With the other side of the tape, the strip is glued to the edge of the lampshade and tucked inward. The tape must be glued on both sides, so it is bent along the axis. |
| The other edge is finished in the same way, and the excess fabric is carefully trimmed with scissors. |


Instead of one fabric, you can use different ones, alternating stripes by color and width. It’s even more convenient to use ribbons - you don’t need to sew them.
Lampshade made of ribbons with bows
Alternatively, strips or ribbons of different colors are not sewn together, but the ends are left to hang down freely.
Ribbons and fabric strips are excellent materials for weaving. Having made the base according to the method described above, it can be intertwined with transverse or diagonal lines.
Lampshades made from braid, yarn, and twine look very original. If the frame has many intersecting ribs, they can be wrapped in different directions.


If the smooth fabric lampshade you have or made yourself is satisfactory in all respects, but lacks some zest, you can always decorate it. Beads, rhinestones, paper flowers and butterflies, fringe, etc. But there is a more original and effective way to decorate lampshades... with wood putty. It is best to use ready-made polymer putty. It comes in white and the color of different types of wood. White is perfectly tinted in any shade.

The technology is extremely simple: a flexible stencil is glued to the lampshade using tape, and then an even layer of putty is applied to it. After it dries, the stencil along with the tape is carefully removed along with the excess putty.

Other types of lampshades
If you don’t want to bother with wire, fabric and paper, you can use completely different materials and techniques for making lampshades. Here are some examples.
To make a lampshade in eco-style, you will need wooden or plastic embroidery hoops, quick-setting glue and slats.
The slats are cut to a length equal to the height of the future lampshade. And they stick to the hoop. That's it, the lampshade is ready. It can be turned into a full-fledged table lamp if several slats are made longer and used as a support.
Any work with wood is always exciting, because it gives you the opportunity not only to show your own imagination, but also to make something that fully suits your needs and tastes. Agree, it’s nice when there is something made by yourself in the house. Read on our website about how to make a wooden box with your own hands.
Lampshades made from disposable spoons
A 5-liter plastic container is most suitable as a frame for such a lampshade. It is this that is used in the proposed master class on making an original lampshade in the shape of a pineapple. But you can take any other container of a suitable size.
Using a sharp knife, cut off the bottom and neck of the bottle, leaving a hole through which the light bulb socket will fit.

We cut the cuttings from the plastic spoons, leaving “tails” 1.5-2 cm long. We paint the convex side of the spoons yellow with odorless paint. Acrylic is best.
Apply a drop of hot glue to the cuttings and glue the spoons with the painted side out to the bottom edge of the bottle close to each other.
We glue the second and subsequent rows of spoons overlapping the previous one with an offset, in a checkerboard pattern. There should be no gaps between them.

In this way we cover the entire container.
From thick paper or thin green cardboard, cut out a circle with a hole in the center, coinciding with the hole in the top of the bottle.
Cut the outer edge into large cloves and bend it slightly downwards. Glue it to the lampshade. Cut out long leaves from the same paper and insert them in a bunch into the top hole, having previously installed a cartridge in the lampshade.
Note. Lampshades made from materials that are not resistant to fire or strong heat can only be used with LED or fluorescent lamps.
Using this technique, you can create lampshades in a completely different style. If “Pineapple” will look great in a children’s room, then the lamp, the production of which is shown step by step in the following photos, will decorate the bedroom.


Lampshade "Pineapple" with feathers
Tiffany lampshade made from a plastic bottle
A large plastic bottle can be an excellent basis for making a lampshade that imitates the Tiffany style - multi-colored stained glass mosaic.

The bottom part of the bottle is cut off. The cut can be smooth or curly. Then a drawing is applied to it and the contours are outlined with a special contour paint of golden or silver color. And after it dries, the plastic inside the contours is painted in different colors.
Lampshade made from paper plates
If your old table lamp has a thick cylindrical shade, you can transform it beyond recognition by using disposable paper plates. Their number is easy to calculate by measuring the circumference of the cylinder: one plate is needed for every centimeter.
Manufacturing instructions are given below.
Bend each plate in half, step back 5 mm from the fold line in both directions and draw two parallel lines.
Attach a ruler to these lines and, with a little force, draw along them with the blunt side of a knife or other pointed (but not sharp!) object.

Fold the plate along the punched lines and glue it to the lampshade using hot glue.

Glue gun prices
Glue gun
Glue the second piece and all subsequent ones close to it and at the same height.
This is what should happen in the end.

This method is known, if not to everyone, then to many. Instructions included.

Inflate the balloon to the desired size and lubricate it with Vaseline so that the threads soaked in glue do not stick to the rubber. You can also wrap it with thin cling film.
In a jar of PVA glue, use an awl to make a through hole just above the bottom.

We thread the needle and pass it through the jar, after which we remove the needle.
We wrap the balloon with thread and glue in any order until we obtain the required winding density. It is better to leave the area around the tail of the ball free so that you can then put the lampshade on the lamp.


We wait for the glue to dry completely and pierce the ball. Before this, the lampshade can be painted with aerosol paint from a can.


We decorate a ball of thread with paper, wire or fabric flowers, if desired, and put it on the lamp.

Video - How to make a beautiful lampshade with your own hands
A very unusual material for decorating a table lamp is metal clasps from tin beer and other cans.

For the first row, they are folded in half and secured to the top ring of the frame lampshade.
For all other locks, cut one ring in half and begin the second row, hooking the lock with the cut ears to two adjacent rings of the first row.
Having reached the bottom ring, the clasps are again bent inward with a hook and hooked to the frame.

These different, but very beautiful and original lampshades can be made from traditional and, it would seem, materials that are not at all intended for this purpose.
Video - Lampshade using origami technique
Their range is very wide and varies in purpose, size, shape. According to the type of material used for manufacturing, the following lampshades are distinguished:
How to sew a lampshade for a floor lamp
All you need to create a lampshade is an idea, material and patience. First, let's look at how to make a fabric lampshade. First of all, choose what material you want to sew from. Silk, linen, taffeta, cotton are suitable. Don't forget about the color of the material. It should be combined with the furnishings of the room (furniture upholstery, curtains, carpets). Although this is not important.
So, you have chosen the fabric and decided on the color scheme. Buy a new lampshade and prepare clothespins, a tape measure, chalk, pattern paper, a pencil, and scissors for work. Now take measurements for the pattern. Measure the top and bottom circumferences of the lampshade and the sides. Add a few centimeters to the seams and hems. Connect the lines. Cut it out.

Lay out the pattern on the fabric and trace with chalk. Cut carefully. Apply a small amount of glue with a gun to the fabric and then to the lampshade. Now cover the frame with fabric and carefully straighten it with your fingers. All is ready!
Today, lampshades for floor lamps, made by yourself, are valued no less than factory ones. Guests of your home will notice and appreciate such a piece of your decor. But you don't have to buy a new lampshade. If you have an old one, you can simply restore it. To learn how to update a floor lamp shade, read the following tutorial. You will understand how a lighting fixture can be transformed using ordinary materials and accessories.
How to update an old lighting fixture
You will need:
Pencil;
Fabric (of your choice);
Scissors;
Floor lamp with lampshade;
Satin tape;
Large sheet (newspaper);
Several pieces of pins;
Spray glue (or regular fabric glue).
First, disconnect the wire. Remove the old lampshade from the floor lamp. Leave only the base. Lay the frame on its side on a large sheet. Outline the top and bottom edges with a simple pencil, rolling along the paper. Connect both lines. Cut out the pattern, do not forget to add one centimeter on each side.

Spray the back of the fabric with spray glue (you can use fabric glue diluted with water, apply it with a brush). Then place the base on the fabric and roll slowly, pressing and smoothing towards the edges. Trim off excess fabric.
Now process the top and bottom edges. Cover them with ribbon, fringe or braid. When the glue has dried, insert the lampshade into the floor lamp and turn on the light. You can decorate the product with buttons, appliqués and whatever your imagination desires.
If you have unnecessary wool at home, use it to update your lampshade. Cut a rectangle out of it (depending on the size of the frame). Cover the frame with it, securing it with pins. Fold the edges under the rim of the lampshade. Secure with a heat gun.
How to crochet
This lamp will update your interior and become a great night light in your bedroom. You will need:
Lampshade frame;
Two skeins of wool (can be of different colors);
Hook No. 3;
Scissors.
The diameter of the lampshade is 26 centimeters. Cast on a chain of 52 loops. Then connect it into a ring. Continue knitting according to the pattern in rows:
First: cast on double crochets (dc).

Second: CH, five air loops (VP).
Third: four CH, one VP.
Fourth: two single crochets (SC), six VP.
Fifth: three CH, eight VP.
From the sixth to the eleventh: three SB, ten VP.
In the twelfth to thirteenth: four CH, five VP.
Fourteenth: five each CH, VP and CH.
Knit the entire last row with SB. Close all loops. The knitted lampshade for the floor lamp is ready. It can be improved, transformed and supplemented with various accessories. Show your creativity.
How to make a lampshade for a floor lamp from napkins
To make it, you need to stock up on openwork napkins, glue and a base. If you don't have a frame, you can make it yourself. Inflate the balloon to the desired size. If everything you need is prepared, then let's get started. Soak the napkins well with PVA glue and immediately cover the ball. Leave a small space where the light bulb will be inserted. When the workpiece is dry, pierce the ball with a needle and remove the remains. The result is such an original decorative element.

This floor lamp will fit perfectly into the rooms.
If you don’t have extra openwork napkins, then read the master class below on how to knit them.
How to knit a napkin
You will need a #1 crochet hook and acrylic yarn. The napkin should be round in shape. So, dial twelve VPs. Connect into a ring. Tie it with single crochets. In the second row, cast on three loops for lifting and knit the air loops to the end. Next, make three VP, four dc above the columns of the previous row. Repeat until the end of the chain.
The next row for beginners will be difficult, be careful (alternate the indicated loops in all rows). We knit five VP and eight CH. In the next row, cast on nine VPs and 10 DCs. Next, knit a row of eleven VPs and four DCs. Proceed to finish knitting the napkin. Knit five VP, fifteen dc in the VP of the previous row. When finished, wet and stretch. Leave it to dry like this. You can starch the napkins to help them keep their shape better.
Lampshades for a floor lamp can be knitted, crocheted, sewn from fabric or woven using the macrame technique. Creating a new accessory is a great way to freshen up your home interior.
Good luck in job!
Are you dreaming of adding brightness to the nursery or refreshing your workspace in the house? Or maybe you are a lover of the East, where the fashion for these such delicate little things came to us from? Then you should definitely read how to make a lamp out of paper with your own hands - unusual, original little things will instantly add a bit of magic to any corner of the house!
We guarantee that your guests will be asking for a long time where you bought this designer lamp, and having learned that you made it yourself, they will ask you to tell you how to make a paper chandelier with your own hands and its step-by-step instructions.
In this master class we will show you four ways to make a lamp out of paper, take a look and choose the option that’s right for you.
To create this delicate lamp, prepare:
- Colored paper of any color;
- PVA glue or glue stick;
- Paper clips;
- Compass;
- Scissors;
- Fishing line;
- Colored yarn;
- LED lamp ( );
- Wire with switch.


Step-by-step instruction:
Step 1
- Using a compass, draw semicircles 1 cm wide on a colored sheet of paper.
- With each line we increase the diameter of the semicircle.
- Please note that you will need quite a lot of sheets. Then cut out semicircular strips and cut them into pieces of 2-5 cm.


Step 2
- Roll and glue the resulting strips, making one side larger than the other - this will make it easy to glue them together into a dome-shaped shape. After that, you can connect them with glue in pieces of five.
- Glue the clusters together, strengthening them with paper clips until the glue dries. Glue until you have a circle, with a small hole for a lamp.
Of course, you can fantasize, and your lamp will be a little different than ours.

Step 3
Now, while our glue is finally drying, let's decorate our wire. To do this, take yarn of any color you like and carefully begin to rewind the wire with it. Try not to leave any uneven spots when wrapping the yarn over the previous layer.
You can add a drop of glue to the end of the yarn to strengthen it.


Step 4
Let's make a holder for an LED lamp. To do this, we tie a fishing line on three sides (it is advisable to measure the distance evenly) to our glued strips, and the other ends to a paper clip, which we first straighten to the shape of a triangle.

All! All that remains is to place the lamp in the circle and screw it to the wire. You can hang such a lamp either separately or in combination with, for example, .

Master class No. 2: Chandelier made of rice or parchment paper
We present to your attention a new master class in which we will teach you how to make lamps from rice paper. There is nothing complicated in making it, as it might seem at first glance, and you can involve all household members in this exciting activity. The designer lamp is suitable for both the nursery and your bedroom.
Instead of rice paper, you can buy a roll of parchment paper for baking

So, to make a lamp you will need:
- Unnecessary lampshade;
- Thin wire;
- Several rolls of rice paper;
- Iron;
- Paper cutter;
- Sewing machine.
Self-production
Step 1
Take a lampshade you don't need (you can buy inexpensive new) and remove everything from it, leaving only the base. If your lampshade is similar to ours, then add a wire in the middle, securing it well.

Step 2
- Prepare the parchment paper by unrolling the rolls and cutting them into roughly equal rectangles.
- Iron the sheets until they become completely even and smooth.
- Fold each sheet like an accordion, measuring equal distances of strips, and use a paper cutter to cut equal, even circles.
- Try to use the cutter more carefully and don't leave a lot of extra paper– you will need a lot of circles.


Step 3
- Connect all the circles together by stitching in the middle. Make connected circles of equal length and begin to strengthen them around the circle of the lampshade.
- Once you complete the first circle, go around the subsequent ones, decreasing the length each time.
- Carefully secure your lamp in the desired location, straightening all the threads.
Remember to use only LED lamps to avoid fire.


This beautiful chandelier is the result of painstaking work, after completion of which you will admire your work and be proud of yourself for a long time. On our website you will find many more ways to diversify your home lighting, for example:
- you can or .
- , for lovers of modernism.
- Or for lovers of eco-style.

You can also at your discretion, paint the rice paper circles in any shade, based on the color scheme of the room. If you want to hang this lamp in a child's room, you can add, for example, glass angels on long gold threads - again, choose the right accessories for different rooms, this will add warmth and originality.


WARNING: Be aware that incandescent lamps produce very hot temperatures and may cause paper to ignite. For paper lamps and fixtures, use only LED lamps.
Master class No. 3: Origami chandelier made of paper

This beautiful bright lamp really resembles a ripe berry!
To make it, take the following:
- 2 paper bags, so that when gluing you get a one and a half meter bag (preferably with an interesting print);
- LED lamp (never an incandescent lamp );
- Wire with switch;
As soon as you decide that training is no longer necessary, we begin preparing the paper bag. Remove the handles and cut the bottoms off the bags and glue them together to make one large paper bag.

Fold the resulting bag in half, and then fold the halves like an accordion so that you get 16 identical folded strips. Then fold the two outer strips diagonally.


Follow the simple diagrams and you will get wonderful lamps to decorate your home. You may have to practice a little to fold origami perfectly, but you won’t regret it, because origami is a whole world of various interesting things created with your own hands. And your children will simply be amazed by your skillful hands!

Master class No. 4: Corrugated paper lamp

To make an unusual lamp you will need:
- Corrugated paper 88×44cm;
- Ruler;
- Spoke;
- Glue;
- A thread;
- Cable;
- LED lamp ( never an incandescent lamp ).
Step 1 
- Using a ruler, mark a sheet of paper at equal intervals and fold like an accordion according to the markings.
- Helping yourself with a knitting needle, fold the folded sheet of paper diagonally, first on one side, and then unfold it on the other side.
- Unfold the sheet - you should have it double sheet marked with diamonds.
Step 2
- Connect the marked lines according to the photograph; it is advisable that the sheet is not very wrinkled at this time - otherwise the appearance of the lamp will be spoiled.
- All that remains is to connect the top of the lamp with a thread so that it does not fall apart, and secure the cable with the LED lamp.

Be safe - do not use regular incandescent lamps, they heat up the paper and it may catch fire.

Paper butterfly chandeliers
The most popular paper chandelier is the butterfly chandelier. And such love for this product is not just:
- Firstly she looks very chic and expensive.
- And secondly The production is very simple, even a child can be involved.
Such an elegant lamp will go well with any interior style, and it is also appropriate in the living room or dining room and even in a children's room.

Manufacturing technique:
- An old chandelier or a frame from it is taken as the basis. If this is not the case, then you can take a regular metal or wooden rim. If there is no such thing, take a thick wire and make 2-3 coils of yourself, so that you get a circle.
- Cut out butterflies according to the template (butterfly template below)
- We take a nylon thread or fishing line and attach butterflies to it. There can be two types of fastenings: either we pierce the butterflies or we put them on silicone glue. Whichever is more convenient for someone.


Butterfly pattern
To make a chandelier with butterflies, simply take a template and scale it to your size. It looks very nice if you make butterflies of several sizes, for example 3-4 diameters. Using a pencil, draw the sketch on paper and cut it out.
- It is best to cut with stationeryknife or straight manicure scissors without curves.
- It's better to use paper more dense and which does not attract dust, for example velvet structure. Since you will have to vacuum such a chandelier often

It is also a very beautiful option if you make a ball out of wire, take an old pendant from a chandelier as a basis and place several butterflies using a glue gun.


Paper ball chandelier
The basis for such chandeliers is a ready-made Chinese lamp made from rice paper. They are usually very cheap, down to $1-2. But you can decorate it however you like with paper tartlets, an unnecessary map, newspaper or sheets of old books. We are publishing several ideas for decorating a ball chandelier with paper.


Paper New Year lamp
A regular idea for the New Year is to use an old lampshade and string snowflakes of various shapes onto a string. Very impressive and beautiful. Below are some photo ideas for such decor for the New Year.


To polish your skills, as well as add to your collection of unusually beautiful lamps, look at more ideas and. We are sure that among them you will find many that you will definitely want to create!
2 ratings, average: 5,00 out of 5)