The best way to insulate a balcony from the inside with your own hands. How to insulate a balcony with your own hands: step-by-step photos, instructions, choice of materials. The material has an impressive list of advantages
Has the day come when it's time to finally throw away your old ski and take all the cans from your balcony to the garage? Your head is full of ideas, and if not, then the global web will help you. You are ready to make all your brightest and craziest desires come true on a vacant piece of living space. There is one small problem left. These are harsh conditions that attack your hard-earned square footage.
Therefore, the first priority that needs to be solved before letting your imagination run wild is keeping warm. In order to minimize repair costs, let's figure it out how to insulate a balcony from the inside with your own hands.
If you decide to add the balcony area to the living area of the apartment, you need to carry out work to insulate it. To avoid unforeseen problems after the repair, the work must be carried out in compliance with established norms, rules and approvals.
Major reconstruction will require permission from local executive authorities, architecture and the Ministry of Emergency Situations. You should not ignore this point in order not to be punished for violating the housing code. In addition, coordination will help avoid certain mistakes when changing structural elements. Experienced specialists will immediately notice inconsistencies in the project. Correcting errors at the design stage will avoid the costs of correcting errors after repairs.
The order of work and its volume depend on what tasks the reconstructed balcony will perform:
- It will continue to be a place to relax in the warm season, and insulation is carried out to protect it from wind, dust and precipitation. This is a less expensive method and easier to implement.
- It will be attached to the area of the apartment as a full-fledged living space, used all year round. Here the scope of work increases significantly, since it will be necessary to provide heating, steam and waterproofing, and change the power supply system.
Attention! Balcony with sliding windows it is almost pointless to insulate, since the windows themselves will let the cold in.
How to insulate a balcony from the inside with your own hands
First of all, it is necessary to take measurements and determine the quantity of materials, their composition and quality. Manufacturers offer a wide range of materials for insulation, insulation and finishing to suit every taste and material income. Of course, you shouldn’t skimp on quality. It is necessary to take care of the environmental friendliness and fire safety of housing.
A balcony is an external structure that is located outside the building; its three sides and the ceiling require insulation, even if the neighbors have already carried out the work. The sequence of work should be structured in such a way as not to miss important nuances that will then have to be corrected:
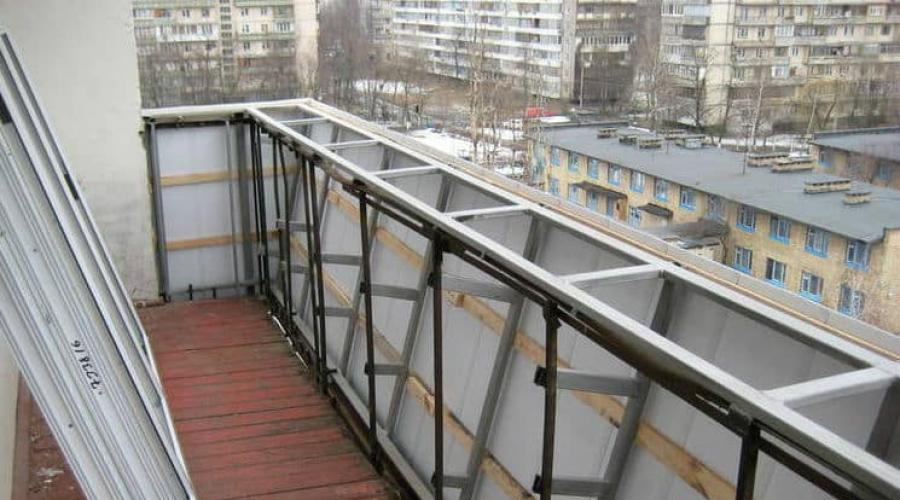
- Particular attention must be paid to the condition enclosing parapet. Most often, this is a thin plate of metal, profile, or iron rods. This structure will have to be replaced with a brick wall or foam blocks. To construct the wall, you need to choose light, hollow bricks so as not to create unnecessary load on the load-bearing slab.

Balcony parapet
- Glazing It's better to leave it to professionals. Depending on the chosen interior, the profile can be wooden or PVC with double glazed windows. The number of sashes is determined in advance to ensure ventilation and ease of maintenance. When installing windows, expansion profiles are installed, which will facilitate the installation of insulating boards.

Glazed balcony
- Sealing cracks, joints, holes, chips and cracks polyurethane foam, polyurethane sealants or mastic. They will protect against the penetration of moisture, dust, and negative environmental influences.

Sealing cracks on the balcony
- Let down energy supply in such a way that access to food is as practical as possible. Electrical work and heat supply installations must be carried out by specialists who have special permission to carry out such work.

Conducting electricity on the balcony
- Insulation carried out in the following sequence: walls and ceiling.
How to insulate walls on a balcony
To choose the right insulation, you need to know its technical characteristics, pros and cons.
The main parameters that determine the quality of a material are its thermal conductivity, environmental And Fire safety. It is very important that the insulation is lightweight and takes up less space.
- . Multilayer, consisting of foil and polyethylene foam, reflective material several millimeters thick. At the same time, it reflects at least 90% of heat, is durable, lightweight, and inexpensive. During installation, it easily takes the shape of the surface and is attached.

Balcony insulation with penofol
- Polyurethane foam. Ensures fire and environmental safety. It is applied to the surface by pouring or spraying, closes all cracks, provides waterproofing, and does not require a frame or fastening.

Balcony insulation with polyurethane foam
- Penoplex. These are foamed polystyrene boards. The material practically does not absorb moisture, but it is voluminous and does not accept the parameters of the surface to which it is attached.

Balcony insulation with penoplex
- Expanded polystyrene. It has excellent sound, steam and heat insulation properties. Due to its efficiency and environmental friendliness, it is well suited for insulating a balcony.

Balcony insulation with polystyrene foam
- Styrodur. A type of expanded polystyrene, extruded, green in color, with good characteristics.

Balcony insulation with styrodur
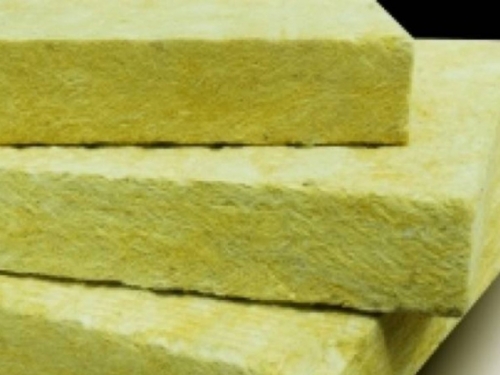
- Isover (mineral wool). Widespread insulation made from fiberglass. This is mineral wool, which will retain heat, provide sound insulation, and will not weigh down the structure. Has an affordable price. Used with additional hydro- and vapor barrier.

Balcony insulation with isover (mineral wool)
It is not advisable to use fiberglass, as it is a fire hazard and emits toxic substances.
Considering the temperature difference between the outside air and the room, it is necessary to provide a kind of hydrobarrier that will not allow warm air to create condensation when it comes into contact with a cold fence. The presence of condensation will lead, in the future, to formation and rotting.
Depending on the type, the insulation is attached using glue, special dowels with a wide head, expansion nails or spraying.
Using mineral wool the surface is pre-primed. After drying, mineral slabs coated with adhesive are applied to the wall. Installation starts from the bottom and is done like brickwork. Allow the glue to dry completely overnight. You can reinforce it in several places using dowels.
Often, a wooden frame is used to lay slabs, the design of which retains heat worse than insulation. Therefore, it is better to fasten the material end-to-end and seal them with aluminum tape or polyurethane foam.

It is better to attach layers of mineral wool end-to-end
The next layer is a vapor barrier. It could be foil polyethylene. It is placed with foil inside the building so that it reflects the heat coming from the house. Insulating materials for other insulation materials may not be used, depending on the purpose of the room.
How to insulate the floor on the balcony
About a quarter of the heat loss on the balcony occurs through the floor, so work needs to be done to prevent these losses. This is not the most difficult operation and it is quite possible to do it yourself. When choosing a material, you need to take into account that the floor level on the balcony after installation should be at or below the floor level in the adjacent room.
There are several simple and accessible ways:
- with frame arrangement;
- monolithic;
- electric heated floor.
Only one thing may require professional skills - installing a heated floor.

Installation of heated floors on the balcony
The main point in choosing a method and material is the condition of the supporting slab. In older houses, the structures may be worn out and are not always ready to withstand heavy loads. Therefore, it is important to agree with the specialists of the architecture department what weight of materials can be used during repairs. This is especially important when installing monolithic concrete floors.
The frame floor, in turn, can be constructed using:
- mineral wool;
- expanded clay;
- pepoplast;
- penoplex or foamed polystyrene.
Floor insulation technology consists of several stages.
- Leveling the surface of the slab is carried out if necessary.
- Waterproofing with polyethylene film or roofing felt (for damp rooms).
- Installation of wooden sheathing. A timber with a height close to the thickness of the insulation is used. They are laid along the length of the balcony at a distance of 50 cm from each other or another convenient distance depending on the size of the insulation sheets. Leave 5-7 cm from the walls, and 5 cm from the ends, so that the wood does not deform when there is high humidity. They are attached to the floor with anchors or self-tapping screws with a depth of at least 4 mm. This will ensure a stable fixation. If it is necessary to install transverse beams, it is necessary to make cuts at the joints to half the thickness and create recesses with the help of which the transverse logs are connected to the longitudinal ones. They control the level and prevent the bars from sagging. If necessary, place wooden wedges or dies, which are fixed to the floor with polyurethane foam. It is important to prevent foam from getting into the joint between the wedge and the beam.
- The sheathing is filled with the selected insulation.
Cheap and effective material - mineral wool. Available in rolls and slabs, light in weight, easy to install. The size of the canvas is chosen so as not to wrinkle or bend it. This reduces the protective properties due to a decrease in the amount of air between the fibers. The main disadvantage of mineral wool is its low moisture resistance, so it is necessary to use a vapor barrier as the next layer.

Popular, inexpensive Styrofoam due to its lightness and ease of installation, it is most often used as insulation. It is very hygroscopic and resistant to any environment. Disadvantages include deformation under load and poor sound insulation.

Insulating the balcony floor with foam plastic
Penoplex It is resistant to mold growth, mechanical stress, temperature changes and has excellent thermal insulation properties. The disadvantages include its flammability with the release of harmful substances and the thickness of the material.

Insulation of the floor and walls of the balcony with penoplex
Has high fire resistance and durability expanded clay. But it is not very good for insulating a balcony, since a thick layer is required for normal thermal insulation.

Insulating the balcony floor with expanded clay
- The gaps remaining after filling with insulation are foamed.
- On top of the insulation or vapor barrier (if used) as a rough flooring, after which the selected floor material will follow, chipboard or moisture-resistant plywood is attached.
Cement screed is used only when the balcony structure is fairly strong. In order not to exceed the permissible load, use a reinforced screed up to 50 mm thick.
The following methods will require special professional skills.
Implemented as insulation electric heating systems using special infrared film, cable, tapes. They are laid on a thin layer of insulation and installed in accordance with the manufacturer's instructions.
For water floors a special water circuit is required.

Water floor design diagram
How to insulate a ceiling on a balcony
Before starting work, you should carefully inspect the ceiling for signs of leakage, since even a small amount of moisture getting on top of the insulation can lead to the development of mold.
Given the difficulty of working on the ceiling, it is necessary to protect your eyes and use glasses.
The already familiar penoplex, mineral wool, polystyrene foam (foiled polyethylene foam) are used as materials for work.
Penoplex with a density of 35-45 kg/cm² allows the use of panels from 20 mm, which will provide normal thermal protection. The only drawback is the high cost.

Insulating the balcony ceiling with penoplex
Thickness foam plastic can be within 50mm, and the density is 15kg/cm², then MDF, PVC or plasterboard panels are mounted on top. At a density of 25 kg/cm², putty can be used.

Insulating the balcony ceiling with polystyrene foam
For ease of installation, markings are carried out taking into account that the slabs or sheets of insulation fit well into the prepared sheathing, and the level of fastening is determined. It’s better to calculate everything below in advance, then the work at the top will take less time. The thickness of the insulation layers and finishing should be such as not to interfere with the opening of windows.
They use different sequences of work:
- Installation of sheathing → installation of insulation → cladding.
- Fastening the insulation over the entire area → vapor barrier → installing a wooden sheathing or frame made of a metal profile → cladding.
If the balcony is located Upstairs building, it is important to prevent moisture from getting from the roof onto the insulation; for this, an additional layer of insulation with polyethylene or foil polyethylene foam is provided under the roof.
The first layer for waterproofing can be a special composition based on bitumen mastic, applied to the concrete slab with a brush. The next step is to install sheet waterproofing.
How to insulate a balcony with penoplex
Penoplex is a cluster of polystyrene foam balls with air layers. It practically does not absorb moisture, has a long service life, and low thermal conductivity. Slabs with a thickness of 2-10 cm are produced.

Penoplex slabs
The lightness of the material does not create additional load on the load-bearing slab. It is resistant to deformation and does not emit harmful substances. To increase fire safety, choose a variety marked C. Since the balcony walls are thin, thick insulation boards are used, which will reduce the usable area of the room.
When exposed to sunlight, penoplex loses its properties, so it is used only as internal insulation.
The material is easy to cut, does not crumble, and does not create problems during installation. Used to insulate walls, floors and ceilings. The following types of fastening are used:
- Disc-type dowels with plastic cores. This mount is suitable for uneven surfaces and metal profile roofs.
- With a special glue applied to a previously primed surface, it is enough to apply the glue in dots or in a zigzag pattern. Adheses well to smooth concrete bases.
- Glue, with additional fixation, dowels.

Methods for applying glue to penoplex
Penoplex slabs are laid in prepared sheathing cells or without it, over the entire surface. The use of lathing, especially on the facade, worsens thermal protection.
The slabs are fitted tightly, the joints are sealed with construction tape or filled with polyurethane foam. The insulation is covered with a layer of polyethylene with a foil layer. Depending on the purpose of the room, a vapor barrier may not be used.
Penoplex insulation is suitable for all types of interior finishing: special plaster, plasterboard, wood and finishing boards.
How to insulate a balcony with foam plastic
One of the most common ways to insulate a balcony (walls, floor, ceiling) is polystyrene foam. This material, at a relatively low cost, can, if installed correctly, provide excellent thermal insulation performance. Among other positive qualities, it is worth noting resistance to adverse weather conditions. It does not absorb moisture, does not collapse under its influence, and is resistant to the formation of rot and mold.
Polystyrene foam does not emit harmful substances and combines well with other materials.
To insulate a balcony, polystyrene foam is used both outside and inside. It is better to entrust external work for multi-storey buildings to specialized organizations for safety reasons.
For internal insulation, a foam thickness of 4-6 cm is sufficient. If the front part is thinner than the side panels, a thickness of up to 10 cm can be used. When choosing a thickness for floor insulation, it is necessary to leave a headroom for the installation of the floor itself, and for the ceiling - for opening windows.
Insulation is carried out in two ways:
- Adhesive. On flat surfaces that do not require waterproofing, foam boards can be glued with special glue (Ceresit ST-85). This method is good for installing a floor under a subsequent screed or walls under plaster. In this case, when the foam sticks, glue is applied to its outer surface with a thickness of 2-3 mm. Without waiting for complete drying, apply a reinforcing mesh, but do not flood it and cover it with another layer of glue.

Adhesive method of foam insulation
- Frame. Since the use of other finishing materials requires additional fastening, a wooden sheathing or frame made of a metal profile is installed. This method is convenient for creating a multi-layer cake that provides waterproofing on the outside and vapor barrier on the inside. The layers can fill the cells of the frame or be located under the bars and along the top. The foam itself is cut to the size of the cells so as to fill them as tightly as possible. It is fastened with dowels or self-tapping screws with wide mushroom-shaped caps.

Frame method of foam insulation
Crevices , emptiness , uneven areas are filled with scraps, polyurethane foam or sealant. After drying, you can attach a layer of vapor barrier over the insulation and the cake is ready for finishing with plasterboard, plastic panels or other finishing.
How to insulate a plastic balcony
Plastic balconies or decorated with plastic panels are resistant to the external environment, sunlight, and temperature changes. The guaranteed service life of high-quality panels is at least 50 years. They are easy to install, have an affordable price, are easy to maintain and look aesthetically pleasing. Thanks to their positive characteristics, plastic balconies have gained popularity.
Plastic panels improve the aesthetic appearance and provide sufficient thermal protection for balconies with improved glazing.

Balcony with plastic panels
Sheathing a balcony with plastic is done on a mounted wooden frame or metal profile, which reacts poorly to temperature changes and changes in humidity. The frame structure creates free space between the walls and finishing panels. It would be stupid not to take advantage of this moment and add one of the common insulation materials to this space. If at the same time the seams and joints of the balcony structure are sealed, then even one layer foam plastic, penoplex or mineral wool, filling the cells of the sheathing, will significantly change the microclimate. And the use of an additional layer of vapor barrier will make it possible to use a plastic balcony all year round as a full-fledged living space.
How to insulate a wooden balcony
Lovers of wood in the interior also maintain style on the balcony. The main advantages of wooden structures are their environmental friendliness and favorable microclimate created by breathable material. The texture of the wood, supported by modern finishing materials, creates a cozy atmosphere and an attractive appearance. However, without additional insulation, a wooden balcony can only be fully used in the warm season. In addition, under the influence of the external environment, wood quickly ages, absorbs moisture, cracks, and succumbs to rot. There are ongoing costs required to maintain outdoor wooden balconies looking attractive.

Wooden balcony
Insulation with installation will help improve consumer qualities glazing and a set of works on waterproofing.
The interior will be well supported by frames made of wood of the appropriate species with double glazing, which will allow you to use the balcony as a living space. After their installation, work is carried out to seal gaps, cracks and junctions using polyurethane foam. The insulation technology is similar to the work for structures made of other materials, however, wood requires mandatory hydro- and vapor barrier.
Work order:
- Wooden balcony structures are treated with agents to protect against rotting, insects and increase fire resistance. This also applies to bars for sheathing.
- The concrete base is primed.
- Waterproofing is laid on the prepared surfaces. Ruberoid or mastic is used for the floor, polyethylene or foil is used for the walls and ceiling.
- A wooden frame is prepared from bars that provide the possibility of laying insulation of the selected thickness.
- Insulation (mineral wool, polystyrene foam or polystyrene foam) is tightly placed in the cells of the sheathing. The remaining voids are filled with foam.
- A layer of vapor barrier made of foil polyethylene foam or penofol is attached on top of the insulation.
- Finishing with wooden panels, lining. It is necessary to ensure that the weight of the finishing material does not overload the supporting slab of the balcony. Some wooden materials can be replaced with lighter ones, without compromising functionality and attractiveness.
To make insulating a balcony with your own hands a pleasure and provide an excellent result, think through your goals and objectives in advance, and carry out the necessary approvals and measurements. Choose materials in accordance with the technical characteristics and your material capabilities. Carry out work in a comprehensive manner, without missing out on details. And success is guaranteed.
You can also watch several videos that will help you insulate your balcony with your own hands.
Video
Insulation of balconies and loggias with mineral wool
Balcony insulation technology with penoplex
Insulation and connection of the balcony
How to insulate a balcony? Choice of insulation
How to insulate a balcony? Step-by-step instruction
How to insulate a balcony with your own hands: how and how to insulate it + video
Many people want to expand the living space of their apartment, and the easiest way to do this is by adding a balcony. But in order to make it suitable for living, it is necessary to take care of noise and waterproofing, as well as reducing the thermal conductivity of its walls. Although the process of insulating a balcony is not the easiest, it is quite possible to do it yourself. This article provides detailed instructions on how to insulate a balcony yourself.
Materials for insulating balconies
The choice of material is one of the most important aspects, because each material has its own individual physical and chemical properties. Common materials include polystyrene foam, extruded polystyrene foam, mineral wool, isolon, expanded clay, and polyurethane. Next, we will consider the pros and cons of each material.

Styrofoam
Polyfoam is a foamed material with a porous microstructure, produced on the basis of styrene. Available in the form of square or rectangular slabs.

- low cost;
- long service life;
- has antifungal and anti-mold properties;
- easy to install; moisture resistant;
- insensitive to temperature fluctuations.

- is destroyed when interacting with paints and varnishes;
- very fragile.


Extruded polystyrene foam
Extruded polystyrene foam - made on the basis of polystyrene by extrusion. Available in the form of rectangular slabs.

- low cost;
- protects from both sunlight and frost;
- has high insulation from noise and liquids;
- easy to install;

- fragile;
- more expensive than foam.

Mineral wool
Mineral wool is made from sedimentary, glass and volcanic natural materials. Available in slabs and rolls of varying densities.

- good sound and heat insulation;
- allows steam to pass through itself, preventing its accumulation;
- fire resistant;
- environmentally friendly

- inconvenient for installation, causes itching upon contact with skin;
- When heated, it releases poisonous phenol gas.

Izolon
Izolon is a two-layer insulation. The outside is covered with thick foil, and inside there is a material resembling multilayer foamed polyethylene. Most often used when insulating walls, behind radiators, because foil is an excellent reflector of heat waves.


- ease of installation;
- compactness;
- good thermal insulation.

- poor sound insulation;
- If compared with other insulation materials, then isolon is weaker.

Expanded clay
Expanded clay is clay particles that have been fired and have the shape of an oval or circle.

- low cost;
- fire resistant;
- has good thermal and sound insulation characteristics;
- has antifungal and anti-mold properties;
- It is lightweight, so it does not weigh down the balcony.


- long drying time;
- complexity of installation;
- increased dust formation.

Polyurethane foam
Polyurethane foam is a representative of the class of gas-filled plastics. It has a liquid consistency; when the subspace is filled with it, it foams and hardens.

- high sound and thermal insulation;
- high protection against steam and liquid;
- easy to install.

Cons: requires the use of special devices.

Attention! Please note the following: under no circumstances should the balcony be made heavier; this is a violation of the building’s design standards.


Do-it-yourself insulation of a balcony
Correct installation of insulation material is a guarantee of longevity and quality. In order not to forget anything or make a mistake anywhere, you must initially prepare step-by-step instructions (plan) and strictly follow it point by point.

Insulation can be carried out both from the inside of the balcony and from the outside. But when insulating yourself, it is better to choose the option of insulating the balcony from the inside.


Preparatory work consists of:
- Checking the supporting structure;
- Removal of trim and frame;
- Patching tile cracks with concrete mortar;
- Clearing the balcony of unnecessary items;
- Balcony glazing. Choose 2- or 3-chamber double-glazed windows for better thermal and noise insulation;
- Electrical wiring;
- Preparation with insulation.

Floor insulation
Initially, it is more logical to start with insulating the floor on the balcony.

Action plan:
Various cracks in the floor are patched with polyurethane foam. You can also use sealant or polyurethane mastic.


A layer of waterproofing is laid on top of the concrete slab. You can use regular polyethylene in these wholes. It must be laid with an overlap, with a protrusion on the wall.

We install a frame of 50-70 mm beams. Initially, the beams are laid on the balcony slab with gaps between them of 40-60 cm. To fasten the beams, use anchors about 110 mm long. Next, we secure the beams in the longitudinal direction with self-tapping screws. They will be used to level the floor.

Next, insulating material is placed into the resulting cavities in the frame. And finally, the finishing surface is mounted on top using self-tapping screws. When fixing the finishing layer, it is necessary to leave small gaps at the junction with the walls to prevent squeaks during operation. The cracks in the walls are filled with polyurethane foam.

Attention! The thickness of the insulation must exceed 7 cm for high-quality floor insulation. But you shouldn’t use too thick insulation. After all, the height of the threshold must be made below 20 cm, and the height of the room should not exceed 2.45 m, and the height of the fence should be more than 95 cm. Based on these data, you need to choose the optimal insulation thickness for you.


Wall insulation
Action plan:
Waterproofing is carried out. Beams in the form of a lattice are installed on top of the waterproofing. The cross-section of the beam must be selected in such a way that after laying the insulation, a small space remains between the finishing surface and the insulation. As a result, an air cushion is formed - the thermal insulation characteristics will improve.

We put insulation into the formed cells. Finishing the walls. Chipboard, lining, plasterboard, etc. can be used as finishing materials. It depends on individual preferences.

You can choose the material that suits your aesthetic parameters by looking at many photos of balcony insulation on the Internet.

Ceiling insulation
There are two options for ceiling insulation: with and without a frame. In the second option, it is necessary to use lightweight materials and this insulation is attached directly to the ceiling slab.

Action plan:
The cleaned ceiling surface is covered with an antiseptic. The insulation is attached using polyurethane foam or glue.

Beams are attached on top of the material to install the finishing. If you use mineral wool: first a frame is made, then insulation is laid and drywall is installed. The finishing coating is installed.

Insulating the balcony from the outside is more correct. This method of insulation allows you to save the balcony space, as well as prevent the formation of condensation from the inside.

But the problem is that it is almost impossible to produce it without specialists. Therefore, it is better to order insulation of a balcony from the outside from specialized organizations specializing in turnkey insulation of balconies.

Photo of balcony insulation


Many residents of apartment buildings are faced with the problem of a lack of square meters. An excellent solution to this issue could be insulating the loggia yourself. This is a painstaking task that requires the performer to have certain construction skills and time. However, the finished result is worth it. A warm balcony expands the possibilities of using space, “ennobles” the living space and can become a source of pride for a home craftsman.
The need to insulate the loggia
Each apartment owner independently decides for himself how to use the additional square meters of the loggia. Some set up a storage room or workshop on the balcony, others use the room more rationally - create a “winter garden” or a separate room. An insulated loggia can be converted into a cozy place for relaxation, work, a compact gym or an area for children's creativity.

In addition, an insulated balcony solves a number of problems:
- heat loss from the premises and heating costs for the apartment are reduced;
- reduces the risk of mold on the walls of the balcony.
You can perform external or internal insulation. Obvious advantages of the external method:
- the usable area is not “eaten up”;
- simplification of interior wall decoration.
A significant advantage of internal insulation is the ability to complete the work yourself without hiring workers.
Selection of thermal insulation material
Various thermal insulation materials are used as insulation, ranging from traditional, inexpensive ones to modern high-tech ones. To insulate the loggia from the inside, it is better to use thin, lightweight materials. Thanks to their small width, you can save useful space.
Let's consider the characteristics of the main thermal insulation materials for insulating a loggia/balcony.
Foil polyethylene foam - a layer of foil is applied to one side of the polyethylene, which reflects infrared radiation and “throws” heat flows back. Insulation characteristics:
- roll width - 1 m, thickness - 2-5 cm;
- ease of installation - polyethylene foam can be easily cut with a knife;
- laying method - butt or overlap;
- thermal insulation efficiency almost doubles;
- the material is used to insulate ceilings and walls.
Insulating a loggia: step-by-step instructions. Use of penofol
Mineral wool has good thermal insulation qualities and an affordable price. However, experts do not recommend using this material to insulate a loggia for a number of reasons:
- poor moisture resistance - mineral wool absorbs liquid, so you will have to further strengthen the waterproofing;
- when using mineral wool, natural ventilation is required - a gap must be left above the insulation, which slightly “conceals” the area of the balcony;
- To cover the loggia, you will need to reinforce the wall and carry out additional measures.
Foam plastic is foamed plastic of varying densities. The bulk of the material is gas. Polystyrene foam has the following characteristics:
- slab size - 1*1 m;
- insulation thickness 2-10 cm;
- foam density - 15 or 25 kg/sq.cm;
- durability.
Extruded polystyrene foam (penoplex) is a modern heat insulator that resembles polystyrene foam, but has a more durable structure and functionality. Properties of expanded polystyrene:
- rectangular slabs 1200*600 mm;
- thickness - 2-10 cm;
- penoplex density - 35-45 kg/sq.cm;
- vapor tightness;
- frost resistance;
- the slabs are chamfered for tighter installation;
- light weight and ease of installation;
- flammability class - G-1;
- the material is not used in open areas where UV rays penetrate.
Insulating a loggia with your own hands: step-by-step instructions. Photo of penoplex installation

Methods for attaching insulation
The choice of insulation method primarily depends on the heat-insulating material used and further finishing of the walls.
Insulation under putty and plaster is suitable when using penoplex or polystyrene foam. Thermal insulation panels are glued to the base with tile adhesive. The slabs are additionally fixed with dowel mushrooms. You can start plastering/puttying walls or ceilings the day after installing the insulation.
Laying of foil polyethylene foam occurs under the base of the frame. It does not matter how the profiles are attached - to the wall or using U-shaped fasteners. Penofol sheets are applied to the ceiling/wall of the loggia and fixed with slats. In this case, an overlap connection is acceptable, and the joining strip can be taped.

Insulation under the base of the frame is only possible when using thin insulation up to 20 mm thick. Pressing thicker thermal insulation will affect the rigidity of the slats and fastenings
If you plan to cover the balcony with plasterboard or PVC or MDF panels, then it is advisable to lay the heat-insulating material in the cells of the frame. 15-density foam or mineral wool is used as insulation. The disadvantage of this technology is the increase in the thickness of the thermal insulation “pie”.
Options for arranging a “warm” floor
The technology for insulating the floor on a loggia is somewhat different from the thermal insulation of the canopy and ceiling. Excessive demands are placed on this element of the balcony.
There are several main options for arranging a “warm floor”:

Insulating a loggia with your own hands: step-by-step instructions
Below are step-by-step instructions for insulating a loggia with penoplex.
Tools and materials
To work you will need:
- foam boards;
- construction level, stationery knife, marker;
- PVC pipes for laying cables;
- container for mixing glue;
- construction mixer;
- trowel;
- polyurethane foam;
- mounting gun;
- grater for grinding thermal insulation sheets;
- plastic flat trowel for grouting the floor;
- metal grid;
- sand concrete M300 coarse-grained;
- polyurethane glue.
Insulating a loggia: step-by-step instructions. Photo - diagram of a thermal insulation “pie”.

Preparatory work
First of all, you need to install energy-saving plastic windows on the loggia. There is no point in saving on glazing - it is better to choose double-glazed windows and fittings from companies that have proven themselves well in the window market.
If high-quality windows are already installed on the balcony, then you can proceed to insulating the balcony.
Preparatory activities:

Ceiling insulation

Installation of heat insulator on walls and parapet

Insulating the loggia floor with penoplex: step-by-step instructions
Let's consider the stages of creating a “warm floor” using penoplex and cement-sand screed:

- If it is necessary to install a supporting frame, it is better to use a galvanized metal profile. Unlike wood, it does not rot and is not heavy.
- Thermal insulation work should be carried out in dry weather. Many adhesive mixtures and primers have special features for use in conditions of high humidity.
- The cracks on the loggia are treated with foam that is resistant to low temperatures.
- The wood used must be dried and then treated with anti-fire and rotting agents.
Insulating a loggia with your own hands: step-by-step instructions. Video.
We will send the material to you by e-mail
The process of insulating a room itself is very important, since with the help of such repairs drafts and cold are removed, and the space of the connected room expands. But it’s not enough to just install double-glazed windows and cover the cracks and holes with polyurethane foam. It needs to be insulated. To save money in your wallet, it is better to insulate the loggia with your own hands; the step-by-step photo instructions presented in the article will help you do the job.
Amazing balcony with ecological materials
Initially, you need to select building materials. It is important to remember that not only thermal performance, but also may depend on the selected components. If the building material is too thick, it will steal the usable area.
Note! Any material for heat preservation must be environmentally friendly and also meet thermal and steam characteristics.
The room can be insulated with the following materials:
- Penofol . An excellent substitute for mineral wool. It has a multi-layer coating, which also has a reflective effect.
- Polyurethane foam . Ideally suited for balconies. It ignites very poorly and is made from environmentally friendly materials. Installation is done by pouring.


- Expanded polystyrene . A fairly economical choice of material and also very effective for a balcony.

- Izover . Available in sheet form. Made from mineral wool with fiberglass particles.

As a rule, polystyrene foam is mounted on the walls and ceiling. It is good to use because its properties have a high thermal conductivity coefficient, as well as a small thickness. It cuts perfectly with a kitchen knife. An alternative option is polystyrene foam. For cold winters, sheets 10 cm thick are suitable; for mild weather it is better to use 5 cm.
Related article:
Calculator for calculating the required insulation of a loggia or balcony
Until recently, the balconies of city apartments served as a kind of storage room - people stored preserved food and various things there. What’s more, all sorts of unnecessary rubbish was taken out onto the balconies, which was a pity to throw away. However, today these premises are increasingly used as additional living space. And to implement such an idea, you need to take care of insulating the balcony.
If you insulate your balcony, you will be able to not only expand the living space of your apartment relatively cheaply, but also significantly reduce heat loss from your home. The fact is that it is through the balconies that most of the heat escapes. But in order for everything to be done efficiently, you need to know where to start. With a well-designed scheme, turning a cold balcony into a small, but almost full-fledged room will be much easier.

So, first sketch out a rough work plan - it will include:

Important information! The balcony can be insulated both from the inside and outside. But since you will be doing the work on your own, that is, without the help of specialists, it is better to resort to internal insulation.
Stage No. 1. Choosing insulation
There are a lot of thermal insulation materials on the modern construction market, but for balconies the following are more suitable:

As for foam plastic and EPS, the laying of these materials is carried out using almost the same technology (the only exception is the form of adhesion - with EPS it is better due to the use of grooves).
It is better not to use mineral wool for a balcony - the installation procedure will be more labor-intensive, and the condensation that inevitably forms on the balcony is undesirable for this material. Expanded clay, for obvious reasons, can only be used for floor insulation (the insulation technology will be described in detail below).
And if we add to all of the above the fact that the balcony should in no case be overloaded, then it becomes obvious: the most suitable option is polystyrene foam 4-5 cm thick, which is cheaper than expanded polystyrene or mineral wool.


Stage No. 2. We carry out glazing
If your balcony is already glazed, you can skip this step. The glazing procedure itself largely depends on the parapet installed on the balcony. If we are talking about iron sheathing, then you must build it up using foam blocks or ceramic bricks. It is important that the resulting wall thickness exceeds 10 cm. And if you have a reinforced concrete parapet, you can immediately begin installing windows.

Today, many (especially fans of environmentally friendly building materials) prefer double-glazed windows with wooden frames. It is worth remembering that such structures need to be treated with an antiseptic and painted regularly. You can learn about installing double-glazed windows with wooden frames from the video below.
Video - How to install a wooden window with double glazing
However, the majority of consumers still buy PVC windows. When purchasing, choose a special plastic profile that is characterized by increased rigidity and strength characteristics. In addition, the profile must have good thermal insulation properties.

Plastic windows should also have:
- 5-chamber profile;
- 2-chamber (if you live in the middle zone) or 3-chamber (if in a more severe climate) double-glazed window;
- reinforced reinforcement.
After installing the PVC structure ordered according to the dimensions of the balcony (the work must be carried out by specialists), you can proceed directly to insulation.
Stage No. 3. We insulate the floor
Let's look at how to insulate a balcony from the inside with your own hands using polystyrene foam (although the technology described below is also suitable for polystyrene foam).
Table. Insulating the floor on the balcony
| Steps, no. | Short description | Illustration |
|---|---|---|
| Step #1 | First, prepare the working surfaces - seal with foam all the cracks found in the concrete, as well as at the joints between the slabs and the wall. |
|
| Step #2 | Mark the floor for the subsequent construction of the sheathing. In this case, it is important that the pitch of the sheathing exceeds the width of the insulation sheets by approximately 10 mm. |
|
| Step #3 | Lay the slats according to the previously made markings (the approximate size of the bars is 4x4 cm, but their width must correspond to the thickness of the insulating material). The first and last slats should be 50-100 mm away from the walls. Connect the slats using self-tapping screws. |
|
| Step #4 | Place sheets of foam plastic between the lathing slats, gluing them to the floor with liquid nails or special glue. Blow out any resulting voids with polyurethane foam. |
|
| Step #5 | Lay a vapor barrier layer on top of the insulation. Lay a vapor barrier layer on top of the insulation (necessary to increase thermal insulation and prevent the formation of condensation). If you use regular PET film, then under no circumstances place it on the “cold” side of the insulator. If you are laying foil insulation, then do it with foil to the foam. |
|
| Step #6 | Fix sheets of plywood or chipboard on top, and the thickness of the floor covering should be at least 20 mm. Attach the sheets to the slats using self-tapping screws. |
|
| Step #7 | All that remains is to lay the finishing coating, which can be carpet or linoleum. |
|


Important information! There is another way to insulate the floor on a balcony with polystyrene foam: sheets of foam plastic are attached to a leveled and cleaned surface, and a thin screed from a previously prepared dry mixture solution is poured on top. Ceramic tiles can be used as a finishing coating here.
Alternative option. We use expanded clay
As noted earlier, the floor on the balcony can also be insulated using expanded clay. This material is also inexpensive, and its installation is not difficult. Let's get acquainted with the algorithm of actions.
Step #1. First, lay a waterproofing film on the floor with an extension of 10 cm to the walls.

Step #2. Place the beacons around the perimeter in increments of approximately 25 cm, being careful not to lean them too far against the walls.
Step #3. Fill the floor with a 15 cm thick layer of expanded clay and distribute the material evenly over the surface.


Step #4. Moisten the expanded clay with cement laitance (this is an aqueous solution of cement).


Step #5. Fill the expanded clay with a layer of concrete or self-leveling mixture. This must be done carefully so as not to damage the structure of the insulator.

Step #6. Wait for the screed to dry completely. After this, you can begin laying the topcoat.

Stage No. 4. We insulate the walls
The technology here is almost the same as for floor insulation. Follow these steps:
Step #1. Mark the future location of the slats on the walls (as well as for the floor).
Step #2. Attach the slats in accordance with these markings.

Step #3. Apply polyurethane foam to the surface using wave-like movements. At the same stage, you should drill holes for the dowels.
Step #4. Attach the foam sheets using plastic mushroom dowels.

Step #5. Blow out all the resulting cracks with foam, then seal with mounting tape.
Step #6. Lay a waterproofing layer on top - for example, penofol, which will also serve as thermal insulation.


Step #7. Seal the seams at the joints with foil tape.
Step #8. Mount the counter-lattice on top of the foam foam and install the finishing material.

Stage No. 5. We insulate the ceiling
This procedure is also performed using a similar technology, but some differences still occur.
- First, make a marking along which the hangers for attaching the guides will be installed.
- Install the hangers themselves necessary to fix the guides (for the latter, use a galvanized profile or timber).


- In appropriate places, cut small holes in the insulator (foam or EPS) for hangers.


- Next, secure the insulation boards using the same mounting foam.

If the insulation weighs too much, you can use dowels for fastening. Blow out the cracks with foam. Otherwise there are no significant differences.

Finishing features
In most cases, balconies are lined from the inside with clapboard or profile, but plasterboard is also used, followed by wallpapering. PVC panels are also used for cladding. As for the exterior finishing, it is better to entrust it to professionals, especially if your apartment is located higher than on the ground floor.


Important information! It is prohibited to install central heating there, so if additional heating is required, you can lay a film “warm floor” under the linoleum.
You can also install an outlet on the balcony to which an electric heater will be connected. The described room is small, so heating will take a minimum of time. We also note that the double-glazed window weighs quite a lot, so the remaining materials (including the insulator itself) must be of minimal weight. By the way, this is another reason why it is better to give preference to EPS or foam boards.

Video - Instructions for insulating a balcony
Now you know about the strengths and weaknesses of materials suitable for insulating a balcony, as well as the technologies for laying polystyrene foam and expanded clay. Therefore, it's time to get to work! Moreover, there is nothing complicated here if you are armed with step-by-step instructions and all the necessary materials. If you do everything correctly, you will turn the balcony into a full-fledged living room with all the ensuing advantages.