Concrete floors in the steam room and sink. The floor in the bathhouse - different options for arranging a high-quality base. Cold floor - design features
Read also
Pouring the floor over the ground is the simplest and most reliable way of arranging a bathhouse; it eliminates the presence of wooden structures, which significantly increases the service life of the structure.
In terms of complexity and cost, the work falls into the middle segment and consists of three stages.
| Pouring stages | Short description |
|---|---|
| A very important stage, the problem with water drainage from the bathhouse is solved. All work must be done correctly, otherwise wooden structures will become susceptible to mold and rot. In the most difficult cases, the foundation may be undermined; the consequences of such a situation are the most unpleasant. |
| The structure consists of several layers, each of them performs its own important function. The number and parameters of layers can be adjusted depending on the geodetic characteristics of the soil and the climatic zone of the structure’s location. |
| The choice of materials depends on the wishes of the owner. Modern technologies, in addition to ordinary floors, make it possible to install electrically heated surfaces - which significantly improves the comfort of taking water procedures. |


To facilitate independent work, we will give detailed instructions for performing each stage of pouring concrete floors. Having this information, each developer can make their own changes to it, taking into account their wishes and capabilities.
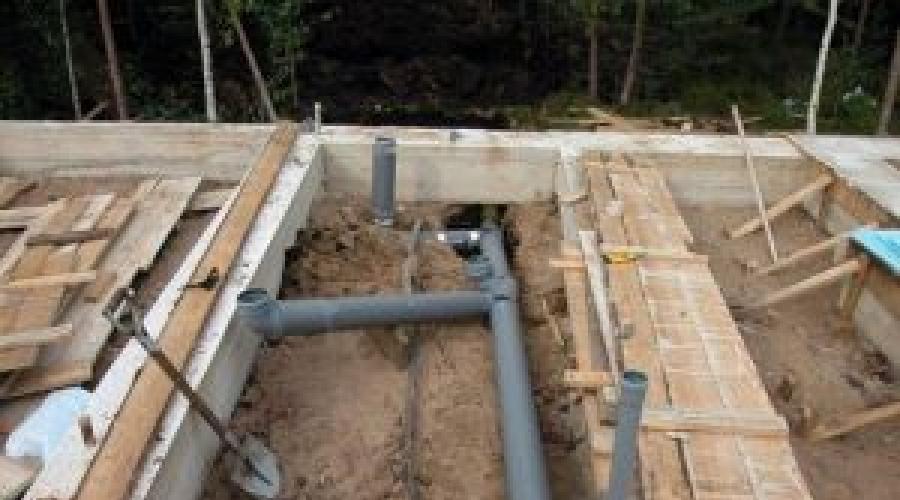
Step 1. Draw up a sewer plan taking into account the placement of the steam room, locker room and other premises. At the same time, carefully consider the installation location of the water receiver, if one is planned to be installed. The receiver can be made from an ordinary metal or plastic barrel with a volume of approximately 100–200 liters; holes should be cut on the sides and bottom of the container using a grinder.

Step 2. Dig trenches according to the diagram. Observe the slope; the difference in height per linear meter should be approximately 1–2 cm. There is no need to use special instruments; the slope can be checked by eye or using an ordinary level.

Step 3. Level the bottom and lay plastic pipes. There is no need to add sand, the depth of the trenches is insignificant, and the sewerage system will not experience much pressure. If we take the drainage level in the steam room as zero, then the maximum depth of the trench at the exit from a 6 m wide bathhouse will be approximately 25–30 cm. There is no need to be afraid that the water will freeze in the winter. First of all, it's warm. Secondly, the slope ensures complete drainage, the pipes are always empty, and there is nothing to freeze.

How to use a bubble level to control the slope of pipes?
- Place the device on a flat surface, take a ruler and place it on a level at a distance of 50 cm from the beginning.
- Raise the device until the clearance between it and the plane is equal to a centimeter.
- Visually remember the position of the bubble on the scale or make a mark with a marker. In the future, when checking the slope of the pipes, use the mark you made.
Step 4. Assemble the drain inlet and attach it to the pipe. To facilitate the assembly process, you can use soap, soapy water or sunflower oil. Wet rubber seals with these liquids. It is strictly forbidden to use automobile oil for these purposes - the rubber in the seals is ordinary, automobile oil will ruin it and will have to be completely changed.


Step 5. Check the functionality and serviceability of the drain. To do this, fill a liter jar with water and place an empty container of the same volume at the outlet of the sewer pipe. Pour water into the receiver and see how much comes out of the sewer. If the volume is much less than the filled volume, this means that the pipe is laid with differences in height, water is retained in uneven areas.
Practical advice. If less than 500 ml is retained per liter, then there is no need to redo the sewer; minor mistakes will not affect the performance of the structure. If there is more than 500 ml of water left in the pipe, then you need to find the problem area and eliminate the defect.
Everything is normal - fill the trench, carefully compact it every 10 cm of soil height. For compaction, you can use any convenient means at hand.

It is advisable to slightly moisten the soil before compacting. Keep in mind that subsidence under a layer of concrete can cause major problems. After installing the drain, further construction work can continue.
Prices for the range of septic tanks "Termite"
Septic tanks termite
Stage two. Pouring concrete
Prepare materials, tools and equipment. For pouring you will need gravel, sand, cement, a concrete mixer, usually a container for mortar, a trowel and a level. The amount of materials depends on the size of the bathhouse and the thickness of the concrete. The minimum pouring height cannot be less than 10 cm. To increase the stability of the structure, it is recommended to use building reinforcement of a periodic profile with a diameter of 6–8 cm or metal mesh.
Preparatory work
Step 1. Remove topsoil and large construction debris from the site. If possible, treat the soil with special products to prevent weed growth.


Step 2. Using a laser or water level, make a zero floor mark along the perimeter of the foundation. It is from this mark that the depth of concrete placement and the thickness of all layers will be controlled. Calculate the parameters and, if necessary, deepen the pit. The soil can be removed manually, but you should constantly check the horizontal surface of the bottom.
Step 3. Begin filling the pit with gravel.

The thickness of the material is in the range of 15–20 cm. It should be filled in layers of approximately 10 cm, then the gravel is leveled and compacted. Leveling is much easier with an ordinary metal rake.

It is recommended to use screenings with fine crushed stone for the first layer; it compacts better and holds loads. If the floors are poured in several rooms of the bathhouse, then work should begin with the most distant one; the material can be transported along wooden ladders. Due to this sequence, the need to re-level the bedding is eliminated.
Step 4. Each layer of bedding must be compacted separately. This can be done manually or using a special unit. Working manually is long and difficult, and the quality may be unsatisfactory; professionals recommend using vibrating plates.

You should go over one place at least three times, fill large depressions immediately, and remove the mounds. The smoother the bedding, the less expensive concrete will be needed to fill the floor.
Step 5. After tamping, you need to pour a layer of crushed stone of fraction No. 10–20 with a thickness of 10–15 cm. After leveling, tamping follows, the algorithm for performing the work is the same as for fine crushed stone with screenings.


Practical advice. You should not use crushed stone of large fractions, it is much more difficult to work with, and there is no noticeable positive effect.
The thickness of each layer should be controlled according to the marks previously made on the foundation tape.

Step 6. Prepare the last layer; you can use sand or fine screenings for it. Choose the material that is cheaper in your region; from a practical point of view, there is no difference. After leveling, tamp down thoroughly. It is advisable to moisten the last layer with water and let it stand for at least one day, during which time the bedding will shrink and gaps and other problem areas will be revealed. They must be removed immediately and compacted again.


Step 7 Install the beacons according to the selected screed thickness. Beacons are much easier to install using a laser level. Drive wooden pegs or pieces of metal rod into the bedding along the beam line. If there is no laser level, then the outer beacons can be set at the water level, then stretch a rope between them and adjust the height of all the remaining ones. The distance between the beacons is 40–50 cm. The width of the lines should be 15–20 cm less than the dimensions of the plaster.
Step 8 To increase the strength of a concrete floor, use reinforcing mesh. Raise it above the bedding; the mesh should be located approximately 1/3 of the height of the concrete. Building codes prohibit placing it in the middle of concrete; in this position it does not strengthen the structure. To raise the mesh, you can use various supports or pour a little concrete under it with a shovel and lift it off the ground with your hands.

Step 9 Place concrete onto a row of pegs.

Important. Concrete must be mobile, but not liquid. Follow the recommended proportions of components; in most cases, the mass requires one part cement to three parts gravel and two parts sand. But this is an optional recipe; if a more durable coating is required, then the amount of cement increases by 15–20% and vice versa. There are marks on the foundation of the bathhouse, opposite which the pegs of the lighthouses were hammered. Use a trowel to smooth out the concrete a little and make lines above the pegs; they will help guide you when laying the slats.

Step 10 Put metal or wooden slats in place, carefully check their position; the quality of the concrete floor depends on correctness. Move the rivers left/right until they completely shrink. Raise the reinforcing mesh and adjust the position of the slats again.


Practical advice. In our case, the water will be drained in the middle of the steam room or wash room. Such a device requires that the floor be angled towards the drain. This condition will be met during laying of ceramic tiles. Concreting floors sloping towards the center is very difficult, keep this in mind when performing work.
To avoid damaging the driven pegs during concreting, it is recommended to cover them with bricks on both sides.
How to pour a concrete floor faster and easier? There are several recommendations from experienced builders.
To make the process easier make a chute for the concrete mixer, along it the mass will be directed to the right place. To prevent the gutter from pressing the reinforcing mesh against the bedding, place a piece of brick under it and lift it up.


During work constantly move the mesh inside the concrete layer, lift it off the ground. Using a shovel, alternately throw concrete between the two lines; the thickness of the material should be slightly greater than the height of the beacons.
We recommend first perform rough straightening of the mass with a shovel and trowel. Due to this rule, less concrete is removed, the work is much easier, the surface is even even after one pass. If the network is deep, then pour the mixture into them and go through the rule again.
Pouring a concrete floor by hand is physically difficult; you have to constantly work in an inclined position. Today there are very practical implementations knee pads, we advise you to buy them and use them. They will allow you to change your body position as you get tired.
Do not spread the mixture over a large area.– very difficult to rule. The width of the area should allow you to easily reach the edges with your hands in a kneeling position.

After each leveling, lift the net again. While walking, it constantly lowers; if the reinforcement rests on the bedding, then there will be no increase in the strength of the floor, remember this. Use the same method to screed the entire room.
Experienced builders use the rule of 2.5–3 meters in length; beacons are made at approximately the same distance. Due to this, not only does the pouring speed significantly increase, but the surface also becomes smoother. An additional condition is that the rule must be quite rigid and not sag in the middle while pulling together excess concrete, otherwise small depressions will form between the lines. This is unacceptable for precise pouring, but it is not a problem for finishing leveling screed.

While working with the rule you need to constantly clean the slats from pebbles, the plane of the tool should not bounce. Remember that following recommendations always takes much less time than eliminating defects. Do not try to simplify the technology yourself; such experiments do not lead to anything good.
Do not pull together a large lump of concrete. The rule will definitely bend, the surface will have to be trimmed several times. If you made a slight mistake with the amount of concrete poured between the beacons, it doesn’t matter. As soon as the rule has collected a large volume, spread the mass with a trowel over the free spaces and only after that continue to pull it together.

Leveling the solution using the rule - photo
It takes approximately 14 days for concrete to harden according to existing standards., during this time it gains at least 50% of its maximum strength, which allows construction work to continue. Inexperienced builders try to continue working on the floor after a few days, once the structure can support their weight. We categorically do not recommend doing this. The fact is that weak concrete produces microcracks, which are initially invisible to builders. But then, over time, microcracks will certainly increase in size, and the strength of the structure will not correspond to the expected parameters. The consequences of haste can be most unpleasant.
Concrete floors do not remain in this condition; they definitely need to be finished. Eat several finishing options.
- Wooden logs or slats are laid on the concrete, and boards are laid on top.
- The floors are finished with ceramic tiles. If the concrete is poured correctly and evenly, then a screed is not required. If the technology was violated during the work or the craftsman does not have enough practical experience, then a leveling screed will have to be made.
Video - DSP screed with a slope towards the ladder
We will briefly look at the option of a concrete floor covered with ceramic tiles.
Stage three. Finishing the concrete floor
As we already mentioned, the drain should be located at the lowest point of the floor. It can be installed not only in the center of the room, but also against one of the walls. The decision should be made taking into account the placement of shelves for the steam room or shower, structural features, etc.

Important. There is no need to make the slope of the coating too large; a few millimeters per linear meter is enough. In any case, all the water will go away, and work will become much easier. Another important nuance is that too much slope creates difficulties during water procedures.
There are recommendations from some builders to make the floor in the bathhouse heated. Of course, you can listen to them, but we do not recommend doing so. Why? Firstly, the floor in the bathhouse is already warm; in principle, it cannot be cold. Secondly, electrically heated floors require special wiring; the total installation power exceeds 5–7 kW. For rooms with high humidity, there are very strict safety requirements of the PUE; it is difficult and expensive to comply with them in full. Thirdly, if you are afraid that your feet will freeze, then it is much easier to make wooden grates. Place them not only in the bathhouse, but also in the dressing room and other rooms. It will be very cheap and will make washing comfortable.


Keep in mind that the larger the tiles, the more difficult it is to lay them on a slope. All corners are located in different planes; it will not be possible to make the joints smooth. The best option is to use mosaic tiles. This material makes it possible to make any turns and tilts; a large number of small plates correct minor errors.
How to lay ceramic tiles with a uniform slope?
Step 1. Take four tiles, place them with their corners on the drain and mark the diameter of the hole on them. Using a grinder with a diamond blade, carefully cut out the holes.
Step 2. All tiles near the drain must have a slope in two directions. We have already mentioned that there is no need to make a large angle, a few millimeters are enough. Small slopes can be made with glue; for larger ones, you will first have to screed or use cement-sand mortar for gluing.
Step 3. Throw the material under the surface of the first tile, put it in place and gradually push it in with your hands so that the drainage point is the lowest. Immediately control the amount of tilt. Place the remaining tiles near the drain in the same way, making sure that they all slope towards the hole.


Step 4. Finish the first row, while controlling only one plane between adjacent tiles. This is much easier than setting two planes at the same time.


Step 5. The position of the tiles of the second row must be controlled according to two parameters. The edges must be located in the same plane as the first row and be parallel to each other.
Practical light. To prevent the tiles from moving spontaneously, you should make the solution a little thicker than usual.
First, it is recommended to lay four tiles around the perimeter of the drain and allow time for the glue to harden. The fact is that these tiles will be used as a template in the future; any displacements are strictly not allowed. The position of the others is constantly monitored using the first tiles; the load on them during the work is the greatest.


Step 6. It is recommended to continue work in parallel rows. If you have concerns about your qualifications, you can increase the area of the square plot by alternately laying tiles on each side of the square. This algorithm requires much more time, but allows you to correct mistakes in a timely manner. For beginners, it is advisable to first lay out the tiles dry and use supports of varying thicknesses instead of glue.

Tile marking


The larger the floor area, the longer the level should be. The tool must simultaneously control the position of at least three tiles; this is the only way to avoid kinks. The seams are sealed after the glue has completely hardened; with their help, you can slightly smooth out the sharp joints of the tiles.

At this point, the work on pouring the concrete floor in the bathhouse is completed, and you can begin finishing the interior surfaces of the room.
Video - Laying tiles with a slope under the drain
The floor in the bathhouse differs in its design only in the steam room and washing room. The remaining rooms of the bathhouse are operated under normal humidity conditions. In this article we will look in detail at the construction of floors in a steam room and tell you how to lay them with your own hands.
Choosing a steam room and washing room floor design
The usual solution would be wooden floors. Their main advantage is the healthy properties of wood, environmental friendliness and practicality. Despite the relatively low service life of wooden floors in a steam room, they are not so difficult to replace, and the total costs will still be lower than installing a concrete floor.


In the steam room and washing room, a fair amount of water constantly falls on the floor, which should be drained into a pit, drainage system, or simply into the ground under the bathhouse. In constructive terms, to solve this problem, wooden floors are divided into leaking and non-leaking.
A leaking floor requires a gap between the boards. Water seeps freely into the underground space. Then it is absorbed into the soil, if its filtering capacity allows it, or it is discharged into a pit, for which a clay castle or concrete base is formed with a slope in one direction.

The second option is a non-leakage floor in the wet areas of the bathhouse. This type of flooring is made with a non-removable coating and is replaced only after its service life has expired. A slope for collecting and draining water is provided here along the surface of the floor covering towards a tray or funnel.

A floor with a removable covering can and even needs to be disassembled and dried regularly while the bathhouse is not in use. Fixed floors, due to their susceptibility to rotting under high humidity, are completely replaced approximately once every 7-8 years.

A concrete base under a leaking wooden floor in a bathhouse significantly increases the durability of the structure and also affects comfort - even after many years there will be no musty smell from under the floor. However, the arrangement of a concrete base significantly increases the cost of arranging a bathhouse, so if the mother soil under the building has a high drainage capacity, then it is easier to get by with preparing a filter layer.
Materials and tools
To cover the floor in the steam room and washing room, wooden elements made of deciduous (linden, aspen) and coniferous (pine, larch, cedar) woods are used. All wooden floor structures must be treated with antiseptics.


To install the floor you will need:
- wooden beam for logs 50(100)x100 mm;
- floorboard 35 mm thick;
- cement M300, M400;
- medium sand;
- expanded clay for the thermal insulation layer;
- ordinary clay brick for posts under logs;
- waterproofing (roofing felt).

It is important to choose the right wood protective impregnation. It should be suitable specifically for baths due to the high temperature and humidity. The easiest way to process wood is to impregnate it with sunflower oil in two steps.
Tool
The floors in the steam room are installed using a tool for laying a concrete base on the ground and a wooden floor covering for the bathhouse.
 Tools for working with concrete. 1. Rake-stroker. 2. Cement grater. 3. Trowel. 4. Ironer. 5. Corner ironer. 6. Rule. 7. Bubble level. 8. Pendulum profile
 Tools for woodworking. 1. Construction corner. 2. Bracket. 3. Hammer. 4. Electric planer. 5. Clamps. 6. Wood saw. 7. Bubble level. 8. Screwdriver. 9. Drill. 10. Circular saw machine
Leaky floor made of individual boards with chamfers
To prepare the soil foundation for the floor structure, it is necessary to remove the fertile layer, no matter how thick it is.
 Leaking floor over concrete base. 1. Soil. 2. Expanded clay concrete. 3. Cement screed. 4. Gutter. 5. Brick column. 6. Waterproofing. 7. Lags. 8. Floorboard
 Leaking floor on the ground with filtering capacity. 1. Soil. 2. Sand cushion. 3. Gravel. 4. Support pillar foundation. 5. Brick pillar. 6. Waterproofing. 7. Lags. 8. Floorboard
It is important at this stage to decide how and where the water will be drained outside the building. For this purpose, a tray (200x150h mm) is provided in the concrete base into which water flows. The bottom of the tray is made with a slope towards the drainage pit (30x30x25h). It is better to locate the pit closer to the location of the external water collector. From the pit, water flows through the drain pipe into the reservoir.
The slope of the surface for water drainage is 2-3 cm per meter in the direction of the tray. It is created either by leveling the ground under the floor or by using bedding (sand and gravel) under the concrete base. The general floor level in the steam room and washing room is made 30 mm lower than in adjacent rooms with normal humidity.
A sand and gravel cushion 10-15 cm thick is laid on the compacted soil. It is necessary to fill and compact the sand in layers of no more than 5 cm, wetting it with water. Next, a heat-insulating layer of expanded clay concrete is laid. The approximate consumption of raw materials per 1 m 3 of concrete is:
- without sand:
- cement M300, 400 - 250 kg;
- expanded clay - 720 kg;
- water - 100-150 l.
- with sand:
- cement M300, 400 - 230 kg;
- expanded clay - 440 kg;
- sand - 195 kg;
- water - 100-130 l.
 It is best to prepare a concrete solution in a concrete mixer or order
It is also acceptable to use other lightweight filler (schungizite, perlite, expanded vermiculite, crushed porous rocks, etc.). The thickness of the expanded clay concrete layer can be taken as 150 mm. Concrete is laid in strips no more than 2.5 m wide on a base moistened with water. To limit the stripes, slats are installed, they also serve as beacons for determining the thickness of the layer. The greater the thickness of the thermal insulation layer, the warmer the floor.
 Be sure to maintain a slope towards the gutter or funnel for collecting and draining water
A cement-sand screed 40 mm thick is laid on a layer of expanded clay concrete. Mortar composition (M100) cement/sand: one to three. Before the solution sets, it is necessary to iron the surface with cement laitance. Cement is mixed with water to form liquid sour cream. The surface is covered with an even thin layer of the mixture. This is done to increase the water resistance of the concrete base.

Brick columns made of solid clay ordinary bricks (250x250 mm) in cement-sand mortar are installed under the logs. The distance between the posts is 0.8-1.0 m in the center. 2 layers of roofing material are laid on their surface. Next, the logs are laid. The floorboards of the leaking floor have chamfers at the edges to allow water to drain away. The gap between the boards is 5-6 mm.
Important! Sand-lime bricks, hollow stones, and silicate blocks should not be used in damp and wet rooms.
This flooring is made removable in order to be able to dry the floorboard to increase its service life. Boards can move when walking on them, they are often grabbed with nails, landing nests up to 5 mm deep are prepared for them in the logs, or spacers are placed on the boards along the edges.

Leaking floor made of removable panels
The flooring of the steam room and soap room can be made from removable wooden panels. The boards are laid with a gap on transverse bars of 50x50 mm. The size of the shields is taken for reasons of ease of removal and drying.

The floor construction is the same: compacted soil, compacted sand and gravel mixture, insulation - expanded clay concrete 150 mm thick. Ceramic floor tiles are laid on a cement-sand mortar 10-15 mm thick. The floor has a slope that is directed towards the drain tray. Removable panels are installed on the tiles so that the lower bars are located along the water drain.

Sequence of work on a non-leaking floor
A leak-proof wooden floor involves a continuous flooring of tongue-and-groove boards along joists. First, determine the location of the support posts. They are placed at a distance of 0.8-1.0 m from each other, measuring distances along the centers. A concrete pad 100 mm thick and 70 mm wider than the size of the column is prepared for each column.
 Solid non-leaking floor on top of the ground. 1. Soil. 2. Sand cushion. 3. Expanded clay or other bulk thermal insulation material. 4. Support pillar foundation. 5. Brick column. 6. Waterproofing. 7. Lags. 8. Floorboard
 A continuous, non-leaking floor must be laid with a slope. The gutter can be placed in one of the joists located close to the wall. 1. Soil. 2. Sand cushion. 3. Expanded clay or other bulk thermal insulation material. 4. Brick column on a concrete base. 5. Gutter. 6. Floorboard
Supports for the logs are made of concrete or ordinary clay brick with cement-sand mortar. The size of the posts is 250x250 mm. The height of the supports should correspond to the upper edge of the embedded beam (column foundation), or the top of the strip foundation.

The direction of laying the logs should be perpendicular to the direction of water flow. Wooden elements must be insulated from concrete or brick with two layers of waterproofing (roofing felt). Expanded clay bedding 15 cm thick is made over the compacted soil.
A version of a non-insulated floor is shown in the figure. In this case, the boards rest on the wall joist on one side and on the gutter joist on the other. The top of the tray is covered with a wooden ladder.
An insulated floor involves joists with cranial bars to which the subfloor is attached. Next, a vapor barrier is laid (membrane, polyethylene, polypropylene films), and a layer of heat insulator (mineral wool board, polystyrene foam) is placed on it. Rolled waterproofing (roofing material) is laid over the thermal insulation layer.
 Insulated non-leaking floor. 1. Soil, sand cushion and bulk insulation. 2. Brick pillar. 3. Joists and rough wooden floor. 4. Insulation. 5. Joists and finished floor laid with a slope towards the gutter. 6. Gutter. 7. A vapor-permeable membrane is laid on top of the subfloor, and waterproofing is laid on top of the thermal insulation layer.
There must be a gap of at least 3 cm between the clean floor and the waterproofing. The size of the log in this case is 100x170 mm. Skull block - 40x40 mm. For lags it is necessary to use only solid timber.

Tongue and groove boards are laid over the joists. The boards are sewn with nails or self-tapping screws to the joists through the tongue and groove. This method of joining boards together is called “parquet”. Its advantage is the absence of caps on the surface of the board.

Each board is attached to all the joists. They should fit snugly against each other. The gap between the boards should not exceed 1 mm. Staples or clamps are used to hold the boards together. Nails for fastening are used 2-2.5 times longer than the thickness of the boards. The end of the plank floor does not reach the wall by 10-20 mm. Subsequently, the gap is covered with a plinth.

Water is drained from the floor surface by sloping the floor in two directions. A hole is made at the drain site and a siphon is installed. The slope of the floor can be adjusted by adjusting the height of the joists.


The bathhouse is a special room when it comes to the microclimate at the time of its immediate use. There is high humidity and the same temperature. Although baths are different, both in the number of rooms related to it and in the characteristics of the microclimate, mainly the steam room. Somewhere the steam is dry and the temperature is over 100˚C (sauna), in another case there is moisture, but the air temperature is lower, within 70˚C (Russian bath). How can such features influence the choice of flooring method in these rooms, and how to make a suitable option with your own hands? These, and some other issues related to floors in the bathhouse, will be the topics of this article.
Which gender is preferable in a bathhouse?

You can simply wash yourself in the bath or shower. The bathhouse, regardless of its type, is intended rather for recreational activities and positive emotions. Therefore, it is important that everything is as natural and natural as possible. So any polymers in the outer layer of finishing of bath rooms, especially in the steam room, are eliminated. The same applies to flooring materials.
The second requirement for flooring is the ability to withstand changes in temperature and humidity. These indicators, again, depend on the type of steam room.
The third condition is comfort during tactile contact with the floor material. It must be at an acceptable temperature, since it is not customary to wear shoes in the bathhouse. This factor depends not only on the coating itself, but also on the quality of the thermal insulation barrier.
Which flooring materials meet all three requirements? These are wood products and tiles. The latter is suitable for a wet steam room with a relatively low temperature; wood will be perfect in a sauna where dry air is provided. Tiles are not suitable for a Finnish sauna, as they will heat up to such a temperature that it will be impossible to walk on them. Products made of wood will not last long if they are constantly moistened. It is not advisable to treat them with all kinds of impregnations, since this will require breathing. Wooden floors are still used in Russian baths. But at the same time, you should select more durable types of wood (aspen, larch), or be prepared to replace the flooring in a few years.
The wooden floor is laid on joists; to lay the tiles you need to make a screed. Are there any features of the installation of a base for tiles in a bathhouse, and which of them should be taken into account? More on this later.
Features of the screed in the bath

The base of the floor for tiles in this room in the vast majority of cases is done on the ground. Based on this, the first two activities that are worth thinking about are the following:
- insulation from ground moisture;
- creating a thermal insulation barrier, especially if it is intended to be used in winter.
Another feature of the screed, when compared with residential premises, is the creation of a surface slope towards the sewer water intake. This will prevent water from accumulating on the surface and forming uncomfortable puddles.
What material should I choose for making rough and finishing subfloors? Taking into account the usually small volumes and not too strict requirements for the surface designed for laying tiles, classic concrete is quite suitable in both cases. If desired, you can use a liquid or semi-dry cement-sand mixture instead of concrete for the finishing layer. It is advisable to strengthen the finishing layer with reinforcement, especially if there is a layer of insulation underneath.
Are there any special requirements for a concrete base in a bathhouse, taking into account the microclimate? If the surface of the screed was the final floor surface, then it might be worthwhile to additionally provide it with moisture-repellent properties. Taking into account the fact that this is now unlikely and tiles will be laid on top, moisture will not affect the base in any way.
When it comes to temperature changes, there are options. The high temperature in a wet steam room will not affect the structure and durability of concrete or other similar material in any way, since the heat goes up. The screed here will warm up to a maximum of 40˚C. This is absolutely not a critical temperature for any cement-based mortar.
It’s another matter if the bathhouse does not have at least minimal heating, and in winter the temperature in the room will drop much below 0˚C (dacha option). Then, when preparing a mixture for installing a concrete screed, it is worth adding substances that improve frost-resistant qualities to it, and when subsequently laying the tiles, purchase an adhesive that meets the conditions.
Making a rough foundation with your own hands

In both options for finishing flooring (whether wood or tile), the first step is to create a rough screed that would become a reliable, durable basis for the structural elements of the floor that will be located above. Therefore, the step-by-step instructions below apply in both cases. To carry out the work you will need the following tools:
- concrete mixer or container for manual mixing of concrete;
- manual or mechanical tamping;
- water (laser level);
- rule;
- trowel or trowel;
- tools for excavation work.
The following materials should be prepared:
- large crushed stone (gravel);
- fine crushed stone (fraction 1-1.5 cm);
- river (washed) sand;
- cement grade 400;
- dense polyethylene film.
Now about the sequence of installing a rough subfloor on the ground.
- The surface soil layers are carefully compacted and leveled.
- Adding is done. First a layer of gravel, then half crushed stone with sand. With a proposed insulation thickness of 50 mm, the top layer of fine bedding should be 15-17 cm below the desired level of the finishing screed.
- The fine bedding is leveled, a polyethylene film is laid on top with an overlap on the walls to the level of the upper edge of the finished base. If the film is not continuous, adjacent areas overlap by about 15 cm. The film will serve as a water barrier in the path of ground moisture, and will also prevent moisture from leaving the concrete.
- Concrete is being prepared. For rough screed, you can use a solution with a reduced content of the binder component. Therefore, a proportion of 4:4:1, where, respectively, fine crushed stone, sand and Portland cement M-400, will be quite acceptable for these purposes.
- The rough screed does not imply perfect leveling of the surface, so it is not necessary to install beacons here. But it is advisable to draw a horizontal line along the perimeter of the walls using a water or laser level and some kind of marker. The smoother the surface, the easier it will be to lay insulation or install joists under wooden flooring. The prepared concrete is poured starting from the wall farthest from the entrance to the room and leveled first with a trowel and then with a rule.
Important! In order to make the rough base as even as possible (within reasonable limits), when the concrete has set to the point that it can be walked on, you need to generally trim the pliable surface, removing strong convex irregularities. The solution that is removed can be immediately placed in the largest recesses. This method allows the surface to be sufficiently leveled for subsequent technological operations.
Do-it-yourself insulation and finishing screed

To create a heat-insulating barrier under a concrete floor base, it is better to use polymer moisture-resistant insulation. In our case, you can use sheet foam with a density of 35 kg/m3, but extruded polystyrene foam is better, which is stronger and absolutely impervious to moisture. In addition, the slabs of this material are equipped with joining protrusions, which makes its installation more convenient without the formation of gaps.
If the rough base is fairly level, the insulation boards can be laid directly on the surface. When existing unevenness prevents the polystyrene foam from being laid properly, you can use polymer-cement glue, which will help smooth out the unevenness and “beautifully” lay the insulation sheets. The slabs should be placed offset to avoid the formation of long longitudinal joints. A gap of about a centimeter should be left between the polystyrene foam and the wall to allow for deformation expansion. It is advisable to fill all seams and gaps with polyurethane foam to prevent the formation of cold bridges.

If glue was used to lay the insulation, you should wait a day, after which you can install the beacons. A long building level is used for control. As guides, you can use plaster beacons with a T-shaped end, or guide profiles, which are used to assemble frames for sheathing. Beacons are installed on thick cement-sand or gypsum mortar laid out in slides. When adjusting their position, they are pressed into the applied mixture.
If you want to make a slope, the beacons should be placed at an angle. In order for water to drain from the tiles, and at the same time the inclined surface does not create discomfort while walking on it, the optimal height difference is within 1.5-2 cm/m.
Taking into account possible temperature changes, even with a small area of finishing pouring, you should attach a damper tape around the perimeter of the wall, which would protrude 2-3 cm above the surface level. The excess can then be cut off or covered with a plinth.

If the choice for finishing pouring is concrete, the proportions of the solution are as follows: 4:2:1, where, respectively, are the volume fractions of sand, fine crushed stone and M-400 cement. The cement-sand mixture is prepared in a ratio of 4:1. The prepared solution is poured between the beacons and leveled using the rule. When the solution has set, the surface should be rubbed using a plaster trowel. The beacons do not need to be removed during subsequent laying of tiles. If this is done, the seams should be filled with freshly prepared mortar and smoothed.
Wooden floor in the steam room

In a room that will be a Finnish bath, everything inside should be made of wood. Only wood at the temperatures provided here will not cause thermal injury to the body. Therefore, you need to make wooden flooring as the floor.
Leaky floors mean a structure in which water freely flows into the cracks between the boards and is absorbed into the ground under the bathhouse.
Benefits of leaky floors
What are the benefits of leaky floors:
- in financial terms, installing such floors is much cheaper,
- low level of labor intensity of their device.
However, leaking floors, unlike non-leaking floors, are cold. It is advisable to create leaking floors in the southern regions of the Russian Federation and the CIS.

Non-leaking floor design
The design of non-leaking floors implies the presence of a special hole into which water flows along the floor. From the hole, water enters the drainage tank and flows out through the drainage pipe outside the bathhouse. Such floors have a so-called “subfloor”. Currently, non-leaking floors are more common than leaking floors.

Floors that do not leak are warm, but their installation requires more labor (it is necessary to perform a slope, a “subfloor”, drainage, etc.)
Preparing the base of wooden floors
To install a wooden floor, you need to prepare the base. First, floor joists are laid from solid larch or pine. Boards will already be attached to them (it is better to choose them from the same wood as the logs).

It is necessary that the floors in the bathhouse be located on a slope - this will ensure the flow of waste water in the right direction. For this purpose, the logs are not laid at the same level, but with a difference, due to which the angle of inclination of the floors will be created.
Note: when installing leaking floors, it is not necessary to slope.
The logs are laid at the shortest distance from wall to wall. If the walls of the bathhouse are equilateral (for example, 4 m x 4 m), then the logs are laid without taking into account the distance between the walls, the main thing is that they end up lying across the water flow.
So that the logs have sufficient rigidity and subsequently do not bend under the influence of loads, support chairs are created in the center of each of them. Such support chairs can be made of concrete (monolith), brick or wood.

When the support chairs are made of wood or brick, then a reinforced concrete support platform must be made under them (its thickness must exceed 20 cm). On each side of the support the platform should protrude 5 cm.
If the foundation in the bathhouse is strip, then the level of the top of the support should coincide with the level of the top of the foundation.
If the foundation is columnar, and the ends of the logs rest on the beams of the embedded crown, then the level of the top of the support should coincide with the level of the top of the embedded beam.
Preparing the soil surface underground
After installing the supports, you can begin preparing the underground, i.e. underground soil surface.
Let's say the floors in the bathhouse should be leaky and the soil is sandy (i.e., it allows water to pass through well). Then you need to fill it with crushed stone about 25 cm thick. Water, flowing through the cracks in the floor, will easily pass through the crushed stone and be absorbed into the sand. In this case, the crushed stone will act as a filter, due to which the surface of the soil in the underground will not silt, and the humidity will be moderate. This way the underground will dry out quite well.
Well, if the soil under the bathhouse does not absorb water well, then it is necessary to make a tray for the water to flow into the drainage pit. From the pit the water will flow outside the bathhouse. To create a tray under leaking floors, a clay castle is created, equipped with a slope towards the pit. The castle can also be made of concrete, but in order to avoid unnecessary costs, it is quite possible to get by with a clay castle.

If we are talking about non-leaky bathhouse floors, then it is recommended to insulate the underground surface with expanded clay. In this case, it is necessary to pay attention that there is a distance of 15 cm between the logs and the expanded clay layer - this space will allow ventilation of the underground.

In the washing room near the wall, it is necessary to create a pit, compact its walls, securing them with clay. A pipe is brought outside from the pit - through it the water will flow outside the bathhouse. It is necessary that the diameter of the pipe is at least 15 cm.
Laying lags
For floors that do not leak, laying the joists begins from the walls to the pit. The outermost joists have the highest point relative to other floor joists. Cuttings in the outer joists are not performed. In subsequent lags, cuts are made with a small bevel (about 2 mm - 3 mm).
The same notch is made in the joist where it comes into contact with the support (the size of the notch is equal to the width of the support). The slope of the floor should be 10 degrees. If we are talking about leaky floors, then the lags can be laid without a slope and from any of the walls.
The beams for the logs must first be cut according to the size of the bathhouse. In this case, it is necessary to take into account that the logs at both ends do not reach the walls by approximately 3 cm - 4 cm. This gap will allow for ventilation between the logs and the bath walls. Logs can be laid on support pillars and embedded beams only through waterproofing (roofing felt, glassine, etc.). In addition, each lag must be pre-treated with an antiseptic.

Please also take into account the fact that near the foundation, the logs should be located along its edges at a distance of approximately 12 cm from each edge.
After laying the logs, they begin to lay the floorboards. It is also necessary to bring the furnace foundation to the level of the flooring. For this purpose, it is recommended to lay out a stove foundation made of baked red brick or concrete (monolithic) on a pre-made site.
Laying a leaking floor
To lay a leaking floor, unedged boards are used, which must first be planed. It is very important that the ends of the boards have a smooth surface. First of all, the boards are cut to the size of the bathhouse (taking into account that it is necessary to leave a ventilation gap between the walls and the boards). Laying the floor can begin from any of the walls located parallel to the laying of the boards.

After the boards are cut, begin laying the first board. In this case, they retreat about two centimeters from the wall and nail the board (for example, the thickness of the board is 40 mm, then you will need nails no less than 80 mm long). Nails must be driven in at an angle of about 40 degrees from the middle of the board. The boards are secured to each joist with two or more nails.
When you nail the first board, lay the next one. At the same time, leave a gap between the boards of 3 cm - 4 cm. For ease of installation, you can use a piece of fiberboard sheet as a template for the gaps.
Note: the floor in the dressing room can be laid without gaps.
When the floors are laid, the boards are treated with a protective compound. There is no need to paint them - then they will dry out better.

Laying non-leaking floors
For flooring that does not leak, tongue-and-groove boards of coniferous wood are used. Please note that the boards should be laid with a groove inside the bathhouse.
Before you begin laying the floor, you need to complete the subfloor. For this purpose, bars with a cross section of 50 mm x 50 mm are attached to the bottom edges of the logs. Between the joists, a “subfloor” is laid on these bars. For this use:
- cutting boards,
- unedged board,
- third or second grade board,
- croaker

After laying the “sub” floor, a layer of waterproofing is laid on top:
- glassine,
- roofing felt,
- waterproofing film.
Then lay out a layer of insulation. Expanded clay is well suited for this - it is poured between the joists.

Then waterproofing is done on top again.

And now, the “rough” floor is completely ready, you can begin laying the tongue and groove boards of the finished floor. The boards in the steam room and sink do not need to be secured with nails. Thanks to this, you can easily remove the boards and dry them. Such floors are secured at the edges using a block with a cross-section of 20 mm x 30 mm. The bars are secured to the joists using screws. When the floor needs to be removed, the bars are very easy to dismantle.

In the washing room (in the corners), during flooring, it is necessary to leave holes into which pipes will then be installed (asbestos-cement, galvanized steel, or PVC). The diameter of the pipes can range from 50 mm to 100 mm. This way you will ensure good ventilation in the room.
How to make a warm and dry floor from tiles over wooden joists in a bathhouse?
Registration: 04/10/12 Messages: 168 Thanks: 106
Registration: 05/23/11 Messages: 16,450 Thanks: 16,625
Registration: 04/10/12 Messages: 168 Thanks: 106
Registration: 04/10/12 Messages: 168 Thanks: 106
Registration: 05/23/11 Messages: 16,450 Thanks: 16,625
Registration: 12/31/12 Messages: 1,701 Thanks: 3,310