Do-it-yourself machine for making cotton candy. How to make a cotton candy machine with your own hands. To prepare the mixture we need
Read also
From unnecessary trash, necessary “trash”.
Somehow the introduction turned out a little florid, but, sorry.
In this article we will talk about a machine for making cotton candy.
I’ve been wanting to make such a device for a long time, but... I never got around to it, or I was just too lazy.
A couple of months ago, my grandchildren simply overwhelmed me with requests to try to make such a device. (They really “fell in love” with this cotton candy, which they occasionally buy and bring as a gift from N. Novgorod, because they don’t sell it in our village). (Don’t be surprised, this is how we live – we rarely travel to “abroads” and very large cities).
As V.S. Vysotsky said: “There’s nothing to do, he disputed the port wine, laid down the “miracle juda” and ran away...”, in general, they persuaded me, and I began to manufacture this Apparatus:
And now, jokes aside, I will briefly tell everyone who is interested in how to make the same (or similar) device yourself from scrap materials at home.
In the end, this is what happened:
I’ll say right away that there are no “inventions” of mine in this homemade product, but I’m sure that it will definitely amount to “innovation”.
And also, I have already made this DIY Sweet Mist Tool, as I called it (abbreviated and hereafter SADIST), and I use it for its intended purpose (my grandchildren are happy), so I will describe in great detail only the nodes that are important for the work of this SADIST. Some parameters are very important for repetition (if, of course, you want to repeat this homemade product). Read carefully, I will explain all the difficulties in manufacturing that I encountered and repeatedly reworked to get a better result than the same devices produced in the Middle Kingdom and those offered by DIYers on YouTube.
- Let's start with the main node:
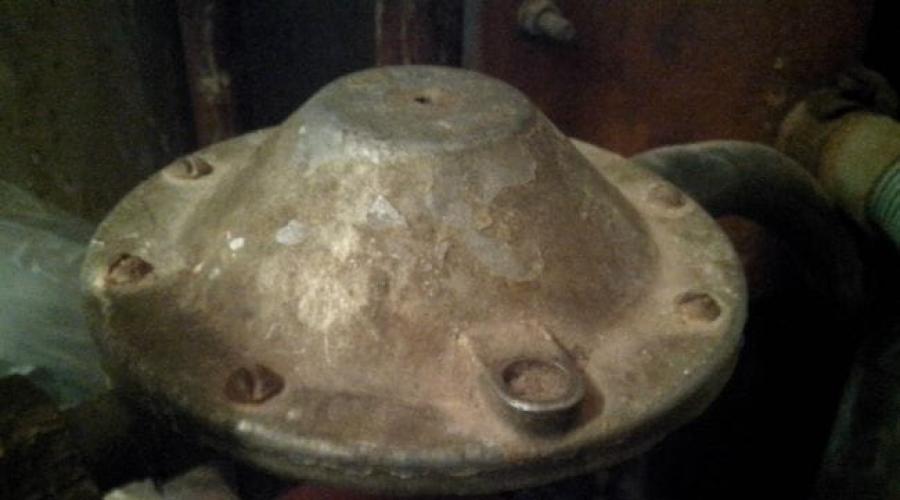
After reviewing many publications on this topic on the Internet, I realized that there is no need to “reinvent the wheel” because... the simplest and cheapest option for manufacturing the main unit, a container for forming and spraying sugar caramel, will be two upper gearbox covers for a 50 liter (large) gas cylinder.

Finding such gearboxes is not difficult, especially since for our homemade product they may be faulty for their intended purpose. (Fortunately, about three years ago, natural gas was supplied to apartment buildings in our village, due to which people abandoned bottled gas, so that these reducers are “at least a dime a dozen”).
So, we take two upper covers from these gearboxes, cut one of them from the upper (conical) side until it forms holes 35 – 40 mm(we will pour granulated sugar into this hole),

in the second we drill a hole for mounting the head on the rotation shaft (for me it is 8 mm).

Then we grind the ends of the covers (which have the maximum size) using sandpaper (on the table) until a smooth surface is formed (remove the shoulders), and connect them with M5 bolts into a single unit through the already prepared holes (there are 8 of them, we take four longer bolts for attaching the fan blades ) through washers - thick gaskets no more 0.2 mm. I used stainless steel foil 0.1 mm thick, placing 2 washers under each mounting hole between the covers.


For washers - spacers, you can take aluminum, brass or bronze foil in several layers, but it is very important (use a micrometer) that the total thickness of the washer between the covers is no more than 0.2 – 0.22 mm (I tried to increase the thickness of the gasket to 0.3 mm, it would seem nonsense - 1 tenth of a millimeter, but the result was negative).

Can not use for washers - gaskets flammable material such as paper, plastic, etc., just like for making sugar caramel. The head will heat up to 400-500°C.
The shape of the fan blades and the material from which they are made (it can be galvanized iron, aluminum with a thickness of 1 mm or more, tin and other elastic, heat-resistant and plastic material) does not matter much, the main thing is that they (the blades) bend when the Head rotates ( we will call it that) of the device, the air flow is parallel to the Head, i.e. so that the air flow when rotating the head strived for the center.
That's it with the main unit.
I’ll tell you honestly, if you did it correctly, you can be sure that this SADIST will definitely work for you. You can change the heating element, motor, fasteners, etc., the main thing is that you have a Head (a container for forming and spraying sugar caramel), everything else is a matter of technique.
- Go ahead:
It’s not difficult to understand that as the basis for my homemade product (I just want to call it a SADIST, because I made and remade it for more than 2 months), I took a fiberglass circle with a diameter of 250 mm and a thickness of 20 mm that had been lying around in the barn for a long time, in In general, what I found, I took.


There is nothing to describe here, you can take any suitable base(not necessarily round), the main thing is that it is weighty for stability, and to it (in any case) you need to attach legs (just kidding) legs, it’s better rubber,

so that they do not slip on the surface when working. This (in any case) is necessary, because Your structure will vibrate when the engine rotates, and crawl away from the place you have chosen (I guarantee).
- Now the engine:
In principle, the engine, may our main “Commentators” of this site forgive me for not calling it an “electric motor”, you can take any engine, starting from an old washing machine and the like, from old “hefty” tape recorders of the “Timbre” type. etc. The main thing is that he is Asynchronous, i.e. brushless(so that it starts through a capacitor) and so that it rotation speed were in the range from 1000 to 1350 rpm. A brush motor cannot be used in this design because As a rule, it has very high rotation speeds and a short-term operating mode.
Honestly, on no website, believe me, I have studied quite a lot of them, when describing such a homemade product, not a single author indicated the parameters of the engine he used.
During the manufacturing process there were many engine options that could be used in my device, such as:


but I stopped there

Based on the dimensions of the structure, fortunately, according to the above parameters and fasteners, it fit perfectly. I won’t lie, I don’t remember where it came from, but it seems to me from some large reel-to-reel “mafon”.
- Fastening the engine strictly in the center our grounds(I think there is no need to explain in detail here), do not forget - it is very important.
When attaching the engine, I put on the mounting bolts between the base and the engine. silicone bushings


By the way, it’s a good thing, if you take it apart, don’t throw it away).
This allowed me to partially reduce vibration, transmitted to the base when the engine rotates and provide vertical shaft adjustment engine (by tightening or loosening one of the four bolts securing the engine to the base, I was able to change the vertical position of the engine shaft relative to the center of the base).
- Base for motor shaft with Head (upper frame).
As a base for the head shaft and connection to the motor shaft, I used aluminum frame from old 25 watt dynamics(there are a lot of such speakers in old wooden speakers like S90, etc.).


I disassembled it down to the skeleton, and fastened the lower part to the base of the structure with three ø 6 mm pins. For greater structural rigidity, I connected the upper part of the speaker frame, which already had four mounting holes, to the base with ø 5 mm studs. I used these studs to fasten the cladding of the finished structure and giving more rigidity my SADIST. This is very important because... all further devices will be attached to this one, let’s call it "top", frame.
- Connection unit between the motor shaft and the Head.
On the Internet there are many (yes, crazy, full, through the roof, etc.) options for making this unit. The point is to find a suitable mount, in which there is a bearing into which a shaft can be inserted, which can be connected to the motor shaft and on which our Head (the container for forming and spraying sugar caramel) can be securely mounted. A “dead” stepper motor is best suited - the two halves of the housing with two bearings are connected together and attached to the base through ready-made holes, and the shaft on which the Head is fixed is inserted into the bearing holes - a container for forming and spraying sugar caramel (by the way, this is the simplest and best option, because Shaft runout is reduced to zero due to the very high quality (as a rule) manufacturing of such engines. Therefore, I strongly advise you that if you can find at least a stepper motor housing, use it.
I did this:
At our dilapidated enterprise, out of old friendship, they turned me on a lathe a T-shaped bushing for installing two bearings (which I could find in my bins) with an internal ø 8 mm and a shaft ø 8 mm for these bearings and a soft bushing, on the end of which was cut with an M8 thread for attaching the Head. They messed up, of course, but “for lack of…”.
However, after attaching the bushing to the upper frame and installing the shaft with the Head attached to it in the bearings, it turned out well (the runout was minimal), all that remained was to connect the motor shaft and the shaft with the Head attached.

To connect these two shafts coaxially with minimal runout, I used soft sleeve,

which I ordered on Aliexpress. The diameter of the motor shaft was 7 mm, and the diameter of the shaft on which I installed the Head was 8 mm (it’s just that I found only such bearings, and it was easier to cut the M8 thread for our “turners” than the non-standard M7). Everything worked out as well as possible.
By the way, these soft bushings are simply a Chinese miracle - you can order any sizes on each side of the bushing, they cost pennies and the quality is beyond praise. In this regard, the Chinese are great.
Look on aliexpress by simply searching for "soft sleeve". I was shocked at the price when I saw these bushings on the website and twice as shocked when I received my order and appreciated the quality. Well, it seems like I consider myself a savvy person when it comes to hardware, but, fellow DIYers, I don’t understand how they do it!
But, let's return to “our sheep”.
So, I secured everything and applied 220V to the engine. The head (the container for forming and spraying sugar caramel) rotates with minimal runout. Everything's OK!!!
All that remains is to make a stable heating of this Head in the lower part so that the poured granulated sugar can, having warmed up to 180-200°C, turn into caramel syrup, under the influence of centrifugal force, fly out into a 0.2 mm gap and, having cooled under the blades of the built-in fan, driven by an air current, rise up in the form of Sweet Fog, in order to be wound on a stick and fed to “hungry humanity.”
- So, the heating element.
At this stage, “dancing with a tambourine” began for me.
I couldn’t find anything ready-made suitable for my design, so I decided to make a heating element (hereinafter referred to as NE) myself.
At first, there was an idea to organize the heating of the Head using a gas burner operating independently from a collet (dichlorvos) spray,


however, after several tested options, it was not possible to obtain stable operation of the NE. When the Head rotated, the burner flame either blew out and went out, or began to smoke, overheated the sugar caramel, and it flew out without forming a sweet mist (cotton candy). During experiments with gas, the lower part of the Head became smoked (you saw this in the photo).
In addition, upon reflection, I decided that using two energy sources (electricity and gas) in one design is at least wasteful, and at most stupid. It was decided to make a homemade mini electric stove modeled on those that our grandfathers made when there was nowhere to buy everything, and there was no money.
My NE (mini electric stove) was supposed to consist of a frame with legs, a stone in which a nichrome spiral was laid, and the nichrome spiral itself.
A tin can of “red” fish – Sprat in tomato sauce – was ideal for the frame in all respects (internal diameter, height and high-temperature-resistant material). There is one important point here, we must take tin can made of tin, i.e. she must definitely magnetize. Its internal ø is 98mm, and the outer ø of the head is 100mm – well, exactly what you need!!! The height was also suitable for my design, so I didn’t have to trim it.

In the bottom of the NE frame can, in the center, I drilled a hole for the shaft - ø 18mm and three holes ø 5mm for the mounting bolt legs.


but during operation, asbestos cement began to delaminate and, in my eyes, lost its right to exist. Final the most reliable and safe an option was to make a Stone for the spiral from fire bricks(it is also called fireclay). Finding such a brick is not difficult, and it turns out to be quite easy to process. Without much effort, I sawed a whole brick with a grinder (cutting wheel for stone) lengthwise, leaving a plate 22mm thick, then made a 100mm square from this plate, processed it to a perfect circle ø 98mm on an electric sharpener and drilled a hole ø 18mm in the center.

(When processing refractory bricks, a lot of dust harmful to all living and non-living things is formed, therefore I recommend doing this work outdoors and, at a minimum, in a gauze bandage. To reduce dust during processing, you could, of course, soak the brick by putting it in water for a couple of hours, but I did not do this, because... I wasn’t sure how it would behave when processed, I was afraid that it would start to crack).
Making cotton candy at home: using a machine and without special equipment - a detailed description for a beginner. Secrets of regular and colored delicacies.
Content
Several centuries ago, making cotton candy was an expensive pleasure, and only very rich and influential people could afford this sweet delicacy. The reason is a labor-intensive, skill-requiring process. But in the last century everything changed: a device for producing sugar dessert was invented. The cooking process has become simpler, cheaper, and the delicacy more accessible. Today it can be prepared both in a confectionery factory and at home in your own kitchen.
Equipment for cotton candy
Typical equipment for making cotton candy is a special apparatus consisting of:- metal box serving as a base for installing a stainless steel bowl
- bowls for collecting sugar strands
- a protective cap, which is a plastic hemisphere or catching mesh and prevents the spraying of sweet threads outside the bowl
Important. To produce 1 serving (depending on the volume of the product obtained) it takes no more than 30 seconds and about 20 grams of raw materials, which the operator pours into a special container before starting work.
What should cotton candy sticks be like?
To collect the finished product, you also need sticks, on which the tasty threads are actually wound. Typically, several of these sticks for preparing test portions are included with the machine.Cotton candy sticks have certain parameters:
- They must be raw so that the sugar fiber does not stick along its entire length.
- Length is 25 – 35 cm (depending on the expected size of the treat)
- The sticks must be smooth, designed specifically for making cotton wool.
Review of popular machines for making cotton candy

Today, in the domestic market of household and industrial electrical equipment, machines for making cotton candy are represented mainly by manufacturers from Germany, China and Russia.
The products of three brands are in greatest demand among consumers:
- Airhot
- Homeclub
- Gastrorag
Airhot
The Chinese company Airhot has been a reliable supplier of equipment for catering and home kitchens for two decades.Airhot kitchen appliances designed for the production of cotton candy have the following advantages:
- ease of use
- modern design
- manufacturability
Airhot models have qualities that are important for kitchen appliances: robust construction and compactness.
The most popular machine for the production of cotton candy of this brand is AIRHOT CF–1. It fits easily on a standard kitchen shelf. Its height is no more than 50 cm, length, depth - 45 cm. In addition, it is not afraid of damage during heavy use. Its body is made of durable material.
Homeclub
The Homeclub cotton candy machine is quite inexpensive and compact; it comes with:- measuring spoon
- 10 bamboo sticks for winding cotton wool
- Detailed operating instructions
Attention! Cheap models, popular among housewives, have a small bowl and are therefore not suitable for large parties with many guests.But such a device will delight participants in small home celebrations with a small but welcome delicacy.
Gastrorag
Gastrorag cotton candy machines are lightweight and therefore do not cause problems during transportation. It can simply be easily carried in your hands.Attention! The Gastrorag device has high performance: it can prepare a portion in just 12 seconds.The device does not require careful maintenance. It is enough to periodically clean the bowl of any remaining sweet threads. This device is durable and strong.
Making cotton candy using a special machine: step-by-step instructions

To get a sweet cloud of airy, delicate sweet delicacy, it is not enough to purchase a device, study the instructions and strictly follow them. You need to know the nuances of preparation, which are not mentioned in the instructions.
It’s easy to learn how to make cotton candy by reading the step-by-step instructions for preparing the delicacy:
- Wash the new device thoroughly using special detergent and hot water.
- Dry all components
- Warm up the device for 10 minutes
- Pour 3 tsp onto the disc. Sahara.
- When the melted product turns into thin threads, they are transferred to a special bamboo stick:
- the stick is lowered vertically into the bowl, in which threads begin to wrap around it due to rotation, forming a fluffy ball
- The fibers remaining on the sides of the container are picked up using a stick
The secret of colored cotton candy

You can get colored cotton candy in several ways:
- By adding food coloring
- Using special sugar syrups to make treats. Several companies are involved in their production. Each syrup has its own taste and color. All syrups are thoroughly tested for safety and the absence of chemical dyes and flavor enhancers, so even children with allergies can consume it without fear.
- Making your own dyes based on natural products:
- Beet juice concentrate can give a color from bright red to blue-violet
- paprika extract gives all shades of yellow, up to red-orange, and also has a persistent antiseptic effect, has a positive effect on digestion
- Turmeric root extract and saffron can also be used to obtain a yellow color
- spinach will give a rich green
- purple can be obtained through the use of black currants, as well as dark grape skins
Lifehack. How to make cotton candy without a machine: video
You can prepare a sugar treat without the use of special equipment. You can see how to get cotton candy without a machine using improvised means by following the link:There is hardly a person who has not tried cotton candy. Now it is sold everywhere - in parks, at various public events. It can even be found in stores. But the modern taste of this delicacy cannot be compared with what it was before.
Many still cannot understand the principle of preparing this delicacy. It's actually quite simple. An excellent option that will allow you to pamper not only the children, but will also help adults remember moments of childhood is homemade cotton candy.
The easiest way to make cotton candy at home is to use a special machine. But you can do without it. But for this you will have to make an effort and spend more time. Let's look at the step-by-step instructions with photos for preparing this wonderful, beloved dessert.
We prepare cotton candy using special equipment

The easiest way to prepare cotton candy is to use a device specially designed for this purpose. It can be ordered on the Internet or found in household appliance stores.
It produces a large amount of product in a short time, which is great for people who often entertain guests, or for organizers of children's events or theme parties.
The cotton candy machine has a fairly simple design: a thicket with a metal disk is located on a stable base, which heats up during operation.

The operating principle of the unit is very simple, which allows you to easily and quickly create your favorite sweet dish:
- Gently rinse your new car with hot water, rinse with detergent, wipe dry and leave to dry completely;
- Connect the device to the network and let it run for 5 minutes to warm up;
- Place two large spoons of sugar on a metal disk. When heated, it will begin to melt and turn into threads;
- Immerse the stick in the bowl and collect the finished threads on it. Collect any mixture stuck to the side walls, but do not throw it away. It can make delicious lollipops. That's all. Our delicacy is ready.

The unit is very convenient; its compact size makes it easy to wash and store. But everything also has its downsides. This device is no exception:
- Constant overheating. Because of this, you need to regularly turn off and cool the device;
- You can get the surrounding area dirty when working;
- Constant cleaning of the bowl and other parts is required, otherwise failure may occur.
There is another way to make cotton candy:
- It is necessary to prepare a sugar-based syrup in advance, then pour it on top of the disk;
- From the rotation of the heated disk, the syrup turns into threads that are distributed along the walls of the bowl;
- The finished product is collected and wound onto sticks.

The device allows you to experiment with additives and syrups, which will make your cotton wool original and bright. Nut-caramel, mint-lemon, strawberry-vanilla - these are just a small part of the new syrups that can be included in the dish.
DIY cotton candy machine
It happens that there is no money to buy new equipment. Don't despair. A machine for preparing your favorite delicacy can be designed independently. This will be especially easy for people who have at least some skills in electrical engineering. The assembly diagram is as follows:

- Prepare two tin lids (you can use baby food in jars);
- Wash them thoroughly, then remove all paint with sandpaper or a file. This must be taken very carefully to prevent paint residues from getting into the finished product;
- Create many small holes in the first cap. The resulting threads will come out of them. Provide the second lid with one large hole in the center. Sugar will be poured here;
- Combine the lids so that there is a cavity between them. Strengthen the structure with wire;
- Attach the motor from any small household appliance (for example, a hair dryer or mixer) to the lids with nuts;
- Now you need to create a solid base for attaching the resulting mechanism. To do this, you can use a piece of plywood;
- Align the motor with the terminals of the battery or Krona battery, being sure to observe the polarity. On one side, place a semicircular partition made of a cardboard sheet folded in half;
- Pour 40 g of sugar into the hole, heat the rotating lid using matches or a lighter;
- When melting, threads will begin to appear and settle on the partition;
- The finished product needs to be wound onto a stick.

You won't get completely fluffy cotton candy, but a little dense. To make it more like store-bought sugar, you need to replace it with isomalt, a powder analogue of granulated sugar.

Making cotton candy without a device
Cotton candy can be made without a machine. The process will be a little more complicated and longer, but the sweetness will be tasty and airy. First you need to prepare:
- Corolla;
- A saucepan or frying pan with a thick bottom;
- Ceramic bowl;
- Frames for winding finished products. You can use cocktail straws and Chinese chopsticks. Cutlery will also work.

The following ingredients are needed:
- Sugar (white or cane) – 2-5 large spoons. Calculate based on serving sizes;
- Water – in a ratio of 1:3 to sugar. For example, for 150 g of sugar there is 50 ml of water;
- Vinegar solution (no more than 6%) – 5-7 ml. Prepare it in advance.
Now let’s look at the recipe for making cotton candy at home:
- Mix sugar and water together, then mash the mixture with a fork;
- Add vinegar, stir thoroughly and transfer the mixture to a selected container (saucepan or frying pan) to heat over a low flame;
- Warm the mixture and mix regularly. We collect the remains from the walls, excluding burning;
- When the consistency of the mixture becomes homogeneous, turn off the flame, cool the product to 30-35 degrees, stirring constantly to avoid sugaring. Our syrup is ready;
- After cooling, set the container again on a low flame, boil the contents, then turn off the heat again and cool;
- We repeat the process about five times until the syrup stretches and acquires a golden hue;
- We lower the edge of the spoon into the finished product, then lift it up. The mixture should be viscous and not tear;
- We create a kind of frame from sticks, placing them in a vertical position and carefully securing them;
- Dip the whisk into the syrup, then circle it around the frame;
- We repeat the manipulations until we wind the required number of threads. They should be thin, so don't grab too much syrup.

To add new color and taste, you can add food coloring, which is sold everywhere. But this is not safe for children. Therefore, you can use natural ingredients such as raspberry, lemon or beet juice. You will get bright fruity cotton wool. In this case, it is necessary to reduce the amount of water, as it will be replenished with juice.
The consistency of the product allows you to create various crafts from it. The kids will really like this.

Finally, a few more tips to help simplify the cooking process;
- It is necessary to use only dry weighed sugar. Refined sugar or a wet product is absolutely not suitable;
- Before cooking, it is better to protect the table and other nearby parts of the room with cellophane film, because dried drops of syrup are very difficult to remove from surfaces;
- Be careful when working with hot syrup. It is better to take children out of the kitchen so that they do not get burned;
- The finished product is best consumed immediately. After some time, the delicacy becomes dense and not so tasty.

As you can see, making cotton candy at home is quite simple. You just need to stock up on time and patience. Then you can please your loved ones with this amazing delicacy.
Video: Making cotton candy at home using a special machine
Somehow, in my spare time, I decided to give the children such a surprise. I searched the entire Internet, but found only vague drawings with a disk on the motor shaft where syrup should be poured. But I was interested in the question (like other people looking for drawings) about adding sugar itself to obtain the final product. After spending one working day with a friend, the device was created from improvised materials.
Type of finished product (not refined)
photo 1
This required:
1. A lampshade from a street lighting lamp (any other bowl or stainless steel tank from an old washing machine will do, but this type of lamp has a convenient mount for the motor)
2. The motor from a car windshield wiper is already mounted in the lamp socket holder housing.
photo 2

3. Heating element from an old electric stove.
photo 3

4. The main part is the head for filling raw materials. The optimal working result was determined by trial and error. To do this, we needed two reducers from gas cylinders (top caps twisted together)
photo 4

and her drawing


Here is a photo of the head mounted on a bolt
photo 5

The electric heating element is installed on fiberglass or asbestos (which is available, but asbestos is more toxic)
photo 6

The assembly itself consists of installing the head on the motor shaft, between which a heating element is mounted, as close to the top as possible.
photo 7
Perhaps everyone likes it. However, it is not advisable to purchase a device for its manufacture solely for home purposes. After all, installation costs a lot of money. However, you can make a cotton candy machine with your own hands.
Is it possible to do it yourself?
Almost everyone can create a machine for making cotton candy with their own hands. This requires few materials and tools. You will need a large saucepan, as well as some accessories that can be found in anyone's pantry. With a little effort, you can create a device without spending a penny. Using a homemade device, you can make any amount of treats at any time.
Required parts and tools
So, as already mentioned, to make the apparatus you will need a large saucepan. But that's not all. You also need a special container where the sugar will be poured. The container must be made of fire-resistant material. After all, the sugar will heat up and melt in it. In this case, the container should rotate and throw out thin threads of cotton wool. Of course, that's not all. So, to create a machine for making cotton candy with your own hands, you will need the following tools:

- Several drills, it is advisable to have a very thin one on hand - no more than one millimeter in diameter, and a drill.
- or metal scissors.
- Set of files.
- Soldering iron.
Device components
A sweet made without a machine is unlikely to turn out so airy and light. To create the device you will need the following components:
- Jet lighter. Such a device is characterized by a blue flame. This type of lighter produces heat that is significantly higher than the heating temperature of conventional lighters. When burning, the device does not emit soot. It is worth considering that the lighter should be installed so that it can burn on its own. It will be much more convenient.
- Power supply for the electric motor. It could be a regular battery.
- DC electric motor. The device must be powered from low voltage.
- A tin can, for example, for vegetables.
- Small lid for lighter.
- Bucket or large saucepan.
- Washer, bolt, nut.
- A rod longer than the length of a metal or wood pan.
- Tube 15 centimeters long.
Lighter mount
Let's look at how to create a cotton candy machine with your own hands. First you need to create a stand for the lighter. To do this, the device must be wrapped in two layers of cling film. To secure the lighter, you should mix a small amount of epoxy glue, apply it to the milk cap and glue the lighter. When everything hardens, you need to take the device and remove the film from it. That's all, the lighter stand is ready. It can be removed at any time.

Installation of rod and motor
In order for a ready-made cotton candy machine, created with your own hands, to work, you need an engine. It can be connected using a short tube or a metal rod to a tin can. It's much more convenient. It is worth making one hole at the ends of the tube or rod. Each of them has its own purpose. One will serve to connect to the motor shaft. You can secure it with superglue. You can also use a locking screw. In this case, another hole will be required. However, this method allows you to remove the engine if necessary.
The second hole is needed to attach a tin can. It is best to secure the container with a bolt. After this, the engine must be secured to the crossbar. This is done very simply. It is enough to drill two holes in the center of the strip. It is better to secure the engine with two screws.

Preparing the Can
So, the machine for cotton candy is practically made with your own hands. The tin can will serve as the container inside which the sugar will melt. To do this, you need to pour the product into it and spin it. A hole should be made along the top edge of the jar. The top cover must be completely removed. It is better to clean the edge with a file.
You need to make a lot of holes on the sides of the tin can, preferably near the bottom edge. To do this, you should use drills with the smallest diameter that exists. It is better to retreat one centimeter from the bottom seam, and only then can you make holes.
Installing the container
It is worth making a hole in the tin can for attaching directly to the rod. The container will be secured using a nut and bolt. If desired, the can can simply be soldered to a metal rod or nailed to a wooden plank. However, bolting is the best option as it allows the container to be replaced.

The jar should be located above the fire source inside the pan or bucket.
How to prepare cotton wool
That's all. The DIY cotton candy machine is fully prepared for use. It's quite simple to use. All you have to do is light a lighter, pour some sugar into a can and start the engine. The lighter should be installed inside the pan or bucket.
As the jar heats up, the sugar will begin to melt and fly out through the holes in the jar, forming cotton candy fibers. After making the required amount of treats, all that remains is to collect everything on a bamboo skewer. As you can see, everything is simple.